Olga Knyazhnikova.
- Carpet embroidery needle with short handle
- Carpet needle video
- Needle for carpet embroidery with replaceable needles
- Set of needles for carpet equipment Gamma video
- How to safely store a Gamma carpet needle
The carpet embroidery needle is the main tool in this type of needlework. Needles for carpet embroidery can be divided into types:
- along the total length together with the handle - for children's and adult hands;
- according to the diameter of the needle-tube;
- depending on the possibility of changing needles of different numbers in one body (removable/non-removable).
Features of the technology
For beginners, carpet embroidery with a needle may seem complicated, but if you purchase a special set with a needle and even patterns for carpet embroidery, then you will have all the items, instructions, tools, and threads at hand.
Needles for carpet embroidery.
There are several ways to embroider using carpet techniques.
- Coloring - take a mesh and attach short threads (about 5 cm) to it.
- Carpet embroidery with a needle or crochet - both tools are suitable for creating beautiful things. The threads are secured to the front surface, resulting in a fuzzy, voluminous appearance. Burlap or mesh is used as a base. The first is suitable for sewing small items - carpets, paintings.
- Creating tapestries is a simple process, comparable to cross stitch or satin stitch.
Note! Do not confuse weaving tapestries with creating using carpet techniques.
For weaving, a loom is used, and for embroidery in carpet technology, a hook or needle is used.
A beautiful shape and design can be made using a crochet hook.
Products, for example, handmade carpets, are sewn with a special needle. It looks like a regular one, only the ear is slightly beveled and a handle is attached for ease of use. The needle for sewing in carpet technology has a lock that allows you to make loops of ideally equal length - the pattern comes out even. The technique is simple, but time-consuming.
A needle for carpet embroidery has the shape of a tube with a cut eye, into which the thread is threaded.
Important! Use a hoop or a special frame - the needle must pass through the base.
It’s quite easy to find a pattern for crocheting carpet embroidery; you don’t even need to buy it – you’ll find everything on the Internet.
Embroidery patterns can be purchased at a special store.
Carpet needle Lavor 5.5 mm
Lavor 5.5 mm is an excellent replacement for the Oxford needle, considering its cost.
As convenient and simple as all Lavor needles. But the diameter of 5.5 mm allows you to embroider carpets and other products using thick yarn.
It fits easily in the hand and makes smooth, beautiful loops.
Features of this needle:
- diameter 5.5 mm.
- 7 levels of loop height. They can also be switched by turning the handle.
- gives an average loop height of 0.2 cm to 1.6 cm.
- The kit includes a needle threader.
Kinds
There are 2 main methods.
- Creating a pattern of loops using long threads. The technique is called looped or non-woven tapestry.
- Tying knots using short threads (5cm) - Called knotting.
Note! Experienced craftswomen advise purchasing an embroidery kit using the chosen technique. It contains everything you need to create a product. For beginning craftswomen, carpet weaving using a printed pattern is much more convenient and easier to understand.
The set includes not only tools and threads, but also a base with a printed pattern.
Let's look in more detail at what is needed to create voluminous embroidery using carpet technique, what is the process for knotting and looping techniques, and other nuances.
Types of embroidery
Each of these techniques is easy to learn even for beginners. And the work is done quite quickly and in the evening you can create a small exclusive product that will become an interior decoration or an excellent gift for loved ones. There are two types of carpet embroidery, which will be discussed below.
Looping - performed using a special needle. On the front side of this work there will be even loops of yarn. And on the reverse side there will be smooth embroidery. Another name for this technique is “non-woven tapestry”.
Knotted - performed using a special or regular crochet hook. During the process, short pieces of thread are tied with knots to the base fabric.
Looped
You will need a compacted fabric or mesh. Use natural or synthetic embroidery threads. If you want a more voluminous weave, take a thicker thread.
Use a special needle for carpet embroidery.
Work begins by transferring the drawing with a marker onto the base. Transferred with tracing paper. Fabric tension is required - use a hoop or a special frame. They embroider from the inside out, and the pattern is applied there. The frequency of the stitches creates the pattern - the denser they are, the more voluminous the picture.
The base itself needs to be pulled well onto the frame, because the needle can pierce the fabric during operation.
On the Internet you can find drawings and instructions for embroidering a rug on a mesh. This technique is believed to help create tapestries. On the Internet you will find diagrams of carpet techniques for embroidered tapestries.
The surface of the embroidery in this case turns out to be soft and fluffy, one might say “carpet-like”, since the design itself is obtained due to the loose threads released. .
The first stitches in your creativity
Let's learn the basic technique of carpet embroidery - needle stitch. Everything is very simple. Step by step you will get better at it, and over time it will seem to you that you have been doing this type of creativity all your life.
Required materials and tools:
- special needle;
- embroidery fabric;
- multi-colored yarn;
- scheme.
Step-by-step description of the process:
Advice! First, it is better to embroider the outline of the design, and then gradually fill the inside in rows.
- Take the fabric. On the reverse side we apply the selected pattern.
- Insert yarn of the desired color into the needle.
- We pierce the fabric with a needle and make a stitch, bringing it out next to it.
- The stitch length should be 3-4 mm.
- When we pull the needle back, a loop is formed on the front side.
- At first it doesn’t look very aesthetically pleasing, but in the end we get an original, beautiful and exclusive picture.
Nodular
The ideal material is sets of acrylic threads of medium thickness.
The peculiarity of carpet embroidery using the knotting technique lies in the yarn. Use cut pieces of thread, five centimeters long.
It is noteworthy that the pattern in the carpet technique can be used for cross stitching.
The base is rigid, Stramin is ideal.
Instead of a needle, a special hook is used for embroidering carpets. You are allowed to take a crochet hook, but it is not very convenient and only experienced craftsmen know how to use it. It is advisable to buy a special hook.
Professional needlewomen use a hook with a moving lock.
Elements are created from the outline to the middle. First, the contour is filled in, the center is painted over using a circular or linear technique. You need to fold a piece of thread in half and put it on a hook. The hook pierces the base, the ends of the thread are held, then grabbed with the hook. The hook snaps into place and pulls the thread onto the front surface, while simultaneously being pulled into a knot.
Using a hook, a strong knot is created on the wrong side and random threads on the front.
Patterns for creating a crocheted carpet can be found online. A simple cross stitch pattern will do.
Updated version of Lavor needle 4 mm and 5.5 mm
In September 2022, Lavor announced the release of a new version of the needle. Now needles in sizes 4 and 5.5 mm can be purchased with a new, more comfortable and ergonomic handle. Yes, the handle design is shamelessly copied from Oxford needles. But who are we to judge. You can buy a new needle using this link.
Carpet embroidery needle
You can find a DIY embroidery needle at a craft store.
Carpet, a special needle allows you to quickly apply stitches. It has a comfortable handle, the tip is cut off, and there is an eyelet inside. Needles come in different thicknesses for thick and thin threads. Using a carpet needle is very simple.
Thread the yarn through the hole and pierce the canvas with a needle. Using a carpet needle comes down to these two steps.
Portuguese Lavor needle 1-3 mm
Oh, this Portugal! Due to its functions and price, the Lavor needle is the most popular among craftsmen.
The needles are very strong, made of durable metal. Comfortable handle made from recycled plastic.
Among the advantages:
- The needle is equipped with three replaceable needles with a diameter of 1 to 3 mm.
- There is a metal screw on the handle that holds the needle tightly. Thanks to the same screw, you can adjust the height of the hinge from an average of 6 to 11 mm.
- The kit includes a needle threader.
- Works with thin yarn and even floss threads.
Hook for carpet weaving
It resembles a crochet hook, but differs in a special movable lock slightly closer to the tip. If an ordinary hook has a straight metal rod, then for carpet weaving it is characterized by a curved shape. There is a comfortable handle.
Specialized hook for making carpet embroidery.
Second option: advanced level
For those who want to make a real carpet, embroidery with a special crochet is suitable. Skilled craftswomen use a device for knitting with yarn. But it is best to take a special tool. In appearance it resembles a crochet hook equipped with a tongue. When pulling the strand, the tongue snaps into place. As a result, a nodule is formed.
On a note! Using this technique, voluminous fleecy products are created.
Required materials and tools:
- canvas with a printed pattern;
- multi-colored yarn;
- special hook.
Attention! The raw edges of the canvas may unravel when working with the fabric. Pre-treat the cut with a basting stitch or machine stitch.
Step-by-step description of the process:
- We have prepared a special fabric - Stramin.
- We will also need short pieces of yarn, a color chart and a hook with a tongue.
- Take one piece of yarn of the desired color and fold it in half.
- We thread the hook through the loop so that the tongue is on top.
- Select the desired square and thread the hook through it.
- The yarn that we hold with our fingers is pulled a little higher and placed on the hook.
- Slowly pull the hook downwards until the yarn is inside its hole.
- The tab should close.
- Pull the hook all the way down.
- We get a knot. This is how we fixed the yarn.
- We tighten each stitch by hand, aligning it, otherwise the pile will lie chaotically.
Carpet technique: looped
You will need a needle for embroidery using the carpet technique described above, canvas, scissors, and a hoop (frame). Choose a beautiful pattern online or buy it in a specialty store.
Each loop is made with a simple precise movement of the needle: from the inside to the front side.
Selecting and drawing a picture
Select a carpet needle embroidery pattern and print it out. Using carbon paper, apply a pattern to the canvas - attach the carbon paper to the canvas, place the picture on top. Use a pencil to follow the contours and it will be imprinted on the base.
The frequency of stitches depends on how dense and voluminous you want to make your embroidery.
Where to start
Immediately after applying the pattern, the craftsman threads the thread through the eye of the needle and places the fabric in the hoop. In the future, you need to pierce the canvas at the same distance with the selected shades of thread.
First the outline is filled, then the middle.
When the thread runs out or you need to change the color, bring the thread to the wrong side, cut it, and secure it with a knot. Next, thread the new material into the eyelet and sew.
Hold the needle perpendicular to the fabric, make a puncture, then remove the needle a little. Make an indent of a few millimeters, stick the tool in again, and work according to the same carpet technique for rugs.
After filling the weave, you need to bring the product into decent condition. Remove the canvas from the hoop, fill a basin with warm water, and add mild (preferably sulfate-free) shampoo. Rinse the product carefully.
Place on a towel and wait to dry. Smooth out the creases a little with an iron.
The carpet technique does not require clear and huge outlines of the pattern, but unlike the technique using a needle, it allows you to work better with color combinations of threads.
Useful tips
The first pancake almost always turns out lumpy, so don’t despair. Purchase a special set from a specialty store. It contains tools and materials for work. All you have to do is embroider a small rug.
If you decide to make an exclusive designer product, you need to apply designs for carpet embroidery. You can use carbon paper.
On a note! Carpet embroidery with a needle is done from the inside out, so the design must be applied to the reverse side of the canvas.
Before you get started, review these tips:
- the stitch should be no more than 3-4 mm;
- on the front side the embroidery should be voluminous;
- When embroidering with crochet, tighten the loops by hand;
- It’s easier for beginners to work with ready-made sets;
- It is better to embroider from left to right, moving from the bottom edge of the product upward;
- Under no circumstances should you skip a single cell of the outline.
Knot embroidery: master class
The kit can be found in the store; it will contain all the necessary tools, even instructions.
You will need a rigid base (stramin), a hook, chopped yarn, and a carpet needle embroidery pattern for beginners.
Operating procedure
Using the hook is quite easy, you just need to get used to it. Place the hook under the mesh, thread a doubled thread through the hook, pull the hook slightly towards you - the lock will snap into place.
Move the hook forward a little - the lock will open, insert the thread and pull it back. The loop will be tied, and the ends will be pulled towards you to secure the loop. The two ends of the thread will stick out from the front side, creating a fluffy weave.
Fill in the outline first, then the middle of the drawing. At the end of the work, if you find any unevenness, level them.
We recommend starting the embroidery process from the bottom left row, leaving no free space.
Main seams
For beginners, embroidery using carpet technique will seem too complicated, however, this is a misconception. There are five stitches that can be used.
- Cross.
- Half cross.
- Elongated cross.
- Oblique tapestry.
- Long oblique tapestry.
Using the tapestry technique, the painting is warm and soft to the touch. This product will become a real decoration for your home.
Where to get the diagrams
To create a rug using a special needle, you need to find a beautiful, simple weave, where the details are visible and understandable, and there are no small elements. You can buy it in a store, but it’s quite possible to find it on the Internet and just print it out.
There are forums for craftswomen who know how to embroider using this technique; they can post easy patterns using carpet needle embroidery techniques for beginners.
This hobby will allow you not only to while away your free time, but also to create exclusive things that will fit perfectly into your interior.
How to do embroidery using the loop technique
Carpet embroidery with a needle for beginners using the loop technique is not difficult. The operating procedure here is as follows:
- A diagram is applied to the reverse side of the fabric. You can use a pencil or marker for this.
- The fabric is stretched onto the hoop with the wrong side up.
- The thread is inserted into the needle and the outlines of the designs are first embroidered using the needle. There is no need to secure the thread; just leave a loose end.
- After the outline is created, the main drawing is filled in.
- To create loops, the fabric is pierced with a needle until it stops and then the needle is pulled back.
- The loops are created at a distance of 3 mm from each other. If the threads are very thin, then loops can be created more often, but this will take more time.
- After creating the pattern, the ends of the threads are secured. Additionally, the loops can be secured from the inside with PVA glue.
There are two techniques for performing this embroidery - loop and knot.
Important! When embroidering, the thread should be loosely tensioned, otherwise the loops will turn out uneven, which will look ugly. In order for the yarn to have even tension, it is recommended to raise the needle low from the fabric - no more than 3-5 cm.
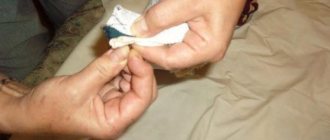
Materials and tools Carpet embroidery How to make a carpet needle
Let's take a medical needle 2-2.5-3 mm in diameter
Use a knife to cut the plastic from the needle
cut the plastic, but not to the metal
This is what happened
Next, a handle for the future needle is made from wood: length 2.5-3 cm, thickness 0.7-0.9 cm in diameter (also made with an ordinary knife).
Next to the needle you see 2 drills for making an eye in the needle. So, a through hole is drilled in the handle for the future needle. but most importantly, according to the diameter of the needle, and at the end a little wider for the plastic tip of the needle
Schematically it looks like this. The bed for the plastic tip can be lubricated with glue for greater secure fastening.
Then the handle is sanded with sandpaper. You can make a needle threader like this from thin wire, and the handle from a television cable.
The needle can be purchased at the store. It is quite suitable for getting acquainted with the technique of non-woven tapestry. But in the store the needle quickly breaks, because... attached to a plastic handle. If you decide to seriously engage in this type of decorative and applied art, then it is better to order several needles of different lengths and thicknesses with a wooden handle from the workshop. Most often, 4 types of needles are used to work on tapestry:
B) The main working needle is 3-5 cm long, with an internal diameter of 2-2.5 mm. This needle is used for embroidery with synthetics and wool.
D) Auxiliary needle – length 6-7 cm, with an internal diameter of 2-2.5 mm. Suitable for embroidery with synthetics and wool
NOTE: Sometimes you have to work with very thick needles, but these are used as an exception. In order to change the length of the loop, needle attachments are used. They can be made from pieces of a ballpoint pen or the insulating sheath of a wire (cambric).
Source