Useful tips
Watch the video if you are too lazy to read
Watch the video if you are too lazy to read
As a rule, the festive table is decorated with interesting dishes, beautiful glasses and cutlery, but all this is perfectly complemented by original folded napkins for guests.
Paper napkins can be folded in many different ways to make your table more elegant and make a great impression on everyone.
Here are the most interesting ways to fold paper napkins for any table and for any event:
How to quickly fold paper napkins
1. Place the folded napkin on the table so that the corner where all the folds meet is on top (see image).
2. Start folding the bottom ends of the napkin upward, but leave a little space at the top after each folded end.
3. When you have folded all the ends of the napkin, turn it over.
4. Turn the napkin with the large end down so that it is shaped like the Superman sign.
5. Fold the left and right sides into thirds, one on top of the other.
6. Turn the napkin over.
*If you wish, you can put a beautiful stamp on the tip of the napkin.
Etiquette rules for serving and using napkins
If this is your first time planning table decor, beautifully serving paper napkins, then the first thing you need to do is figure out how to use this element correctly:
- According to generally binding etiquette standards, fabric models are usually placed behind the collar or placed on the knees.
- Whether it is a fabric, paper or knitted napkin, it should be taken only after the owner of the house. At the end of the feast, it is forbidden to put the product on the plate.
- A cloth handkerchief is best suited to be placed on your lap (if you have left the table, just leave it to the right of your plate or on the back of your chair).
- Excessive use of scarves is not encouraged at the festive table. This is worth remembering at banquets, business meetings and official events.
Beautiful paper napkins on the table: double fan
1. Place the napkin laid out on the table.
2. Fold in half (from bottom to top).
3. Bend the top layer down (towards the bottom edge).
4. Turn the napkin over.
5. Fold the top layer down (toward the bottom edge).
6. Fold the napkin evenly like an accordion.
7. Take the napkin in your hand so that there are 2 layers on top. Fold the first layer inside each inner accordion piece downwards (see image).
8. Gently spread the napkin to form a fan.
Video instruction using a cotton napkin as an example:
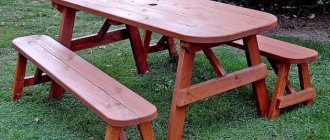
DIY serving napkins
Textiles have long been used to decorate home interiors. Even an ordinary white tablecloth can transform a table set for dinner and bring coziness to a family feast. This decorative element performs not only an aesthetic, but also a practical function.
Fabric option
Every housewife should be able to decorate the table in an interesting way for the arrival of guests. We will look at how to easily sew napkins with your own hands and fold them beautifully for table setting. First of all, you should prepare all the necessary materials and tools that may be needed during the work.
To make a fabric napkin for serving table we will need:
- scissors;
- cotton, linen or artificial fabrics;
- pins of different sizes;
- skein of thread for basting;
- sewing machine;
- iron.
The sewing process is as follows:
- The dimensions of the product can be very different, in this case it is a square of 50 by 50 cm. Once you have decided on the parameters, mark them with a pencil on the fabric and draw the contours.
- Now open out the desired part and bend one of the edges by 7 mm. Repeat the action three more times and iron all the corners around the perimeter of the resulting square.
- Next, you need to make a second fold - to do this, turn one side a centimeter and smooth it with an iron. Do this with the adjacent side of the square, then walk around the entire perimeter of the future napkin.
- Each corner needs to be unfolded and a line carefully drawn from the lower left corner to the upper right corner (diagonally). Repeat with the three remaining sides.
- The drawn lines will help you cut the fabric evenly at the four corners. Fold those edges of the fabric that are located on both sides of the cut corner into the center. Smooth the top of the corner towards the center and make a second fold along the ironed lines.
- We sew all folds with a basting stitch around the perimeter of the product. The edges should be smoothed using a regular straight seam on a sewing machine.
In the video: how to treat a corner on a tablecloth or napkin.
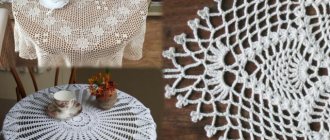
Crochet napkin set
Knitted napkins in a ring for table setting or individually create an atmosphere of well-being and comfort in the living room or dining room. Any novice craftswoman can knit such a product. By making home decorations with your own hands, you get pleasure from everyday little things. After all, a family dinner should be different from a lunch snack or breakfast on the run.
Crocheted napkins look elegant and homey. They are suitable for both holidays and everyday life.
It is not necessary to choose the most intricate napkin patterns, because they will be almost completely hidden under the plates. However, it wouldn’t hurt to starch the products so that they don’t lose their shape after the first feast.
The set of serving napkins for the tea table includes one large and six small handmade items. For production we used SOSO yarn (two skeins of white and dark brown) and a 1.5 Clover hook.
When knitting tightly, as shown in the example, there is no need to starch the finished product. The photo below shows a knitting pattern - it is suitable for a beginner level.
In the video: a beautiful crocheted napkin in 10 minutes.
Festive paper napkins: aster in a plate
Below is a video instruction for a more detailed analysis.
1. Lay out the napkin and place it on the table.
2. Fold the bottom and top to the middle.
3. Turn the napkin so that it lies across the table. Fold the top and bottom towards the middle.
Press the folds down well to maintain shape.
4. Unfold the napkin to a rectangular shape (with two opposing folds made in step 2). You will get 4 folds that divide the napkin into 4 rectangles (2 on each side).
5. Now you need to make 8 out of 4 rectangles (each of them will become an aster petal in the future). Start folding the napkin evenly like an accordion. First, turn the napkin over and start with the fold towards you and then away from you.
6. Prepare aster petals. From all the folds you need to make three-dimensional triangles. The work will be done with a quarter of the folds.
Start tucking the edges of the folds inside, after which you need to bend them so as to get triangles - the petals of a paper flower.
7. When all the edges of the folds are folded into triangles, connect the outer triangles to each other and the flower is ready. Place it on a plate.
Video instruction
Cloth napkins
Original serving during a feast includes not only the correct arrangement of dishes, but also a unique presentation and decoration with cloth napkins.
Christmas tree
Blanks in the shape of a decorated New Year tree will delight children and adults during the New Year holidays. To assemble such a figure you will need a cloth napkin, preferably green.
Build process:
- At the beginning of assembly, roll the napkin into 4 layers.
- Fold each layer step by step towards the upper corner in 1 cm increments.
- Turn the resulting workpiece wrong side out.
- Place it with the folded edge towards the top and bend the corners so as to obtain an angle of 60°.
- Turn the workpiece with the front side up.
- Raise the resulting 5 corners up and tuck them one by one under the triangle located at the top.
- You can decorate the resulting Christmas tree with a star or a bow.
Skirt
A skirt made of fabric napkins is made quite easily according to the instructions:
- Unfold the cloth napkin.
- Each corner of the napkin is connected to the next, after bending the straight edge into the napkin.
- This procedure is carried out with each of the corners.
- Fluff the resulting skirt and place it on a plate.
- The top of the resulting skirt can be decorated with a ribbon or ring.
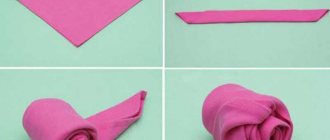
French napkin
A French-style napkin in the shape of a fan is suitable for a friendly meeting or corporate event.
Rules for collecting workpieces:
- Fold the top of the cloth napkin to its center.
- Turn the bottom to the opposite side by ¼ of the length.
- Tuck the bottom just above the center and fold the resulting piece into a “transverse accordion.”
- Squeeze the bottom with your fingers and secure the inner corners at the bottom.
- Bend the top corners of the napkin back.
- Tie the bottom of the resulting fan with ribbon.
Crown
Napkins on the festive table in the shape of a crown, made of fabric material, will look solemn and elegant.
To get a beautiful blank, you need to fold it according to the instructions provided:
- Fold the unfolded cloth into a triangle in such a way as to subsequently turn the figure into a rhombus.
- Bend the free ends to the bottom.
- Fold the angle formed after all the steps 2 times until you get a triangle resembling a “boat”.
- Bend the edges towards each other and secure them in a “pocket”.
- Give the resulting “crown” the shape of a circle and bend the corners with “sails” down.
Artichoke
To give the napkins the appearance of a flower called “artichoke” and emphasize the elegance of a romantic party, you need to do the following step by step:
- Place the fabric blank in an unfolded form with the wrong side up.
- Pull the corners towards the middle of the napkin.
- Turn the product over to the opposite side and repeat the action described in point 3.
- Turn the workpiece over again and do the same.
- Supporting the central part of the finished flower, pull out the petals, grabbing the lower corner adjacent to the middle of the figure.
- Do the same with the remaining 3 corners.
- The “artichoke” flower-shaped blank is ready; its center can be further decorated.
Candle
Start with a simple pattern that doesn't require time or skill. Wrap the napkin in a tube (for convenience, you can wrap it around a pencil and then remove it) and place it in a glass or glass. Appropriate decoration for a home evening, New Year's party, dinner with your loved one. It's quick, easy, and sophisticated, so your guests don't have to guess how to unwrap. By the way, if you arrange a master class for children, they will then be happy to take on this function.
Lotus - some variety
This variation is a modified fan described above, it looks like this:
The napkin stand is filled with products installed in one direction, then napkins are placed next to it in the other direction. The result is two layers of multi-directional napkins.
Note!
DIY airplane craft: the best options for creating an airplane from paper, cardboard and plastic. 120 photo ideas
- DIY crafts for March 8 step by step - a review of the most beautiful crafts for International Women's Day (120 photo ideas)
Diaper cake for a girl - 180 photos of ideas for original diaper cakes + DIY instructions with examples of finished products
The fan can be done in another way. First, half of the future fan is created in a napkin holder, after which napkins are placed in the other half in a mirror image. Napkins folded into a triangle are placed in the middle part of the ensemble, with one corner pointing upward.
The result will be a fan that opens from the center in both directions.
This ensemble will look good in a small napkin holder. This allows you to install it next to each guest.
Stages of work completion
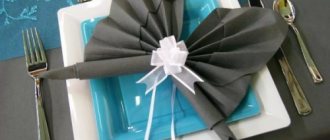
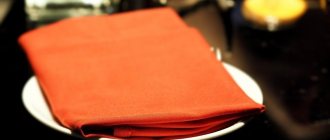
We will show the folding process using the example of a large red paper napkin.
Initially, the napkin should be folded. Moreover, its open cuts are directed in our case upward and to the right. After this, we begin to fold back the layers of the napkin from the upper right corner. First, bend the top layer completely.
Then grab the next layer of napkin and fold it in the same direction. But you should leave some distance from the previous layer.
After this, we tuck the newly bent corner under the previous one.
Finally, we fold the third layer of the napkin in the same way, tucking it under the previous one. The fourth layer should remain unchanged.
After this, we turn the red napkin over to the other side, and then bend its left side by about a third.
On the right side of the napkin we make the same fold.
We turn our serving napkin over, it is ready to serve.
Place the folded napkin on a plate.
Source
Peculiarities
To create an unusual composition of napkins with your own hands, you should learn in more detail about some of the features of such products:
- Unusually folded napkins are the key to successful table setting for any themed holiday. It could be an anniversary, a child's birthday, New Year's - or it could be a romantic dinner for Valentine's Day. Unusual compositions can be made from both textile and paper napkins. The limitations in this matter are solely in your capabilities and imagination.
- Napkins for cutlery should be in perfect harmony with the overall theme. When planning to make any kind of envelope out of them, choose the right color scheme.
- Today there are a lot of options for designing napkins for cutlery; everyone can find something suitable, the most successful design in a particular case. In addition, you can always add something of your own to this or that scheme, and you may well end up with something original.
7 photos
- For cutlery, it is better to choose fabric products, since they hold their shape much better than paper ones (and they also look more attractive and expensive).
- If, for example, you want to fold a beautiful cutlery sachet, starch your napkins in advance. This way they will keep their shape better.
- Beautifully folded fabric envelopes can be complemented with beautiful paper napkin figures in the appropriate style.
You should not set the table or fold items with dirty hands. This is due not only to personal hygiene rules, but also to the fact that you can ruin the appearance of the napkins. As a result, they will not please the guests and will not give them emotional pleasure.
Arranging cutlery
Cutlery should be 10mm apart from each other and the plate.
• The fork is on the left and the knife is on the right, as is the spoon. • The fork should be with its teeth up and the knife with the blade facing the plate. • If there are more than three dishes on the menu, then you do not need to lay out all the cutlery; they should be taken out when needed. • With the plate there should be a fork and a knife, after them for fish, then a knife and fork for various salads. • A spoon can be placed instead of a fish fork.
Adviсe
- You can also use paper napkins for this. In this case, unfold the napkin completely, forming a large square, then follow the same steps, otherwise the napkin may be too small to wrap the cutlery in it. Be careful not to tear the napkin.
- You can use anything to knit a roll of napkin. If you're having an outdoor party, you can use string or a long stem of grass. If there are little girls at the party, tie the napkin into bracelets that they can then take as a gift. Or you can refuse any binding at all.
Methods for laying out a napkin holder
The easiest way is to fold the napkins into a triangle. The resulting corners must be placed in the holder in one of two ways: in a single or double fan. In the first case, the fan is laid out towards each other, in the second - from the center to the edges. These two methods are good because, if necessary, the napkin can be removed without destroying the integrity of the composition.
Another simple but beautiful option is a double-sided waterfall. To make it you will need a cup. The napkins are folded in half, forming flat strips. Having made twenty blanks, stack them on top of each other. Bend the middle and place it in a cup. There are other, more original ways of laying out to decorate the holiday table.
Bird with a colorful tail
This option is simple to implement, but guests like it. The layout starts from the tail of the bird. To do this, you need to choose bright, rich colors of napkins. Plain colors will also work, but the bird will look less impressive. Manufacturing sequence:
- Each napkin has two parallel corners folded. Fold the napkin in half. It turns out to be a trapezoid - one part of the tail. Continue working until the required number of such parts is available;
- make the head and neck. To do this, the napkin must be folded several times, forming a flat tube. The top part of the tube must be bent to form a head;
- All parts are placed in the holder.
This interesting layout method is suitable for any celebration. The bird symbolizes warmth and homeliness. This figure is especially relevant during the celebration of the New Year, the symbol of which is the rooster. Rich colors will also decorate the festive table at a child’s birthday. A bright napkin holder will attract the attention of little guests and delight the birthday boy.
On a note! Before looking for patterns for folding napkins, you need to determine where they will be placed. This could be a napkin holder, a glass, a plate. Based on this, the addition option will be selected.
Christmas tree
Coniferous tree is a companion of New Year and Christmas. Christmas trees made from napkins will look beautiful on the table; they are not difficult to make. This option is also suitable for children’s birthdays celebrated in winter. Place the Christmas trees on plates, and on top you can put a bow or star-shaped cookies on top for decoration.
![How to beautifully fold napkins for a festive table: a variety of options [master classes]](https://1000koek.ru/wp-content/uploads/kak-krasivo-slozhit-salfetki-dlya-prazdnichnogo-stola-raznoobrazie-variantov-master-330x140.jpg)