A transom above the door is not so common in modern apartments. A more modern option could be doors to the ceiling or arches; transoms have nevertheless lost a little of their relevance. However, if you want to make your interior design different from everyone else, you can add a window above the door - this will definitely give your apartment a unique look. Today we will talk about how to make a transom above the door with your own hands. Here you can see photos of the original transoms, and also learn about the nuances of its manufacture.
Transom
Transom - the horizontal upper blind part of the window, the side or upper part of the door opening. The linear dimension from the ceiling to the top of the door frame can also be called a transom.
Transom horizontal upper blind part of the window side or upper part of the door opening
In common parlance, a transom is also called a downward-opening (folding) upper part of a window frame, which is often used for the safety of children and ventilation without drafts, since the cold air outside, as it descends, gradually warms up.
The window transom is made blank, and sometimes unglazed. When the word "transom" is used in relation to doors, it usually refers to the upper or side compartments, which can be rectangular, arched, oblique, triangular, etc. in shape. The transom can have an inspection hole, glazing, forged grille, etc., and can be made of wood, plastic (PVC), metal, plasterboard. Transoms with glazing serve to decorate the room and improve illumination.
Blind transoms can be used instead of erecting walls when installing doors in small passages to improve gas, noise and heat insulation of the room. They are also used for massive windows and doors, when the entire structure cannot be opened due to excess load. An opening design is possible for the upper section.
Design Features
The transom above the door has a variety of shapes, including:
- Rounded;
- Rectangular;
- Triangular;
- Oblique.
Sometimes there are other formats that have an unusual shape and are used to decorate the interior of the house. In addition to conventional glazing, the door transom can be equipped with an inspection hole, stained glass or forged grille. The materials from which the door transom is made are different - natural wood, plasterboard and metal.
Often there are interior doors with a transom located on the side, on one or both sides at the same time. This design is used in cases where the doorway has a wider width than the standard one, and there is a need to close them so as not to worsen the decorative component of the room. Side transoms can be either solid or glazed - these allow light to pass between rooms well.
What is a transom
When ninety percent of people hear the word door, they think of something that specialists in the remaining ten percent call exclusively door leaf. This is, without any doubt, the main component of the door, but far from the only one.
In fact, the door consists of a number of elements that non-specialists are not even aware of. First of all, this is the door frame to which the leaf is attached. The door frame also determines the type of door movement - one-way or “swinging”. The next required element is the platbands, which cover the place where the door frame is attached to the wall. And finally, the lock and hinges, which are well known to everyone, but for some reason are not perceived as an obligatory part of the door.
In addition, there are a number of elements, the presence or absence of which does not affect the functionality of the door. The most popular element of the “functional-aesthetic series” is the transom, which is located directly above the door frame. The purpose of the transom is to cover the gap between the door frame and the ceiling in cases where the door is lower than the height of the walls.
Transoms can be glazed or solid. Glazed versions of transoms are usually used on doors leading into the corridor. They are needed so that at least a little sunlight gets into the corridor. Blind transoms are usually used when a door of much smaller height is installed in the doorway. Sometimes the installation of a blind transom is dictated by the decision of the designer, who is confident in the need to completely separate two adjacent rooms.
The shape of the transom can be different and depends on the overall style of the interior. Transoms can be triangular, arched, rectangular. The arched transom remains the most popular and beautiful. In general, wooden transoms are a great addition to a wooden door, which allows you to highlight the stylistic decision and make the door even more attractive.
Transoms are created both specifically for solid wood doors and in accordance with the wishes of our clients. When designing transoms, special attention is paid to the compliance of all elements of the ensemble with a single stylistic solution. Transoms must form a single whole not only with the door, but also with the fittings.
Entrance doors with transom
The term "transom" is used to refer to variously shaped overhead or side compartments. Entrance doors with transoms may look different.
The transom above the entrance door can be made of different materials and often allows you to increase the level of illumination in the room
The transom itself may have an inspection hole, it may be glazed or equipped with a forged grille. The transom above the front door can be made of different materials and often allows you to increase the level of illumination in the room.
If we are talking about rooms with unusually large doorways, a metal entrance door with a transom will be an ideal option. Thanks to the transom located on the side or top, you can fill the empty space even when installing a standard-sized door.
In addition, this will ensure reliable fixation of the door in the opening. Transoms can be considered as one of the design elements, since they can be made in different styles and harmonize not only directly with the door, but also with the interior of the entire room.
What types of transoms are there?
Depending on the shape, transoms are: arched; straight. Straight ones are quite simple and laconic, while arched ones can look like real masterpieces decorating the interior. Entrance doors with a transom to an apartment are also usually divided in accordance with the location of the transom itself.
The transom can be installed:
- above the door;
- on the left/right side;
- on both sides;
- top and sides.
A system based on the use of side and top transoms is called complex. In order for it to perform all the functions assigned to it for a long time, it is important to select it correctly.
For the manufacture of the transom, the same material is used from which the door structure itself is made.
It depends on the height and width of the doorway. For example, if the width of the doorway is 180 cm, then an 80 cm wide door with two transoms placed on the sides, each measuring 50 cm, is ideal for it.
Material for making transoms for doors
Entrance doors with a transom and double-glazed windows or with a blank panel and a transom? The choice is not always easy! In order not to be disappointed in it in the future, it is important to take into account a number of factors, starting with where exactly the front door will be installed - in the entrance or on the street - and ending with its aesthetic characteristics.
As a rule, the same material from which the door structure itself is made is used to make the transom. Depending on this, it can be either solid or glazed. The latter option is ideal for poorly lit rooms: the glass transom will become another window through which light will pass.
It is also possible that two types of materials are used to make the transom. For example, the glass in an arched transom can be divided by wooden beams, which looks just great!
Types of elements
One of the features of the doors is the possibility of using them in indoor decoration. Beautifully made and matched in color and texture to the doors, decorated with carvings and curly trims, it will be a wonderful addition to any interior (see Interior doors in the interior).
There are two types of transoms:
I mainly use arched doors indoors. This form allows you to make the interior more original and attractive.
Types of transom location
There are many types of valve arrangement:
- above;
- On the one side;
- on both sides;
- combined - from above and from the sides at the same time;
If the top and side transoms are used simultaneously, then such a system is called complex. Depending on the width and height of the opening, the most optimal option is selected.
Advice: when choosing the type of placement of the sashes, you need to think everything over very carefully. So, for example, if the opening is 1800 mm wide, then it is better to install products with a size of 800 mm and two side transoms of 500 mm each.
Materials for production
Basically, the transom is made of the same materials as the door itself and its frame. They can be solid or glazed. One of the interesting design solutions could be a combination of a solid structure (see Solid interior doors) and a transparent transom placed above it. It is both beautiful and practical.
When using glass, there is an additional opportunity to illuminate the room. For example, in a dark corridor it will be much lighter during the day, due to the sun entering from the windows of the rooms through the transom.
Tip: using an arched glass transom makes it possible to visually enlarge the doors
DIY transom above the door
What to do if the doorway has non-standard dimensions, but there is no transom suitable for your taste or dimensions on sale? The solution to the problem is to make a transom above the door with your own hands! Despite the widespread belief about the complexity of the process, manufacturing a structure will not cause problems if you approach the matter from the right side.
To install interior or entrance doors with a transom yourself, you will need the following materials:
- box timber;
- a set of wooden or plastic wedges;
- polyurethane foam;
- platbands and additions;
- fasteners;
- silicone sealant (if glazing is planned).
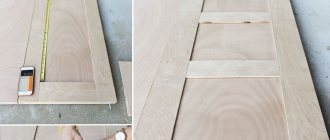
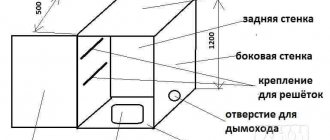
The transom manufacturing process includes seven sequential steps
First, the door opening is measured. This stage must be approached with care and responsibility, since the quality of the final product depends entirely on how correctly the measurements are taken. We arrange the box. We install the transom box made in the previous steps in the space allocated for it above the interior door.
It is advisable to use wedges to level the structure. All cracks should be filled with foam and wait until it dries completely.
Only after the box is in place can you proceed directly to glazing the assembled structure. Subsequently, extensions and platbands are installed, performing a decorative function.
This is done in four steps:
- we mark the box beam, taking into account the required gap between the lintel and the ceiling;
- cut off excess pieces of timber exactly according to the markings, carefully so as not to damage them;
- lay out the pre-assembled box on the floor;
- We twist the box parts using self-tapping screws. It is recommended not to tighten them all the way, since during installation in any case the structure will have to be leveled.
How to close it?
There are many ways to seal the opening above the door. But a lot directly depends on the material from which the walls are made:
- construction of a plasterboard structure;
- use of wood;
- brickwork;
- use of improvised materials.
To build a plasterboard structure you need to take:
- small blocks of wood or metal profiles;
- sheet of drywall;
- fasteners;
- primer and putty.
And also tools:
- hammer drill (if the walls of the room are not wooden);
- screwdriver;
- roulette;
- pencil;
- level;
- putty knife;
- roller;
- sandpaper;
- material for finishing the finished structure (wallpaper, paint, etc.).
Advice
First, the structure is made. When assembling it, it is necessary to take into account the relationship with the dimensions of the wall, because the plasterboard will be attached to the finished box.
also need to consider the placement of structural elements and ensure rigidity:
- Drywall is secured using fasteners and only after installing the box.
- In this case, the screws need to be pressed in a little so that they are located flush with the surface of the drywall.
- The locations of the fasteners, as well as the joints, must be puttied, thereby creating a flat surface.
- When the putty dries, it is treated with sandpaper and coated with a primer.
- After the primer has dried, you can begin finishing.
If the transom is a continuation of the wall, then the finishing material should be identical. In the case when the wall is already lined, then for finishing it is necessary to select the same material or supplement it with another option that will not stand out from the overall interior. If the walls of the building are made of wood, then the best option for equipping a transom is to use wooden blocks and boards. This option is also relevant for those apartments where boards in combination with plaster are used for floors. In this case, it is very important to correctly perform all the calculations so that the finished structure is no different in size from the main wall of the room. To create the structure you will need a minimum of materials and tools:
- roulette;
- pencil;
- ruler-level;
- screwdriver;
- saw;
- wooden beams and boards;
- fasteners;
- putty;
- finishing material.
First you need to take all the measurements, then make the structure, install it and finish it.
Important
The box is assembled in the same way as in the previous version.
Another way to seal a transom above an interior door is to cover it with bricks. When choosing this method, you must remember that it is the most difficult, so if possible, you should avoid it. But if such a decision was nevertheless made, then before laying the brick you need to equip the base. To do this, a crossbar is made above the door, on which bricks are subsequently laid on the mortar. You can use steel angles and channels as a base.
When making brickwork, it is very important to “weave” bricks into the existing one , thereby ensuring the necessary strength of the structure. Without the proper experience and appropriate qualifications, it is very difficult to carry out these actions. Therefore, it is recommended to seek help from specialists or choose an alternative option. In the case when financial possibilities are limited, you can use the simplest and most affordable option - to seal the transom using available materials in the arsenal, for example, an old door or a piece of plywood. The material must be cut to the size of the opening, and then secured. But this method has one drawback. If in all other cases you can cope on your own, then here you cannot do without outside help. Each of the methods proposed above for sealing a transom above an interior door has certain advantages and disadvantages, so the choice must be made based on the structural features , as well as individual physical and material capabilities. The main thing is to act consistently, taking into account the advice of experts, and then the space between the ceiling and the top of the door will not differ from the rest of the wall.
What is a window transom
Before you decide what kind of plastic window you need, you need to understand what a window transom is and whether you need it. This term refers to the part of the structure located on top; it is necessarily separated by a horizontal strip and can be placed on the window separately or be part of it. The transom can be opening or blind.
When choosing a window with a transom, it is best to order a design in which it will open; this will make it easier to care for the window.
The transom of a window is found quite often, but people do not always pay attention to it, without separating it into a separate part that has any name. The shape of the transom can be different: for example, there are designs in the shape of a trapezoid or arch.
The most common element option is a square or rectangle. Less often you can find a polygon or other non-standard shapes, the choice of which depends on the customer’s design intent, or the unusual shape of the window opening. The window transom is most often part of a PVC profile structure; less often, a separate installation of the element is provided, and the buyer has the choice of installing the structure with or without it.
You can see a window with a transom if its size is larger than average. Such an element will not look good on small windows and will not fit into the design. The optimal window size should be more than 170 cm. A window transom is needed not only to make the appearance of the structure more attractive and visually enlarge it, but also to let more light into the room.
The design allows you to create large windows, while significantly reducing the load on their sashes and the structure itself. The room becomes brighter, the windows visually become much larger, adding a feeling of free space to the room. Eliminating excess pressure on a PVC structure allows you to increase its service life and facilitate operation.
Using this technique will allow you to create a large window opening without the need to install a bulky, expensive window. Such windows are used in private houses and apartments with high ceilings. Large window openings not only look attractive, but also make the room quite bright.
When choosing a window with a transom, it is best to order a design in which it will open - this will make it easier to care for the window, it will be easier to clean, and will also provide an additional window for ventilation.
Expanding functions
Doors with closed transoms require frequent maintenance, which can cause some difficulties. To make the use and maintenance of the structure simpler and more convenient, it is recommended to make it opening. This will make cleaning easier and create a flow of fresh air between rooms.
The opening function is realized through the use of ordinary rotary fittings. The main difference is the rotation of the sash in the horizontal direction. The sash can be tilted either from top to bottom or from bottom to top. It is recommended to use special transom fittings, which are equipped with limiters for the opening width of the sash - it allows you to significantly expand the functionality.
An entrance door with a transom becomes a reliable barrier for insects if a suitable mosquito net is installed on the latter. This is only relevant for opening structures. You can also sew up the transom to seal the opening. Remember - this will reduce the penetration of light from one room to another, but this is not critical.
Closed transom
Window above the door
A transom (a window above a door) is the upper element of a window (or door) structure, which is located strictly horizontally in relation to the frame. It is both a decorative and functional component of the window.
Types of window transom (windows above the door):
A transom window above a door is the upper element of a window or door structure that is located strictly horizontally in relation to the frame
- deaf. Most often found in large windows installed in rooms with high ceilings. In this case, the use of a transom is advisable - this element divides a large window into compartments and allows you to install sashes of standard sizes, reducing the excessive weight of the window structure, eliminating problems such as difficulties in operating the window, premature wear of fittings, etc.;
- swing The simplest and most familiar option is a window in a plastic window that opens horizontally, from above or from below. If blind transoms can have various shapes, then flaps are represented only by the traditional rectangular configuration - it is impossible to create other shapes due to the characteristics of the fittings used.
Advantages of windows above the door:
- the possibility of effective ventilation without drafts. Transoms, located in the upper part of the window, provide comfortable air ventilation in the room (from top to bottom). Ideal for bedrooms, children's rooms;
- safety: windows with transoms are an ideal choice for families with children and/or animals. Neither children's hands nor animals can reach this element, which is located almost under the ceiling;
- reliability: installation of a transom, thanks to additional horizontal elements, increases the strength of the window, its resistance to external influences, and the service life of the window structure.
It’s worth saying a few words about the disadvantages, which, although conditional, still need to be taken into account when thinking about the need to use transoms in the windows in your house, in your apartment.
An additional profile (lintel under the transom) leads to a decrease in the light transmission capacity of the window. However, in practice this decrease is not felt at all. The second disadvantage is the increased cost of the window. Only you can decide whether you are willing to pay for increased comfort and safety in your home.
The transom matches the top horizontal window as well as the top and side door sashes
Transom as a window element
The transom matches the top horizontal window and the top and side door sashes. As a rule, the transom and frame are a single structure, glazed or solid, the use of which is possible in a wide variety of rooms.
Transoms are installed in window frames to strengthen the structure, as a design element and for ventilation, including ensuring the safety of children if it is necessary to leave the window ajar. In this case, air enters the room from top to bottom, gradually warming up. In some cases, transoms are made blind without the ability to open them.
In door designs, a transom refers to the side or top compartments. They can be different in shape - round in the form of arches, rectangular, square, triangular, with beveled corners, have an inspection hole, be completely glass, in the form of a stained glass window.
At the same time, such open door transoms rather serve to decorate the interior and as an additional source of lighting. They can be made from plasterboard, metal, wood. The need for blind door or window transoms also arises in cases where it is impossible to make the entire structure openable due to its massiveness and heavy load.
The nuances of installing a transom
You don’t have to buy an interior door with a ready-made transom - you can make it yourself. The construction of the structure should begin after the installation of the door leaf is completed.
To work with the transom you will need the following materials:
- box timber;
- plastic or wooden wedges;
- additions and platbands;
- polyurethane foam;
- fasteners;
- silicone sealant.
The installation process includes the following steps:
- Take measurements of the required transom, that is, measure the parameters of the free space in the opening that needs to be closed;
- make a transom box: guided by the previously obtained measurements, mark the box beam. In this case, it is very important to provide a gap between the beam and the ceiling, so that in the future you can freely align the transom in the doorway;
- cut out the box parts of the required shape and fasten them together with self-tapping screws.
- Attach the finished structure to the doorway with self-tapping screws. To level the box, use wedges;
- make the leaf of the sash, that is, the body of the transom itself, from the selected material;
- install the sashes in the already installed frame and secure them with self-tapping screws;
- fill all the cracks between the opening and the box with polyurethane foam or treat with sealant;
- install platbands and necessary decorative elements.
Do not tighten the screws to the maximum stop - during the installation process it may be necessary to align the frame with the doorway. As you can see, a transom is not a very troublesome, but quite effective solution to the problem of a non-standard doorway. It will not only successfully close an unaesthetic space, but will also make the room look more original and fresh, so don’t give up such a useful interior detail.
Door frame
Installation of the door and transom will not be complete without installing the frame. It is the basis of the future design, and the further operation of the product, its service life and ease of use depend on the correct performance of the work.
To install the door frame you will need the following materials and tools:
- Drill and set of drills.
- Screwdriver.
- Chisel or milling cutter.
- Hammer.
- Hand hacksaw.
- Plumb.
- Mount.
- Hammer.
- Bulgarian.
- Building level.
- Rotary miter box.
Before installing the box, you should assemble it. Assembly can be carried out in three ways: using tenons for connection, fastening the beam at an angle of 45 degrees, and similar work with the beam, but at an angle of 90 degrees.
The tenon connection includes several points. First, you need to make spikes in the adjacent bars. It is worth noting here that both horizontal and vertical beams must have spikes, with which the joining process could then be carried out. The second point that you need to pay attention to is that the height of the spikes should be equal to the thickness of the bars.
Assembling a door frame at an angle of 45 degrees is carried out in the following way. That part of the vertical beam, which will subsequently be connected to the horizontal beam, should be sawn at an angle of 45 degrees. Similar actions are carried out with a horizontal bar, but on both sides. It is worth paying attention that when choosing vertical racks you need to rely on the dimensions of the doorway: its height and the thickness of the beam. Don't forget about the gaps.
To assemble the structure and final fastening, nails or screws are required. They should also be screwed in at an angle of 45 degrees.
The connection at an angle of 90 degrees is much simpler than the previous option. In this case, the horizontal beam is laid directly on the vertical post, without any cutting. But you will still need to use a saw, since you need to saw off the porch. Self-tapping screws or nails are also used for connections.
;