When decorating a kitchen, small gaps appear between the countertop and the wall at the joints, which spoil the appearance of the room. They are hidden with the help of skirting boards, thanks to which a smooth transition is formed in this space.
Such products are sold in the form of structures consisting of two parts - the inner part and the strip. You will learn more about how to attach a baseboard to a kitchen countertop in our article.
How to attach a baseboard to a kitchen countertop
How to install a plinth on a kitchen countertop: detailed instructions
How to attach a baseboard to a kitchen countertop, and is it necessary to do so? This part is also called molding. It closes the gap that forms even when tightly adjacent to the wall. It is quite difficult to adjust the dimensions if there is noticeable curvature of the wall, and even if this is corrected with a layer of plaster or plasterboard sheets, empty space will still remain. It can be sealed with sealant, but such a joint looks ugly. Construction mixtures will crack if the base is in motion, and the furniture is deformed during use. Chipboard and MDF sheets, as well as natural solid wood, bend slightly under load. A well-balanced system will become loose over time and a rigid seal made of fragile materials will not last long. The best solution is a decorative strip that you can install yourself - it’s not difficult to do.
Subsequent care of the baseboard
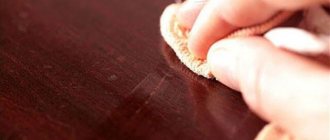
Correct installation of the plinth is not the only factor influencing the condition of the product and the length of its service life. It is also important to learn how to properly care for baseboards. First of all, it is not recommended to use any detergents to wipe the baseboard. Dust should be wiped off with water only. Otherwise, dirt may be absorbed into the surface of the baseboard, especially if it is made of wood or chipboard.
You need to properly care for the baseboard
Note! You can also remove dust using a vacuum cleaner - this is the most effective and safest way to clean the surface of baseboards. But before cleaning, you need to put special attachments made of rubber on the vacuum cleaner.
Vinyl and plastic cleaner
If large stains appear on the baseboard that cannot be removed with plain water, you can use an abrasive cleaner. But before this, you need to test the selected product by using it to wash a section of the kitchen baseboard in an inconspicuous place, for example, behind the microwave. This is the only way to ensure that the powder or other cleaning agent is harmless. If everything is normal and the surface of the plinth is not damaged, then the product can be used to treat other areas of the plinth.
Kitchen baseboard
Even if the care of the skirting boards after their installation was of high quality, the products may still deteriorate slightly over time (their appearance deteriorates). In this case, restoration of the moldings is required. Restoration of wooden products involves applying one or several layers of varnish, and restoration of stone skirting boards involves grinding the surface . The sealant may also need to be replaced, but the old material must be removed first.
Functions of the decorative strip
- Protecting the joint from water - the cut of a sheet of chipboard or MDF is an open structure, vulnerable to moisture. Once inside, steam and drops destroy it. The edge swells and cracks. In addition, in conditions of constant dampness, it begins to rot. The result is an unpleasant odor that permeates the air and is transferred to items stored in the lower cabinets. Dampness spreads to furniture walls if their ends are not protected. Natural wood is less resistant to moisture. Unlike particle boards, it changes size and shape when wet and dry.
- Fixing the cabinet - it rests on an elastic gasket. This reduces the load on the legs when loosening. If the legs are unbalanced and the cabinet is wobbly, the elastic rail will prevent it from hitting the wall and protect it from destruction. It can be glued and screwed with self-tapping screws, creating a reliable, stationary mount.
- Decorative function - installing a kitchen plinth on the countertop allows you to close a gap with the wall that looks unattractive. Other methods are less effective.
Types of moldings
Products differ in design, shape and material.
Differences in design
The outer part is a decorative profile. During production, a sealant is attached to the back to fill the gap. It can also be installed in a groove specially made for it in a sheet of chipboard. There are two main types of moldings.
- Monolithic - the profile with the seal is smelted from one piece. They have increased rigidity and are therefore short-lived. The long service life of the gasket is ensured by its elasticity.
- Universal - the rail is placed on a silicone seal. It is more flexible and lasts longer.
Materials
- Wood - it undergoes treatment that increases resistance to external influences. The fibrous structure is covered by a protective shell. The cut is vulnerable to moisture and there is always a risk that the product will become unusable. Before installing the baseboard on the countertop, you need to make sure that it fits. The pattern of wood fibers goes well with different shades, but choosing a specific color to match the color of the countertop can be difficult. If in doubt, it is better to continue searching for the right color and texture. Products cannot be returned after installation.
- Chipboard and MDF boards are available in a wide range, and finding the right shade is not difficult. Their durability depends on their quality. MDF has a long service life and high strength.
- Artificial and natural stone is perhaps the most reliable finish, withstanding mechanical loads and invulnerable to moisture. Minerals do not tolerate high temperatures well, so they should not be attached near the stove or oven.
- Aluminum and stainless steel - products are available with a natural metal surface or with a painted top. The planks can be smooth or textured. They are not afraid of dampness and high temperatures. Aluminum and steel surfaces tolerate detergents well.
- Plastic - does not deteriorate when exposed to moisture, but melts easily even at low temperatures up to 100 degrees. Low quality products quickly lose their attractive appearance. PVC imitates different materials and textures, but the difference from the original is clearly noticeable.
Update
If you decide to equip your kitchen with interesting functionality, then LED lighting is the best choice. To do this, you need to purchase a baguette made of transparent plastic. A diode strip of any shade is inserted inside.
If you want to save money, you can install a regular Christmas tree garland. The room will acquire a stylish design and an intimate atmosphere. This will allow you to have romantic dinners every day and for any occasion. Additionally, the backlight can be used as lighting.
How the baseboard is attached to the countertop in the kitchen
Structures can be removable or non-removable. In the first case, the rail can be removed when rearranging furniture, and then returned to its place. In the latter, it is attached tightly. Removable ones are attached to furniture. They are pressed tightly against the wall, but not fixed to it. Fixed ones are mounted only on the wall. You should not fix the seal on two surfaces at once - this will quickly deform.
Moldings are also collapsible and non-removable. Both types can be installed with screws or glue. The difference is that in the first case, a decorative profile is put on the seal, and in the second, a monolithic strip is attached.
The connection with screws is easy to disassemble and assemble, but their heads are visible on the surface. There are models with top bars that hide the heads. The adhesive connection cannot be disassembled. After dismantling, the part will most likely no longer be usable, since it is very difficult to remove the glue from its back side, and the new layer will only lie on a clean surface. When torn off, the rail can easily be damaged. There are products with holes for self-tapping screws. If they are not there, there is a risk of damaging the surface. Fragile products will crack when drilled. It is better to place them on silicone glue or another composition suitable for this material. It must be chosen correctly. What is suitable for wood is not always suitable for artificial stone.
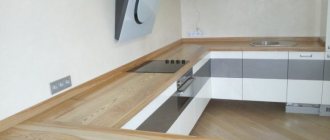
Corner kitchen countertops and plastic border
As mentioned above, for a corner tabletop, the border must either be cut off or use a corner, which is often included.
Very often, a plastic border is purchased for a corner kitchen, as it is easier to work with. What can be said for sure is that the density of contact with the surface of a plastic skirting board is actually higher. And even if the wall is not very smooth, the curb will fit quite evenly against it.
You can glue such a border using the same “liquid nails”.
The plastic border has a wide range of colors and looks great in any interior. Despite this, this type of plinth is a matter of taste: some people like it, but others don’t.
Features of fixing the plastic border:
- The holding time of the glue is no more than five minutes, but if the glue, for example, is fresh, then maybe a little more;
- By allowing the glue to sit, you will give it the opportunity to thicken, and you won’t have to press the border against the wall or countertop for a long time.
It must be said that often the plastic plinth comes with fittings that allow it to be correctly fixed at the corners and, for example, to hide the ends of the plinth.
Step-by-step installation instructions
You should not try to install artificial and natural stone products yourself. They are installed by craftsmen along with the headset. Professional equipment is required for cutting and other operations. Our instructions are intended for slats made of plastic, metal, wood and composites.
Required Tools
- Hacksaw for wood or metal. The first option is only suitable for natural wood. For PVC, both options are suitable. It is more convenient to cut soft plastic with a carpenter's knife, which does not leave burrs, unlike a serrated blade.
- Roulette.
- Colorless silicone sealant that seals joints, or glue.
- Screwdriver or screwdriver.
Screw mounting
- The plinth is measured with a tape measure according to the width of the tabletop and the blanks are cut to the required length. It is better to cut prefabricated elements separately.
- The sealant is tightly applied to the installation site and holes are drilled for the screws. The step between them is 15-30 cm. If you apply markings to the wall and moldings separately, the holes may not match. Fragile material should be handled carefully. To prevent it from cracking, it is first passed through with a thin drill. Fragile plastic may not withstand even such delicate intervention. In this case, it is better to use glue. You need to work on stone with a special drill with a concrete attachment. Do not turn on the drill in impact mode.
- The joint can be treated with sealant. It will prevent moisture from getting into the open sections of chipboard or natural wood, but it will have to be cleaned off when rearranging.
- The outer part is attached with latches to the base mounted along the perimeter, starting from the long side. A connecting corner element is placed at the corner. The second part of the decorative coating is inserted into it. After this, they press on it to snap the end onto the guide. The parts go inside under the corner by about 0.5 cm. The joints are treated with silicone glue.
- The edges are covered with plugs that come with the rest of the parts.
For step-by-step instructions on how to install a baseboard on a kitchen countertop, watch the video.
Adhesive connection
- The wall surface is cleaned of dust and dirt. Grease stains are removed with an alcohol solution. The profile must also be clean. Plaque significantly reduces adhesion.
- The rear part is removed from the collapsible rail.
- Measure the width of the base and cut a blank along it.
- The base - a wall or tabletop - is coated with glue and the guide is pressed tightly against it. It needs to be kept in this position for several minutes. The setting time is indicated in the instructions on the package.
- If there is a corner, installation of the outer part begins from there. First, install the corner element, then insert both sides into it by 2-5 mm.
- The ends are closed with plugs.
Note! How to paint polished furniture white?
MDF skirting boards
Everyone is probably familiar with MDF boards, used as a facing material and widely used in furniture production. They are produced in a wide range of thicknesses and shapes, most often decorated with a special polymer film with a pattern, usually imitating various wood textures. MDF skirting boards are their closest “relatives”.
What is MDF? No matter how hard they try to freely decipher this abbreviation! Some argue that this is a designation for “fine fraction” or “modified fiberboard.” Interestingly, both options are quite close to the truth.
Indeed, MDF is a step forward compared to the usual fiberboard. And in the production of this material, wood fibers are ground to very small sizes. But still, in fact, this is the Russified English abbreviation MDF: “Medium Density Fiberboard”, literally translated - “medium density fiberboard”.
MDF boards are made from crushed wood fibers, which, when heated and pressed, release natural glue - lignin, which is an excellent binder for the created mass. Manufacturers position MDF as an environmentally friendly material, but in fact, to bind fibers, some companies sometimes use formaldehyde resins, which are not at all beneficial to human health. This factor must be taken into account when choosing this material for finishing - it is better to give preference to manufacturers with a consistently high reputation.
MDF skirting board production line
MDF skirting boards are made from boards that are not yet decorated with film. The blanks are cut and processed on special milling equipment, where they are given the intended shape and relief pattern. After this, the skirting boards are cleaned of dust, and their front surface is laminated with a self-adhesive polymer film.
Taking into account the manufacturing technology, MDF skirting boards most often have the form of a profiled smooth board, which is sometimes also decorated with simple reliefs, without any special frills.
MDF plinth with an insert, which is designed to mask the points of its attachment to the wall.
Variants are produced with an insert-bar along the entire length of the plinth. This detail allows you to simplify installation as much as possible - it will perfectly hide all the heads of the fasteners after installing the plinth on the wall.
In addition to lamination, natural veneer and painting are used to decorate the front side of MDF skirting boards.
Prices for MDF plinths
their MDF plinth
Veneered MDF plinth - Italian walnut look
Veneered plinths, instead of PVC film, are covered with veneer made from natural wood of expensive species. Therefore, in appearance they are almost impossible to distinguish from real wooden ones.
Painted MDF plinth
Skirting boards can also be sold in painted form. For such decoration, special paints are used, which are designed to reliably protect the material from moisture, as well as from the effects of household chemicals. If you want to give the products individuality, that is, paint them yourself, you can purchase a baseboard primed with a neutral white or light gray color, prepared for painting.
MDF skirting boards, like products made from other materials, have their own advantages and disadvantages, which you need to know about before purchasing and installing them.
- The MDF plinth has an easy-to-install design, so even a novice craftsman who is inexperienced in construction can handle its installation.
- The products are very well fixed tightly to a flat wall surface.
- The aesthetic appearance of plinths made from this material brings neatness and sometimes exclusivity to the interior design. Especially if the products are made to order or painted independently.
- The fairly high moisture resistance of MDF allows the material to be used in rooms with slightly higher humidity levels. But direct ingress of water should still be excluded.
- The products have a certain flexibility, so they can be attached even to a slightly curved surface.
The disadvantages of products made from this material include instability to fracture, that is, they can easily be broken by hand. Therefore, during installation you should act carefully, without applying excessive force.
Although buyers are assured that MDF is an absolutely pure, harmless material, this statement should be treated with a certain degree of caution. In order to save money and speed up the manufacturing process of boards, some manufacturers (90% of the world production of this material comes from China) additionally use phenol-formaldehyde resins as a binder. And products may have a negative ability to emit toxic free phenol.
Care instructions
There are special care products for each material. For example, special polishes are used for solid wood. There are cleaning products for aluminum and stone. If the dirt comes off well, it should be removed with a damp sponge or rag. It is undesirable to use chemicals, as it accumulates in the joints, forming a solid deposit.
Do not remove stubborn stains with aggressive chemicals - they can damage the coating. Powders need to be diluted in water to dissolve solid particles - they will leave scratches on the surface.
How to attach a baseboard to a kitchen countertop: choosing the best way
- Why is this necessary?
- Installation methods
- Fasten with self-tapping screws
- Fasten with glue
- Let's sum it up
Hello, dear friends! Today I’ll talk to you about how to attach the baseboard to the countertop. There are several options. But not all of them are worth using.
Skirting boards are used not only on the floor, but also in the kitchen when assembling a set. It covers the joint between the countertop and the wall. It is also possible to attach it to a tabletop or backsplash.
These elements differ from each other in shape, design, and materials of manufacture. The plastic and aluminum versions are mainly used. Wood, MDF and other materials are rarely used.
Installation methods
First, I will dwell on the design features of the moldings.
Kitchen baseboards can be solid or consist of a base strip and a removable element.
Choose dismountable kitchen baseboards.
There are several reasons:
- the removable part can be replaced over time;
- fastenings remain invisible;
- you can use self-tapping screws for fixation;
- wide selection of decorative strips;
- ease of installation.
Both plastic and aluminum plinths, which I have already talked about, can be collapsible.
Depending on the materials used, there are 2 types of fastening:
- On self-tapping screws
. This is how skirting boards with a removable cover are attached. The base strip is fixed, and the molding is already snapped onto it. As a result, the attachment point remains invisible; - For liquid nails
. Or silicone glue. It is the same. Suitable for solid skirting boards. They are not mounted using self-tapping screws. After all, this damages their design.
There are also different types of installation using self-tapping screws depending on where they are screwed:
- On the countertop
. The most practical and common option. The base strip is fastened with self-tapping screws to the tabletop, positioned close to the wall. The main thing is to choose the correct width of the molding itself. As a result, there is no gap between the wall and the set; - Into the wall
. All experienced craftsmen do not advise attaching the baseboard to the wall, as is done when installing floor elements. Even a slight displacement of the kitchen unit leads to the formation of a gap. There will be no protection anymore.
Now you can separately see how to attach the plinth to the tabletop using self-tapping screws, and we will also take a separate look at the option with glue.
Fasten with self-tapping screws
There are also those who use nails. This is a wrong decision. If it is a flexible plastic baseboard, then you should not nail it to the tabletop. It is so easy to damage the molding itself, as well as the headset element.
Self-tapping screws are suitable for dismountable skirting boards. The installation sequence is as follows:
- prepare tools and materials for work;
- remove the decorative trim from the kitchen baseboard;
- attach the base strip and mark for fastening;
- make cuts in the countertop with a small drill for self-tapping screws so that the material does not begin to crack;
- This is especially true for wooden countertops;
- clean the surface and degrease it;
- Apply a layer of silicone sealant along the entire installed baseboard;
- Place the base of the baseboard on top of the sealant and press it;
- screw the base bar according to the markings;
- install a decorative profile;
- install all plugs;
- add sealant where it is missing.
It is important that all possible gaps between the headset and the wall are filled with sealant.
If the molding becomes worn out, damaged, or simply becomes boring, it is not necessary to completely replace the baseboard. It is enough to remove the decorative trim and install a new one. At the same time, you can add a little sealant in places where it has worn out.
Fasten with glue
Mainly used for solid plastic skirting boards. Objectively, it is considered a simpler installation option.
An important condition is the purchase of high-quality adhesive-sealant. Nothing will work without him.
The step by step process looks like this:
- take accurate measurements of the kitchen after it is fully assembled;
- determine the size of the plinth itself, as well as the required number of plugs and corners;
- prepare the surface by cleaning and degreasing it;
- if it is a collapsible plinth, then divide it into 2 parts;
- cut the required length of the base strip using a hacksaw or a sharp knife;
- Apply glue to the surface at the junction of the wall and the furniture (table top);
- attach and press the baseboard;
- keep for as long as the glue manufacturer indicated in the instructions;
- cut the decorative strip and snap it onto the base;
- install all caps and corners.
That's all. The work is completed. Nothing complicated.
Why is this necessary?
Before attaching the baseboard to the tabletop, many are interested in why this is necessary.
Not everyone understands its functions and tasks. But in vain. An important and also necessary element in the kitchen.
There are 3 main functions:
- Disguise
. The gap between the headset and the wall looks ugly. It should be covered with molding. It's a plinth. It hides all defects and also forms a complete picture; - Protection
. I consider the main function to be protection from moisture. When cooking and cleaning, water and dirt get into the joints. Over time they accumulate there. Water pours behind the furniture. It mixes with garbage there. The process of decay begins. As a result, the furniture deteriorates and an unpleasant odor forms on the furniture. This is a source of mold and mildew. If you install a plinth, all these problems will be eliminated; - Decorative effect
. Modern skirting boards are beautiful and are also made in the style of kitchen furniture. They decorate it perfectly and complement it visually.
These reasons are enough to take moldings from Leroy Merlin or another store and install them in your kitchen.
Let's sum it up
Finding the best way is objectively difficult.
But I can draw the following conclusions:
- For solid plastic skirting boards, only fastening with glue is suitable;
- if it is a collapsible plastic flexible plinth, then you can use glue or self-tapping screws of your choice;
- You need to drill into the plastic carefully, and you shouldn’t screw a self-tapping screw directly into the plastic without a drill, otherwise it will crack;
- for aluminum baseboards, use self-tapping screws supplemented with sealant;
- if you plan to regularly move furniture and remove baseboards, then silicone will not work;
- try to mount the element to the countertop and not to the wall.
If you disagree with something, you can write in the comments. Let's discuss some additional issues.
- Is it possible to place a bed opposite the door?
- How to sell furniture active sales?
- Adhesive paper for furniture
By the way, this article contains details about the choice of sealant for our purposes and more.
Which mounting option did you choose? Which skirting board do you prefer and why? Did you make any mistakes during installation, and what were they? What advice can you give to beginners?
All that remains is to hear your answers, as well as stories from your life.
Differences in materials
- Wood. Typically, this type of molding is used for countertops made of the same material (chipboard or wood). Varieties of such skirting boards have a low cost, but choosing them in combination with the color of the tabletop is quite difficult.
- Aluminum. Such moldings are quite popular. They have a long service life and are not exposed to heating devices and are easy to clean. They can have different shapes and appearance.
- Plastic. This type is made of PVC. Accordingly, they are easy to change, so they are presented in various modifications.
- Stone. A type of molding from the “good” price category. They are installed using glue and are installed in a vertical position.
- Metal-plastic. This type of plinth can be used for any type of countertops. But installing them next to heating devices is not recommended.
We attach the baseboard to the tabletop ourselves.
Many women spend most of their time in the kitchen, so they strive to make it as cozy and comfortable as possible.
Skirting boards attached to the countertop and closing the gap between it and the wall will give the kitchen set a decent look.
The presence of baseboards is necessary in any kitchen, purchased in a store, ordered in a workshop or made by hand, as it has practical functionality.
The appearance and cleanliness of the kitchen will depend on its correct installation.
Types and purpose of plinths
In the space that appears after installation of the kitchen unit between the wall and the furniture, moisture, food residues and other particles that are difficult to remove can accumulate.
Because of them, an unpleasant odor may arise and even the process of rotting may begin, which can lead to the destruction of furniture and the appearance of unpleasant insects.
In order to avoid such consequences, there is a kitchen baseboard that ensures cleanliness in the kitchen.
The plinth consists of a strip and a guide that is attached to the tabletop, and onto which the plinth is subsequently “put on.”
It also helps to hide small defects in built-in utensils that arise as a result of uneven walls or other reasons.
The plinth will perfectly close all the cracks and gaps, firmly connect the joints that appear at the edges of the tabletop and apron, and hold together all surfaces located at different angles.
The set, purchased to order, is equipped with a kitchen plinth, necessary fittings, plugs, and joint elements.
Furniture and related accessories in such cases are made of the same or similar material, the same color and texture.
If you purchase ready-made furniture in retail chains, you will have to buy the baseboard yourself.
In this option, it is worth remembering that the baseboard must be combined in all respects with the set.
- If the composition of the purchased countertop is made to look like stone, then the accompanying equipment is similar.
For a countertop made of natural or artificial stone, it is best to buy a marble or metal-plastic plinth.
A wooden plinth is ideal for a countertop made of chipboard or natural wood.
For a stainless steel table, the optimal solution would be to install an aluminum or stainless steel baseboard.
Aluminum structures or their plastic imitations are available for sale, which will bring them to the desired size.
Ready-made skirting boards for countertops come in a variety of colors.
The most popular among kitchen baseboards are products made of plastic and aluminum. They are used in those cases when selecting fittings from a similar texture to the entire set is impossible.
Aluminum and plastic are considered universal.
- Plastic plinth - polyvinyl chloride, made by extrusion. The plastic melts, and the necessary pigment is added to it for the desired color.
You can laminate the top layer with different films that imitate the texture of the base of the baseboard.
The most common textures are stone, metal or wood. The surface of the coating can be smooth, shagreen, matte or glossy.
The advantage of plastic is a rich range of colors and sizes, easy installation and flexibility.
Plastic is resistant to moisture, environmentally friendly and has an inexpensive price range. The material is very convenient in cases of uneven walls and complex shapes. Aluminum plinth is durable, as a special oxide film is applied to it. It helps to withstand various loads and easily tolerates various cleaning agents, including aggressive ones.
The material is durable and heat resistant.
Fittings of this type are preferable for protecting the space separating the countertop from the stove or oven.
Aluminum is slightly higher in price, but still acceptable for all segments of the population.
Shape and size
Before purchasing a plinth, you need to decide on its shape and size. The choice depends on the size of the gap - the wider it is, the more voluminous the fittings should be.
Triangular, rectangular, flat, rounded and shaped skirting boards are available for sale. The choice of one configuration or another depends on the design of the kitchen furniture and the personal preferences of the buyer, but most still choose triangular-shaped products.
The main thing in choosing is to choose the right size. Kitchen plinth for countertops can have different sizes. It can be made either in the form of a narrow strip 5 mm wide or have a wide volumetric shape up to 50 mm in size. The length of the product usually varies from 3 to 4 meters. The choice of size depends on parameters such as the size of the gap, the thickness of the table top, furniture design, etc. So, if the gap between the wall and the table surface is small, you can use narrow rectangular sides, similar to those installed on the floor.
How the device is attached
The set of accessories for the table top is equipped with shaped and shaped profiles of three, three and a half and four meters. The silicone seal is located along the length of the structure.
When fixing the baseboard, the silicone adheres firmly to the surface, sealing the joints and preventing moisture from penetrating the ends of the tabletop.
The wall plinth has the shape of an equilateral triangle or boot, extended upward.
The base is fastened with self-tapping screws, and a decorative insert is secured at the top of the base until it clicks.
Fasteners include right- and left-side end caps and angle brackets attached to the outer sides.
All fittings have the same color as the baseboards.
Installation is easy.
- First, measure the tabletop from the corner and “cut off” the required part of the profile using a hacksaw.
- Clean the end parts with abrasive material. The gap from the tabletop to the apron is treated with sealed material for better adhesion.
- The base of the plinth is placed at the joint and screwed to the tabletop.
If you attach metal or wooden baseboards with screws, then be sure to treat the edges with silicone.
Finally, we secure the corners and the front part by snapping it into the base, according to the instructions.
To accurately fit the decorative insert, you need to cut the strip correctly, subtracting three to five millimeters from the long sides of the tabletop when taking measurements. The insert is fixed in the corners by pressing. A click will notify you that the bar has been successfully and tightly fixed. The side elements of the decorative part are also installed.
Installing the plugs will complete the job of securing the baseboard.
Using silicone sealant, treat all elements before fastening, wait until it “sets.” This procedure is necessary for proper fixation and tight fit to the surface. Then insert and press the plugs.
The baseboard will provide the kitchen with sterility, cleanliness and freshness, which is what this room should have.
The installation of skirting boards using glue is practically the same. This method is less time-consuming, but does not allow you to hide kitchen appliances, since it fits firmly to the wall. And it will be almost impossible to remove the layer of glue after dismantling the kitchen baseboard.
In addition, the kitchen plinth will help you hide defects in the built-in kitchen and make its position visually more even.
Kitchen plinth for countertops and its installation
Hello dear friends.
Today we will talk about plinths that are installed on countertops.
When installing a kitchen set, there is always a small gap between the countertop and the wall to which it is pressed. If the wall is curved (convex or concave), then the gap is quite large.
To hide such gaps, as well as to isolate kitchen drawers and facades from water, there are baseboards.
When installing them, even uneven walls are “leveled”, as it creates the effect of a perfectly even joint between the wall and the countertop.
The plinth for the tabletop can be of different configurations and sizes. But its design and installation are the same in any version.
It consists directly of a plastic tape and a guide, which is attached to the tabletop, and on which it is “put on”.
This plastic guide has a special groove into which the tape fits, snapping into it with a “lock”. This guide is attached to the table either with shoe nails (25mm) or self-tapping screws. When attaching, you need to press this guide firmly against the wall so that there is no gap between the wall and the tape.
For the installation itself, the tools you will need are:
- Hammer with nails (or screwdriver with self-tapping screws)
- Shoe knife
- Silicone
- Hacksaw for metal
The kit for the plinth also includes special corners. They can be internal, external, end. The outer corners are placed on the ends of the tape, and the corners are formed using the inner corners (all corners are attached with silicone).
First, measure the size of the guide for a specific wing of the table. Its size should be 100-200mm smaller than the actual one (for example, the guide should not “reach” the corner and the edge of the tabletop by 50-100mm).
You can, of course, install the plinth without cutting the guides to the dimensions indicated above (as shown in the pictures), but, in my opinion, the installation will be easier in the first option.
Having measured the required size, the guide is cut with a hacksaw for metal, after which it is attached to the surface.
If a corner joint is made, then a plastic corner is installed in the corner, and one wing of the plinth is installed (it is inserted into an already fixed guide, and inserted into the corner itself).
It should be noted that before installing the tape in the guide, on the table (right next to the guide itself), you need to apply a layer of silicone. Silicone forms a strong barrier between the baseboard and the countertop.
When one “branch” of the plinth with a corner corner is installed, the dimensions for the second, joining branch are measured in the same way. The second branch is installed, and at the end, silicone end caps (corners) are placed on the ends of the baseboards.
During the work process, sometimes you have to use a shoemaker’s knife to trim the tape (or its protrusions for the grooves for the guide) in order to insert it into the guide.
When the baseboard is installed, remove any remaining silicone with a rag.
Thus, by installing the plinth on the kitchen countertop, all the gaps between it and the wall are hidden, and an excellent waterproof layer is formed.
What about drywall?
For various reasons, fastening can be done on a plasterboard structure. The material is very fragile and therefore requires special installation technology. Here are a few basic points that are important to know when working with this material.
- Drywall has its own fasteners - butterfly dowels (pictured below).
- The cabinets are hung on a special strip, which is attached to as large an area as possible to ensure even distribution of the load.
- It is better to strengthen the fastening with anchor bolts.
Installing skirting boards on a kitchen countertop
Before cutting the baseboard, it is important to remember to take into account the dimensions of the caps and corner joints. It's not difficult to figure this out. After the baseboards are cut to size, it is worth degreasing the tabletop. I do this with acetone. then you need to ask for silicone
If the kitchen is corner, then I pour more silicone into the very corner. Since the corners are the weakest points. then you can screw it on. I don't recommend pressing it too hard against the wall. It is usually enough to press. Otherwise, the decorative part of the plinth may not fit correctly.
After the plinth is screwed in, everything needs to be coated with silicone. Joint with the countertop, apron and fill in the screw heads. This is the most important moment of the entire kitchen installation!
Then we attach the decorative insert. If the silicone is squeezed out in places, it is not a problem. It can be easily erased. I use Solvent for this. It doesn't corrode plastic, but it washes well.
That's all. Thanks to this, many problems can be avoided. Not all installers comply with this, and when a defect is discovered, the warranty is usually limited.
Possible duplicates found
Chipboard will die faster in the sink area than in the baseboard area, especially if the baseboard is normal with a rubber seal.
As a rule, the base under the sink dies first, the next base is next to the oven and the bases to the left/right of the hood.
then the edge of the PVC above the hob near the facades begins to peel off (and the film on the facades begins to swell), the countertop (if it is not made of marble or stone) near the sink begins to “wipe”, because The water next to it is constantly being wiped off. and yes, the wife can hit this corner with cleaning agent, which then turns into a black and gray speck.
what performance?? this is an experience.
What experience? How many kitchens, how many years? I ruined the whole kitchen with white sealant.
IBD when installing a kitchen to look like a pro.
there is no hood - the facades are damaged due to oil, grease, soot
Oh, how the sink is poorly located, there will always be puddles on the left.
Using wall panels 1200mm wide could have been done better.
I also didn’t understand why the sealant was needed, I installed the baseboard with tension - the silicone sides will hold back light splashes and spilled water. And another question, to the right of the sink there is a blind corner cabinet, why would there be connections to the water supply there? Maybe the metal plastic should be taken directly under the sink? Is there a pull-out shelf in a semicircle?
Silicone you are all wrong..
In the last photo, everything seems to be fine - with silicone there is a pronounced upper limit, but here, how smooth it is :)
they inserted (implants) into the bottom, and the bodice of the dress had such support.
Well, apparently not, I Googled the picture and immediately found out that it was Lindsey Pelas - a model with natural breasts, here is the proof: https://www.thesun.co.uk/fabulous/5070768/model-lindsey-pela.
I would move the slab to the right so that there is more work space
Is this a makeshift kitchen?
How much did you come up with based on materials without taking into account household appliances?
When I was looking for a plinth for my kitchen, I couldn’t find any normal ones at all. All of them are ugly, either too wide, or tall, or simply scary. In the end, I took the layout for the inner corner of the tile.
If this is an advertisement for your furniture services, then only for the naive.
-Oh God, look, he degreases it, silicones it twice and wipes it with solvent.
And he also calls the priest to illuminate all this, dances with a tambourine and cuts a lamb.
No silicone needed. What kind of silicone sealant lovers? One “master” installed a toilet for me (I discovered 4 years later) that everything is silicone-coated: the tank is on silicone, the drain fittings are all attached to silicone where the threads are tightly sealed. Water filter with silicone threads. You'll figure it out. They also like to silicone the joints of MDF skirting boards and platbands.
And then you can’t move the kitchen away from the wall if something happens.
Silicone parts can be disassembled very easily; it is not glue but just a sealant.
You just need to silicone only the places where the gaskets adhere to the body parts. They use it in droves only because the quality of casting parts and gasket material is very poor, especially often on inexpensive models.
I myself often use sealant, it’s not always possible to go to the store, and it’s not a fact that you’ll find something useful, and clients often don’t want to buy a replacement, the main thing is to apply it without fanaticism.
We had to install shower cabins that were not equipped with seals and all sorts of rubber gaskets, without sealant, otherwise it would leak like a colander.
If they assembled it for you without gaskets, but only with silicone, then of course it’s fucked up.
Well, take a look at the plastic thread of the toilet fittings, which someone “for reliability”, but in fact, due to their own crookedness, generously asked for silicone.
Disassembled 100500 times. Including at home, five times already, because the quality of the water causes the fittings to fail. From time to time I also disassemble, change, repair clients’, and everything unscrews without any problems.
Maybe in your case they didn’t use silicone, but some kind of glue, I recently encountered something like this, the curtain was sealed with some kind of shit by some people, I barely pulled it off the tile, I ended up with two chips.
Why move the kitchen away from the wall?
Some pipe will leak behind the sink and, for example, it will need to be welded or replaced. And you can’t get through there without moving away.
The bases can be removed individually without touching the adjacent ones or touching the countertop.
It depends on the configuration. Not always. It’s generally difficult with corners.
This means the next base is taken out and the corner one is taken out. The built-in refrigerator is more complex and the base of the refrigerator is tied to the cornice - then it’s a long story with disassembly.