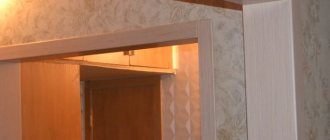
Replacing the handle begins with the door swinging open and the key being removed from the iron door. Next, the open canvas must be secured to avoid unexpected slamming. To do this, you can hammer small wooden wedges under it on both sides.
The security of our home largely depends on the front door. It must be durable, reliable and last for many years. But nothing works forever. And sooner or later it is necessary to replace the door handle if it breaks on the metal entrance door. Of course, you can use the services of a professional, but such repairs are quite feasible for an untrained person.
Upon completion, you need to check the functionality. Press the handle and watch how the pawl slides behind the pad. Then the lever is released and checked how easily the latch returns to its original position. If you lubricate the insides of the lock with machine oil during assembly, the operation of the unit will improve and its service life will be extended.
Preparing for replacement
There is a simple rule when disassembling complex structures. It is necessary to remember the sequence of actions, and it is better to photograph everything on your phone. This will help you put everything back together correctly.
We begin to free the plates from the screws. Unscrewing the clamping bolts, we sequentially remove the linings on each side of the door.
Tips for selecting a new product:
Push ones are more of a hassle, but replacing a door handle does not involve purchasing a new lock for a metal door. When the locking mechanism is working properly, it is possible to buy separate parts in stores that are only connected to the handle. After all, one of the reasons for replacing the handle on the front door is the loss of its attractiveness. The appearance deteriorates due to abrasions, scratches and deformations.
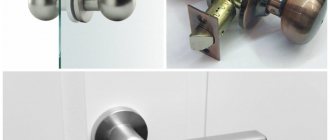
Mortise lock design with handle
Components of a lever handle with a latch
Removing and replacing the door lock handle is done in the same way as replacing the latch handle. You just need to dismantle the lock itself, and also take into account some nuances:
Pin breakage
This square-section element most often fails when insufficiently strong material was used to produce the fittings. Silumin products suffer from such damage. They are cheap, so they attract buyers. However, it is better not to save money and purchase fittings made of steel; they will last longer.
To replace the door handle of a metal door when the internal pin breaks, you need to unscrew its fastening at the base of the handle, then remove the fittings. After this, you need to unscrew the decorative strip and bolts and dismantle the structure. Then you need to install new fittings, performing the procedure in reverse order.
Replacing the latch handle
When the handle comes only with a lock, you will need to completely change the lock on the metal door.
- We bring the handle to the “open” position.
- Rotate the decorative plug 90°.
- Unscrew the fasteners and remove the handles.
- Install the new handle in reverse order.
The following video will help you familiarize yourself with the process in more detail and taking into account all the nuances.
Components of a handle for a metal door
Afterwards, to replace the door handle of the front door, one part of it is inserted from the outside of the door leaf. The counter part is attached from the reverse section of the sash and bolted. A rotating lever is attached to the protruding square. When all work is completed, you need to make sure that the handle retracts the pawl and returns freely to the correct position. If you drop a little machine oil into the lock halfway through the process, this will only extend the overall service life of the entire assembly.
A small but important element in terms of significance is the door handle. With its help, the sash is brought to the full ledge and the lock pawl is opened. It also plays a decorative function, for which many shapes, lines and colors have been invented. But over time, this part may break or lose its appearance. Why does this happen and how to replace the handle on a metal door?
To remove the old element and install a new one, you need to open the door and remove the keys from the keyhole. Use a hexagon to unscrew the recessed bolt that secures one of the swing arms. The secret knot is located at the bottom of the axis or on the bend side of the handle.
Eliminating squeaks
A fairly common occurrence is when a metal front door begins to creak. This sound is not only unpleasant, it indicates friction that has arisen due to improper functioning of the awnings. This means that these fittings are under extra load.
Repairing an iron door in this case is not at all difficult. To do this, you need to lubricate the parts that make an unpleasant sound. To do this, you will need a lever, such as a crowbar. With its help, the door leaf should be raised slightly. Distribute machine oil or other lubricant into the cracks near the canopy pins. After this, the canvas must be lowered to its original place. It is better to carry out the procedure together, without haste, without rushing, so that the sash does not fly off its hinges.
What to consider when replacing a handle
By following these simple tips, you will be able to choose the right one and replace the door handle on your front door. But how is this process actually carried out?
The next step is to unscrew the tightening bolts pressing the plates of the product. This will allow you to remove each side in turn. If the square in the new handle turns out to be short, then this rod is rearranged with the old one, provided that it does not have erased edges. Next, a plate is attached to rotate the night bolt onto the new handle.
Replacing the handle on a metal entrance door will be possible correctly and without additional problems if you take into account a number of factors:
produces reliable products with high-quality fittings. All products are guaranteed, and if you need to replace the handle of your metal entrance door, experienced craftsmen will do it quickly.
The new kit comes with a handle and bolts for tightening the device. They can also be longer than existing doors. In this case, you should look for markings on them for trimming. The bolts are shortened using a hacksaw, and the end is cleaned with a file for a smooth entry into the thread. If the old square is worn out on the edges, then it should be replaced and the excess part cut off.
High-quality locks can serve for a long time, but there are times when only the handle that allows you to move the latch to the side breaks. In this case, you do not need to buy a new locking device, but only need to install a rotary lever and a number of other elements, depending on the model, so that the device continues to work. How to replace the handle on a metal entrance door correctly?
• unscrew two or four bolts holding the cover with the handle; • remove the plank panel; • remove the square from the mechanism and replace it as necessary (if the edges are worn out and the handle is sagging); • lubricate the seat; • assemble in reverse order.
Troubleshooting
Having the necessary tools, almost all repair work can be done independently. Actions are carried out after carefully examining the damage and determining the type of problem.
Handle jamming
Metal parts wear out with constant use. Where regular friction occurs, grooves are formed. Over time, they can cling to other parts of the lock and interfere with movement. Sticking and, in some cases, even resistance to movement occurs. Often this problem can only be solved by completely replacing the mechanism.
And as a preventative measure, repairing a handle comes down to simply lubricating an iron door. In particular the elements of her castle. A little lubricant is dripped onto all moving parts including the bolt. Then you need to twist the mechanism parts in all directions so that the lubricant gets to all the necessary parts. Such a simple operation will extend the life and performance of any locking mechanism and its external parts, including the handle, for many years.
If the handle falls off
In this case, the circlip is to blame. Its deformation or displacement will weaken the grip of the handle on the guide. The ring may burst. To fix the problem, you need to get to the desired node. To do this, remove the decorative parts. You may have to unscrew hidden screws.
Having freed the node, they study the problem. If the ring comes out of its grooves, then it is installed in place. If it becomes warped or split into pieces, a new ring must be found. After repairing the unit, it is necessary to mount all parts in the reverse order.
The tetrahedron is broken
Sometimes the inner square is made of silumin. If the purchased product is inexpensive, then so be it. The use of low-quality brittle material in the swivel assembly will lead to the fact that it will quickly break if used frequently.
To fix the problem, buy a new tetrahedron, preferably steel. The locking mechanism is partially disassembled. The outer covers are removed and the handles are disconnected. The debris of the old square is removed and a new one is installed. All parts are secured in reverse order.
The tongue stopped moving
Usually the same tetrahedron is to blame. However, in this case it did not break, but was simply a little short. During installation, it was installed exactly in the middle. Then, during operation, it gradually shifted to one side and stopped clinging to the lever with one edge. The latter begins to move “idle”.
To repair a door handle, you need to purchase a new square, which will be longer than the previous one. It is possible to buy a part slightly larger than the thickness of the iron door. The excess can be sawed off. During the work, one of the handles is removed and replaced.
The handle does not return to its original position
When the lever remains lowered, the culprit is a small spring. It’s good if it just fell off and can be put back in place. If it bursts, you may have to replace the entire locking mechanism. The fact is that such a small detail rarely appears on sale.
Door handle made in China
Products from China are characterized by low-quality fittings. It is not uncommon for parts of the lever to break off. If the locking mechanism remains operational, then only the handles on the lock can be changed. To do this, new ones are purchased that match the shape and color of the entire door structure. Then the broken ones are removed, and the purchased ones are installed in their place.
Results
If you correctly determine the cause of the breakdown, then repairing the handle will take place without any problems. You just need to remember that on a metal door such parts can be right or left
This needs to be taken into account when choosing
When repairing it yourself, you must first familiarize yourself with the design of the mechanism by studying the instructions. When all the features are known, the repair can be completed successfully.
A more complex replacement case
To replace a broken device, you must:
Rubber gaskets are often installed under large slats to prevent damage to the coating when the sides are pulled together. If they have become very rough and have lost their shape, they will stick out from under the new lining. Then when purchasing, you should look for a handle model with the same rubber seals.
Installation of a new device is carried out in the reverse order. But this cannot always be done so simply. How to replace the handle on a metal door in difficult situations?
There are options for handles without a bar. A solid metal square connects the interior handle and the latch rotation mechanism. Sometimes, when moving heavy furniture, you can knock off part of the swing arm, which is attached directly to the door leaf and is free-standing. Despite the serviceability of the lock, it is inconvenient to grasp such a turn signal with your hand.
Lever handles have to be repaired, so it is important to know their structure. The design differs little between different models. List of main elements:
the location of the mounting holes on the overhead strip and their diameter must match;
Best season for glazing: when to install windows
You no longer have the strength to clear your balcony or loggia of tens of liters of snow and “drown” after every rain? Maybe you decided to increase the area of the room by adding a loggia to it? Or do you need your own small winter garden, where coolness reigns in summer and lush vegetation pleases the eye in winter?
We will tell you when it is better to start glazing a balcony or loggia, help you choose the best option and give you some tips that will help save your nerves, time and money.
Introduction
There is an opinion that balconies should be glazed only with aluminum frames, and loggias with plastic ones, but this is not at all true. Usually, when they talk about plastic structures, they mean warm glazing, and when they talk about sliding aluminum ones, they mean cold glazing. Each of them requires certain preparation. We will not consider wooden frames, because their service life in Russian realities tends to be a year, and windows simply fall out, shattering into thousands of small pieces of glass under the house.
Before you start the process, you need to ask yourself the question: “Why do I need this?”, and only then begin to prepare the balcony or loggia for the procedure, while simultaneously going through the options.
- Do you need to increase your living space or create a winter garden? Then you will have to install warm, plastic frames with two chambers, insulate the entire balcony or loggia around the perimeter and think about the location of the shelves.
- Protect yourself from natural phenomena and urban debris? Then it is enough to install a budget aluminum frame.
You should also decide in advance about the presence of cabinets and boxes for all sorts of things on the loggia or balcony. This is important, because then an incident may occur and there will be nowhere to put them or they will interfere with the functioning of the installed structures.
Preparation for glazing
Why should you take it seriously? The service life and efficiency of glazing increases significantly. As an example: an aluminum frame lasts three years on average, and if a loggia or balcony is properly prepared, then all 15. And the price of preparation is an order of magnitude lower than the cost of the most budget glazing. However, sometimes the question of whether it is needed or not is simply not worth it. In 80% of cases, it is impossible to install the structure on the average balcony or loggia without preparation.
To install an aluminum “slider”, a frame is assembled from timber (50×70mm), which forms the correct installation plane and has minimal weight, without taking up useful space.
- This is aluminum - it conducts heat perfectly, which will be distributed evenly throughout the frame. The heat will also be at the bottom, unlike plastic, which will only be warm at the top.
- Twice cheaper.
- More compact.
- Poor sound insulation.
- Compared to plastic, it retains heat inside a balcony or loggia worse.
Preparing for the installation of warm (plastic) glazing is more difficult, because it is important to think through the heat exchange inside the balcony or loggia. Typically, the structure is installed on a supporting masonry made of foam blocks, which perfectly supports large weights, retains heat and withstands extreme wind loads. But foam blocks have a disadvantage - they do not tolerate rain or snow, so they need to be protected from environmental influences.
A warm loggia increases the cost of housing. Even if you don’t plan to sell the apartment or add a loggia to it, warm square meters have never hurt anyone.
When is the best time to start glazing?
The best time to glaze a balcony is winter. All errors and shortcomings in installing frames along cold air flows will be instantly noticeable, which can be corrected immediately. Another important factor is that in winter, as a rule, they offer discounts.
Many people mistakenly believe that glazing, no matter what kind, is best done in the summer. Like, it’s warm, there’s no hurry, the workers will do better. Quite the opposite is true: weak points in installed glazing are difficult to track. You will be happy until the first frost, and then you will fully appreciate the quality of the work done. So it will turn out that you will redo everything in the winter.
Therefore, if you still decide to postpone glazing your balcony or loggia until the summer, carefully choose the company you trust to do it. Ask your friends, study the reviews on the site, because you remember that translucent structures are by and large all the same, but the results of their installation are different. And it is the quality of installation that will determine how warm and cozy your home will be.
Specifics
Provedal
One of the most common cold types of glazing is the budget sliding aluminum Provedal system. Depending on the scale of work, the cost ranges from 2,500 to 5,000 rubles. per m²:
The advantages of this system:
- Space saving. The doors do not open inward, like other structures, but simply ride on rails.
- Easy to use. Cleaning Provedal is not difficult at all. I took the sash off, washed it, and put it back.
- Possibility of installing a mosquito net.
- During frosts, the doors may freeze, and they will not open until they thaw.
Slidoors
This is a more expensive plastic design. The cost of Slidoors ranges from 3,500 to 6,000 rubles. per m².
This design has all the advantages of the previous one, but also does not freeze in winter, because it is made of a three-chamber plastic profile that does not allow moisture to penetrate inside the mechanism.
Lever handle
the size of the mechanism should not exceed the existing groove at the end of the door;
To replace, it is recommended to buy two handles at once. During use, they wear out and lose their attractive appearance. If you replace only one, the difference will be noticeable and the door design will deteriorate.
When the handle is fixed with a latch, the connection may become loose and to strengthen it, you need to wind a strong thread or sealing tape between the door and the latch. True, this technique gives a short-term effect;
The handle on the front door is an important detail. Without it, the door leaf cannot be opened and closed. In 99% of cases, this element of fittings is included in the kit. However, sometimes, in order to save money, consumers purchase a metal structure without a handle, planning to buy and install it themselves.
However, some believe that they will save a lot if they purchase fittings somewhere on the market and install them themselves.
When is the best time to replace plastic windows?
What time of year is it better to install plastic windows - a question that many people ask themselves, who have already decided for themselves another question - which plastic windows are better. Now all that remains is to choose the right season to update your plastic windows. We will be happy to tell you why it is better to install windows in the spring.
Many companies advise
installing plastic windows in winter, and there is a logic to this - in winter, the production of plastic windows is not busy with work, sellers reduce prices, the shortcomings of new windows are revealed immediately after installation, since in the cold season, blowing and freezing through a plastic window is felt instantly and clearly . However, from my own experience, a reduction in window production time due to minimal production workload can have a negative impact on quality - workers are relaxed due to an irregular work schedule, as they either sit at home or wipe their pants in the workshop while waiting for your order. Due to the seasonal drop in demand for windows in winter, window companies often do not have sufficient working capital and are forced to buy cheap components for windows and consumables for installation, which also has a negative impact on quality. Installation of plastic windows in winter is, of course, possible, at temperatures not lower than – 10 degrees. You just need to overcome the psychological barrier of the fact that for some time the street will be very close. And do not demand from window installers or the company that accepted your order that the installation of windows be carried out in accordance with GOST - the external mounting tape PSUL does not expand at negative temperatures! And don’t forget the human factor - the installer is also freezing and strives to complete the work as quickly as possible, by any means necessary, sometimes missing important installation moments. In summer and autumn, there are no obstacles to high-quality installation due to weather conditions, however, if you think that it is better to install plastic windows in an apartment or country house not in the spring, but in the summer or autumn, then remember that window companies have high season during this period of time. They are forced to either increase order fulfillment times or raise window prices in order to cope with the work. During the season, it is more difficult to get good discounts on windows, and the number of accidental mistakes increases - from incorrect window measurements to double-glazed windows broken in a hurry. And this is all your time and nerves.
In conclusion, we will once again list the positive aspects if you place an order for the installation of plastic windows in the spring:
- the order will be completed quickly, since the window workers don’t have a lot of work yet;
- at the same time, window production is already entering a working rhythm, but fatigue has not yet accumulated among its workers;
- Many companies still offer good winter discounts on windows and installation;
- the weather during the day is consistently positive, which provides conditions for high-quality installation;
- at the same time, the weather at night is quite cold, and it is easy to notice shortcomings in the production or installation of windows and doors (especially when the heating has already been turned off and the nights are still cold);
- the window company will correct these shortcomings faster than in summer or autumn, due to the light workload;
Initial installation
The manufacturing company always marks the door leaf - holes are drilled in the places where the lock, latch and door handle should be installed. It is important to choose the right components, because their correct operation and service life depend on this.
Changing the handle is easy, so you can do without the help of a specialist.
We will also consider the option when the handle is located separately from the lock, and it is push-type. Procedure if the fittings need to be replaced:
The work can be done alone, without involving anyone. There is nothing complicated in this activity. Please note that some parts are extremely small. To avoid losing them, all components of the pen should be placed in a small box or jar.
After this you can install a new handle. It is assembled in the opposite way. Lubricate all operating components. They must be included. Otherwise, use existing ones. Check the quality of the new fittings by closing and opening the door. If necessary, correct it. If it turns out that it is not possible to achieve success on your own, then contact a professional specialist.
Substitution
If repairing the mechanism is not feasible, then you need to replace the front door handle with another one. To begin with, a latch is inserted into the end hole, which is screwed on with screws on both sides. After installing the latch, you need to clear the hole from construction debris. This can be done using a stream of air, for example a hairdryer.
Then the pin (square) is inserted into the corresponding square hole of the latch. A handle is attached to the pin on both sides. It is important not to confuse which side the left side of the handle should be on and which side the right side should be on. The correctness of the door opening will depend on this. Then the handle is screwed to the door with screws. Now all that remains is to disguise the fastenings. This can be achieved using decorative overlays.
How to remove an iron or other structure from a lock?
The right decision would be to call a locksmith who repairs and replaces door handles, or a technician from the company that installed the door. The specialist will do his job quickly and efficiently.
- The handles need to be inserted.
- Then 2 connecting pins are screwed onto the outside of the new kit.
- Next, a square rotary pin is inserted into the core of the handle and the outer trim is mounted in its place.
In most cases, a plastic door is equipped with technological holes for attaching a handle. To disassemble the old product, you need to turn the decorative plug horizontally and unscrew 1 handle.
Depending on the type of structure, the disassembly sequence may have its own nuances.
When the cylinder is pulled out, assess its condition. If there are no visible defects, then you should carefully reassemble the handle by performing the reverse sequence of steps.
The simplest solution is to change the entire mechanism. However, in most cases the problem can be fixed on your own and there is no need for replacement. For example, a possible solution is to simply remove the handles, lubricate them, and put them back in place, tightening the mounting screws fairly tightly. Therefore, many people want to know what to do and how to fix the door handle if it is loose. In addition, when purchasing a new design, you will still have to work on the door.
Recommended Procedure
Repairing the handle of a push-type interior door is no different from restoring the functionality of analogues installed on entrance doors. All technological operations, as well as typical faults, are completely identical. The only difference is in the nuances determined by the type of locking mechanism (mortise or overhead) and its model (manufacturer).
Removing the locking device
- On both sides of the sash there are fastening strips connected by long screws. Depending on the lock model, there may be 2 or 4 of them. The latter is typical for handles installed on frame doors. The task is to unscrew the hardware and remove them from the mounting sockets.
- All that remains is to remove the locking mechanism. If it has a decorative strip, you will first have to unscrew the small screw that secures the handle. After this (rotating counterclockwise) the cover is removed.
Troubleshooting and repair
One end of the spring flew off its seat. This becomes clear even without disassembling the fittings; with such a defect, after pressing the handle does not return to its original position. It's easy to fix - hook the spring and check the mechanism in operation. But if the part is broken, then it is useless to repair. Firstly, we still need to find it, with the same linear parameters. Secondly, its tensile force must be identical, otherwise the operation of the lock will cause a lot of inconvenience. For example, the tongue will not be completely recessed into the sash, constantly clinging to the bar. In this case, it is advisable to install a new lock.
When purchasing a handle for a metal door, you need to look at the location of the holes in the strip for fasteners. It is unlikely that anyone will be happy with the prospect of drilling a steel sheet if it turns out that the old sockets for fixing the lock are not suitable.
There is no tongue displacement. This mechanism malfunction is caused by several reasons.
Option 1 – the handle itself has become loose. This is mainly typical for samples made of soft metals (alloys). The edges of its groove gradually flare out, and the reliability of the coupling with the rod is lost. There are two ways to solve the problem. The first (temporary, while searching for new fittings) is to seal the gap between the “square” and the groove in the handle. The second is to replace the part. Pens are sold at retail, and you can choose a product of any configuration you like. The main thing is that the landing “socket” is identical in size for reliable docking with the latch mechanism.
Option 2 – pin damage. As a rule, cheap locks have rods made of silumin, but this alloy is no different in strength. It’s easy to buy such a part, cut it to length, file the ends and install it in place.
The handle periodically falls out, but there is no destruction of the metal. The only reason is that the retaining ring is loose or broken. If it bursts, fragments will fall out immediately after dismantling the mechanism. This is the worst scenario - such a lock will have to be changed. If the latch is simply loose, you can try to tighten it. This does not always work out, especially if the steel is of high quality; it springs easily. But there are no other repair options in such a situation. If the result is positive, the lock will still serve for some time.
Entrance door handle device
Durability and reliability are the qualities for which metal entrance doors are valued. However, their design contains an element that is used much more often than others and, as a result, wears out more quickly. We are talking about a door handle. Regardless of design, these elements experience the same problems. Owners often find that door handles are loose, and when pressed or turned, the iron door lock is difficult to open.
Of course, you can call a repairman. But the fact is that much more time will be spent waiting for him than the work itself will take. The process does not require specific skills and usually a person only needs to know how to disassemble a round or push handle with his own hands.
There are some features when working with pressure structures. Using the example of popular manufacturers, let's look at how to disassemble a Sirius or Apecs door handle with a built-in latch:
Structurally, door handles from different manufacturers do not differ from each other, which is a definite plus when troubleshooting problems yourself. The only difference is in how the lock is opened: by pressing the handle or by rotating it.
Most steel entrance doors are equipped with high-quality foreign locks. You can buy parts for them separately, in particular the handle. If it breaks, you can replace it without touching the lock.
Try it on again. If everything matches, tighten the bolts on the axle, then install one, then the other handle and secure the bar. If the bolt holes do not line up with the old ones, drill new ones. Use a metal drill.
Some useful recommendations from experts
If the tongue is jammed, then the first step in repairing the handle of an iron door is to open it. You need to choose a suitable thin and durable item. A screwdriver works best. With its help, you need to press the tongue and push it into the lock. If this does not work, then you need to unscrew the handle on one side.
Simple tips often get rid of troubles; do not ignore them:
- Since the mechanism contains many small parts, all repair work must be carried out carefully. The floor under the door should be covered with light-colored paper or film.
- When purchasing a door handle, you need to consider its quality, reliability, and design. The fittings must match not only the finishing of the sash, but also the other elements.
- We must not forget that such products are produced left-handed and right-handed. This must be taken into account when purchasing, otherwise you will have to make an exchange. It is impossible to correct this point or change the handle to the other side during installation.
- If the device not only does not function very well, but also begins to lose its appearance, then it is better to buy new fittings. Scuffs, scratches, loss of shine or stains spoil the mood of the home and negatively affect the company's image if the handles are installed in the office.
- When purchasing new fittings, you need to pay attention not only to its shape and size, but also to the fastening elements. Sometimes similar models have bolts that differ in length. You need to buy a suitable mount immediately or you will have to use the old one.
How to choose the right model?
Before changing the handle, study the mechanism. The bar can be fixed with screws - unscrew them. If it is smooth, then pick it up with something, for example, a screwdriver and remove it. There will be screws underneath - unscrew them.
Dismantling is completed. Take an old product and buy exactly the same one in the store or, if you can’t find one, one that is as similar in design as possible.
If the new handle is significantly larger than the failed one, you will have to drill new holes for the bolts on the door leaf. Also be prepared to trim the turning mechanism - the new one rarely matches the old one.