When a child appears in a family, expenses increase significantly along with it. Young parents often have to save on themselves in order to provide their child with everything they need. But many of these necessary things can be done with your own hands: sew diapers, prepare baby food in the form of fruit and vegetable purees, and even make furniture. And we recommend starting with the simplest thing - with a highchair.
DIY high chair
You can look up ideas on the Internet, you can take the design of factory-made chairs as a basis, or you can come up with something of your own, original. In any case, you will get exclusive furniture, created with love for your child.
High chair and table with teddy bears
Required materials and tools
The choice of material for wooden chairs in the nursery is determined by the financial capabilities and skills of the home craftsman. It is much easier to make a seat from plywood, and if for some reason the workpiece turns out to be unusable, duplicating it will not make a hole in your wallet.
- Solid wood – beech is considered the best. Its wood is dense, medium hard, but much easier to process than oak. If the cost of the material is high, then you can use solid birch or pine. Preference is given to deciduous tree species.
Before manufacturing, it is recommended to subject pine to a procedure such as de-resining. Wood contains quite a lot of resin, this will interfere with work, and in the future may cause resinous dirty spots to appear on the surface.
- Plywood is a multi-layer material made from the veneer of deciduous and coniferous trees. Perfect for a children's highchair, as it is light in weight and very easy to handle. With minimal skill, a plywood chair can be made very beautiful, with slotted carvings. In addition, plywood bends easily, which allows you to make the back curved.
- Chipboard is the most budget option and the most short-lived. The strength of the material itself is quite sufficient for the loads to which children's furniture is subjected, but the ability to hold fastenings - screws, nails - is low for this material. As a rule, flat parts such as a feeding table or seat are made from chipboard.
The selected material must be available in the following form:
- bars - 20*40 mm on average, or more - up to 50*50 mm;
- boards – 25 mm thick;
- furniture panel, if the material chosen for the seat and back is solid wood, or sheets of plywood and chipboard.
The product is best mounted on dowels - wooden bushings. They are inserted into holes when joining parts and hold them together. This is the most reliable way. But self-tapping screws, nails and even metal corners can also be used.
Quite a few hardware stores offer their services for cutting wood materials to size. If you have little experience working with wood, it is better to take the help of professionals.
If you plan not only to assemble the parts, but also to completely make a wooden children’s chair with your own hands, then you will need the following tools:
- jigsaw or wood saw for making blanks;
- screwdriver if metal fasteners are used;
- a sanding machine or sandpaper of varying degrees of grit - all parts of the children's chair must be sanded and polished to prevent injury;
- hammer - used to seal the joint;
- brushes, varnish or water-based paint.
Is your child still very young? Then the following video will help dad create a high chair for him:
Which material to choose?
The choice of manufacturing material is of no small importance. Of course, it will depend on the financial capabilities and skills of the master, but the factor of its naturalness and safety for the child’s health should not be overlooked. In the production of children's furniture, it is best to use raw materials from deciduous trees. The advantage belongs to beech, since its wood has good density, hardness, and is easy to process (for example, compared to oak). You can also use linden and birch. Coniferous species - pine, spruce, but to prevent resin stains from forming on the surface of the product during operation, the wood must be deresined.
When choosing wood for a chair, be sure to ensure that the pieces are free of knots. Such areas of wood are less amenable to processing and are less strong. Active use of the high chair can lead to breakage at the knot, resulting in injury to the child.
Inexpensive wood materials include plywood. It consists of several layers of veneer of coniferous and deciduous trees. In addition to its low price, the advantages of plywood include light weight and ease of use. The elasticity of the material allows you to create original curved shapes of various parts
Chipboard is considered the most short-lived but cheapest material. A significant drawback is the use of formaldehyde and phenol-formaldehyde resins (6-18%) in its production. Also, chipboard does not have a dense texture; because of this, the fastenings are not reliable. In children's furniture, flat parts are often made from chipboard (as well as from plywood): seats, backs, table tops.
DIY high chair: its dimensions
Children's chairs, even those made by hand, must have certain dimensions. This is directly related to the growth of the baby, who is growing and developing. For this purpose, specialists have developed special GOST standards: 11015-93 and 11016-93.
Let's look at a summary table of parameters in accordance with the child's height and the size of his stool.
| № | Baby's height (cm) | Chair height (cm) |
| 1 | up to 85 | 18 |
| 2 | 85 — 100 | 22 |
| 3 | 101 — 115 | 26 |
| 4 | 116 — 130 | 30 |
| 5 | 131 — 145 | 34 |
| 6 | 146 — 160 | 38 |
| 7 | 161 — 175 | 42 |
| 8 | from 175 | 46 |
These dimensions must also be correlated with other parameters that will be needed to make a high chair for a child with your own hands. The following recommendations apply to any chair height:
- Seat surface recess – from 10 mm.
- The recessed surface of the seat occupies 2/3 of the rear part of its minimum depth.
- The deep part falls on a certain point (it is located at a distance of ¾ from the front edge of the seat, starting from the dimensions of the minimum recess).
- Non-profiled seat tilted towards the back by 3 degrees.
- The distance from the floor to the footrest is from 0.75 of the seat height.
It should be borne in mind that the depth of the seat is measured according to two parameters:
- front edge of seat;
- the line where the seat and backrest intersect.
Another way to measure this parameter is to draw a vertical line, which should pass through the inflection point of the back of the chair.
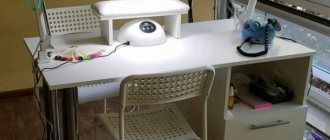
Functional
Drawers, shelves and bedside tables play an important role in the functionality of the table. The student's luggage is quite large. These are books, additional materials, notebooks, notepads and school accessories and supplies. All this should have its place so that the child can quickly find the thing he needs at any time.
Many tables are initially equipped with cabinets, drawers and racks. When choosing a table, pay attention to the functionality of the table. A child’s workplace should accommodate everything he needs for study and play.
Drawings and diagrams
You can always use a ready-made drawing of a children's chair with your own hands, found on a construction site. The best in such cases are the sketches presented on the forums. Firstly, they contain the maximum possible amount of information. Secondly, the questions asked on the forums and the answers received can clarify many difficulties that arose along the way.
Before starting production, you need to make sure that the dimensions indicated in the drawing are suitable for the child. If not, then the parameters need to be increased proportionally, since the stability of the product depends on the correct ratio of height and width.
If you decide to develop the drawing of the chair yourself, then it is recommended, after calculations, to make a test model from ordinary construction cardboard. Thus, the proportions, height and stability of the model can be checked by the best method - practical.
Children's high chairs - from 0.5 to 6 years old, are made according to two main schemes.
- For feeding - a stationary or folding product that contains a table. There is no need to seat a one-year-old baby at a common table: her feeding schedule is completely different, and she still doesn’t know how to eat with everyone. An individual table taking into account the height and weight of the baby is a much better option.
- An ordinary chair - that is, the one that is necessary for studying at the table and for playing. Its shape is similar to that of an adult chair, but the execution may vary.
Traditionally it is a frame with four legs, a seat and a backrest. However, for children, a good option would be products made from two sides, a seat and a back. The first model is usually made of wood, the second - of plywood and chipboard.
High chair for baby
Such an original chair can be made using simple drawings, or even without them, from a lightweight (715 g) material - plywood. The chair has small dimensions, namely:
- product height – 360 mm,
- height to seat – 180 mm,
- seat – 190x240 mm,
- back – 115x235 mm.
You can make a test model out of cardboard to see if a highchair of this size is suitable for your child. If this product is small, increase it by the required factor and feel free to get to work.
Materials and tools
- Plywood 8 mm thick.
- You can assemble the chair using spikes or simply screws, if desired.
- Feather drills, jigsaw.
- Sandpaper.
- PVA glue.
- Drill with screws for connecting parts.
- Clear varnish.
Deciding on design and construction
For a wooden product, you can come up with any option. A highchair is usually made with straight supports and the following forms of the back structure:
- solid square or rectangular;
- wide truncated cone;
- straight through (with jumper bar).
To accurately apply the image you will need a stencil.
For the chosen design solution, the parts are processed in accordance with it.
Creating a product with your own hands requires careful preparation. You must first make a sketch of the project. Visually draw a diagram of the connections of all parts separately with calculations of sections and lengths. Following the sketches, you will recreate the model in reality with exact parameters. A chair that has all the right dimensions will fit the baby and will not create any inconvenience.
For a wooden product, you can come up with any option.
Certain models are created with the expectation that the child will sit at a common table with other family members. In this case, high legs are chosen for the product, which are not attached exactly vertically in relation to the seat and floor, but more widely. The lower part of such a chair will look like a truncated cone, connected for stability by wooden blocks around the perimeter. The top part will be approximately 30-35 cm below the table level.
A children's high chair is usually made with straight supports and the following forms of the back structure
If you have certain skills, you can assemble a folding product. Such items can be easily removed if necessary into storage areas.
For the chosen design solution, the parts are processed in accordance with it.
How to make and assemble?
If natural wood is chosen as the material for the manufacture of children's furniture, it will need to be carefully prepared for the work process:
- The wood is protected with a grinding machine or sandpaper so that the baby does not get splinters and get hurt on a new piece of furniture.
- Next, the wood is treated with antiseptics.
- After this, the parts can be covered with stain and varnish or painted with non-toxic paint.
Attention: when choosing a varnish, it is better to give preference to turpentine-based material. It does not release toxins and does not have a sharp or unpleasant odor.
The process of manufacturing a furniture item will be divided into four main stages:
Preparing lumber for work. If the purchased wood is slightly damp, it will need to be thoroughly dried.- Cutting out the necessary parts according to the drawing. The prepared parts are polished.
- Assembling the product into a single structure.
- Finishing and decoration.
Our chair will be made of natural wood. To make it, we cut out the following elements:
- two short legs 25 cm long, with a cross section of 3.3 by 3.8 cm;
- 2 long legs 53 cm high with a cross section of 3.3 by 3.8 cm;
- back measuring 10 by 30 cm;
- seat dimensions 30 by 30 cm.
To strap the chair under the seat we will need four crossbars. Two crossbars are 25.7 cm long and two are 25.2 cm long.
The chair is assembled in the following sequence:
First, the rear legs are fastened with self-tapping screws to the crossbar.- Next, the front legs are attached in the same way and fastened to the rear ones.
- Now we screw the back and check the product for a clear horizontal fastening. Otherwise, the piece of furniture we assemble will not look aesthetically pleasing.
- The last step is screwing the seat.
As you can see, making and assembling a highchair requires a minimum of skills and very little free time. As a result, you will get an original and reliable chair model that will harmoniously fit into the interior of the children's room and will delight your baby with ease of use.
Painting and decor
You can decorate any homemade table for a nursery either independently or together with your child. You can simply paint the table with any paint, apply patterns on it using a stencil, or use decoupage.
For decoupage, primer, acrylic paint, brushes and glue, as well as pre-selected pictures are most often used.
Step 1. The surface on which the picture will be applied is primed and sanded.
Step 2. Then the tabletop is painted a uniform color. It is better to choose special acrylic paints. Wait for the base to dry completely.
Step 3. Then the selected picture is glued using a special glue for decoupage or regular PVA. While gluing, make sure that no bubbles form under the paper.
Step 4. After the glue has dried, cover the tabletop with 2-3 layers of furniture varnish and wait for the table to dry.
Note: Wood is the most capricious of materials, so it is better to coat children's furniture with a safe varnish. Without a varnish coating, it will be difficult to remove traces of paint, fruit juices and other liquids that a child may spill on the countertop.
Step 5. The result is a bright table on which your favorite animals or fairy-tale characters will be depicted. See how it will look in our gallery.
Manufacturing process
Furniture production can be divided into 3 stages: preparation of material, cutting and assembly of the product. A fourth option is also possible – finishing. The sequence is the same when making any model, but the work itself will depend on the complexity of the design and the selected material.
The following video will help you make a beautiful and bright highchair:
Preparation and production of parts
Often these stages are carried out in parallel to each other. The material in the store does not always have a sufficiently low degree of humidity - 12–16%. Therefore, it is advisable to dry the wood additionally. Also, any of the wood materials must be acclimatized. Therefore, before starting work, it is recommended to leave wood, plywood or chipboard in the room for at least a day.
Cutting bars, boards and sheet material can be done independently, or to order in a workshop at the store. A standard drawing of a high chair includes the following elements:
- legs for table and chair - 4 pcs. for each part of the product. The bars are cut to size using a jigsaw and must be treated with sandpaper;
- upper and lower crossbars – 2 pcs. also made from bars;
- crossbars – 3 pcs. for a chair and 4 for a table. The bars are sawed on a workbench or on a table, held in a vice. A miter box is used to cut 90 degree corners;
- roundings - 4 pcs., cut from the board. In this case, the wood fibers must be perpendicular to the bending angle. Otherwise, the part breaks easily due to internal stress;
- The tabletop and seat are cut from a sheet of plywood, wood or chipboard to size.
If the chair is made entirely of plywood or chipboard, then all the parts - the sides, the partition connecting them, the seat and back - are first drawn on a sheet and then cut out with a jigsaw.
The following video will tell you how to make a children's chair from chipboard:
Product assembly
The best option is to connect with dowels. The latter are easy to make yourself from a board. The bushings are rectangular in shape, their edges are sanded.
- Holes are made in the parts of the product for dowels: first, with a drill of a smaller diameter - up to 6 mm, then widened with a chisel to 8 mm.
- The parts are attached with glue - carpenter's glue, PVA, etc. Before the final connection, it is advisable to carry out the installation without glue to ensure that the dowels and holes are at the desired level and the angles are respected.
- For the most durable fastening, proceed as follows: place the parts on a dowel, tap with a hammer to fit the elements as tightly as possible, and then secure them in a clamp for a day. Making the chair will take longer, but its reliability will be much higher.
All parts according to the drawing are connected to dowels using the described method. If we are talking about a plywood chair, then its elements are cut out with tongues and grooves, and connected in the same way - with glue.
Bright children's homemade chair
Chair finishing
- The easiest way is to open it with water-based acrylic varnish. The color and gloss level of the varnish are determined at will.
- You can paint the product with water-based acrylic paint. Although it is not as stable as the oil composition, it is completely safe.
On the seat, and sometimes on the back, a soft insert is made of foam rubber and a fabric cover. It is better to choose a fabric that can be easily washed, as it will get dirty quickly.
Requirements for a children's table
The main requirements for children's furniture are its safety and environmental friendliness.
In this regard, furniture made from natural wood, coated with safe oils or varnishes, occupies a leading position. Tables for children must have the following properties:
- has a light matte surface so as not to distract the child’s attention from activities or eating;
- be resistant to moisture, this will allow you to comply with hygiene requirements;
- correspond to the height of the child, the most suitable option for a preschool child is a table that varies in height;
- have no sharp corners;
- be strong and stable, yet lightweight;
- have low thermal conductivity.
When purchasing children's furniture in a store, you must ask the seller for a quality certificate to ensure its safety.
What you need to make a wooden highchair
We offer drawings and manufacturing procedures for a children's chair. Its dimensions:
- product height – 630 mm;
- distance between legs: depth (from front to back) – 280 mm, width (between front/rear) – 320 mm;
- length of legs: rear – 630 mm, front – 410 mm.
For a more reliable connection of parts, self-tapping screws and tenons will be used simultaneously.
To make a wooden chair for a child with your own hands, you need to prepare the following materials, tools and fasteners in advance:
- We will use a block with a cross section of 50x50 mm in the construction of the frame.
- 20x40 mm block for stiffening ribs and crossbars.
- We will make a chair seat from plywood, a board or a piece of solid wood 30x10 mm.
- To enhance the reliability of perpendicular connections, we will use metal corners.
- Electric jigsaw or hacksaw.
- Plane.
- Screwdriver or electric drill.
- If fastening will be done using spikes, you will need an electric router.
- Sandpaper or sander to smooth wood surfaces.
- Tape measure, square, ruler.
Step-by-step instruction
- First of all, you need to cut off 4 legs from the timber (20x35). 2 of them should be 410 mm long and another 2 – 630 mm. Then we prepare 4 connecting strips (from the same timber) 280 mm long. They will be assigned the function of stiffening ribs, as well as handrails.
- Using spikes of a standard diameter (from 8 to 10 mm), we connect the left legs: the short front and long back. Drill holes in the required places of the parts to be joined with an electric drill. For a strong connection, the hole must have a diameter 0.5 mm smaller than the tenons. Then generously lubricate each hole with glue and firmly hammer the spike into it.
- Next, we connect the front and rear legs with crossbars at a height of 250 and 410 mm (we get the height at which the seat will be installed).
- Similarly, in the same sequence, you need to do the right legs - connect the front and back.
- The places where the chair legs connect with the crossbars are additionally reinforced with metal corners. We fasten them with self-tapping screws.
- Upon completion, we compare the two resulting designs. They must mirror each other, otherwise the chair will turn out uneven.
- We fasten both halves together using 20x20x310 mm bars. We drill holes in the crossbars with a diameter of 8 mm. We screw into them self-tapping screws containing internal hexagonal recesses in the head. At the end of this process, we get an almost finished chair without a back and seat.
- At the next stage of work, you need to make the back. To do this, we take several (2-3) pieces of plywood or planks with the following parameters: width - 30 mm, thickness - 10 mm. We glue them together and place them under a press until the glue dries. We secure the back to the long legs with small nails. This detail will give the entire structure additional rigidity. In a similar way (from glued boards of the same size or plywood) you should make a seat.
Children's furniture should not only be comfortable and light, but also completely safe for the child. Therefore, after assembling the chair, it must be processed, varnished or painted. When playing with his furniture, the baby will move it and turn it over. All surfaces, edges and joints must be thoroughly sanded using sandpaper or a sanding machine, sharp corners must be rounded.
Several layers of drying oil will create a protective coating for the wood and extend its service life. Afterwards you can start painting. Choose light or bright colors for the decor of children's furniture; paints that are wear-resistant will not peel off. A layer of colorless water-based varnish will help securely fix the paint.
Step by step instructions
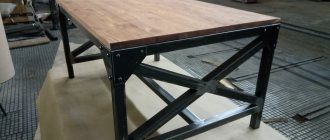
The design is very simple and includes a tabletop and legs, as in any classic table model. For the legs, as we said above, we will use 40x40 bars, and for the tabletop - a furniture panel, which must be cut so that we get a tabletop measuring 40x80.
Now let's move on to the actual production:
- Turn the furniture panel over, step back 5 cm from the edge, and then draw an even strip around the perimeter.
- Take a long block, and then cut it so that you get 2 elements of 30 cm and 2 elements of 70 cm.
- Secure the resulting elements to the furniture panel using self-tapping screws (along the previously drawn line), coat the joints with PVA to prevent cracking.
- Fix the metal corners inside the resulting frame, and screw the previously prepared 40x40 beams to them.
- The finished product must be sanded and then covered with 3-4 layers of varnish.
Another mini-instruction that will help you create a table from a long block and a painted wooden plate.
In the video, the master makes a charming table and chair from solid wood (beech).
Master classes with step-by-step instructions
There are only two main models of chairs:
- high - designed for the baby to sit at the table with adults, that is, the seat is located 27-37 cm below the level of the tabletop;
- ordinary - low chairs installed next to a table of appropriate height, sometimes with armrests.
The back design is also different:
- solid, square or rectangular;
- through straight line, with one or two jumper bars;
- in the shape of a wide truncated cone.
If this item is expected to be moved frequently around the apartment, it makes sense to equip it with small wheels equipped with brakes.
Making a regular children's chair with a backrest
To make the simplest chair you will need the following parts:
- supporting (front) legs - two pieces, length 20-30 cm;
- rear legs, turning into the back - two pieces, length 60-63 cm;
- strips for connecting the seat frame - two pieces, length about 30 cm;
- back straps - two pieces, length 30 cm;
- seat - approximately 25 by 30 cm.
All legs are made from bars 50 by 50 mm, lintels - 25 by 50 mm, seat thickness - at least 7-10 mm.
What do we have to do:
- calculate the exact length of the legs, saw off the excess parts;
- cut out the jumper bars for the seat frame, connect them to the supporting parts using self-tapping screws and glue;
- Next, the seat and backrest are attached, which are previously adjusted to size;
- all parts, especially at the joints, are carefully sanded with sandpaper to avoid burrs and roughness;
- the finished product is painted or varnished, stained, and dried.
To understand whether the chair is made correctly, you need to sit the child on it, ask if it is comfortable for him, and, if necessary, adjust the design.
Folding plywood
To make a folding chair you will need plywood, at least 10 mm thick, and a jigsaw. On paper you should sketch out the general appearance of the product, then its individual parts - two sides, a seat, a back, and cross bars. All parts are made with grooves and flat tenons - the structure is assembled without the use of glue or metal fasteners. Next, the parts are transferred directly to plywood and cut out. After cutting, the sidewalls are superimposed on each other, for comparison - if they are not identical, an adjustment is made. All parts are carefully sanded along the edges - sharp corners and edges are unacceptable in children's furniture. The item is assembled to check its “functionality” and disassembled again. The parts are painted or varnished in one or two layers, dried, after which the product is assembled and used for its intended purpose.
High chair for children
A chair in which it is convenient to feed a child is made at a height suitable for a dining tabletop. The structure itself often has the shape of a truncated cone - this is how maximum stability is achieved, because many children spin violently and try to get out.
To create the product you will need plywood, 15 mm thick, a drill, and a jigsaw, which is used to cut out the parts:
- one back part (with holes for seat belts, a slot in the upper part for convenient moving from place to place), measuring 400 by 370 by 15 mm;
- one pear-shaped seat 300 by 370 by 15 mm;
- three pieces rectangular drawers 370 by 85 by 15 mm;
- one C-shaped table 315 by 470 by 15 mm;
- two pieces. supports, elongated C-shaped, with dimensions 610 by 880 by 15 mm;
- one step for feet 370 by 120 by 15 mm.
The edges and slots of the parts are polished, and holes are drilled at the fastening points. Afterwards, all parts are varnished or painted, dried, and assembled using self-tapping screws. The finished product is equipped with seat belts with carabiners or ties, and a soft insert.
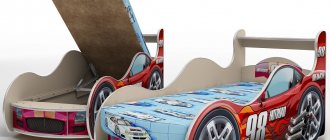
Chair in the shape of a car
The car chair will please both one-year and four-year-old children. To work you will need boards or plywood, a jigsaw, glue, and bright paints. To begin with, draw a sketch of the car you like on paper, think over its silhouette, suitable for a chair, and transfer it to sheets of plywood.
Construction details:
- two side parts, shaped like a car;
- high back, usually straight or curly at the top;
- front tsar - narrow or wide;
- armrests.
The parts are cut out, sanded, and the product is assembled using glue or self-tapping screws. An important point here is decor. On the sides, back, and front, it is necessary to depict the details of the selected car as realistically as possible. Ideally, the product is equipped with rubberized wheels, LED lights, and a removable steering wheel.
Height adjustable chair
The structure, the height of which varies widely, can be used by a child for several years, and therefore must be made as durable as possible. The “growing” chair is made of two inclined L-shaped sides with perforations, three connecting drawers, a narrow seat, and a step for the feet. The stands are made of metal or wood, the seat and footrest are made of wood or chipboard. Under no circumstances should the frame bend. The seat here can be easily rearranged higher or lower, the recommended “step” is 10-15 cm.
The recommended mounting height for the seat is from 18 to 50 cm. Such a structure can be used from one year to adulthood.
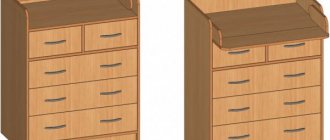
What parts need to be made
First, sketches and drawings are prepared, regardless of whether the chair for the child will be made of plywood, chipboard or wooden boards. Only then, using a jigsaw, are the parts cut out from which the product itself will be created. There are not so many of them, but without one of them, the made chair will not be so strong:
- Required to have top, bottom, front and side bars
- Four legs
- Middle crossbar
- Seat surface
If one of the parts is missing, the product will not be reliable and will not last long or will be completely unusable. You can think over your own option for arranging the chair. The same presence of parts is required to construct a high chair. A distinctive feature of this product is that the chair can be combined with a table, that is, it turns out to be transformable furniture.