DIY floating bed
Do you want to make changes to your bedroom interior? How do you like the idea of making a floating bed with your own hands ? It's not too difficult, even if it's a big project. A floating bed can be a fresh addition to your bedroom design as it presents a minimalist modern aesthetic while adding a feeling of spaciousness to the room. Our article presents several wonderful examples of how to make a bed with a floating effect , which will allow you to acquire original furniture even on a limited budget. Here there are projects of a floating bed with lighting , on wheels, with a beautiful solid wood headboard, and even an example of a floating bedside table. You can use links to primary sources, read instructions on how to make a floating bed with your own hands with drawings and detailed master classes with step-by-step photos.
Backlight types
In the bedroom, the main attribute is the bed. Therefore, lighting should mainly emphasize this piece of furniture. The best option would be to organize lighting in this area. To beautifully emphasize the design, it is necessary to pay attention to such parts as the general outline of the bed and the decorative design of the backrest. It is also advisable to further emphasize the bed linen and bedspread.
When choosing lighting, you should adhere to the following rules:
- exclude the presence of bright light on a smooth glossy surface;
- do not use green and blue colors;
- to make the white light warmer, more muted, you should add a little bright reflection.
There are four types of lighting you can use for your bed:
- backlight made from LED strip, which can be independently attached to any piece of furniture;
- from an LED strip with a built-in wi-fi module, thanks to which the lighting can be controlled using your own smartphone, changing the hue, brightness and many more additional functions;
- bed lighting with a motion sensor, allowing you to turn on the lights if necessary;
- lighting made of duralight, which is a luminous cord.
Each option has its own characteristics and advantages. Each of them can be purchased already built-in with the bed or installed independently.
Recommendations for selection
The bed is the most important piece of furniture for any person. Therefore, you should approach your choice carefully:
- the frame is the main part of any furniture, so it is worth choosing it to match the overall interior of the bedroom. It is also worth paying attention to the strength characteristics of this element, since it is on it that the heavy base will rest;
- the base provides comfortable rest conditions, so it is worth choosing an orthopedic structure made of bent-glued wooden lamellas;
- the mattress must be made of natural and durable materials. It should also be comfortable;
- The size of the bed also plays a very important role. When choosing, you should pay attention to the number of people sleeping in the room, as well as their build;
- The bed lighting must be built in efficiently and safely, and also be in working condition. When purchasing, you should pay attention to the quality of the electrical wiring connection and evaluate its safety.
When purchasing furniture, you should pay attention only to functional models that have a quality certificate and sanitary and hygienic conclusions. This is especially true for children's furniture. It is advisable to entrust the assembly of the structure to qualified craftsmen with good experience.
Locations
The location of the bed lighting depends on many factors: design features, the interior of the bedroom and its parameters, and the personal wishes of the owners. Let us examine separately the lighting features of each part of the structure.
At the head
The head of the bed is most often equipped with lighting. Lighting fixtures that can be used here:
- Spotlights;
- LED bulbs;
- LED Strip Light.
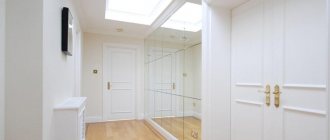
The option of directing flows of white light from the headboard to the top looks beautiful and modern. If you want to add beauty and functionality to this part of the design, you can install mirrors or small shelves.
Often, instead of a headboard, a bedside niche is equipped with additional light. LED lighting is used for this.
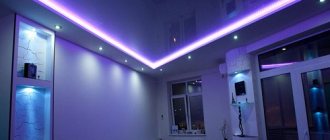
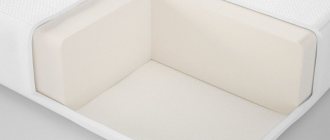
From below
A bed equipped with lighting from below looks luxurious. To make the interior lighter and more modern, you can use a so-called “floating” bed on discreet legs, which is complemented by lighting from an LED strip attached around the perimeter.
In order to connect the backlight with your own hands, you will need to perform the following steps:
- first of all, it is necessary to secure the tape by putting a cap on each end;
- then you should put on the adapters and immediately attach the plugs to them;
- check the operation of the LED backlight;
- Now you can start fixing the backlight. This will require special fastenings that are screwed to the bed with self-tapping screws;
- Once the strip is fully attached, you can plug the strip into a pre-prepared extension cord and enjoy a beautifully illuminated bed.
If you have the skills to work with electrical wiring, you can do everything more carefully by installing hidden wiring with a specially designated switch for lighting.
Illuminated podium
The podium bed looks impressive and stylish. In addition, it helps to significantly save space. And if you add lighting to this furniture, then in the dark a “floating effect” will be created. This is also convenient, since at night the possibility of falling will be eliminated due to the lighting of the step.
In order to organize lighting in this part of the structure, two options are used:
- Spotlights;
- LED Strip Light.
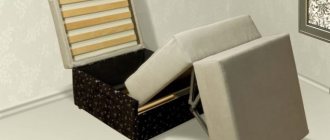
Often, additional storage boxes are built into the podium. Here it is imperative to provide lighting that will help maintain order and create a comfortable environment for the user.
Children's models
For any child, their own room is a space where they can enjoy play, relaxation or their own fantasies. In order to make this world more interesting for a child, you should think about purchasing a children's bed designed in the shape of your favorite cartoon characters.
A wide variety of car beds have been developed for boys that will help the child imagine himself in the role of a racer. The best option would be a bed equipped with lighting. It will be very interesting to sleep in a car with glowing headlights and dimensions.
Car beds have also been designed for girls in a more delicate pink or white design. Additional lighting can be installed in the following areas:
- headlights;
- street racing lower lighting;
- lower contour headlights, which are cilia.
These models are equipped with a remote control that allows you to adjust the lighting from a distance.
Children are often afraid of the dark, so a bed with additional lighting will be a great alternative to a night light. You can arrange additional lighting in the bedroom above the bed, which will make children's sleep more restful. To do this, you can use spotlights or LED strip.
Functional Features
Flying beds have taken their rightful place among both professional designers and people, due to their originality and unusual appearance. We can’t help but mention its functionality:
- Even the most classic look of a bedroom, thanks to such a bed, will acquire originality;
- the sleeping place is quite spacious, cozy, designed for two;
- LED lighting serves as additional lighting at night and creates a romantic mood;
- due to the strong fastening of the bed to the wall, a floating effect is created;
- The flying bed can be used by both adults and children.
Backlight options
Bed lighting in a bedroom or children's room can be made:
- LED strip;
- from duralight.
An LED strip is a circuit board on which special light bulbs - LEDs - are located.
LED strip
The advantages of LED strip are:
- diversity of species;
- ease of installation. The tape has an adhesive base that allows you to fix the equipment on any surface;
- long period of use;
- minimal energy consumption;
- the ability to create specific effects, for example, a floating bed as in the photo earlier.
The disadvantages of LED strip include:
- higher cost compared to spotlights and other lighting devices;
- low color rendering coefficient.
LED strip allows you to make beds:
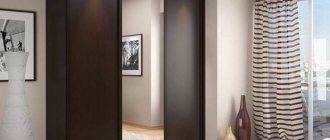
- with illumination from below, which can be located around the perimeter or at certain points (picture above);
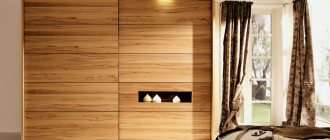
- with lighting in the headboard. The LED strip can illuminate the headboard, wall, any shelves or decorative elements.
Using LED strip to illuminate decorative elements in the headboard
Duralight is a flexible cord containing incandescent lamps or LEDs.
Flexible glow cord
The advantages of a flexible cord are:
- complete moisture resistance;
- resistance to mechanical stress;
- ability to work in a wide temperature range from -20°C to +60°C;
- duration of use.
Each light bulb installed in the cord is designed for 25,000 hours of continuous use.
The following are produced using duralight:
- lighting under the bed;
- podium made of pallets with lighting.
Bed on a podium made of pallets with lighting
Design overview
Floating beds are gaining popularity, and modern manufacturers offer many options. This sleeping place is multifunctional and comes in several types:
- with one hidden support in the middle - the bed is mounted to the wall. The legs are made of plastic, metal, sometimes not one, but several legs are used. They are hidden; you have to bend over to see them;
- a floating bed with ropes that are attached to the ceiling makes it very easy to swing. This bed has a mattress with springs and a box frame, so it requires support;
- floating bed on magnets. A significant disadvantage is the magnetic field. Therefore, this bed is not suitable for people with pacemakers.
Do-it-yourself beds are most often made with a wooden base, the dimensions of which are much smaller than the sleeping place, so it is hidden from view, but this does not affect the strength.
On the ropes
On magnets
With support
Types of Home LED Lighting
For home interiors, LED strip (LED strip) or duralight are usually used. They are energy saving and durable. But there are some differences between them. To make choosing easier, I suggest you understand their advantages and disadvantages.
Illuminating the bed using duralight
Duralight is a flexible cord with LEDs inside. Its main advantages include:
- protection from any damage;
- resistance to temperature changes;
- waterproofness and strength of the material.
Flaws:
- the price is higher than for LED strip;
- the glow is not very bright.
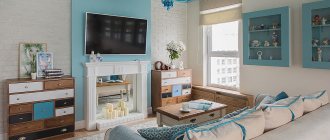
Examples in various interior styles
Initially, floating furniture was intended for minimalist design, loft, and hi-tech. But designers have proven that the floating effect can fit perfectly into classic and vintage interiors. A hanging sleeping bed looks organically in oriental and Mediterranean interiors; light wood furniture is typical of Scandinavian design.
Preparation and installation options
At the preparatory stage, the size of the bed and the location for placing the LED strips and power supply are calculated. To do this, you will have to remove the mattress, find the optimal place to mount the LED strip so that its light is directed downward, and measure the length of all the segments that will be located around the perimeter of the structure. Then you need to select the type of light-emitting chips:
- SMD 3528 IP20 with a brightness of 420 lm, costing about 60 rubles/m;
- RGBW-SMD 5060 IP33 with a brightness of 2000 lm, costing about 200 rubles/m + RGBW controller;
- or some other intermediate option.
After this, you need to purchase an LED strip and a profile of the same length. Why the cost of a profile? Firstly, the LED strip will stick well to the clean and smooth surface of the profile, and secondly, it will serve as a radiator, since it is not recommended to operate fairly powerful LED strips without an additional heat sink. Often the supporting part of modern double beds is made of fibreboard (MDF) or wood, which have extremely low thermal conductivity. But even if the bed frame is made of steel, it is not advisable to glue LED segments to it. Only inside the aluminum profile will the LED strip be reliably protected from any mechanical impact, such as:
- vacuum cleaner tubes during cleaning;
- children's curious hands;
- teeth and paws of domestic animals.
You can use a cheaper option - a plastic cable channel. It costs an order of magnitude less and is sold in every hardware store. But it will no longer be possible to create very bright, let alone RGB, lighting for the bed. Plastic will not be able to dissipate heat from emitting crystals for a long time and effectively, which will lead to their degradation within the first year of operation. For installation in a cable channel, LED strip without silicone coating type SMD 3528 with an element density of 30, 60 or 120 pcs/m of any glow color is suitable.
At the last stage of preparatory work you need:
- cut the LED strip and profile into pieces of the required length;
- degrease the inner surface of the profile for reliable adhesion to the LED segments;
- prepare connecting wires and, if desired, a switch.
Schematic diagram
The electrical circuit of an illuminated bed is extremely simple and consists of only 2 key elements: a power supply and an LED strip. If RGB or RGBW tape is used, then the circuit is supplemented with an RGB or RGBW controller. Below is a lighting diagram using a multi-color LED strip.
Assembling and connecting the bed lighting
Depending on the type of LED strip and the location of the power source, select a cable of the appropriate length and number of wires. For safety reasons, as well as to ensure sufficient load capacity, it is better to use double-insulated stranded copper cable with a cross-section of 1.0 mm2. It is flexible, tins well and calmly (without overheating) passes current up to 6 A.
It is highly undesirable to use twisted pair cables as the power cable for bed lighting. The cross-section of one core is approximately 0.2 mm2, which means it can pass no more than 1.5 A, and then with gradual melting of the insulation from overheating. So to connect powerful RGBW strips you need a more reliable option.
To electrically connect individual lighting areas located around the perimeter of the bed, you can use special connectors with existing wires. This method will speed up the assembly process and allow the structure to be quickly disassembled in the future. If this method is unacceptable, then all sections will have to be soldered together with separate wires.
You can learn how to properly solder an LED strip from this article.
Having all the necessary parts of the LED bed lighting, you can begin assembly in the following sequence:
- glue the LED strip to the profile;
- solder the wires observing polarity or fasten them with connectors;
- connect the power source and perform a test run;
- Fill the soldering area inside the profile with hot glue;
- Attach the finished lighting to the base using standard latches, screws or ties, depending on the type of bed.
For greater lighting effect, one of the 4 LED strips is attached behind the back of a double bed at the headboard, directing the light flux upward. Exposed live parts of the RGB controller, power supply and wires are reliably insulated to prevent fire and electric shock.
A bed with LED lighting will be much more functional if the controller has a built-in wi-fi module. In this version, the backlight can be controlled from a smartphone, easily changing the brightness and color. In addition, the program allows you to set the time to turn on/off the bed lighting, set an alarm with a smooth increase in brightness, and use other useful functions.
Making a floating bed frame from a metal profile
A metal frame is much stronger, more reliable than a wooden one, it is less bulky and can carry a larger load. To create a frame, you will need a welding machine, since bolted connections in this case are inconvenient and labor-intensive. It is more convenient to use a rectangular steel pipe as a material; it has smooth edges, which allows you to firmly connect the parts without additional processing.
Required Tools
- Grinder with cutting wheel.
- Electric drill and drill set.
- Welding machine and electrodes.
- Roulette, ruler, square.
- Pencil or chalk to mark when cutting.
- Clamps for fastening parts to the base for precise welding.
Manufacturing procedure
First of all, you need to assemble the frame frame. To do this, you can cut two long pieces of pipe along the length of the mattress and several short ones (the width of the mattress minus twice the thickness of the pipe). They are welded in a flat plane so that the manufactured frame does not have deformations. It is necessary to control the dimensions of the diagonals so as not to deform the frame. The fully assembled frame must be cleaned of burrs, metal deposits that may occur during welding, and sharp edges formed when cutting the pipe.
The second stage is installation of the bracket. This can be a node located along the central axis of rotation of the frame (at the point of intersection of the diagonals), or several supports located under the frame (in this case, the optimal distance from the outer edge of the frame is 30 -35 cm). The central support gives a realistic feeling of the structure "hovering" above the ground, but requires a fairly large platform bolted to the ground. Four vertical slats are welded onto it, creating the height of the frame, and several beams - inclined slats, creating rigidity of the structure. It is not recommended to attach such a bracket to the frame for welding, as it will interfere with carrying or transporting the frame. It is better to use a bolted connection.
Important! Both metal and wood frames should be coated with a protective layer of paint or varnish, which can reduce the wood's absorption of atmospheric moisture or protect the metal from corrosion.
Bed lighting with LED strip
An LED strip is a board with LEDs placed on it. It also has its pros and cons. The advantages include the following:
- easy installation due to the adhesive layer;
- ease of use, compactness;
- the price is lower than for duralight.
Flaws:
- low moisture resistance;
- lack of protection from mechanical damage.
Most often, LED strip is used to illuminate the bed. Now let's look at the installation methods step by step.
Installation of LED strip
- Buy LED strip according to the size of your bed. Use the same principle to select a profile. The LED strip can already be found with an existing power supply, but if you bought the parts separately, then the power supply and other elements are connected using a soldering iron, according to the diagram below.
- Cut the tape and profile into pieces of the required length.
- Install a profile following the instructions in the photo below. Do not forget to degrease the mounting surface of the future lighting.
- If you decide to use RGBW tape, then make sure that there is an RGBW controller in the circuit. If it is missing, buy it separately and connect it using a soldering iron.
- Below is a diagram using RGBW.
- According to the diagram, connect all the elements together and check for functionality.
- Be sure to insulate exposed joints and solder joints.
If you want to add some zest to the design of your bedroom, then using the same principle you can use LED lighting for shelves, headboards, etc. Let me remind you that it is easier to purchase an LED strip with a power supply included if you do not consider yourself a jack of all trades.
This completes the installation of the bed lighting.
From all that has been said, we can conclude that LED lighting is the best analogue to conventional lighting. With the help of such lighting, you can create an unusual bedroom design, with your own hands.
Conclusion
Now you know all the main options for bed lighting and can choose the optimal solution for your bedroom. The video will tell and clearly show additional information on the topic, and if you have questions, write them below in the comments.
Did you like the article? Subscribe to our Yandex.Zen channel
June 17, 2022
Accessories,Interior lighting
If you want to express gratitude, add a clarification or objection, or ask the author something, add a comment or say thank you!
How to illuminate a bed with LED strip: step-by-step instructions
Now let's move on to the most important thing and try to talk about how to make lighting in the bed yourself. In fact, there are no special problems in this matter, the main thing is to show a little patience and desire.
- Initially we must determine the length of our tape. Here we need to measure the bed and think about where our tape will be attached. The final length of the tape should differ from your measurements by about 5%, this will avoid possible problems.
- Next, you need to think about how you will connect the tape. This is what the standard scheme looks like, based on which option you chose.
- Now we must determine the place where we will attach our tape. It is optimal to place it at the bottom of the bed, this is what will allow you to achieve optimal lighting. Initially, it is recommended to fasten it with clamps; they will serve for a long time; if the design of the bed does not allow this, read our instructions further.
- The place where you will glue the tape must be degreased. Alcohol or purified gasoline are suitable for such purposes.
- According to the chosen scheme, you need to connect everything together and check its functionality. If everything is in order, then you managed to make the backlight correctly. And so that you don’t make a mistake, we found a few more videos for you on the Internet.
After watching this video, you can effortlessly create high-quality bed lighting in your home.
Note! Instead of the usual LED strip, you can use durlight. It has similar characteristics and is lower in cost. However, the light of its glow leaves much to be desired, so it’s up to you to decide.
The nuances of working with duralight
In view of the technical features of such a lighting device, several points should be noted that should be taken into account when making lighting from a light cord:
- if you are joining several pieces for a bed, make sure they have the same characteristics;
- connectors are selected according to the shape and number of contacts of the connected cords;
- The connection points must be dry without visible damage to the insulation;
- before turning it on, unwind it and check its functionality, but you can assemble and mount the backlight from duralight only in the switched off state;
- the cord has a special hermetic sheath, which you must keep intact, but if you damage the silicone during the installation process, this place is sealed with insulation;
- If you want the cord to not only light up, but also enter the blinking mode, install the controller along with the adapter.