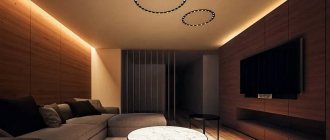
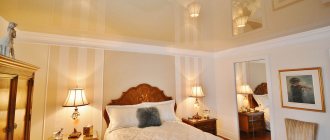
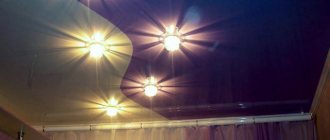
A ceiling with lighting placed around the perimeter looks very impressive and harmonious.
A ceiling with lighting around the perimeter is a very original solution that looks much more attractive than just a ceiling without lighting. This design solution is simple and very inexpensive. In addition, you can do such lighting yourself, with your own hands, without resorting to the help of a hired team, which, by the way, is quite expensive.
It is no accident that LEDs were adopted, since LED lighting is not just lamps, but a very thoughtful design solution, which, together with the main lighting, creates a harmonious lighting ensemble.
- How to make a ceiling with perimeter lighting with your own hands
- LED lighting along the perimeter of the ceiling: in a foam baseboard
- Necessary materials for LED backlighting
- Ceilings with LED strip under baseboards
- Correct connection and installation
- How to connect an RGB LED strip (video)
- Ceiling with perimeter lighting (photo)
Types of lamps for suspended ceilings
Convenient LED strips, as a rule, help to create a stretch ceiling with lighting. These products are printed circuit boards in the form of cords of different lengths, equipped with LEDs. Most often, special niches in a plasterboard surface or in another system of several levels are used for their installation.
Classification of lighting according to installation location:
- LED strip lighting around the perimeter.
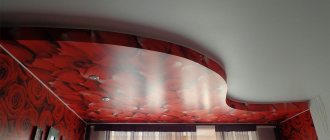
- Curly. May have different shapes and colors. It is placed on the base in the form of various figured compositions.
- Uniform. A classic option used on ordinary flat ceilings.
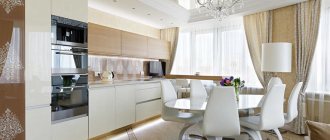
Examples in the interior
Curtain lighting is a practical and stylish solution. It will suit a room of any purpose and size.
Fluorescent lamps
These light sources are considered classic solutions that have been in use for a long time. In the old days, they were used exclusively on single-level ceilings, decorated with whitewash or paint. Currently, individual areas are illuminated with fluorescent lamps. They are also an indispensable attribute when creating hidden or open lighting.
Although devices of this type are very common, they have a number of weaknesses:
- Can be used exclusively along the main contour as additional lighting elements.
- Needs frequent replacement due to short service life. And this despite the fact that the lamps themselves do not get very hot. To make a replacement, you have to dismantle the entire ceiling structure. Next, the canvas needs to be re-stretched, which entails a significant loss of time and finances.
- Inability to adjust brightness level.
- Dependence of lamp operation on ambient temperature. At low temperatures their functioning deteriorates noticeably.
- Health hazard. One of the components of fluorescent lamps is mercury: as is known, the vapors of this substance pose a serious threat to people and the environment.
Is there a greenhouse effect?
The disadvantage associated with the creation of a “greenhouse” effect is quite real: after all, ceilings made of PVC film hermetically seal the ceiling space, preventing it from “breathing,” that is, allowing air to pass through. Ventilation deteriorates and in this case there is no doubt about the lack of environmental friendliness.
Undoubtedly, with regular ventilation of the room, the negative impact is reduced to zero. However, if we are unable to constantly ventilate the room at night, the humidity in it increases.
Manufacturers note that fungus will never appear on the ceiling itself. But it may appear in another place in the room (for example, on the main ceiling under the film).
Of course, it all depends on the room itself. In a dry room, a suspended ceiling will not create critical humidity. The situation is different with wet rooms (for example, with a bathroom).
Does PVC film create a greenhouse effect in a room?
If we are talking about a fabric ceiling, then it is more natural. It is breathable and does not create a greenhouse effect. However, the fabric itself is saturated with chemical compounds that negatively affect health. In this regard, after installation it is necessary to regularly ventilate the room for a month.
Neon lamps
Due to the low brightness level, they are practically not used as the main light source. The undoubted advantage of neon devices is a large palette of bright colors, which is widely used by designers to realize their ideas.
Using light sources of this type, you can successfully highlight individual ceiling elements, enhance or shade the main lighting fixtures. The main stopping factor on the way to the mass use of neon lamps is their high energy consumption, with a short service life. This will explain the fact why neon is practically not used in combination with stretch ceilings illuminated from the inside.
Floating ceiling lighting color options
The color scheme of lighting will create a certain mood. Color options:
- white;
- green;
- neon;
- red;
- yellow;
- blue;
- violet.
LED strips
Products of this type are by far the most popular options for creating suspended ceilings with internal lighting.
This is facilitated by the presence of a number of advantages in LED strips:
- Durability
. Replacing devices of this type is required very rarely, which is a fundamental factor for tension systems. The fact is that dismantling these structures is quite complicated and requires a certain level of skill - Flexibility
. This quality opens up great opportunities for creating smooth light compositions and lines on the ceiling surface. - Versatility
. The tape can be used in the design of a wide variety of ceiling structures - straight, curved and multi-level. - The presence of a uniform glow
, which can be adjusted.
- Hue variety
. LED devices can have not only the classic white color: products are available in various colors. This makes it possible to select the most successful combinations from the point of view of the overall design of the room. - Low heat
. In fact, the operation of diodes is not accompanied by heating of the surrounding space. This feature is invaluable for elastic PVC films, which can become deformed when the temperature rises. - Economical
. LEDs require very little electricity to operate. - Possibility of adjusting the brightness of lighting
. The device includes a remote control, power supply and control unit.
The Duralight cord is very reminiscent of LED strips: its flexible design makes it possible to perform approximately the same functional tasks. However, Duralight is inferior to LEDs in several respects: its light is not uniform and requires quite significant energy costs. In addition, products of this type quickly fail.
Benefits of the solution
Installing contour lighting using ceiling plinths provides us with a number of advantages:
- As I noted, this is a fairly simple way to install lighting. We don't need to build additional frames, attach grooves, etc., so the whole job can take literally a few hours.
The installation technology itself is not complicated
- Financial costs will also be relatively small. Yes, a high-quality LED strip costs a lot, and you won’t have to buy the cheapest baseboard. But otherwise, it’s a completely economical solution, at least compared to other lighting methods.
- The efficiency of lighting mounted according to a contour scheme is also sufficient. By choosing bright LEDs (more on this below), you can radically solve the problem of background light. And if you consider that the energy consumption of LED strips is minimal, the savings on room lighting will be significant.
On a cloudy day, such a luminous circuit perfectly replaces an energy-intensive chandelier
- Finally, ceiling lighting using LED strips allows you to realize a variety of ideas for lighting decor. So it's at least very beautiful!
The design potential of the solution is difficult to overestimate
Lighting in combination with plasterboard structures
Plasterboard elements are often used in combination with tension fabric or film sheets. This is especially true when it comes to a suspended ceiling with LED lighting around the perimeter. Most often, such structures consist of two, three or more levels.
The role of the base here is played by the upper part on which the light falls. To make the lower tier, use a gypsum plaster board with a backlight hidden underneath it. The plasterboard element can have different configurations. The simplest solution is a regular slope around the perimeter of the room. More complex options are multi-level structures with steps or various shapes inside the main profile.
There are three options for illuminating suspended ceilings around the perimeter of the box:
- Ceiling perimeter.
- Separate points around the perimeter.
- Using tapes covered with tension fabric.
When decorating perimeter lighting using LED strips, a variant with niches in the sides of the contour is often used. This is where the light sources will be placed.
A plasterboard niche with illuminated stretch ceiling has the following advantages:
- Obtaining an unusual visual effect. It seems that the luminous flux is pouring onto the ceiling surface from nowhere.
- Simplicity of the device and universality of the system. This type of lighting can be used to decorate any type of plasterboard box.
The main disadvantage of this modification is the accumulation of a large amount of dust inside the plasterboard box, which is where the lamps are installed. Cleaning the surface will require significant effort due to the inconvenient location. Spot lighting involves installation around the perimeter instead of LED built-in lamps. As a result, the lighting is not so uniform, but the likelihood of large volumes of dust accumulating inside the box is completely eliminated. This is achieved due to the presence of closed sides in this design.
In cases where the LED strip is mounted under a tension surface, there is no need to use a plasterboard circuit. This method of illumination around the perimeter requires the least financial expenditure, however, it also has many disadvantages. If you place LEDs in the ceiling space, they, along with the canvas, will illuminate all the other elements located there.
We are talking about various communications - wiring, ventilation lines, cables, etc. In addition, all the debris and weld seams that have accumulated on the back of the film will become clearly visible. To avoid this effect, special false ceilings and high-quality PVC sheets without seams are used. All this significantly increases financial costs.
Calculation of the number of lamps according to standards
For auxiliary LED strips, calculations are not carried out, since they serve for orientation in the room at night. But to calculate the number of lamps, you need to multiply one lumen by the number of square meters in the room, then divide by the power of one lamp. This way you can find out how many units of spotlights you need to distribute on the ceiling for normal lighting.
Installation work
During the construction of the plasterboard box, you must adhere to the following recommendations:
- When arranging the frame, the guides should be placed at a distance of 60-70 cm from each other. Its outer part should be decorated with plasterboard sheets.
- The area of contact between the tension fabric and the body is reinforced with additional fixing devices - mortgages. If this is not done, there is a real danger of the structure breaking due to the high tension force.
- To cover the joints of the frame, a narrow serpyanka mesh is used, followed by putty and sanding.
The technology for making illuminated suspended ceilings using a plasterboard box is as follows:
- Install the structure using the fixation method on the walls and ceiling around the perimeter of the room.
- A small vertical protrusion (up to 10 cm) is made on the lower cut of the body. Another one should extend upward from it to a height of 5-7 cm. This will make it possible to build a niche for lighting fixtures. The distance from the base surface to the edge of the protrusion should be at least 10 cm: this will allow you to stretch the decorative fabric without interference.
- The vertical area of the profile is equipped with a mounting baguette. This will make it possible to fix the film in accordance with all the rules.
- The finished niche is decorated with an LED strip or other lighting device. Switching to the electrical network is carried out in accordance with safe connection standards.
Plasterboard housings for LED lighting of hidden structures are used in combination with glossy stretch ceilings. This type of surface has a mirror effect, perfectly reflecting various objects. If you use an open niche, the lamps will be visible from below. Inside the hidden niche, there are completely no visibility zones for lighting fixtures. At the same time, the uniformity and beauty of the emitted light does not suffer. However, you need to remember that installing a suspended ceiling with a closed niche for lighting will require a lot of effort and time.
Installation procedure:
- Arrangement of a plasterboard box. This procedure is carried out exactly the same as in the previous case.
- Installation of PVC film on the sides of the gypsum plasterboard profile.
- The resulting recesses are decorated with LED strips. Switching with the electrical network is carried out in accordance with all safety standards.
- To ensure complete coverage of the upper side of the niche, pre-cut plasterboard strips of small width are used. Special holes are made in them for light.
The result should be a closed gypsum board box with holes along the top surface: this will ensure uniform illumination of the tension fabric. These holes will be completely hidden and therefore will not be reflected on the glossy film.
Thanks to the hidden niche, you can beautifully highlight the strengths of the glossy canvas. At the same time, external dust does not lose the ability to penetrate inside the plasterboard casing. Most often, this arrangement technique is used in children's rooms and kitchens.
What shapes do floating ceilings come in?
Such designs have endless possibilities for creating a wide variety of shapes.
- Floating lines. Lighting elements in the form of straight, wavy stripes or broken lines in the shape of a zigzag allow you to evenly illuminate a room or interestingly play up its zoning.
- Along the perimeter. Visually expands the room and gives it additional depth and spaciousness.
- Geometric figures. Circles, squares, rectangles, ovals and other geometric shapes are the most popular elements of modern interior design.
- Free form. They create a beautiful and custom ceiling design.
- Near the wall. This asymmetrical shape, located along one wall, allows partial illumination of the room and looks great in the interior.
- With a niche. Various types of niches, for example, for a frame, for a chandelier or around the entire perimeter of the room, are not only decorative, but also functional.
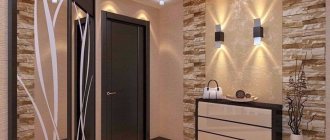
Backlight without gypsum board profile
To implement this option, use the space above the decorative canvas or the internal cavities of the plinth. Using this backlight, it is necessary to ensure that the light from the LEDs reaches the base base: the glow reflected from it will be softly reflected on the film surface. The effect is very beautiful and uniform. This type of lighting has proven itself to be excellent when decorating lounges, bars and bedrooms, where there is no need for bright lighting. The light is diffused and soft. As for large premises, this option is not suitable due to the appearance of an unlit area in the center.
The procedure for arranging lighting without a gypsum board profile:
- Equipping the perimeter of the room with LED strips.
- Installation of baguettes. The indentation is made downwards by 5-6 cm, baguettes are attached. This will create a safe buffer between the light sources and the stretch fabric, protecting it from excessive heat.
- Installation of stretch vinyl film on a baguette. To cover the edges, a ceiling plinth installed around the perimeter is used.
If the ceiling height in the room is small, then the possibility of using lighting in combination with several ceiling levels disappears. In this case, the first step is to install the tension film. After this, making a downward indentation of 50 mm, the LED strip is attached to the walls.
To additionally decorate the lighting elements from below, one of the many decorative options is used. For example, wide-width ceiling plinths are often used. In this case, two methods are combined at once - installing a plasterboard box and arranging niches for LED lamps. In this case, plasterboard sheets are not used.
Recommended distance from baseboard to ceiling
The size of the indents depends on what effect is being achieved. The closer the LED strip is to the surface, the narrower and brighter the outline.
The minimum distance from the ceiling is 50 mm. The maximum depends on the height: the illuminated ceiling plinth should be located above eye level in order to hide the tape itself. Baguettes are not mounted below 20 cm from the surface of the floors.
Attention! If the LEDs are sparsely located or the strip is glued close to the ceiling, it is better to cover it with a plastic diffuser screen. Then individual points will not be noticeable on the surface. And in wet rooms, transparent covers are installed to protect against splashes and dust.
How to install LED strips around the perimeter of the ceiling
Products of this type go on sale wound in convenient spools. The total length of the glowing cord there is up to 5 m. The ribbons can be cut into several separate parts in the places indicated for this. Professionals do not recommend laying strips that are too long on the ceiling. As a rule, one power source can serve up to 15 m. If the total length of the strips used exceeds the specified limit, then a separate cable is supplied for the remaining part. Powering long-length LEDs takes too much energy, which affects their service life.
Recommendations for installing LED strips:
- Most often, the tapes are attached in the grooves between the ceiling plinth and the tension film. This makes the backlight completely hidden from visual view.
- Lighting effects can be controlled by changing the distance between the tape and the ceiling surface. In this way, they achieve accentuation of individual contours of the perimeter (or plasterboard box) or illumination of the entire area of the upper tier with soft light.
- When using translucent tension material that transmits light well, due to the correct positioning of the backlight, you can achieve the effect of an original glass roof.
- To equip curved sections of the structure with lighting, it is not recommended to bend the tape too much. If the bend radius is less than 2 cm, there is a real risk of damage or breakage of the strip.
- During the installation of the LED strip, you must be extremely careful to avoid any mechanical damage: this may damage the conductive elements.
- When making connections with a source of electrical energy, it is important not to confuse the polarity. Direct connection of the tape to the electrical network is prohibited: an additional controller must be present in the circuit.
- Before gluing the LED strip, the base must be leveled and degreased. When using non-self-adhesive tape, high-quality double-sided tape comes to the rescue.
- Fastening with dowels or self-tapping screws is also allowed. This method makes it possible to remove the strip if necessary, without the risk of damaging the finish.
- During installation, you must follow electrical safety rules: there must always be a power supply reserve of at least 25%.
- When installing an LED strip on a metal base, a special insulating lining made of dielectric material is used.
Along with LED strips, LED tubes have gained widespread popularity. They make it possible to create unusual island lighting. Combined lighting is also very common: in this case, the central zone of the base is equipped with a chandelier, and its edges are equipped with LED devices. Most often, multi-tiered structures are designed in this way, which makes it possible to obtain fancy light combinations.
Correct connection and installation
In order for the backlight to turn out without flaws and shortcomings, you should take into account some rules.
Rules:
- The tape is sold in five-meter reels, and, if necessary, it is cut and soldered to the required size;
- The tape is carefully cut exclusively according to the markings;
- Pieces of tape are soldered according to the diagram;
- To secure the LED strip, use double-sided tape or self-adhesive tape. Before gluing, the surfaces are degreased, the protective layer is removed, and the tape itself is pressed to the required area.
Installing the tape on a baseboard is different from installing the tape on a wall. Both options are used by the consumer.
The plinth is not glued directly to the ceiling, but five centimeters lower, and ten centimeters lower in the case of gluing to the plinth.
It happens that the power supply is sold without a power cord. Then you need to buy a cord.
How to solder correctly:
- Plus and minus when the tape is the same color;
- If the tape is colored (RGB), then contacts V+, R, G and B should be soldered.
After the tape is of the desired size, you need to connect the transformer and controller.
When soldering, do not allow the tape to overheat! You cannot solder more than three coils in series - the tracks, in this case, cannot withstand the load.
At all stages of work, the main principle is accuracy, caution and thoroughness. The bending radius is at least 2 cm. The tracks cannot be bent more than 90°.
Options for creating lighting for suspended ceiling structures
Illumination of suspended ceilings is currently carried out using the following modifications of lighting devices:
- Fiber optic cable
. The element contains a large number of glass or plastic cores that conduct light. Design features protect it from light scattering beyond the fibers. Most often, fiber optic products are used for arranging spot lighting. First of all, a projector and diodes are placed on the base base: a canvas with star compositions is stretched under them. Next, the tension material is equipped with a series of holes of small diameter (2 mm). Subsequently, light fibers are threaded through them. - Diode mini-luminaires
. These elements are also included in the “starry sky” ceilings. Their design has good light-diffusing parts. Installation of mini-luminaires is carried out together with a fiber optic cable. Place of installation – seats in the canvas. The light initially passes inside the cable, after which it is diffused into the mini-luminaire. In the overall decorative perception, fibers play the role of small stars, and mini-diode lamps play the role of large stars. - Neon cord
. Equipment of this type operates at high voltage, which leads to the appearance of an electric field. As a result, a uniform glow that is comfortable for the eyes begins to emanate from the phosphor between the copper terminals. The neon cord can be powered not only from the mains, but also from batteries. To obtain the required voltage, a special current inverter is used. Using a cord, it is convenient to decorate the perimeter of a ceiling or plasterboard structure. It is also used as internal illumination of PVC film. - LED strips
. We are talking about printed circuit boards up to 5 m long, which are sold in convenient reels. The diodes are placed on the strip at different intervals. The color of the emitted light can be monochrome or multi-colored, which opens up a lot of scope for various combinations. Individual LEDs provide the ability to change the intensity of the glow in different sections of the strip. When choosing an option for illuminating the stretch fabric, the choice most often falls on the LED strip. For ease of installation, one of its sides is covered with an adhesive strip with a protective film.
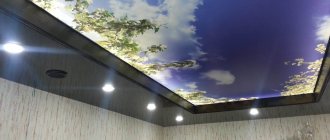
You can make the illumination of the entire area of the tension fabric as interesting as possible by using the “starry sky” effect. To achieve this effect, a fiber optic cable and mini-diodes are laid under the tension film.
Cold and hot installation of a floating ceiling
The expressions “cold” and “hot” refer to a specific way of installing the ceiling. Each type of installation is adapted to a specific material.
Hot laying is intended for polyvinyl chloride (PVC) sheets, and cold laying is for polyester sheets with a polyurethane coating.
hot
PVC is a thermoplastic material. This means that it responds to changes in temperature by changing its flexibility. In order for PVC to become elastic, it must be exposed to temperatures of 40 to 50 degrees.
During hot installation, the room is artificially heated using gas generators. The PVC sheet becomes more elastic and rests freely on profiles installed in the four corners of the room. The room temperature at this time ranges from 45° to 55°C.
The ceiling can consist of several PVC films with a width from 150 cm to 200 cm or even from 360 cm to 500 cm. The harpoon, in turn, ensures that the canvas is held in a profile around the perimeter of the room. This will allow you not only to install the ceiling, but also, if necessary, to easily disassemble it without replacing the film.
“Hot” installation of a floating stretch ceiling is performed as follows:
- installation of profiles designed to place the canvas around the entire perimeter of the room;
- installation of backlight mounts;
- fastening the canvas with harpoons to the four corners of the room;
- heating the room from 40 to 50 degrees with a heat gun aimed at the ceiling;
- stretching the canvas and installing it into profiles using the “shovel” method (the material is pushed into the spaces provided for this purpose using a spatula);
- cooling the room to room temperature.
Pros of hot stretching:
- warm stretch ceiling is waterproof, resistant to condensation and rotting, it is an ideal choice for wet rooms (bathrooms, kitchens, swimming pools);
- in the case of laying cables or other electrical installations, dismantling a warm stretch ceiling will be much easier than a cold one;
- PVC ceilings have an impressive color palette and many finishing options (glossy or mirrored ceilings are only possible with hot stretching);
- PVC stretch ceiling is cheaper than cold stretch ceiling.
Disadvantages of hot stretching:
- requires additional manipulations to heat the room;
- heating PVC material inevitably leads to the release of particles, so before installation, make sure that the material does not contain toxic substances;
- PVC is vulnerable to direct physical impacts and is easily damaged;
- a hot ceiling cannot be repainted.
Cold
Cold installation is simpler than hot installation, since it does not require artificial heating of the room and takes place entirely at room temperature. The cold stretch fabric material is polyester gauze with a polyurethane coating. This fabric is 15 times stronger than calendered PVC film. This strength of the material makes it easy to cladding walls.
Cold stretch ceilings have approximately 250,000 invisible holes to defragment sound waves and serve as an excellent acoustic insulator.
Sequence of actions for cold installation of a stretch ceiling:
- Fastening peripheral profiles around the perimeter of the room;
- Installation of supports for lighting placement;
- Preliminary installation of the canvas in the four corners of the room with harpoons;
- Manual stretching of the tape along the profiles with a spatula and adjustment.
Pros of cold tension:
- installing a cold ceiling is more convenient and does not require heating the room;
- polyester fabric is almost completely biodegradable;
- it is a more environmentally friendly approach, without emissions and energy consumption;
- polyester is extremely durable: it is almost fifteen times stronger than PVC canvas;
- Unlike hot stretch ceilings, polyester fabric can be painted.
Flaws:
- sheet intended for cold laying has a higher purchase price than PVC;
- the choice of colors for polyester fabric is less wide, so you will have to forget about bright colors;
- you can forget about the mirror or glossy effect;
- A “cold” stretch ceiling can only be partially disassembled.
Briefly about the main thing
Illuminating the ceiling with LED strip is an important step in creating a design solution when decorating a room. For correct installation, you must purchase the right products in accordance with the required protection class, luminous shade, and length. Installation must be carried out using special tools and consumables. LED strip can be installed in cornices, niches and on the back side of ceiling plinths. Fastening is done using double-sided adhesive tape or using mechanical clamps.
Floating curtains - an innovation in the world of design
Another innovation in the world of design is the floating tent, which provides integrity and a single horizontal plane to any structure “suspended in the air.” To get an idea of it, we offer you another selection of photos.
A hidden bracket is very practical for rooms with low ceilings, as floating curtains will make your room appear taller and more spacious. Also, the price of a regular cornice will be much more expensive.
If you don’t need window lighting yet, you can limit yourself to a hidden curtain that is attached directly to the stretch ceiling profile and does not “take away” excess height from the cornice.
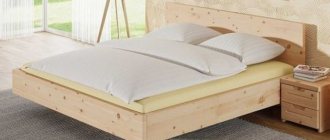
If you have a large enough studio, attic or bedroom, you can build a hidden translucent curtain above the bed, repeating its perimeter. This will create a cozy, romantic sleeping area and protect you from annoying insects.
Main varieties
These types of lamps are used in the production of strip lighting devices.
Tricolor
Another name is RGB strips. In these products, all diodes consist of different LEDs (green, blue, red). And the stripes themselves have four outputs: a common one and one for each shade. From all possible combinations of these colors, a rich range of colors is obtained.
Using a special controller, you can control three-color diode strips: set the required frequency of color changes, select one fixed shade.
Helpful information! High-tech diode strips are equipped with built-in Wi-fi. This allows you to configure them using the appropriate applications on your smartphone.
Strips with RGB lamps can withstand voltages of 12 and 24 V: this is important to consider when choosing a power supply Source dekoriko.ru
Sealed
Protected tapes with diodes are extremely popular because they are characterized by high wear resistance and long service life. These products are also called waterproof or moisture-proof. The tightness of such devices is achieved by a silicone shell that completely frames the elements.
Sealed LED strips function perfectly outdoors, as well as in water. They are used for lighting aquariums and swimming pools.
The sealed tape is protected from external mechanical influences, dust and moisture Source mbright.com.ua