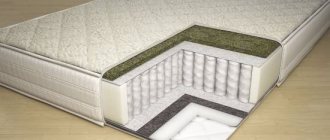
An inflatable mattress will provide a comfortable rest in the forest and will allow you to accommodate a guest staying overnight. The thing is convenient because it is compact when deflated, and you can inflate it in a few minutes. But a practical product is easily damaged, and then you need to find a way to seal the air mattress yourself. Simple repair instructions will help you repair your item reliably and inexpensively.
If the mattress is leaking air, do not rush to throw it away. The product can be sealed at home.
Causes of damage to air mattresses
The appearance of a hole in the mattress is not a reason to get rid of it. You can eliminate the defect yourself if you know the reason for its occurrence. There are different reasons for product damage:
- Piercing or cutting the surface of the mattress;
- Rupture of partitions inside the structure;
- Seams coming apart.
To seal a small puncture, you can use adhesive and special patches. But if the internal partitions or seams have been damaged, repairing the mattress will require professional help.
Some manufacturers of mattress products offer in-home warranty service, which is very convenient.
At the same time, other cuts and punctures can be easily removed with your own hands. The reason for the constant deflation of the mattress can be daily use with an impressive load on it. In this case, the volume is lost insignificantly, so there is no need to resort to any actions other than pumping up air. If the mattress has lost its air literally overnight, you will have to identify the damaged area.
Often mattresses become unusable due to a serious manufacturing defect. Even models from trusted manufacturers are often sold defective. To prevent the purchase of such a product, you need to check it for punctures and holes in the store. To do this, you can treat the area near the valve with a soap solution.
Sealing seams
The seams can usually be sealed by pouring glue. It is important to wait until it hardens completely. The layer turns out to be thick, so you will have to wait a while, preferably at least a day. There is a more complex but effective solution:
- the damaged part of the product must be turned out through the valve hole;
- degrease the damaged seam;
- wait for the product to dry;
- cut out a patch from rubberized material and treat with glue;
- Press the part firmly against the defective seam.
Using this method, you should not rush to use the product. Leave it for at least 12 hours. After the glue has polymerized, turn the product back inside out and inflate it to check.
How to look for a damaged area
Identifying a hole in an air mattress at home can be difficult. After all, the puncture site may be in the most unremarkable part of the structure, which the owner does not even think about. To identify damage, one of the existing inspection methods should be used.
Sound of air escaping
First, you need to inflate the mattress as tightly as possible, and then ensure complete silence in the room. When you bring the product close to your ear, you should listen to see if any hissing sounds appear. If they are present, it means the mattress has been damaged. To determine exactly where this happened, it is important to carefully examine the entire area, as well as listen to the valve separately.
Immersion in water
The inflated mattress must be immersed in a container of water. Air bubbles will appear at the cut site, which will indicate the cause and location of the damage. When checking a surface, it is necessary to inspect it from all sides. If there is no access to open water, the procedure can be carried out in a regular bathroom. However, even 1-bed models have difficulty fitting into such tanks, and piecemeal testing may not be accurate enough.
Soapy solution
The mattress is carefully inflated and then treated with a sponge dipped in soapy water. Foam should be applied to the potential cut site. If there is a hole, bubbles will come out of it. Using this method, you can check the entire surface of the mattress. Liquid soap, shampoo or dishwashing detergent is used as the key substance for the foam solution. However, it is better to avoid washing powder, because... it consists of coarse particles that can damage the surface of the product.
Shaving foam
It is necessary to inflate the mattress tightly and treat the valve with shaving foam. If there is a puncture, bubbles will appear in the treated area. This technique is especially effective when checking valves for loss of tightness.
Starch
You can check the product using starch. The substance is scattered over the entire area, and if there is a puncture, a so-called “cloud” appears. After carrying out the above steps, the mattress needs to be vacuumed.
Cling film
The surface of the inflated mattress must be moistened with a spray bottle and then covered with cling film. At the puncture site, air will begin to collect under the film.
Liquid filling
A popular way to check a mattress for punctures is to fill it with liquid. It is necessary to pour several liters of water into the mattress, pump it up and start twisting so that the water is evenly distributed over the inner surface. Then you should inspect the mattress on both sides. If there is a puncture, a wet spot will appear on the velor surface, and liquid will appear on the smooth surface.
Preparing the necessary tools and materials
Many models of Intex air mattresses come with a ready-made repair kit. It consists of a special adhesive, vinyl, and step-by-step instructions for use. A basic repair kit is enough to fill two or three holes. If there are no patches, but the glue remains, you should not throw it away, because... it can be stored for up to two years and will become useful in the future.
What can a patch be made from?
If there were no repair tools included with the air mattress, you can make a patch yourself. For this purpose, small pieces of thin rubber or cotton fabric are used. The latter option is pre-treated with rubber glue.
Cutting out a patch
When cutting out a new patch, you need to make sure that it is 2-3 centimeters larger than the size of the puncture. It is also recommended to use oval or round shaped products, and degrease them with alcohol or gasoline before gluing.
Glue the PVC side
After preparing the materials, you need to find out the sequence of actions on how to properly seal an air mattress. Steps for gluing the PVC side:
- Using scissors, cut a patch 30mm larger than the hole in a circle.
- Apply adhesive around the hole.
- Press the patch and load the gluing area with heavy weight. For example, it could be books, a weight.
- Leave the compound to dry for a day.
Before using the item further, you need to check the quality of the gluing. To do this, the repaired area is immersed under water before the mattress is inflated.
Glue selection
When wondering how to seal a hole in an air mattress, you need to choose the right glue. Due to the wide variety of such compositions, finding the right option can be problematic. Experts advise giving preference to rubber and universal types, as well as special glue for PVC. The key requirement for consistency is the formation of a durable, waterproof and elastic layer after processing.
Glue "Moment universal"
It is considered a popular product, which is characterized by highly reliable adhesion to almost any surface. It is used to join rubber, PVC, plastic and fabric. Before processing, the product and patches are degreased, after which the working surface is lubricated with glue and pressed for 15 minutes. The mattress can be used within a day.
Polyurethane shoe glue
This composition is widely used in the shoe industry, but can also be useful for restoring a punctured mattress. Due to its excellent properties and high quality, it firmly adheres to two surfaces, preventing further damage. Shoe glue is applied only to cleaned and dried material.
PVC glue
Many models of air mattresses are made of polyvinyl chloride, so to repair them you have to use a special PVC glue. They treat both the damage site and the patch itself. After the first layer has dried, another one is applied. After a quarter of an hour, you need to apply the patch and press it.
Glue "Super-moment"
Specialized adhesives are used for serious punctures, when it is necessary to restore the integrity of a seam or a large area of the mattress. But some series may contain aggressive substances that can cause damage to the surface. Also, Super Moment glue creates a hard seam that can crumble when bent.
Natural rubber rubber adhesive
It is characterized by a natural composition and the ability to create an elastic seam without visible stains. The solution is applied in two layers, allowing each layer to dry. When gluing surfaces, it is necessary to exert considerable effort, so any weight is placed on the patch and left there for 25 hours.
Air mattress repair kit (repair kit)
Many air mattresses come with ready-made adhesive compositions. They are designed for a specific material, so they are the best option. If after several repairs the adhesive has been exhausted, it is recommended to find similar products in the store.
Other adhesives
If your home workshop does not have the necessary glue to seal the hole, you can use simple tricks. Some craftsmen take pieces of PVC and thoroughly soak them in solvent. After this treatment, the plastic stretches well and acquires a number of qualities that make it no worse than store-bought glue. As an example of such a composition, acetone and a plastic bottle are considered.
12 hours have passed (even a little more)
The sight of glued patches was depressing. They looked too primitive. Most likely, all this is a fool's errand. But when I tried to pick at the edge of one of them, it turned out that it was stuck tightly.
Having inflated the air bed, I first left it alone and went about other things. Imagine my surprise when, after about a couple of hours, I came to the room where the experiment was being carried out and discovered that the Intex product did not even think about “lowering”. It looked exactly the same as it did immediately after pumping.
Having decided to conduct a more daring experiment (it was just time for an afternoon rest), I lay down on the bed. Waking up about an hour later, I noticed that the bed had lost a little of its elasticity.
One of two things - either some patch has “come off” or there are one or two more “unaccounted for” holes.
Other repair options
In some cases, sealing the hole in the mattress does not solve the problem, so you have to resort to other repair options. They are selected depending on the cause and nature of the damage.
If the seam comes apart
If the seam has been damaged during the use of the mattress, using a patch on the outside will be ineffective, even if you take into account all the subtleties of gluing.
To successfully restore the product, you will have to use some tricks and seal it from the inside. First of all, you should pull the damaged area through the valve hole, and then fix the patch with glue. The structure can be turned back only a day after the composition has dried.
Method without glue
If there is no glue in the house, you will have to fix the defect in another way. To do this, you may need an iron, paper, and a flat wooden surface. First of all, you need to turn the mattress out through the valve hole, clean the surface from dirt, and then align the edges of the tear and fix it on the backing. Next, the soldering area is covered with paper and processed with a hot iron. After the paper has cooled, you can remove it and turn the mattress back inside out.
Method with “Liquid Patch”
To implement the procedure, you will need a special composition called “Liquid Patch”. You can buy it at an inflatable store. If the diameter of the damage does not exceed 3 cm, there is no need to use additional gluing methods. If there are larger damages, you will have to use regular thread.
If the valve leaks
The cause of an air leak may not be damage to the rubber sheet or seam, but a loss of valve tightness. But even such a defect can be easily solved at home. To do this, you need to unscrew the valve and clear its grooves of debris, remove the gasket and clean the end part of the valve with sandpaper. After thoroughly lubricating the valve, the structure must be placed back, and then the mattress must be inflated. A soap solution is also applied to the surface, which is necessary to check the tightness.
Gluing the patch
Before gluing an air mattress using a repair kit or using improvised means, it is important to carefully read the instructions for the glue and read all the manufacturer’s recommendations.
The standard sequence of work when gluing a patch is as follows:
- Apply glue to both surfaces, being very careful so that the product does not get inside the mattress;
- Wait for the period of time recommended by the glue manufacturer - from 2 to 15 minutes;
- Carefully align the parts and press them tightly together for 10-20 seconds for reliable adhesion.
Depending on what kind of glue the mattress was sealed with, the junction of the parts must be additionally placed under a press for a period of 3-4 hours to a day (the need for this is indicated in the instructions).
How to seal a velor surface at home
If damage occurs on the side of the velor surface, you will have to clean the area using a cotton pad soaked in acetone, as well as the blunt side of a knife.
But when performing such manipulations, you should be careful, otherwise you can create additional holes. Then the surfaces to be joined are cleaned with sandpaper and treated with a degreasing compound. In order not to spoil the appearance of the mattress, it is better to glue it from the inside, because it is, in most cases, smooth.
What to do if the valve is faulty
When the repair work is completed, the quality of the connection is checked, but air continues to escape, you need to check the place for inflating the item. Over time, this location becomes unsafe, which can cause a leak.
Valve mechanism repair:
- Unscrew the plastic housing.
- Wipe off dirt and dust.
- Remove the rubber membrane.
- Using sandpaper, sand the inside end of the housing.
- Lubricate the inside of the body under the rubber band with grease. Any, even vegetable oil will do.
If, after installing the element in place, air continues to escape, you need to take the item to a workshop. It's better to change it completely. This method does not always guarantee a reliable connection.
Sometimes the membrane is changed because the rubber becomes tanned over time and then warps.
In another case, ordinary polyethylene for weight products will help, which will completely block the air leak. Before doing this, you first need to remove the washer, then install it in place.
How to avoid new damage
After successfully restoring a burst mattress, you must follow a number of rules for its use to avoid future damage.
First of all, it is important to carefully inspect the surface of the ground before placing the mattress on the grass, sand or floor. The presence of prickly and cutting objects is a serious threat to the product.
You cannot play on the mattress with pets, because they can damage its surface with sharp teeth or claws. Also, do not pull the mattress across the floor if there are people on it: this can lead to seams coming apart.
Many holes and damage to a mattress are not fatal. Therefore, it is not necessary to go to a workshop to fix the problem. It is enough to determine the cause of its occurrence and find a suitable recovery method.