Choosing a work surface for a kitchen set is a responsible matter. After all, it suffers most from humidity, cleaning products and mechanical stress. Postforming countertops are one of the highest quality and most economical surfaces that housewives love.
What types of countertops are there?
Furniture in the kitchen should not only be beautiful, but also comfortable, functional and practical. The countertop is one of the integral components of the kitchen environment. It is important that it is also of high quality and durable, because it is on it that most manipulations are performed.
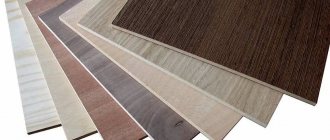
Let's look at what types of countertops there are. The canvas for covering kitchen cabinets is made from various materials, for example, such as:
- natural and artificial stone;
- tree;
- chipboard (chipboard);
- medium density fiberboard (MDF);
- metal;
- concrete.
What material to choose for a countertop is purely a matter of taste.
The choice of material for a countertop directly depends on your taste and financial capabilities, since products made from stone and wood are:
- the most practical;
- durable;
- durable;
- but also the most expensive.
Products made from MDF are in the mid-price range. The most budget option, but also the most common and popular, would be a countertop made of chipboard.
It is very important for the countertop that it is moisture resistant and resistant to damage. Therefore, when purchasing an inexpensive chipboard product, it will be useful to learn about postforming technology.
The countertops must be moisture resistant and highly resistant to damage.
How furniture is created
Thanks to modern Italian equipment, we produce more than 7,000 parts per day, with high precision. And if you need a unique and inimitable set, we will make a kitchen according to your measurements and sketches.
To ensure that the wood does not change shape, we place it in special drying ovens, only in this way the furniture will not deform due to temperature changes. Chipboard of the highest category does not emit formaldehyde, and paints and varnishes from Italy and Switzerland are certified and meet sanitary and hygienic standards. Reliable German and Austrian fittings ensure smooth operation of all moving elements, so Merckx kitchens will delight you with working mechanisms for a long time. are characterized by durability and high resistance to damage:
- quartz - similar to stone, do not absorb odors, stains, have mechanical and thermal endurance;
- acrylic - a smooth surface allows you to keep the coating clean, available in a variety of colors;
- post-forming - an affordable option for a sophisticated interior, practical and pleasant to the touch.
What is postforming
The concept of postforming is quite broad. In addition to the fact that this is the name of the technology itself, it can also include any chipboard and MDF products made using this method.
Postforming technology is a method of covering products made of chipboard or MDF with a laminated film, which is plastic consisting of several layers. Using this technology, plastic is heated to a temperature of 220 degrees and the base of the future product is covered under high pressure. The coating on the slab has no seams, which means that the product is less vulnerable to external factors.
Paper impregnated with special resins turns into plastic that reliably covers the tabletop
The laminated film, which covers the surface of the product, as already mentioned, consists of three layers:
- durable base consisting of several layers of kraft paper, which is impregnated with synthetic resins;
- a layer of paper with a pattern that performs a decorative function;
- a layer that protects the tabletop from moisture and damage, consisting of paper impregnated with acrylic and melamine resins.
Decorative coating using this technology can be designed in any style, color scheme and absolutely any ornament. Everything that the customer’s imagination is capable of can be accomplished in production. In construction hypermarkets you will find laminated countertops in standard colors, most often they are plain or imitate marble, wood, or granite.
The last layer of the tabletop is protective
The last, protective layer, protects the surface from various mechanical, chemical damage and moisture on the chipboard base. The layer, for example, will withstand accidental contact with a fork or knife, will tolerate non-aggressive cleaning agents, spilled tea, coffee and juices will also not cause harm. But still, you should not experiment, and you need to take care of the product in a timely manner, especially if you spill substances such as hydrogen peroxide, coloring compounds, and glue. Despite the fairly good wear resistance, it is still not recommended to cut with a knife directly on the countertop. After all, any surface, if treated carelessly, will sooner or later lose its quality and appearance.
The tabletop needs a drip tray so that it drains moisture from its surface more efficiently.
Postforming also has an “Achilles heel”, namely the side opposite the laminated one. It is covered with simple kraft paper, which in no way protects the product from moisture or damage, so any liquid spilled on the surface should be wiped up immediately to avoid getting on the back of the tabletop.
How to properly care?
Proper surface care is not difficult. It is enough to do the cleaning on time and use cleaning products if necessary. For example, to prevent gray spots from appearing on a light panel, greasy stains are immediately covered and washed with soda. When removing dried stains, use a soft cloth or sponge with warm, soapy water. Use an iron brush as a last resort, especially if the surface is smooth, because it will leave microscopic scratches that will eventually destroy the gloss.
Even if you choose premium postforming, you need to wipe the table dry after cooking and periodically polish the surface. Wiping is necessary in order to avoid the formation of limescale. It is also important to ventilate the room, because with high humidity, mold can form on the surfaces, which will damage the material.
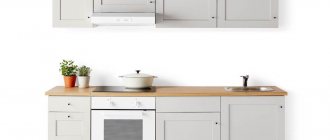
Straight kitchen design with cabinets up to the ceiling- What material are kitchen sets made of?
Kitchens with patina: decor options and tips on color combinations
You need to be careful with the surface. If you place dishes at more than 220 degrees, dents, bulges and color changes may occur. Such a panel cannot be restored; it will require a complete replacement. You can take convenient coasters for hot food and the table will be unharmed.
Mechanical impacts also cannot be restored on the panel. Severe cuts or chips not only affect the appearance, but can also cause swelling if moisture gets in there. Therefore, it is better to always use a cutting board.
The table may be affected by caustic substances that emit fumes. Therefore, it is better to store them in another closed place. Weak natural acids contained in vegetables, fruits, and juices can also affect the loss of color and surface smoothness.
The detergent must be non-abrasive and not contain aggressive compounds (chlorine). Contact with leave-in technical products (acetone, bleach, ammonia, etc.) and household products (hair dye, manganese, brilliant green, etc.) should be avoided, and if contact occurs, immediately eliminated. They can lead to irreparable consequences.
Types of countertop cladding
There can be two types of cladding for the base of the tabletop:
- 90 degrees;
- 180 degrees.
Postforming 90 degrees involves facing the product only on two sides, which are located at right angles to each other - this is the surface itself and the front end. This method has a significant drawback - the absence of a drip tray. That is, if water gets on the countertop, then pouring down, it will wet the lower surface of the product, which is extremely undesirable, because, as you know, chipboard is a material that is afraid of moisture. Therefore, it is necessary to treat the bottom joint of such a countertop with a silicone-based sealant.
Drip tray on the countertop
Postforming 180 degrees implies that the surface of the tabletop, the end and a short distance of the bottom side are lined with plastic in a U-shape. This creates the opportunity for spilled drops to collect and flow onto the floor without falling on the unprotected base of the product.
Technical details: how production takes place
Based on the name of the technology, postforming involves applying plastic to a ready-made countertop surface during its assembly. As a rule, the first step is to shape the surface under the influence of high temperatures and then cover it with the material indicated above. The latter can be carried out in two ways:
- U-postforming, also known as complete, during which the plastic is folded at both ends of the tabletop.
- L-postforming, also known as one-sided, which covers only the outer part of the end with a 90-degree bend.
At the same stage, a drip tray can also be added, the role of which is to prevent dripping condensation from reaching the uncovered part of the countertop. Its absence does not pose a serious threat to the integrity of the furniture, however, in the future and in case of poor quality assembly, accumulated moisture may slightly disrupt the structure of the material on the inside.
Attention! The issue of having a drip tray is often considered a sign of high quality services from the manufacturer.
Moving on to painting the finished postforming, it is worth remembering the huge variety of available visuals, which can be either a monochromatic coating or a more decorative one with an imitation of any material, including:
- Dark wood texture. Adds aesthetics to any interior, stylized with a classic look.
- Granite surface. Another noble color option for fans of more aristocratic European styles, especially ancient Roman architecture.
- Monochromatic application of a certain color for lovers of minimalism and rigor in the appearance of the kitchen. Looks especially good when choosing a matte surface.
What sizes are there?
It is worth knowing that manufacturers have the opportunity to produce tabletops of different, non-standard sizes, it depends on the wishes of the customer. The maximum length can reach 4 m. But basically, in stores you will find two standard sizing options:
- length – 305 cm, width – 62 cm;
- length – 224 cm, width – 60 cm.
The thickness of the tabletops can be 28 and 38 mm.
In this case, all countertops will be covered with laminated film on only two sides - the working surface and the front end. The side and rear edges remain unprocessed. This is done so that during the installation of the product the master can file it, if necessary, or add it using a connecting strip. In any case, upon completion of the installation of the tabletop, its edges are covered with edge strips.
What are the options for countertops?
Concrete surface
You can combine impressive appearance and durability with a concrete countertop. There are several options for its manufacture. One is to make formwork and a frame so that later a hob and sink can be built into the table top. To do this, use tin strips to create an insulated contour that will not contain concrete. Then the homemade base of the product is reinforced and the solution is poured.
Another option is to make a new product based on an old one: it is washed, dried and well polished. Then the aluminum border and corners are attached to the ends using liquid nails. A day after assembling the prepared base, you can pour the concrete mixture.
If a decorative layer is planned on top, the concrete mixture is not poured to the top: it should not reach the top edge of the planks by about 10 mm. When the solution is completely dry (after about two days), you can begin decorating with tiles, marble chips, etc.
Advantages and disadvantages of postforming countertops
Like any product made using postforming technology, countertops have their own advantages and disadvantages. Using the table as an example, we will consider the positive and negative aspects of the most common type of kitchen surface, made of particle board.
Table 1. Advantages and disadvantages.
| Advantages | Flaws |
| 1. Affordable price due to low-cost manufacturing technology and inexpensive materials used. 2. Huge palette of colors. The ability to choose any color and print is achieved due to the fact that absolutely any design can be applied to the decorative layer. 3. Sufficiently high wear resistance of the surface is achieved precisely thanks to postforming technology. 4. Over time, the surface pattern does not wear off or fade. 5. Not afraid of elevated temperatures. This does not mean that you can place hot dishes from the stove on the surface, but postforming will easily withstand proximity to the hob. 6. The countertop is easy to care for; it can be easily washed using any dishwashing detergent. | 1. Postforming countertops are manufactured only straight. If you need a U-shaped or corner one, you will have to join several tabletops, cut to the dimensions you need. 2. The service life of the countertop depends on the quality of the plastic used; the worse the plastic, the sooner you will find it peeling, bubbles or other defects. 3. Impossibility of repairing the product. If somehow mechanical damage occurs, then the entire tabletop will have to be replaced, since it cannot be repaired. 4. Contains formaldehyde resins, which can initially emit an unpleasant odor and are quite harmful to humans. 5. The service life of the product is on average five years. |
An MDF tabletop will have different parameters than a chipboard tabletop
A postforming tabletop based on MDF will have slightly different indicators, since the board itself has a different density than chipboard. MDF, unlike particle board, has no voids; it is a very tightly compressed material that does not contain formaldehyde and other resins, which means that it is environmentally friendly and safe for humans. In addition, due to its texture, the wood fiber material can be given smooth rounded shapes - the board will not crumble, as is the case with chipboard.
MDF board is laminated according to the same principle as chipboard, and their main indicators are the same, except that MDF is more resistant to moisture and mechanical damage. But the price of fiberboard is higher than that of particleboard.
MDF is much more resistant to moisture than chipboard
Advantages and disadvantages
Currently, postforming countertops are becoming increasingly common.
| pros | Minuses |
| Durable tabletop material, good edge treatment to protect it from moisture. The thickness allows you to place hot dishes (less than 220 degrees). Also not subject to sun fading | Possible swelling of the surface in places of cracks, chips and dents when water enters. To avoid this, you need to look at the end processing and postforming thickness |
| Low cost - it is possible to find models covered with plastic starting from 600 rubles. per meter and various designs | Postforming for the kitchen of any manufacturer will differ from natural wood. For example, if a tree is taken for manufacturing, then the characteristic color and texture are immediately felt. Despite the varied design and efforts of the craftsmen, it is clear what kind of material was used in production - plastic |
| Easy care - does not deteriorate from household chemicals and brushes. Easy installation and replacement if necessary | Impossibility of repair. For example, acrylic kitchen countertops can be restored if damaged. In the same case, laminated chipboard panels can only be thrown away. But due to the low cost, this disadvantage is easily eliminated |
What should you pay attention to when purchasing a postforming countertop?
When you go to a furniture store to buy a countertop, arm yourself with a few tips to find out when purchasing from the seller.
- Be sure to find out the emission class when purchasing particle board. This is an indicator of the environmental quality of the material used. For furniture, class E1 should be used, ideally E0, which means that the board is non-toxic (and we remember that formaldehyde resins, which are quite harmful to humans, are used in the production of chipboards) and are not harmful to your health. Be aware that if the stove has an emission class of E2 and higher, it is strictly not recommended to use such a product due to the high content of formaldehyde in the composition. The quality of products must be confirmed by relevant certificates. Russian and European manufacturers accompany their products with these documents. Manufacturers from China - no. Therefore, when purchasing, find out the country of production. This indicator does not apply to products made from MDF, since resins are not used in its manufacture.
E1 marking implies the safety of slabs for human health - To use a chipboard countertop in the kitchen, of course, it is better to choose a moisture-resistant product. Note the raw edge of the slab. Moisture-resistant chipboard can be distinguished by its characteristic greenish or bluish tint. The fact is that manufacturers add a special coloring pigment to the base for future slabs. MDF board has a lower ability to absorb moisture, so it is not marked with color.
- Find out what type of plastic is used to line the slab. There are two of them: HPL and CPL. Our advice is to choose the HPL type; it differs from the other type in thickness, and therefore has increased wear resistance and a longer service life.
- Experts advise that if you cook often and a lot, then consider the option of a countertop with a matte finish. This surface is easier to care for and will retain its original appearance for a longer time. Glossy surfaces are less resistant to all kinds of mechanical damage. For people who love to cook, matte countertops are better suited.
- Keep in mind that light-colored countertops deteriorate faster, since various stains are more difficult to completely remove from a light-colored surface. On a dark, non-uniform countertop, even over time, stubborn stains will not be so noticeable.
Over time, dark spots appear on countertops that are too light.
Choose factory-made countertops
The postforming technology used to produce countertops is used by many enterprises, both those that produce countertops and those that manufacture custom-made countertops. By and large, the manufacturing quality and colors are identical. For custom countertops, the texture of the plastic even has a wide variety.
What's the difference? The difference is that companies that manufacture countertops additionally produce accessories for them: aluminum end strips, countertop connection strips, etc. These strips are designed to protect the ends of the countertops from moisture.
Countertops made to order often have a profile different from the factory one. For this reason, the connecting strips do not fit with them. The problem is solved by gluing plastic to the end of the tabletop. However, it does not have the same protective effect as an aluminum strip. As a result, water can get under the plastic and the tabletop will swell.
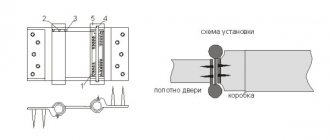
Tools and components required for countertop installation
So, the countertop has been purchased, and if you have not used the services of professional installers, you will have to install it yourself. Let's take a step-by-step look at all the questions and steps related to installing a postforming countertop.
Before starting work, prepare the tools and components that you will need in the process:
- table top canvas;
- roulette;
- pencil;
- level;
- jigsaw;
- drill;
- silicone sealant;
- metal strips;
- wall plinth;
- edge tape.
Convenient to use jigsaw
Main advantages
See also
Do-it-yourself toy rack for a nursery using improvised materials
The kitchen option of postforming countertops has strengths and weaknesses.
The advantages include the following points:
- affordable price due to simple production technology and the use of inexpensive materials;
- wide selection of design, stylistic and color solutions;
- there is a classic option for stone or wood;
- you can find original solutions;
- resistance to various external influences;
- continuous protection without joints;
- high heat resistance;
- ease of maintenance during operation.
But this coating also has a downside.
Postforming installation instructions
Step No. 1 - take the necessary measurements
Measure the required length of the product taking into account the width of the end strip. Use a jigsaw to saw off the extra centimeters. Treat the ends with sealant and use small self-tapping screws to attach an end strip that will protect the tabletop from moisture. Wipe off any remaining sealant from the surface using a cloth moistened with acetone. Don’t forget to also treat the back end of the tabletop with silicone and preferably the edges of the cabinets on which our tabletop will lie.
We make the measurements we need
Step No. 2 - make the necessary cuts
Mark the locations for the required openings, for example for a hob or sink. To make the cuts neat, outline the location of the future cut with a pencil, drill holes along the drawn line with a drill, and use a jigsaw to cut out the space for the sink or stove. Treat the edges with silicone compound. Try on the sink and hob. It will be easier to immediately adjust the holes at this stage than at the final stage.
Cutting out the opening under the sink Treatment with silicone compound
Make a fitting of the sink or hob at this stage
Step No. 3 - installing the countertop
Now we install the tabletop itself. We lay it on the lower cabinets of the kitchen unit. We check the level, if necessary, we tighten the legs of the cabinets, but if this is not possible, place special plastic pads or wedges under the legs for adjustment. The tabletop needs to be secured to the cabinets with self-tapping screws. If the kitchen set is new, then it has special strips with holes for self-tapping screws through which you can fasten the countertop. If there are no such strips, use metal or plastic corners, especially for the cabinet under the sink. You will need self-tapping screws with a length of 30 mm and 16 mm.
If the geometry of your kitchen requires an L-shaped countertop, then the panels are connected to each other using a joining strip.
Putting the tabletop in place
The sink is a functional element in the kitchen that is used every day, so its installation should be given special attention to avoid further problems with leaks. In addition, the attachment of the sink to the countertop (from below or from above) must be reliable so that it does not fall down along with the dishes or water. In a special article, we will look at detailed methods for installing various types of sinks on the countertop.
Step No. 4 - install the wall plinth
All that remains is to install the wall plinth between the kitchen apron and the countertop. The plinth can be secured with self-tapping screws or glued. But in both cases, treat the joints with silicone sealant to prevent moisture from getting into them. You can often find single-color skirting boards. They are not color coordinated with most countertops, but are made so that the buyer can match the edge strip to the color of the countertop and insert it into the baseboard.
After installing the set along the line where the table top meets the wall, you need to secure the baseboard
Such products are sold in the form of structures consisting of two parts - the inner part and the strip. You will learn more about how to attach a baseboard to a kitchen countertop in our article.
Stylish examples
Thanks to the unique texture of facing plastic, kitchen countertops have any patterns and structures. It is very easy to produce an imitation of natural wood, stone, ceramic tiles and even natural glass. In addition, on such a surface, in modern production, patterns are printed, landscapes and photographs are applied.
Stylish marbled kitchen countertop
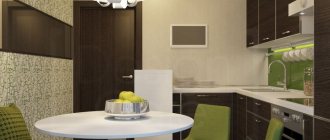
Tables finished in a glossy format look especially beautiful. For classic styles such as Provence, English and Scandinavian, as well as for modern High-Tech and Minimalism, gloss is very suitable. Let's look at an example of the French Provence style, mixed with a Scandinavian motif.
Kitchen in Provence style with postforming countertop
Finishing begins with the floor covering. Planed parquet boards treated with clear varnish will look good. The latter must be applied in several layers to protect the wood from dirt and moisture. Birch or ash will do. Here it is important to make the floor tone white.
The color of the countertop and floor is almost identical, which makes a wonderful ensemble in the kitchen
The kitchen set is purchased to match the color of the floor covering. Find a quality product with standard paneled cabinets. Ordinary straight doors will also work, but they won’t look as nice. The tabletop is selected with a marble texture. Choose another dominant interior color. Since there is already one - white. It is set by the “Provence” style. The second color, for example, is green. Then the plastic covering of the desktop headset will be white and green, with a marble texture. Make the backsplash piece the same structure as the desktop.
Kitchen with postformed marble countertop in Provence style
Buy hanging shelves the same as floor cabinets. Whitewash the walls with simple whitewash or paint them with white paint. Place vases with green plants around the perimeter of the kitchen table. Since we have a dual style - Provence, combined with a Scandinavian motif, white and green colors will be the best choice, fully characterizing both of these directions. But you can add a little beige, warm tint to white.
Postforming countertop in a kitchen in Provence style, combined with Scandinavian style
Try to combine several interior design styles. This way you will get an unusual, unique design, not like the others. And postforming countertops will fit perfectly into your fantasies.
The postforming countertop will look great in any kitchen
See alsoThe design of the kitchen set is an important element of the interior
Tips for choosing, installing and caring for surfaces
- The most convenient option would be a solid tabletop, without joints. In this case, it will have a more expensive appearance and it will be more convenient to work with such a product.
- The countertop should be in harmony with the design of the kitchen unit and the color scheme of your kitchen as a whole. Thanks to a wide selection of postforming color options, you have the opportunity to choose a countertop in the same style as your kitchen design. So, for example, if you have a country-style kitchen, then a wood pattern will come in handy. A high-tech kitchen will suit a plain gray-silver surface. For classics, manufacturers present a wide selection of light colors that imitate marble and granite.
- The countertop surface should be level with appliances and other cabinets. This is especially important if you are not installing the entire surface, but are building on an existing one. Ergonomics in the kitchen
- If you need to saw off a product, try gluing masking tape at the level of the intended cut - it will help prevent chips and cracks.
- If, nevertheless, small chips appear, sand them with a file or sandpaper and treat them with silicone.
- It is preferable to choose a worktop with a thickness of 38 mm for the kitchen, as it fits perfectly under the built-in hob, and is also more reliable and durable. And many manufacturers of ready-made kitchens produce countertops of just this thickness with moisture-resistant impregnation.
Moisture-resistant and regular countertops have different interior materials - In order for the countertop to last as long as possible, promptly remove all spilled liquids from it; laminate flooring especially does not “like” vinegar.
- When cutting food on the countertop, use cutting boards. Here you need to understand that scratches on the surface are not just a spoiled appearance. Moisture seeping through the scratches into the body of the tabletop will cause it to begin to swell and swell from the inside. And you will have to change the product.
Leader in the furniture industry
For more than 25 years, the Merck furniture factory has been producing kitchen sets for domestic and foreign consumers. In our catalog you will find a kitchen for every taste and preference, from classic to modern sets, or in country style. Our kitchens were presented at famous exhibitions in Italy, where they successfully competed with European brands. For several years in a row, having earned customer loyalty with an open policy and attractive prices.
Merx kitchen sets are exquisite, stylish sets made from environmentally friendly materials. They will create a cozy atmosphere in the house, have functional elements and durable mechanisms. The combination of glass, ceramics and wood provides Merckx furniture with an exclusive design, and the decor, handmade by our craftsmen, brings a piece of soul to every detail. The Merx company presents kitchens in Kyiv and other regions of the country; our designers and managers will help you choose the appropriate set on the official website of the store or in branded showrooms located throughout Ukraine and abroad. Our representative offices are open in the USA, Canada, Australia, Great Britain and the European Union.
How else can you use postforming countertops?
The kitchen set is not the only place where you can use a countertop made using postforming technology. For example, you can use post-forming to decorate a trendy island or bar counter in modern kitchens.
Due to the fact that today the countertop can be purchased separately from the entire set, and construction hypermarkets offer us a huge selection of all kinds of accessories and spare parts for furniture, you can design a very convenient element in your kitchen - an island.
Countertops for the island must be arranged in accordance with the same requirements
The basic requirements for the surface under the island are exactly the same as for all countertops. The only difference is that when installing the surface on a kitchen cabinet, no one will see the back, untreated end. And for the island it is important that all ends are lined with edges. And this is where edge tape comes to the rescue.
All you need to do is choose the product according to the color and thickness of the tabletop. It will not be difficult to glue the edge, since hot-melt adhesive is applied to its reverse side. All you have to do is heat up an ordinary household iron to medium temperature, warm up the edge and, using smoothing movements, glue it to the end. Under the influence of temperature, the glue will melt and, subsequently cooling, will reliably and firmly connect the edge to the edge of the tabletop.
Furniture edging: types
If it happens that the edging tape has come out beyond the edges of the end, or you did not calculate the size and took it a little wider than necessary, then carefully remove the excess using a file. To sand the resulting joint, use a laminate wax chalk. Apply it several times along the joints and rub it in with a gloved hand or a cloth.
Thus, your countertop will be edged around the perimeter and can be installed in the middle of the kitchen - it will look aesthetically pleasing from any side.
Postforming tabletops can also be used to create small kitchen or even children's tables. Having sawed off to the required size, edge the edges and secure them to the legs, which are also sold in a large selection at any construction hypermarket.
The method of making countertops that interests us is also relevant for other types of furniture.
Photo
In order to choose a beautiful option for the kitchen, we suggest looking at photos of countertops in combination with a set:
How do you like the article?
Arrangement of an exclusive coffee table. Part one: making the tabletop blank
In this master class, consisting of several parts, I will tell you how I made an exclusive coffee table.
For the tabletop, I took a blank from a cross-cut of an Angarsk pine burl, and for the legs - the Angara pine branches themselves. As can be seen from the title photo, which photographs the working part of an unfinished tabletop blank, the wood pattern is very beautiful and interesting, and the shape of the tabletop itself is very original, has a very unusual shape, which nature itself gave to the burl. The already fully processed workpiece “at the exit” has quite large dimensions - 61 x 51 cm, which is quite normal for a coffee table.
First, a well-dried (two years) workpiece from a cross-cut burl should be leveled with an electric planer.
And then smooth the surface with an angle grinder.
Dust from grinding and small shavings from a plane need to be collected, they will be useful to us.
When drying the pine burl, cracks appeared in some places along the annual rings. They need to be sealed.
Using a brush, we clean out any wood dust that has accumulated there during planing and sanding.
Prepare epoxy glue with filler. As a filler we take dust-chips, which were formed after planing the surface of the workpiece with a plane. I told you how to make such glue in my master class >>
And we begin to putty the cracks.
This is what happened after puttying.
Before the glue sets, you should sprinkle the entire surface with fine dust from sanding with an angle grinder.
We leave our blank for the glue to harden for a day.
The next day we continue work. We use an angle grinder to go over the putty areas.
After this operation, it was discovered that we had a couple of unfilled cracks.
We repeat the putty, as in the first case.
Again we send the workpiece for drying. And only after drying do we proceed to the final grinding of the workpiece.
The surface of the sandpaper quickly becomes clogged with wood dust. Personally, I clean it periodically with a wire brush.
I think it’s clear that if at the beginning we work with sandpaper No. 35, then we move to No. 60, and finally we sand it by hand somewhere around No. 150.
Here is the blank sanded clean.
At the next stage, remove the bark on the side surface of the workpiece. There is no point in leaving it - it won’t hold on anyway, especially since in some places it has already peeled off.
Now you need to finish sanding the sidewall with an angle grinder,
And finally “finish” the surface manually with sandpaper.
Now our workpiece is ready.
I’ll tell you what we’ll do next in the next parts of my master class.
Source
How to make a kitchen countertop from chipboard and plasterboard
Forum member shurigin replaced the kitchen table cover made of laminated chipboard, which could not withstand the dampness in the sink area, with two sheets of moisture-resistant Giprok plasterboard, reinforcing them with mesh. Then I glued the tiles and treated them with sealant in places.
SlobalWS has built a kitchen from scratch several times and knows very well how to make a countertop from scrap materials. Since the prices for finished products were not encouraging, they looked for alternative options. Having thought through everything, I came to the conclusion that it is best to make a countertop with your own hands, and from these materials: plywood, liquid nails, tiles or porcelain stoneware and grout for joints. For the first time, he used 40x50 timber and regular tiles to make a countertop. I secured the wood to the floor with metal corners and dowels to the wall. I put plywood on top, screwing it in with self-tapping screws (flush). Thus, the forum member prepared a flat surface for laying tiles.
Qualities that make postforming popular
The main advantages of postforming boards are water resistance, mechanical strength, resistance to ultraviolet radiation and aggressive environments, and heat resistance. Postforming products have the following structure:
- MDF or chipboard;
- melamine edge;
- kraft paper;
- decorative plastic;
- durable protective layer.
To produce high-quality household and office furniture, postforming with rounded edges (on both sides) is used. Although postforming is much more expensive than laminated chipboard, it is a very popular material that has received well-deserved high ratings from consumers in many countries.