Unique designer and unusual items are and will continue to be in high demand. It's all about their uniqueness - only with your own hands or the hands of a skilled designer can you bring to life something that no one else will have.
These things include a table made from cut wood, which you can make yourself . And despite the fact that many people have already brought this idea to life, such a table will still be unique and one of a kind, because nature will certainly not repeat the pattern of the inside of the tree.
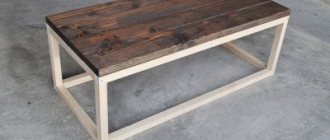
Table made from cut wood
What is good about a table made from sawn wood?
Before we talk about how to make such a table yourself, you should understand why you need to pay attention to it in the first place. So, first of all, it should be noted that furniture made of wood is an environmentally friendly and natural product. To make such a table, you only need a tabletop, the role of which will be played by the end cut of a thick tree trunk, as well as what will play the role of legs. These can be metal supports or supports made of wood.
Table made from cut oak
On a note! Sometimes you can take a whole piece of driftwood suitable for the parameters and make a table directly from it, where the root part will serve as a kind of support, and the even cut itself can be decorated and made into a tabletop.
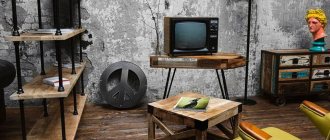
Table made from cut birch bark
Another undeniable advantage of a table made from cut birch bark is that it can fit into a number of different interiors. So, it will look good in an ecological style, country style, it will fit perfectly into the kitchen or living room, and in the country it will become the optimal addition to the house.
Coffee table made from cut wood
It is also worth understanding that the pattern of the tree, although it will be similar to other cuts, will still remain unique and inimitable. And it will still be different for different trees.
Making a table from cut wood yourself is quite simple - you don’t have to resort to the help of craftsmen and designers. It is enough to allocate a little time and make some efforts, and a unique and inimitable, unusual and beautiful product will appear in the house.
Making a table from cut wood yourself is quite simple.
Important! Such a table will look wild in some interior styles. So you must definitely decide in which room it will stand and whether it will fit into its style, if the decision was made to make such a table.
A little about forms and parameters
The first step is to decide what shape the table will be made. This will largely determine what shape of saw cut will need to be found, and how the work itself will be carried out. So, as for the countertop, it can be:
- round , which will require quite a lot of space around the table. But this furniture looks great. However, it is important to take into account that to make such a table you will need to find either a very large saw cut in diameter, or you will need a lot of end cuts of more modest parameters. These tables look best in spacious rooms;
Coffee table made of natural wood
- oval , which is perfect for use in a large family. It is comfortable to sit at the oval tabletop, and due to its large size, you can place a lot of things on it;
- rectangular , which means the table will fit perfectly against the wall and take up less space than a round one. But in this case, the cuts will have to be taken not end-wise, but longitudinally. Although you can make such a tabletop from many small cuts, choosing the optimal shape. The same can be said about square tables.
Wooden coffee table
On a note! It is not necessary to make a large dining table from sawn wood. You can limit yourself to a small magazine or coffee one. It all depends on the desires and capabilities of the person who will make the furniture and then use it.
Also, immediately “on the shore” you need to think about the number of legs. So, round, square and rectangular tables usually have 4 supports. But there are variations using three legs located at a certain angle, or even one support, but with a wide, stable base. Whatever one may say, the most stable option will still be a table with 4 legs.
Cross-cut oak table
Where can I get the saw?
Having decided on the basic parameters of the future table, you need to prepare the necessary materials. And the most important material that will play a decisive role in the process is a good quality cut of wood that fits the size. It seems that everything is simple here - I went into the forest, took the first log I came across and sawed off a round piece from it. But in reality everything is much more complicated.
Safety precautions when working with a chainsaw
Preparing saw cuts is not entirely easy. First, you need to find a good tree of the required diameter as well as quality. Secondly, mistakes should not be made during sawing. The slightest mistake - and you will have to look for a new tree and do all the work over again.
Wooden cuts
For the manufacture of tabletops, saw cuts with cracks are almost unsuitable (except in certain cases). Also, the wood must be treated before use. The easiest way is to buy ready-made saw cuts - it turns out that they are sold, but finding a supplier is not so easy.
Table made of saw cuts and epoxy resin
If you prepare saw cuts yourself, then you need to look for one that will have a beautiful wood color, will not be cracked, and will have a beautiful pattern. If several cuts will be used for the tabletop, then it is important to ensure that the pattern is similar, or at least use cuts from the same type of wood.
Important! The pattern of the tree on the saw cut is the highlight of the future table. And therefore, the selection of wood patterns must be treated with utmost care.
Wood cuts
It is best to take wood cuts that are already dry for making a table, moreover, they should be made from a type of wood that is less afraid of moisture than others. It is better to choose those that do not have knots and other defects that can break off over time and ruin the product. The cuts must be of sufficient thickness and not too thin or too thick.
Thus, only at the stage of preparing the cuts can you stall. But it’s worth it - a unique table made from sawn wood, created by yourself, can become the highlight of the interior. In addition, as a rule, such tables are very durable and can serve for many years without complaints.
Coffee table made from cut wood
Instructions for making a table
The design has been chosen, the tools and consumables are at hand - now it’s time for real men’s work. More precisely, let's move directly to the technical part.
As a result, you should get perfectly processed cuts, without knots and bark.
For strength, apply wood glue to the holes, and then secure each leg with long screws to the table surface.
You can buy pigments in a variety of colors.
The process uses a grinding machine and sandpaper.
You need to cover 7 layers with varnish, pre-treat each layer with sandpaper to form a more reliable coating.
Bringing such a project to life is not so easy. Moreover, this is persistent painstaking work, in a process that requires patience, dedication and hard work from the master. But such an element of the interior will attract much more attention than a boring piece of furniture bought in a store.
Your work will be rewarded.
Materials and tools
In addition to the fact that you will need wood cuts as a base for the tabletop, you will also need other materials, and, of course, tools. But here a lot will depend on what table manufacturing technology was chosen. Thus, a saw-cut table can be made either using epoxy resin or without it; varnish, corners and various fasteners may be required. Tools that will be useful are a grinder, a plane, a saw (preferably a chainsaw), as well as a drill, drills, brushes, etc.
On a note! You should not use nails to secure the legs - the connections obtained in this case are not reliable. It's best to buy self-tapping screws.
DIY table made from cut wood
Table. Something you can't do without.
| Material, tool | Explanations |
| Spil | The cuts for the tabletop can be either end or longitudinal - it all depends on the selected table model and its appearance. The table can be made from one large-diameter saw cut, or you can also join together many smaller cuts using epoxy resin or wood putty. Here everything depends only on the imagination of the master, but it is important to choose high-quality cuts, the choice of which was discussed above. |
| Carpenter's glue | This substance may be needed for repairing/fastening various wooden elements. |
| Epoxy resin | A substance actively used in construction and repair work, as well as to create all kinds of products. It is necessary to fill empty spaces if the table is made from a mass of small cuts; it can also be useful when filling in recesses. The resin must be mixed with a hardener. |
| Grinding tools | Materials must be sanded, and the best assistant is a sanding machine. However, if you don’t have it, but you have time and patience, then you can limit yourself to a block and sandpaper. |
What will you need for your job?
To make an original table from a vertical cut of wood with your own hands, you need to prepare:
- A cut of dry wood with approximate dimensions of 1700x600 mm, 25 mm thick.
- Metal (steel) plate about 600x35x3 mm.
- 4 steel rods with a diameter of 9 mm, length 1.5 m.
- Epoxy resin (transparent).
- Wax, varnish for a transparent finishing coat of wood.
- Black spray paint.
- Screws No. 12 (1.9 cm).
- Painting tape.
- Grinding machine.
- Sandpaper of different grits.
- Hammer.
- Chisel.
- Drill.
- Welding machine.
- Protective gloves and glasses.
How to make a small table for coffee from sawn wood?
Let's see how to make a simple small coffee or coffee table from a medium-diameter end cut. As we remember, to make tables you can use many cuts at once, but in this case you will use one, but a large one, which will become a full-fledged tabletop.
Step 1. First of all, you need to get the saw cut itself. The easiest way is to buy a ready-made one, but in this case the master decided to go into the forest and prepare it himself. It is best to do the cutting in the summer in very dry weather. “Winter” cuts may become deformed during drying or crack. So, you need to find a large and beautiful tree - walnut or oak, etc. And then you need to use a chainsaw to cut off a section from the trunk in the thick part of the required thickness. The saw chain should be sharp and the wood should not be rotten. The cut itself needs to be dried well for some time and only then can you start creating the table.
Suitable wood is being cut
Preparing a tree cut
Step 2. Next you need to carry out rough general processing of the cut. You need to use a plane to cut off all the irregularities from the surface and remove the bark.
Rough processing of saw cut
The bark is removed
Step 3. After roughing, you need to sand the surface of the future table well.
Sanding the saw cut
Step 4. There may be cracks on the saw cut, and in theory such a cut is not used. But sometimes the problem can be solved - the cracks just need to be strengthened. To do this, you need to purchase a small piece of wooden board and cut out “butterflies” from it, as shown in the picture.
The butterfly is marked
Then it needs to be cut
Step 5. Next, the butterflies need to be attached to the cut in the area of the cracks so that both sides of the tree relative to the crack look like connected butterflies, and then you need to outline them with a pencil.
The butterfly is outlined with a pencil
Step 6. Now you need to cut out the notches for the butterflies on the cut itself.
Notches need to be cut on the saw cut
Another photo of the process
Step 7. All that remains is to insert the butterflies into the places prepared for them and cut off their upper part so that it does not protrude above the cut surface (if necessary).
Excess butterfly is cut off
Step 8. Now you need to secure the butterflies with epoxy resin. You can also glue them with any wood glue.
Fixing the butterfly with epoxy resin
Step 9. After this, the tabletop must be carefully sanded again until perfectly smooth.
Re-sanding the countertop
Step 10. Next you need to coat the wood with a layer of varnish or epoxy resin. Can be applied with a brush. After applying the paint and varnish material, its layer must be thoroughly dried before further work.
Wood is varnished
Step 11. Now you need to drill holes in the underside of the tabletop to fix the legs. The markings must be applied in accordance with the location of the holes on the leg mount.
Holes are drilled in the tabletop
Step 12. The final stage is attaching the legs for the table themselves. In this case, metal ones were used. They need to be screwed to the tabletop, and the table is ready.
This is where the leg will be attached
Attaching the legs
DIY coffee table made from a box and branches – Blog Stroyremontiruy
Today we ourselves will try to create coziness in the house with the help of a homemade coffee table made from a wooden box, branches and glass with our own hands. Homemade products have decorative value, but will also bring practical benefits. It looks beautiful in the interior and allows you to drink coffee or flip through a magazine with comfort and self-esteem.
In addition to all of the above, we need patience, work and the desire to create something useful with our own hands. The main requirement for a box is the strength and flatness of the walls; their beauty worries us little, since the walls will be decorated.
What work will be needed:
- An ordinary wooden box (preferably in the shape of a cube so that all the walls are equal).
- Glue.
- Pencil.
- Thick and thin tree branches (brushwood).
- Saw.
- Sandpaper.
- Glass.
Step 1 - preparing the necessary material
Let's get started. To begin with, we take thick branches and saw off small “nickels” (about 3-5 cm from the beginning). Using sandpaper, we sand the surface so that during operation we do not have to suffer from splinters in our fingers every time.
Nickels will be needed to line the ends of the box , everything is clear here. After we have completed the first point, we proceed to the second. For this we need thin branches. Don't break them carelessly.
Place a box in front of you and measure the length of the wall that is directly in front of you, add the thickness of the “patch” multiplied by 2 (x=z+y*2)* to the result obtained, then measure the branch and cut as much as needed. You will need a lot of these.
Also treat the places where the branches were cut with sandpaper. The branches will be used to line the sides of the box where there are no rounds .
Step 2 – measurements and practice
Now it's time to use your hands, glue and good mood. Place the box in front of you. Place two hands on the sides of the object.
It is these two empty sides that you need to fill with small wooden circles. To ensure everything turns out neatly, without regretting wasted time, take a pencil and the material used in this step.
Circle each wooden circle and mark it with a number and the place where it should be located.
After you have accurately distributed the position of each “part”, take the glue and begin to slowly attach the timber to the box, then turn the box over for 30 minutes so that the area where the work was done is in close contact with a flat surface - this will allow for better bonding . (To improve the effect, place a heavy object on top, but not capable of breaking the box). Do the same on the other side.
(WARNING!) Please do not apply glue along the very edges of the wood, as it will go beyond its boundaries and you will have to redo everything. Once we've finished working on the ends, we can move on to the remaining three sides.
(Why three?) Because the part that stands on the floor should remain empty. We put the box in its original position.
Now paste thin branches over the side that you see in front of you, the top and opposite to what you see.
What to do? Along the previously prepared branch, you apply a thin strip of glue and carefully stick it so that the next one is placed right next to each other.
Step 3 - finish
After completion, leave for 5 hours in a dry room to allow the glue to dry. When the work is completed, it is not forbidden to put the glass on top (after knowing the size of the table surface).
Don’t even think about buying window material - ask the store for special reinforced glass. It is better to cover wooden nickels and branches on the sides with Latek stain and L-S varnish, so they will last longer.
If you want chic of the highest degree, then take thick plywood, attach furniture casters to it along the edges and “plant” the plywood with glue to the bottom of the table. It can also be nailed, depending on the thickness of the walls of the base box. This coffee table moves on rollers; it is not carried from place to place like a bear carrying a barrel of honey.
Voilà*, the homemade coffee table is ready. You can easily place a mug of hot coffee on it, while the morning news awaits you on the newspaper pages.
*X – unknown, Z – wall length, Y – timber thickness.
* Voilà (French) – here.
Source: https://stroyremontiruy.ru/disain-interjera/samodelki/339-zhurnalnyy-stolik-iz-yashchika-i-vetok-svoimi-rukami.html
How to make a table from several end cuts?
Above are instructions for making a table from one large end cut. Now let's see how you can make a table from many small cuts using epoxy resin.
Step 1. The first thing you need to do is make a base on which the pattern of end cuts will be laid out. To do this, you can take a sheet of plywood or chipboard and draw on it the shape of the future tabletop. Two contours are drawn - external and internal. The inner one should be the same size as the final tabletop, the outer one should be a little larger.
The future tabletop is being drawn
Step 2. Now the base needs to be cut out using a jigsaw according to the applied markings (along the outer contour).
The base is cut with a jigsaw
Step 3. You also need to cut several strips of small height from fiberboard to create edges around the base for the tabletop.
Strips are cut for the sides around the base
Step 4. You need to attach the fiberboard sides to the base of the tabletop using glue and small nails. This will create a unique shape for the tabletop. It is better to seal the joints with tape.
Fastening the sides
The sides are fixed
Step 5. Inside the mold you need to lay many end cuts of various diameters so that the desired pattern is obtained. The saw cuts need to be laid close to each other - this will affect the consumption of epoxy resin.
Saw cuts of various diameters are laid out
The cuts are arranged as tightly as possible
Step 6. Now you need to prepare the resin itself, mixing it with a hardener, and apply it to the end cuts, as well as pour it into the mold and be sure to level it as much as possible.
Resin is applied to saw cuts
Result of work
Step 7. The tabletop must be left alone until the resin has completely dried.
The resin must dry completely
Step 8. You need to remove the sides from the fiberboard. They are no longer needed.
The sides are removed
Step 9. Next, you need to sand the surface of the tabletop well using a grinding machine, removing all the unevenness.
Sanding the table top
Step 10. You need to cut the tabletop along the inner contour using an electric jigsaw.
Trimming the tabletop
Step 11. The edges of the tabletop need to be rounded.
The edges are rounded
Step 12. Next, you need to cover the perimeter of the tabletop with masking tape. This is necessary so that during the process of coating it from the wrong side with varnish or epoxy resin, the compositions do not get onto the end parts.
Painting tape is applied around the perimeter
Step 13. All that remains is to cover the inside of the tabletop with paint or another composition, dry it well and screw the legs to it. The table is ready for use.
Painting the countertop