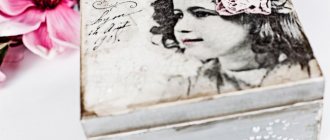
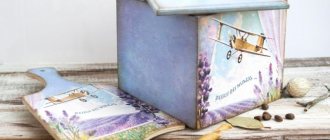
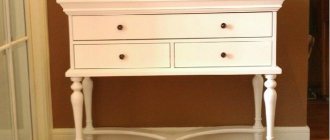
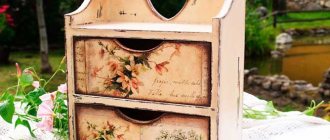
Decoupage in the shabby chic style is a way of updating old furniture, which in the process of decoration gives it sophistication and vintage. The works made using shabby chic decoupage are distinguished by an imitation of an antique surface, a color scheme within pastel shades, and the use of details similar to the interior decoration of old England.
What you need to decoupage a box
An antique box in a shabby chic style is quite easy to make. For a family with children or for friends, this will be an interesting and exciting activity. It is on such products that it is most convenient to practice honing the skill of decoupage.
Decorating a box in the shabby chic style with your own hands is quite simple.
To create an antique box you will need the following materials:
- Casket or box.
- Beige or white acrylic paints for primer.
- Brown acrylic paint.
- Acrylic paints in pastel colors: pink, purple or blue.
- Sandpaper.
- Wax or paraffin candle.
- Varnish glue for decoupage.
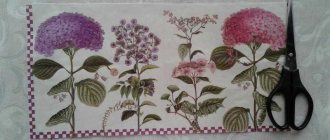
- Decoupage cards or napkins with flowers.
- Brushes.
- Stencils.
- Stationery file.
- Additionally, you can take beads or rhinestones.
Before you start making a shabby chic style box with your own hands, you need to prepare it. To do this, you need to remove the lock, hinges and other attached parts from the product and clean it.
A little history
In the 80s of the twentieth century, the Englishwoman Rachel Ashwell began restoring lost items bought at a flea market.
After transformation by the girl’s hands, unnecessary old objects acquired a sophisticated, elegant look and new life. Her works were distinguished by their imitation of an antique surface, a delicate combination of pastel colors, and the use of design elements from the times of old England. At first, Rachel restored furniture only for her home, but over time she began selling. Later she began to decorate other interior items: boxes, dishes, wall panels, bottles, mirrors, trays, photo frames. Not only old family furniture and household items were salvaged, but also all sorts of items from flea markets and sales. Not everyone liked this solution, which is why the idea was born to artificially create the effect of antiquity, which was called “shabby chic,” meaning “shabby chic.”
The style is very popular in decoupage. For finishing, aging and subsequent decoration techniques are used, such as gilding, volumetric decoupage, gold leaf, and smoky decoupage. But regardless of the method, the general design direction of shabby chic remains: pastel colors, tenderness, romance.
Decoration with abrasions
Before you start decorating the box with decorative elements, you need to create abrasions. To do this, the object is first primed. The first coat of primer should be acrylic brown paint. It will help create abrasions. After this, you need to rub with wax or paraffin from the candle the places where abrasions are expected. Usually these are the corners and ends of the object.
To create the effect of antiquity, artificial abrasions are used.
After this, you need to coat the product with white or beige. After the background has dried, the box needs to be lightly sanded. In those places where there was paraffin or wax, the paint will come off easily along with this substance. This creates stylish and natural scuff marks.
Preparing the base
To decoupage furniture with your own hands, an important step is proper surface preparation. For beginners, it will be enough to follow a certain pattern. There is a generally accepted sequence of surface treatment before decoupage: first, sanding and degreasing are performed, then leveling and priming. But the subtleties of technology require an individual approach to different materials. Master class on preparing a wooden surface:
- If necessary (there are uneven surfaces), clean the surfaces with sandpaper.
- Prime it and then leave the product to dry.
- Next, sand the surface again, as the wood fibers rise and unevenness remains.
- Then apply a second, and if necessary, a third layer of primer.
If there is damage (chips, cracks), they should be covered with wood putty.
If the surface of the wood is painted, then its treatment depends on what further result is required. If the paint color and coating are satisfactory, then it is enough to degrease and prime the material. Otherwise, you will need to sand the surface and repaint it in the desired shade.
If the chipboard surface has been painted and the paint has peeled off, then again further processing depends on the desired result. If the master wants to get the effect of antiquity, then you can leave cracks in the paint and add new ones. Otherwise, you need to carefully remove the old paint with a spatula or other available tool, and then thoroughly sand the surface. If there are chips or cracks, they are puttied and then primed.
Before decoupage, the laminated surface only needs to be degreased.
Often, owners want to update or decorate a polished cabinet using decoupage. In such cases, it is important to handle it correctly. Otherwise, after a while, the decor will begin to peel off from the surface, and all the work will go down the drain. First, you need to carefully polish the furniture with coarse sandpaper, and then cover the furniture with a layer of putty to level the surface. Then you need to completely paint the surface with acrylic paint and begin decoupage of polished furniture.
Clean the wooden surface and prime it to the desired result.
If the paint color and coating are satisfactory, it is enough to degrease and prime the material
If the paint has peeled off, remove the layer, sand the surface, putty, prime
Treat polished surfaces with coarse sandpaper, cover with a layer of putty, paint with acrylic paint
Stylistic moments
For scuffs, you can use not only brown, but also any other contrasting color. A dark purple or burgundy tone will go well with a white or soft pink background. Dark blue scuffs will pair beautifully with a white or slightly bluish background.
The white background of the product looks more elegant. Beige, on the contrary, is more natural. A pastel colored background will look more beautiful if you add a little gradient. To do this, the first layer of base can be painted white. Cover only the central parts of the surfaces with the second color layer, while blurring the boundaries of the second layer.
To add elegance, you can paint the box with a white background.
Important! When creating a background with a gradient, the tones of the two colors should be barely distinguishable. This will create the effect of slightly faded or yellowed paint.
The effect of faded paint will be created by painting with a gradient.
Advice. A wooden box will look bright and unusual if you use a bronze or golden tone instead of brown or another dark color.
Imitation of worn cardboard
After brushing, we begin to imitate shabby, crumbling cardboard. For this stage we used this self-hardening clay.
Roll it out into a thin sheet and place it on the lid of the box coated with PVA glue. This will be our future cover.
We tear the edges and leave to dry. The thin layer of clay dries very quickly, we used a hairdryer.
After drying, sand the surface, removing excess pieces of hardened clay. It is better not to touch the torn edges; let them remain as they are dry.
What can be aged
In this way you can age any item, not just a box. It can be:
- Any wooden boxes.
- Frames for mirrors or pictures.
- Plastic or metal boxes.
- Pocket mirror.
- Wooden plates.
- Furniture: stools, chairs, small benches.
Methods of creating interior items using various techniques
For major restoration work on furniture that has served for many years, but has been well assembled, a variety of techniques are used:
- decoupage (gluing images and pictures from thin layers of napkins or parchment onto a prepared surface),
- craquelure (a technique during which each new layer of paint is treated with a mixture that makes it crack),
- painting on wood followed by varnishing.
As you can see, there are many options for giving old furniture an interesting new look. You can also purchase ready-made furniture and then artificially age it, as experts do. Often designers use the above techniques to subsequently sell this furniture as an exclusive hand-made product.
. It is worth dwelling in more detail on the decoupage technique, since it is most often applied to all interior elements, and as a result, each item has its own flavor.
What materials can you use to decorate a box?
After creating the background and base, you can begin to decorate the product. You can decorate an item in two ways: with a relief design or by transferring the design from paper.
For a relief design, a stencil is applied to the side walls. A pattern is applied over it using wood putty. The drawing must be applied in several layers, which must dry out. 4-5 layers of putty will be enough. They can dry out in about 1-2 hours.
The relief pattern is made using a stencil and putty.
After this, you need to remove the stencil. Then the pattern must be covered with one layer of transparent varnish. Let it dry and cover the pattern with the dark paint that was used to create the wear. While the paint is wet, it should be carefully washed off with a wet cloth. Thanks to this action, dark paint will remain in the recesses of the pattern, which will enhance the aging effect.
The pattern is varnished and an aged effect is created.
Advice. In this way, you can create a stylish monogram of your first and last name or a monogram of the person to whom you are supposed to give the craft. It will turn out to be an old personalized little thing.
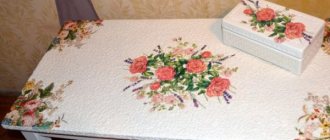
Decoration with paper flowers is applied to the lid of the box. Flowers can be cut out from napkins or decoupage cards. After this, the borders of the drawing are treated with light background paint so that they are blurred and the drawing looks painted. The central parts of the picture can be further developed with paints. This will create the necessary accents in the design.
Paper flowers are transferred to the box and treated with light paint.
Master class on patination
To age the surface, patination is often used, which is an imitation of darkening of the product, as if it acquired this color over time. You can get any shade - from light gold to blue. To achieve this effect, the composition is applied to the edges of the product (edges, corners) or to the relief parts. The following means are used:
- Bituminous patina. The effect is obtained by applying it to the product with a swab or brush.
- Acrylic paints. They are diluted with water, poured into the surface relief and then wiped.
- Chemical patina. It consists of metallic paint and a special oxidizing agent. This product must be applied with a soft natural brush.
- Shellac varnish. It is a solution of shellac resin in ethyl alcohol. It is applied with a synthetic brush and left to dry.
- Waxy patina. This is a special paint made on water-soluble wax. It is rubbed over the surface.
There is no universal technique that will allow you to get a patina. Craftsmen independently develop methods that allow them to achieve the desired effect. Master class on patting with acrylic paints:
- Prepare two cans of acrylic paints, brushes, sponges, varnish.
- Apply a base layer of metallic gold paint to the surface of the item to be decorated (after sanding and priming). This should be done with a wide brush.
- For the best effect, apply the base in two stages (the second layer – 1-1.5 hours after the first). Use a hard sponge or very fine sandpaper to rub the surface for better adhesion of the next layer of paint. Then let it dry for at least an hour.
- Next, apply a final coat of dark metallic paint with a wide bristle brush.
Apply dark paint so that it gets into all cracks and depressions. Excess should be removed with a paper towel or sponge. When the paint dries, you need to fix it with matte acrylic varnish. This effect can be achieved by combining any similar contrasting compositions.
Do-it-yourself decoupage of furniture will allow you not only to decorate, but also to update the interior of your home. There are an inexhaustible number of ideas for this. In addition, anyone can engage in the creative process.
Prepare materials
Apply several layers of base paint to the surface of the item to be decorated.
Rub the surface, let dry, cover with another layer of paint
Remove excess with a paper towel or sponge, after drying, fix the effect with matte acrylic varnish
How to decoupage a box in the shabby chic style with your own hands
After the decor is completed, the finishing touches should be applied:
- Cover with several 2-3 layers of clear varnish. Each layer must dry.
- Reinstall the fittings.
After coating the box with varnish, you can install the fittings.
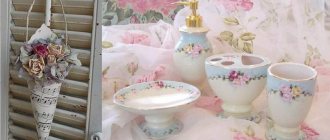
To make the box more elegant and stylish, you can complement it with other decorative elements:
- Wooden or metal legs. They can be purchased at furniture hardware stores. The legs can be painted and aged to match the color of the product, or you can choose them from the same metal as the hinges with a lock.
- Rhinestones or beads around the perimeter of the lid.
- Handle for the lid. The handle can also be purchased additionally or cut out of wood. It is important that all the fittings are in harmony with each other: they are made of the same metal or painted with the same paint. A model richly decorated with fittings looks more luxurious and rich.
- The surface inside the product can be decorated with a modest pattern. It is applied with a darker or lighter paint than the tone of the product. To do this, you can use a stencil from which external drawings were made. This way the box will have a more finished look.
In the old days, household items were decorated very richly; people knew what chic was. Therefore, when creating a box in the shabby style, the author’s imagination has no limits.
Caring for flowers made from self-hardening polymer clay
Flowers made from cold porcelain are quite durable despite their apparent fragility. However, there are some nuances to caring for these products that will allow you to keep your work clean and tidy for many years.
- It is necessary to avoid prolonged contact of products with water, otherwise; The flower petals may become deformed and their color may also change. Since the polymer clay you are working with is not fired in a kiln, but hardens in air, it is not so stable and when it gets very wet it begins to soften again, lose its shape, and becomes viscous and sticky to the touch. If there is a slight ingress of iodine, you need to wipe off the moisture with a napkin or dry the flower with a hairdryer. In this case, the work will not be damaged.
- It is advisable not to expose flowers made from cold porcelain or cellulose clay to direct sunlight for a long time - ultimately, the color of the flowers may fade or change somewhat.
- It is best to clean flowers from dust using a dry, soft, clean brush, as well as a hairdryer (for a short time and from a certain distance).
- When they fall, most often the flowers are not damaged, only the petals are slightly deformed, they can be carefully straightened. But it’s better not to drop it, because if it falls on a tile or flowers fall along with a heavy vase, the thin edges of the petals can crack or crumble, which is difficult to restore or change.
Design of boxes in shabby chic style in the photo
Decorating kitchen utensils and old pots
You can create a pot like the one in the photo above using the Shabby Chic technique. The boxes look very harmonious in this style.
They will serve as a place for you to store various small items. And besides, such a box will decorate any shelf in your home.
Try to apply this style to things that seem to be completely far from decoupage - decoupage a shoe box and you will be pleasantly surprised!
Volumetric decor
Creating a three-dimensional or raised image will require a lot of effort. You can use a ready-made element (for example, a cameo). This can be an item of similar design made from any raw material. You can make such a part yourself from polymer clay using suitable stamps (templates). In this case, you can use clay that hardens during firing. Having prepared such an item, stick it in the right place. Let's dry it. We re-paint the places where it is required. We coat with varnish three times. (Each time we wait for it to dry).
We finish with fittings. She must return to her place.
You can apply bas-reliefs to the finished product. In this case, you will need polymer clay, which does not require firing. With its help it is easy to decorate an item with a three-dimensional image. This is done as follows:
- Let's prepare two identical pictures.
- We glue one of them according to all the rules of decoupage in the right place.
- Let's sculpt the middle part of the picture from polymer clay. This could be several details or one episode. At the same time, we try to make a cast with rounded edges, without jagged edges.
- Glue the clay craft to the place in the picture that is intended for it. We are waiting for it to dry.
- From the second drawing, identical to the first, we cut out the part that is covered with clay.
- Place it on top of the clay and carefully glue it. Can be tinted along the contour.
Let it dry.
- Cover with several layers of varnish. We get a three-dimensional image. Of course, such a thing looks very elegant and original.
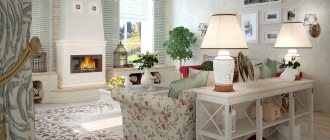
Provence
This style came to us from France. It implies a snow-white background with pastel images applied.
Modern designers often dilute it with floral motifs.