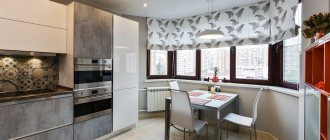
The design of the ceiling in the kitchen plays an important role in interior design. A room with limited space can become visually larger, a low room is taller, and a large room is much more comfortable. You can even isolate yourself from noisy neighbors with the help of competent finishing. And if previously you didn’t think much about decorating the ceilings in the kitchen, you just painted or whitewashed them, but today new opportunities have opened up. Modern materials and technologies make it possible to bring even the most daring ideas to life.
Slatted ceiling in the kitchen Source ceiling.ru/
Whitewash
Does anyone else whitewash the ceiling these days? - you ask. Yes, someone else is whitewashing. Either out of old habit or because whitewashing is one of the most budget-friendly options for finishing the ceiling in an apartment. And the most famous material for whitewashing is lime.
For a kitchen, whitewashing is not the best option due to the low performance properties of such a ceiling. High humidity and temperature changes are not the best friends of a whitewashed ceiling. And even without taking into account “harmful” factors, the whitened layer will last in its original form for no more than two to three years, after which it will begin to crack and peel off. It will not be possible to wash or clean such a ceiling from soot or dirt; you will have to whitewash it again.
But, most importantly, whitewashing requires preliminary preparation of the ceiling. Firstly, to improve the adhesion of the whitewash layer to the base. Secondly, without preparation, all surface imperfections will only be emphasized by lime. This means that if your kitchen ceiling is not ideal, the following steps await you:
- cleaning the surface from old coatings;
- sealing all existing cracks and recesses, including height differences between ceiling slabs;
- general leveling of the surface with putty;
- leveling with finishing putty;
- cleaning with sandpaper;
- cleaning the surface from dust;
- applying primer.
Agree, the process is labor-intensive and requires, in addition to the purchase of lime, the purchase of additional finishing materials. And the question already arises: “Is this really budget-friendly?”
Painting the ceiling slab
If you are looking for the simplest, fastest and cheapest way to install a ceiling slab, then you should choose the option with putty and painting. But this type of repair requires great skill from the plasterer. The surface must be perfectly leveled, since even the slightest flaw will immediately be evident.
For work you will need the following tools and materials:
- wide and narrow steel spatula;
- paint brush and roller;
- abrasive mesh;
- liquid primer;
- starting and finishing putty;
- sandpaper of various grain sizes;
- water-based paint.
Installation of beacons Puttying (leveling) the flow Final check of the level
In order to be able to easily reach the ceiling with a tool, you will need a high stepladder or other stable base. The plasterer making a ceiling of this type must protect the respiratory system and eyes from dust, which will be released in abundance during work. Therefore, you should purchase safety glasses and a respirator.
The ceiling in a small kitchen is finished in a certain sequence:
- All lighting fixtures are removed from the base plate. All unstable fragments of the old coating are removed. The stove is cleaned of oil deposits and other contaminants;
- Large cracks and holes are sealed. The slab is treated with a liquid primer;
- The starting putty solution is mixed. It must be applied quickly even to a small ceiling area, since this type of putty hardens very quickly;
- hardened plaster is treated with a primer;
- a layer of finishing plaster is applied. After hardening, its surface is leveled with abrasive materials, cleaned of dust and coated with a primer.
Sequence of applying paint layers
The final stage of repair is painting the leveled surface. If you are finishing a kitchen with high ceilings, then it is advisable to use paint in beige tones, on which dust and oil deposits are almost invisible.
Painted ceiling tile options
Video instructions for painting surfaces
Painting
In recent decades, whitewashing has been replaced by painting, which has its obvious advantages. Painting can also be considered a budget finishing option and it also requires leveling the ceiling surface. The most popular material for this type of finishing is water-based paint - an environmentally friendly finishing material that dries quickly and allows you to give the ceiling different color shades. This ceiling can already be washed and used without repair for about 5-6 years.
Exotic - unusual, but impractical
The moisture-absorbing laminate surface is easily susceptible to mold and mildew.
In addition to the common ones, there are unusual designs. For example, from laminate. But such a coating is irrational, because the material has the property of moisture absorption and low resistance to mold and fungal formations.
Laminate ceilings are quite expensive
In addition, this finishing option is quite expensive. The only pro is to emphasize the atmosphere of creativity. You can create an exclusive coating using polystyrene foam.
Rack and pinion look great in the interior
Rack and pinion ones are assembled from individual elements. The design can be either closed or open. They are moisture resistant, thanks to the treatment of the “lining” with special impregnations, they look great in a rustic style interior, but they interfere with the height of the room and exclude partial dismantling.
Polystyrene tiles
The low cost of polyurethane foam tiles makes them a good option for those who are not willing to spend too much on a kitchen renovation. At the same time, polystyrene tiles have other advantages. The tiles are resistant to water, which is suitable for use in the kitchen, and the variety of textures and colors of this finishing material will help add special chic to the interior of your kitchen.
Installing tiles is very simple, you can handle it yourself and do it in one day. If you have a flat ceiling, then you can easily glue the tiles directly onto the plaster or painted surface without first cleaning it. The tile will easily cover all the cracks and minor unevenness of the ceiling due to its volume and some flexibility of the material.
Two more advantages of polystyrene tiles are that they are easy to dismantle and can be washed. Abrasive detergents cannot be used for polystyrene tiles; they will destroy the surface of the material.
The only possible disadvantage of polyurethane foam boards is their irrelevance in the modern world of interior design. Simply put, using polystyrene tiles is becoming unfashionable.
Secrets of care
To maintain shine and remove traces of cooking, glossy stretch ceilings need to be wiped from time to time. You can moisten a napkin in a 10% solution of ammonia, and then wipe it dry again.
Any product containing acetone or solvent is strictly unsuitable for care.
Matte and satin surfaces can be cleaned with a vacuum cleaner, but only with the softest and most gentle brush possible. Otherwise, there is a high risk of scratching the surface. If there are any stains that are difficult to remove with a regular rag, use a school eraser. It will help get rid of the stain and will not leave a trace behind.
To clean fabric ceilings with a pronounced wicker structure, use brushes with very soft bristles - they are most effective. Difficult to remove stains can be removed with a soap solution with a neutral PH - after which you need to walk over the surface with a dry cloth.
Wallpaper
Another relatively budget-friendly, but admittedly somewhat old-fashioned way to decorate a kitchen ceiling is wallpapering. Like polystyrene tiles, wallpaper will successfully cover various cracks and unevenness in the ceiling, and due to an even greater variety of colors than tiles, they will create a unique interior in the kitchen. Vinyl wallpaper is suitable for the kitchen, as it can easily withstand moisture and is also easy to wash.
The main disadvantage of finishing the ceiling with wallpaper is the inability of the joints to maintain their strength for a long time. Over time, under the influence of temperature changes in the kitchen and humidity, the wallpaper at the joints will begin to peel off from the ceiling and spoil its appearance.
Plastered ceiling: advantages and disadvantages
Plaster is an economical surface option. The material is not subject to strong changes in humidity and temperature. Its advantages:
- Eco-friendly raw materials.
- Fire resistance.
- Elimination of unevenness and defects in the ceiling.
- Financial benefit.
With all its advantages, plaster has some negative points:
- Labor-intensive work process.
- Difficulty in operation - it is problematic to remove dirt and soot.
The plastered ceiling is used in further work: painting or whitewashing the surface.
Where to start renovating a kitchen and how to properly distribute the order and carry out all the work correctly? Read how to combine the kitchen and living room here. What do you know about loft style design? Read on.
Whitewashing and painting
Whitewashing is a simple and inexpensive type of finishing the ceiling surface. Chalk is used - whiteness and freshness, or lime (bactericidal properties).
The advantages of application are low cost and ease of repair. Necessary tools: bucket, brush, newspapers or film to protect furniture and floors.
The disadvantages are various factors:
- Frequency of re-whitewashing - dirt cannot be washed off from this ceiling.
- Same appearance.
- The formation of material deposits over time - the whitewash is removed again along with the plaster, which leads to a large amount of work.
If the kitchen ceiling is fairly flat, then it can be painted with water-based paint. It will give a nice matte finish.
How to paint the ceiling correctly.
The surface is easy to care for, the paint can be washed. Due to the thin layer of material, the formation of sagging will not occur soon.
When painting the ceiling, use a roller rather than a brush. The surface will be smoother.
Decorative plaster
Everyone knows about decorating walls with decorative plaster, but not everyone realizes that it can just as well be used to decorate the ceiling, including in the kitchen. The coating is durable and never repeats its pattern; it can be washed, including using light detergents.
First, the surface of the ceiling will need to be leveled and eliminated from obvious defects. The plaster will cover small irregularities and cracks on its own. For the ceiling, as for the walls, the following main types of decorative plaster can be used:
- textured;
- structural;
- Venetian
All previous methods of finishing the ceiling in the kitchen have one more advantage that unites them all - maintaining the height of the ceiling. If the height difference on your ceiling is more than 5 cm, then you need to resort to other finishing methods. These methods, unfortunately, “steal” from 5 to 20 cm of the height of the room due to the fact that they require the creation of a frame system for installation of the main finishing material. Therefore, almost all of these methods relate to so-called suspended ceilings and are best used if the height of the room in your house before installing the ceiling is at least 2.7 m.
Features of the kitchen area
The characteristics of the room influence which ceiling is best. What are they? Even with ventilation installed, it is impossible to avoid small amounts of grease splashes in the kitchen. Much more soot can accumulate if cooking is done with gas. In the kitchen, the air temperature always rises during the cooking process, while a hot stream first forms above the stove and gradually moves throughout the entire space of the room.
A properly installed hood and switched on at the right time will ensure uniform heating of the ceiling and make the air much cleaner.
High humidity is also present in the kitchen. Cooking is always associated with high air humidity, since steam is generated during cooking and never immediately escapes through ventilation.
The presence of a sink and drainage system in the kitchen also influences how practical and better it is to finish the ceiling. This means that it is necessary to take into account the possibility of a flood. From a clog that has formed in the sewer, you can find only a small puddle under the sink; no one is safe from this either. That is why, based on the ability of the finishing material for the ceiling to withstand natural disasters and other troubles, it is necessary to make a choice in favor of the best option.
Drywall
One of the suspended ceiling systems also includes plasterboard, the sheets of which are mounted on a pre-installed metal frame. This allows you to hide not only ceiling problems, but also various engineering communications (electrical wiring, ventilation, etc.).
For the kitchen, of course, it makes sense to use a moisture-resistant version of drywall. After installation, the plasterboard sheets must be puttied to eliminate minor defects (places where screws are screwed in, sheet joints, small scratches). And then choose from the above finishes, and they will be needed: painting, wallpapering or decorative plaster.
Drywall has another feature - it can be used to create unusual designs on the ceiling, including multi-level ceilings.
Using plasterboard as a ceiling finishing option can no longer be considered a budget method; it is not a cheap pleasure, given that the installation work is quite complex and you will have to invite and pay for the work of specialists.
A small drawback of plasterboard is that its installation will take a relatively long time, especially if you want a multi-level ceiling or a complex design structure. But as a durable, moisture-resistant coating that quickly covers all the defects of the worst ceilings, it’s worth it.
Drywall - a couple of disadvantages and many advantages
Thanks to the use of plasterboard, there is no need for plastering work. And this saves time and money.
Smooth surface is easy to decorate
The advantage of plasterboard structures is the ability to achieve a smooth surface and decorate it with any material. With their help, all irregularities are perfectly masked, wires and communications are hidden, and almost any shape is created - bulges, curved lines, niches, arches.
Plus, in the space from the ceiling to the sheets of drywall, you can place a system of original built-in lamps. It will serve as lighting, help to visually increase the verticality of the walls, and serve as an original decoration of the room.
The only negative is the reduction in height
Significant disadvantages of plasterboard shelf covering are the reduction in the height of the space and the complexity of structural work.
Stretch ceiling
If you dream of a completely flat surface, then choose a suspended ceiling for your kitchen. A stretch ceiling is a special fabric (PVC film or fabric) stretched over a metal frame. Installation of a stretch ceiling can only be carried out by trained specialists.
Unlike drywall, it can be installed in just a few hours and makes it possible to apply absolutely any image to the ceiling, including photographs. The stretch fabric is not afraid of moisture and is easy to care for. Like plasterboard, it allows you to make complex multi-level ceilings.
Types of suspended ceilings:
- budget matte , ideally imitating a painted ceiling;
- glossy , capable of expanding small spaces;
- modest and at the same time presentable satin .
Ceilings made of MDF panels
They do this too... But, in the end, the ceiling looks not like a kitchen, but like a bath (because the main design of MDF panels is wood-like).
This is a rough look and there is absolutely no practicality in it. MDF will swell from the flood, become smoky, it will need to be scrubbed hard, and it is afraid of abrasives... No, we cannot recommend such a ceiling.
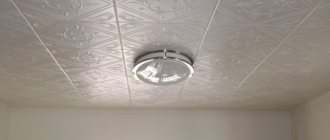
Cassette ceiling
The cassette ceiling consists of a suspended metal system and decorative plates placed in the resulting cells. According to experts, you can easily install such a ceiling yourself, and this is a plus of this type of finishing. On the other hand, we are more accustomed to seeing cassette ceilings in office premises. So won’t they spoil the cozy space of the kitchen with their official appearance?
With a creative approach, such a ceiling can very well decorate your kitchen. It is not suitable only for small kitchens (from 9 sq.m. or less) and for kitchens with low ceilings, since, like any hanging system, this ceiling will “eat” up to 20 cm of the room’s height. But if you take into account its durability, environmental friendliness, moisture resistance and the relatively low cost of some types, then it is worth taking a closer look at it.
All necessary communications can be hidden behind such a ceiling without much difficulty. In addition, the low maintenance requirements of such a ceiling and the easy replaceability of the damaged slab or slabs evoke additional respect.
Decorative boards can be made from different materials:
- Mineral fiber (the most budget option);
- metal (colored, mirror);
- glass or plexiglass (transparent or colored);
- chipboard or fiberboard slabs (for premium premises).
What to do with lighting?
Good lighting for the kitchen is incredibly important. There are several lighting options that are ideal for stretch ceilings. First of all, it is recommended to hang a chandelier above the dining table. For workplaces, it is best to use several powerful spotlights.
Pay attention to the diagrams of the possible arrangement of spotlights in combination with a chandelier:
- The most optimal for a medium-sized room are the second, fifth, eighth and ninth options.
- The fifth scheme is suitable if there is a desire to create a romantic atmosphere of twilight in a separate part of the kitchen.
- The seventh, tenth and twelfth pictures show ideal options for a spacious room that should be evenly illuminated from all sides.
The choice of a specific scheme depends on the dimensions of the kitchen and the type of tension fabric covering. In a room with glossy ceilings, you can use fewer lighting fixtures, since they themselves will reflect the light.
Plastic panels
Ceilings made of plastic panels are similar in many respects to cassette ceilings. To install these panels you also need a frame. Plastic is durable, moisture-resistant and easy to maintain, just like cassette slabs. If one or more panels are damaged, it is very easy to replace them with new ones. However, the installation of the slabs itself is also simple, which you can do with your own efforts.
Plastic panels of all hanging systems are among the most budget-friendly. Suitable for any kitchen, except for interiors that claim to be elite. They have a wide range of colors and textures.
Stucco and monograms
For a kitchen in a classic style, wide moldings, high baseboards and a variety of monograms on the ceiling are perfect. Ceiling stucco will create a unique design, giving the room sublimity and solemnity.
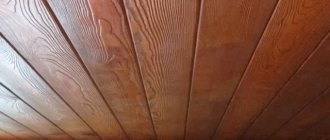
Slat ceiling
Another suspended ceiling system is a slatted ceiling. Metal or wooden frame and slats laid on it. The material of the slats, as well as the method of their installation, is varied.
Rail material:
- aluminum;
- steel;
- plastic;
- tree.
Metal slats have a U-shaped profile, are powder-coated and can have the texture of fine wood.
Methods for installing slats:
- With open space between the slats;
- with closed inter-slat space using decorative inserts;
- with a closed space due to the installed butt-to-end slats.
The first method for kitchens is less preferable due to the fact that dirt will accumulate in the space between the slats, not to mention the fact that all the imperfections in the ceiling base and the communications laid there will be visible. We'll talk about wooden slatted ceilings in the next section.
Two-level ceiling in the kitchen
With this type of ceiling covering you can easily hide uneven ceilings or various pipes and wires.
The most common materials used for installing a two-level ceiling:
- drywall;
- tension fabric;
- slatted ceilings;
- ceiling panels;
- noble stone.
Pros:
- They zone the room well.
- Visually make the kitchen larger.
- They mask communications and wires well.
Minuses:
- The height of the ceilings is reduced by several centimeters.
- The price depends on the chosen design and material used.
Wood finishing
This type of finishing is not suitable for every interior. Firstly, a kitchen with a wooden ceiling requires a large area, especially if you plan to decorate it with dark-colored wood. Secondly, the wooden ceiling must have an appropriate interior setting.
A general recommendation that must be followed for any type of wooden ceiling is that wooden elements must be treated with fire-resistant compounds and compounds that prevent rotting. Treatment with moisture-protective agents (paint, varnish, wax) is also included in this mandatory list. This will help the wood last in your kitchen for a very long time.
Lining. An economical option for finishing the ceiling with wood. The lining consists of long planed boards with a tongue-and-groove fastening, which makes it very easy to install such a ceiling on a pre-prepared wooden sheathing.
slatted ceiling is essentially a lattice made up of bars that are attached to a metal frame in a secret way. A current modern way of finishing ceilings in residential premises.
Wooden panels as a type of finishing are very common. They can be made in different versions:
- in an expensive version - made of solid wood;
- from 3-layer slabs, where the first face layer is made of valuable wood, and the next layer is made of less valuable species such as spruce or pine;
- in a cheaper form - from MDF boards covered with veneer;
- and in the cheapest form - from plywood.
Installation of such panels, like all previous options, is possible only if there is a prepared wooden sheathing.
Finishing the ceiling with laminate may be surprising at first glance, but moisture-resistant laminate is quite applicable not only on the floor, but also on the kitchen ceiling. Installation is carried out using a hemming method, which significantly preserves the height of the room.
Beams and false beams . A ceiling with such elements is always original and gives the room a certain solidity and solidity. To attach beams made of natural wood, there is no need to create battens; long self-tapping screws are sufficient to attach the beam to the base of the ceiling.
False beams are as durable as natural ones, but at the same time they are lighter in weight and make it possible to hide the necessary electrical wiring inside the beam. Installing a false beam has its own characteristics - to attach it to the ceiling you need a frame made of a metal profile or a wooden beam.
The cheapest and fastest DIY finishing methods
Most homeowners do the decoration of economical housing on their own, without the involvement of specialists.
Painting
The easiest way to repair is painting. The work consists of the following stages:
- Remove the old coating.
- The uneven surfaces are filled with putty (first the starting one, then the finishing one), after priming them. When the composition dries, sand it with fine sandpaper.
- Remove dust from the working surface.
- Prime the ceiling.
- Painting is being done. Use a roller with a long handle or a spray gun. The composition is applied in 2-3 layers, each subsequent one is performed perpendicular to the previous one.
Foam tiles
Pre-level the ceiling. Sometimes masters believe that this stage can be skipped. But then the material will lie unevenly, making the flaws more visible. Then a laying diagram is drawn up. It is better to stick from the middle. If there will be a suite or mezzanine near a wall, then start from the opposite side.
The work consists of the following stages:
- The ceiling is treated with a primer.
- Markings are applied. Two perpendicular lines are drawn from the middle of the walls to determine the center of the room. If a chandelier is used as the main light source, gluing begins from there.
- Apply adhesive to the edges and center of the panel, then press it to the ceiling. The setting time depends on the glue used and is indicated on the packaging.
- Next, in accordance with the chosen pattern, tiles are laid over the entire ceiling area. The outer elements are cut to the required size.
- The cracks formed at the joints are masked with acrylic sealant.
Wallpaper
For work you will need: glue, a roller, a plastic spatula, scissors and a stationery knife. At the preparatory stage, the old coating is removed. The wall is cleaned of dust and primed.
Pasting is performed in the following sequence:
- Dilute the glue according to the instructions.
- Cut the roll into strips with a margin of 20 cm.
- Apply the adhesive to the ceiling and/or wallpaper (indicated in the annotation). The edges and corners are especially carefully coated.
- Glue the strip and level it with a clean pressure roller (wide for the panel, narrow for the joints). The seams are placed parallel to the window, and not across, so that they are less noticeable.
- The wallpaper is placed end to end without overlap. Near the walls, excess material is pressed with a wide spatula and cut off with a stationery knife. It turns out to be a perfect joint. Small flaws will be covered with ceiling plinth.
PVC panels
To line the ceiling with plastic panels in the kitchen, a metal frame is required. Sometimes craftsmen use wooden slats as a base. But this should not be done, such sheathing is afraid of hot air, moisture and temperature changes.
Installation is carried out as follows:
- First, the frame is assembled. A guide profile is attached to the walls under the ceiling along the perimeter of the room. A ceiling profile is installed across the planned direction of the panels into the grooves of the previous design. Hangers are attached to the base slab and connected to the overhanging reinforcement.
- Next, install three pieces of plastic trim profile: one on the wall from which installation begins, two on the sides. Attach the parts to metal guides around the perimeter of the room.
- Then the panels are inserted into them and screwed to the ceiling profile with self-tapping screws and a press washer. In this way, plastic slats are installed up to the opposite wall.
- The last element is trimmed if necessary. Put on the trim profile. The lamella is inserted, the profile is attached to the wall using silicone glue.
Stained glass ceiling
If we take into account that stained glass ceilings are mounted on the basis of the Armstrong suspension system, then to some extent they can be classified as cassette ceilings. But due to their non-standard nature, they are placed in a separate group.
A stained glass ceiling is not a cheap ceiling. The material used for the plates is glass or plexiglass. The advantage of the latter is that it perfectly imitates stained glass, but does not break, and also absorbs noise well and retains heat in the room. Plexiglas is easy to care for, the main thing is not to use abrasive detergents.
Due to its fragility, silicate glass is inferior to acrylic glass (plexiglass), but it looks more beautiful and expensive.
Stained glass windows can be made in several ways. Let's list the most common ones.
- use of PVC film (the image is not applied directly to the glass, but is printed on the film, which reduces the cost of the design);
- hand painted with special paints;
- sandblasting glass processing method;
- fusing - an image made from pieces of colored glass, baked at high temperatures;
- “Tiffany” mosaic technique (joining pieces of glass using special foil and a soldering iron).
The advantages of stained glass ceilings, regardless of their material, are durability (they will last for dozens of years), inertness to moisture, a variety of printed images and, undoubtedly, their beauty.
Many of the listed types of ceiling finishes in the kitchen can be combined with each other, it all depends on your design imagination, taste and technical compatibility of finishes. For example, a suspended ceiling and a stained glass system look good together.
The option of combining drywall with plastic or wood panels is quite appropriate and harmonious.
Stretch ceilings can be combined well with plasterboard.
Wood surface – ecology and naturalness
Wood is a fashion trend in the interior
The roots of using natural wood for decoration go back to the distant past. The following is used as cladding:
- “lining” - planks of the same size, connected tongue and groove;
- panels made of two layers, the front side of which is covered with valuable wood;
- slabs impregnated with wax, which protects against moisture, cracking and lamination;
- plywood treated with a special compound.
The lining is easily installed using the tongue-and-groove system
This cladding retains heat well, has breathability, sound insulation, and is low maintenance. However, it absorbs odors and moisture, is a fire hazard, and reduces the height of the room.
See other options in our photo gallery:
Color solutions for the kitchen
The traditional finish is white. It visually increases the height of the ceiling (especially in a glossy texture) and is combined with any other shades.
Beige color is more practical in the kitchen, especially in the area of the stove, since droplets of fat on it are not so noticeable. Beige can be easily combined with other tones. The interior turns out to be light, but not as easily soiled as white.
The bright design of the ceiling in the kitchen immediately attracts attention. The color is repeated in cabinet fronts, curtains or decorative items, while the walls and floor are decorated in a more restrained manner. Each shade has its own influence on the mood and atmosphere of the kitchen.
Yellow reminds of the sun, invigorates and gives joy. This is a good choice for dark kitchens that receive little daylight.
Red is an active color that increases appetite. In large quantities it can cause an aggressive mood.
Orange gives warmth and comfort. Recommended for rooms with windows facing north.
Green promotes concentration, calms, but does not put you to sleep. Combines with shades of warm and cold spectrum. Looks great with wooden elements.
Blue is a noble color, but can reduce appetite. Cools the room, so it is suitable for the south side.
Purple is mysterious and enigmatic. Promotes creative exploration. Kitchens in this design look unusual.
Dark ceilings are only suitable for high rooms. The effect of lowering the level is partly compensated by the glossy texture.
Black is graphic and discreet, easy to combine. Brown is a softer and warmer option, reminiscent of natural stone and wood.
If such decisions seem too bold, bright colors are combined with white or pastel colors. This helps to zone the space without reducing the overall height (for example, in studios).