Show me your balcony and I'll tell you who you are! No joke, you can tell a lot about the owners by looking at the balcony: it’s not for nothing that someone has cleanliness and flowers, while someone has a collection of car tires on display for everyone to see.
It seems like who cares - well, a person stores wheels on the balcony, what’s wrong? But, firstly, there is a more convenient solution - to entrust the tires to the Attic, and secondly, you will feel the difference, how pleasant it is to live in a house when the balcony is used not as a warehouse, but as a place to relax.
However, sometimes the layout and the number of square meters do not allow you to simply empty the balcony of things. In this case, we propose to competently solve the issue of storage on the balcony - we tell you in this article what things can be kept on the balcony and how to properly organize storage on it.
What can be stored on the balcony
The range of things that can be stored on the balcony greatly depends on whether it is insulated or not. If there is no heating on the balcony or loggia, then during the cold season condensation may accumulate there and it will be cold and damp. Accordingly, things can become damp, deformed, become moldy, and their condition cannot be restored. If the loggia is insulated, then most likely it will maintain the optimal temperature even in extreme cold (not lower than +9-10 degrees Celsius), at this temperature things will not deteriorate.
On the insulated balcony you can store:
- clothes;
- shoes;
- documents and paper archives;
- fruits and vegetables;
- organize a greenhouse - winter garden;
- make a work office, a place for yoga or sports, a relaxation area.
On an uninsulated balcony you can store:
- tools;
- building materials;
- furniture;
- hobby items (tents, fishing gear, etc.);
- sports equipment (sleds, skis).
If the balcony is glazed but not insulated, then it is also suitable for storing canned food and vegetable preparations.
Shelves and drawers
- The size of shelves for a balcony structure depends on their purpose. For canned goods and small household utensils, a height of 30–40 cm is sufficient. In homemade cabinets, it is easier to install shelves across the entire width of the balcony. The structure is already small, so there is no point in cutting it into many small cells;
In the simplest version of planning balcony furniture, the shelves are mounted across the entire width of the span.
- Some owners prefer to make a cabinet with two compartments. One compartment is high for bulky items such as an ironing board, and the second consists of standard shelves. The option is convenient, plus if you assemble it yourself, it is not much more complicated than the previous one, while the size and proportions of the sections are selected individually;
Two-section furniture is easy to use;
- Drawers in homemade designs are rare. Firstly, the craftsman needs to assemble the box itself, which can be problematic for an amateur, and secondly, on the balcony, drawers are relevant only in the case of arranging a workplace. In addition, retractable fittings significantly increase the cost of the cabinet.
A balcony bedside table with drawers will cost more than a homemade wardrobe.
Preparatory steps for storing things on a balcony or loggia
Before you start arranging storage systems on your balcony and loggia, they should be prepared. The arrangement of the balcony occurs in three stages:
1. Rearrangement. It is worth rearranging if, in all other respects, the balcony is suitable for storing things. Rearrange the storage furniture so that when you enter you can freely open the door, walk onto the balcony and freely take out any item.
2. Cosmetic repairs. If you don’t like the appearance of the balcony, then paint the walls with fresh paint, choosing your favorite color, restore the floor or lay new linoleum.
3. Major repairs. It is carried out if major modifications and insulation of the balcony are required. Major repairs are also carried out when the owners decide to glaze the balcony. When carrying out major renovations, be guided by what you will use the balcony for. If you are planning to organize a work office, then think about the wiring and how the sockets will be located. If you are planning to create a space for yoga and sports, pay attention to the flooring so that it is convenient to lay a mat. To organize a greenhouse, you will also need special lighting - this should be thought through at the renovation stage. If you plan to use a loggia or balcony for drying clothes, then you can calculate and drill special holes in advance in order to hang drying slats.
Perforated panel with hooks and shelves
A perforated panel with hooks and shelf holders will help organize the storage of some things. “If you are a bookworm and go out to the loggia in the evenings to enjoy the literary word, why not put your favorite books on the shelves?
If after a busy day at work you like to sit in the fresh air with a cup of tea, store your favorite cup and container with tea leaves on the loggia. Stylish flowerpots with green “pets” look very beautiful against the light background of the perforated panel, and tools for pruning plants and loosening the soil can be hung on hooks,” directs Ekaterina Yaroslavtseva. By the way, the location of hooks and shelves on the panel can be changed, this is very convenient.
remontostroitel.ru
Basic principles of organizing space on a balcony or loggia
Even on a small balcony you can arrange your own mini-universe, where each thing has its own place and is easy to find. To prevent your balcony from turning into a dumping ground for things, here are three options on how you can conveniently organize your balcony space for living and storing various property.
1. Zoning storage space. If the loggia is large enough, then zoning can be easily done with your own hands using carpets or furniture.
On the loggia you can organize different zones - one for storage, another for flowers and seedlings, a third for relaxation by placing garden furniture.
2. A work corner is one of the popular options for arranging a balcony. For this purpose, a side wall is usually designed, and the wall opposite can be used for storing things.
3. Lounge area. To design a recreation area, you may need furniture (for example, wicker or garden), floor mats, ottomans and a coffee table. At the same time, you also have access to storage options on the balcony - for example, hanging shelves or wall organizers under the ceiling.
Home workshop
Anyone who is seriously passionate about fine art will certainly appreciate the idea of setting up a workshop on the loggia.
“Move an easel or table there, think of a convenient storage system for paper, canvases, paints, brushes, pencils, pastels and finished works - and create!”
- the specialist inspires.
dekoriko.ru
Professional seamstresses can also do their work on the loggia; the main thing is not to skimp on custom-made furniture. What do we end up with? And the sewing machine does not take up space in the apartment, and the necessary materials are at hand, and you won’t go broke on electricity.
mebel169.ru
Balcony furniture
1. Cabinets. The storage cabinet on the balcony should be made of moisture-resistant material. Storing clothes on the balcony, as well as shoes, is allowed if it is insulated. A hanger bar is the easiest way to organize a small dressing room.
2. Dressers. To make the most of the space, it is better to combine a chest of drawers with wall-mounted storage systems. On the balcony it is better to install furniture with sliding doors for the most efficient use of space.
3. Shelves and racks. A storage rack on the balcony is a cool solution that will allow you to immediately see what is on the shelves, find the thing you need and quickly use it. In addition, with the help of shelves you can not only store personal belongings, but also decorate the space with photo frames, candles and other accessories.
Not only convenient, but also beautiful
In apartments with an area of more than 100 square meters, it will not be difficult to find space for several spacious closets, a dressing room, a pantry, and a room for washing and ironing. What about those who live in less luxurious apartments? Use the loggia! Just think through the storage systems to the smallest detail, so as not only to avoid cluttering the space, but also to make it pleasing to the eye. “It’s not a matter of having a bad mood because of clutter or visual noise, so caring about aesthetics is not a whim,”
the expert insists.
mebel169.ru
Storage containers on the balcony
1. Boxes. They are ideal for storing tools on the balcony. You can make wooden boxes yourself or buy ready-made options in the store.
2. Containers. Transparent containers are convenient to use when you want to quickly find what you need. If you like color options, use markers and sticky notes to label what's inside.
3. Baskets. If you are decorating a balcony in a fashionable style, for example, creating a Scandi interior, then wicker baskets will fit perfectly into the design of the balcony. You can use vertical high baskets to store linen and home textiles, or you can use small hanging baskets to store magazines, books, and small items.
4. Lari. These are boxes with a hinged lid - a convenient solution for storage on the balcony, since the chests can also be a couch for relaxation. Just throw a thick blanket or blanket on top and use the chest as a small sofa to sit and read a book.
Vegetable storage cabinets
Such places for storing vegetables on the balcony can be of different sizes depending on the size of your room. There are many options in stores for every taste, but you can make a cabinet for storing food yourself. Foam plastic, penoplex and mineral wool are suitable materials for thermal insulation.
Interesting! How to beautifully and inexpensively decorate the inside of a balcony with your own hands
Cabinets for storing vegetables must be equipped with ventilation and an internal insulation system.
Features of seasonal storage
1. Storing tires and wheels on the balcony. Summer car tires are capricious in cold temperatures; they become tanned, which means that by the season they can become deformed and will no longer be so elastic. Therefore, you can only keep tires on an insulated balcony. In addition, the wheels take up a decent amount of space, and when stored on an open balcony they look completely unaesthetic.
2. Bicycle storage on the balcony. The bicycle is not used for 6-7 months (from November to April), which means it is stored on the balcony during the coldest, dampest time of the year, and even with temperature changes. Therefore, you should not keep it on an open, uninsulated balcony - this risks the rubber and mechanisms drying out and the chain rusting.
3. Storage of skis and other sports equipment. It is also better to keep cheesecake sleds and snowboards on an insulated loggia (a snowboard becomes deformed due to temperature changes, and rubber products can crack in the cold).
4. Preservation (snacks). Oddly enough, canned food should not be stored in frosty conditions, that is, it is optimal to keep jars of cucumbers and other pickles at room temperature or on a glazed balcony (temperature about 5-10 degrees Celsius).
Window sill with a secret
For owners of wide (more than 1 m) loggias that are not glazed to the floor, the designer recommends installing a shallow storage system under the window sill. “You can send glass jars, containers with household chemicals, rags, napkins and cleaning brushes to the loggia.
Hide all this stuff in a long cabinet under the windowsill - and the loggia will immediately become more spacious. Since narrow shelves only allow items to be arranged in one row, you won't have to dig around for long to get what you're looking for. And even more so, you are unlikely to forget what is stored under the window sill, because the contents of the cabinet will be in sight every time you open the doors,” the designer lists the advantages.
domfront.ru
The doors for the cabinet under the window sill can be either hinged or sliding. For skilled men, it will not be difficult to make such a cabinet yourself. Knock down the frame, make shelves, hang louvered doors - and a convenient storage system is ready. “Louvered doors not only look stylish, but also promote normal air exchange. This means that you definitely won’t encounter the problem of musty smell,”
— adds Ekaterina Yaroslavtseva.
uutvdome.ru
The attic is your personal balcony for everything else
Once you have taken care of your balcony, it will never be the same again. Ideal order, clear organization - all this pleases the eye, but a bunch of seasonal and “extra” (temporarily unnecessary) things make themselves felt. Where now to put the skis and sleds that are not needed in the summer, tool boxes or car tires that you kept on the balcony? Everything seasonal and temporarily unnecessary can be put into the Attic.
How we work: you determine how many things you want to put into storage, the manager suggests a suitable tariff, we come to your home and take the things to a warm warehouse. As soon as you need something, we will bring it back to your home! In the meantime, enjoy order and cleanliness.
Why is the Attic better than a balcony or loggia:
- things in the Attic are stored in the right conditions: here at any time of the year it’s about +18 degrees Celsius, so your things won’t know what winter is like;
- There is always a constant level of humidity in the warehouse;
- we clean and air several times a week - we are willing to bet that such cleanliness is impossible to maintain on the balcony, especially in winter;
- we will provide as much space as you need - no restrictions, everything will fit: from bicycles and tires to boxes of clothes and shoes;
- We are safe: the warehouse is equipped with a video surveillance system without blind spots and 24-hour security;
- we will not lose anything: each client’s belongings are stored on a separate pallet, securely packed and labeled;
- we have home delivery - that is, to hand over or return things, you just need to make a couple of clicks in the mobile application and that’s it! Movers will come home, pack your things, label them, take photographs and take them to the warehouse. You control storage through the application and can order the return of your property at any time.
What we are used to storing on the balcony and what can definitely be put in the Attic:
- bicycles;
- car tires separately;
- wheels assembled;
- skis;
- clothes;
- shoes;
- tool boxes;
- boxes of books or documents;
- Sports Equipment;
- containers with building materials remaining after repairs;
- children's toys or things for growth;
- country accessories;
- gardening tools and equipment;
- household appliances;
- furniture.
You can return several types of items and return any of them upon request. It is not necessary to hand over everything at once and return it in full - you can also then return things as needed. It is very convenient to store seasonal property in the Attic: for example, you give us summer tires and a bicycle in the fall, and we deliver them in the spring right at the beginning of the season.
Household appliances, go out!
In a tiny apartment, every free “square” is worth its weight in gold, sometimes there’s even nowhere to put an ironing board. There is an exit! If the project of reconstruction and (or) redevelopment of the apartment has been agreed upon with the local executive and administrative body, “move” the washing machine, dryer, ironing board, and iron to the glassed and insulated loggia.
stanok.guru
“Refuse clothes dryers in the form of long sticks hanging from the ceiling or, especially, a stretched rope. Nowadays, wall-mounted folding and retractable dryers are relevant: they are not an eyesore and do not spoil the design of the loggia,”
- the specialist draws attention.
mebel169.ru
Some people move the kitchen to the loggia - entirely or individual modules, as well as some household appliances. “Suppose you have a refrigerator that suits you in every way, but, alas, does not harmonize with the facades of the new kitchen or does not fit at all. Agree, it is unwise to get rid of a good refrigerator if it can be “registered” on the loggia. An oven and a microwave can keep him company,” –
designer shares ideas.
peace-comfort55.rf
Out of the balcony, out of the loggia
Why pick a catchphrase, let’s face it: things on the balcony are terrible. Terribly inconvenient, terribly ugly and certainly not modern. Remember that every time someone sees tires on your balcony, there is one sad Attic mover in the world. Don't turn your apartment into a warehouse. After all, somewhere there is already a special warehouse for your things, where all conditions are met and there is even a home delivery service - and this is a warm, clean Attic warehouse. Welcome to a new world where the balcony is a place of power for relaxation and meditation, and not a warehouse for car tires - we will gladly take care of its storage, call us!
Five stages of self-assembly and arrangement of the cabinet
Of the options described above, you cannot assemble only a metal-plastic cabinet yourself. All other models are within the capabilities of a home craftsman, the only question is the availability of tools and materials.
Stage 1: list of tools needed for carpentry work on arranging wooden cabinets
To arrange a wooden cabinet you need more tools than when working with any other material. We provide a complete list for comfortable work, but it contains some devices that you can do without, especially if you decide to make a cabinet, for example, from laminated chipboard.
A desirable set of carpentry tools.
- A hammer drill or electric drill with an impact function - needed for any type of work;
- Jigsaw;
- Wood hacksaw;
- Hacksaw for metal;
- Hammer;
- Awl;
- Roulette;
- Pencil;
- Laser level (can be replaced with a hydraulic level);
- Bubble level;
- Plumb;
- Metal ruler;
- Set of chisels;
- Screwdriver;
- Fortsner drill (used for inserting furniture four-hinged canopies);
- Feather drills (for making large diameter holes in wood)
- Plane;
- Grinding machine (replaced with an attachment to an electric drill or a hand block with emery);
- Knife;
- Mallet (rubber or wooden hammer);
- Pliers;
- Minimum 2 - 3 clamps;
- Square;
- Set of files with round and flat rasp.
Stage 2: what is the frame made of?
For self-assembly, 3 frame options are suitable - from laminated chipboards, from metal profiles for plasterboard and wood. I will talk about plasterboard structures later. The rest of the materials are like this:
- Using wooden blocks is the simplest and cheapest option, but you shouldn’t expect a luxurious factory-made look from such a cabinet, the “hand-made” look is immediately visible, plus the wood will have to be sanded, impregnated with stain and varnished;
You shouldn’t expect factory quality from a homemade wooden cabinet.
- Laminated chipboard or MDF boards cost 2 times more than wood, but the price is reasonable. To get the perfect look, you will have to order sawing and finishing of the ends in a furniture workshop, which will entail additional costs.
The appearance of furniture made from chipboard is no different from factory models.
| Assembling a wooden frame | |
| Illustrations | Recommendations |
| Drawing. Decide on the contents of the cabinet and draw a sketch of the future design. Beauty is not needed, the main thing is to indicate all sizes. You need a sketch in order to describe in detail the details (what and how much is needed), lumber is purchased based on the details. | |
| Vertical beat . Use a plumb line to mark where your supporting posts will be located. | |
| Installation of racks. First, the racks are attached to the floor and ceiling and then fixed to the walls. The stand is screwed to the concrete with a metal angle.
| |
| Frame for shelves . Based on vertical posts, a frame for horizontal shelves is assembled using metal corners | |
| Doors _ In the budget version, the doors are made from clapboard and hung on vertical posts. The easiest way is to use butterfly hinges; they do not require insertion and are screwed directly onto the beam and door, plus the appearance of such canopies is quite decent. | |
Stage 3: what to make shelves from
Traditionally, shelves are made either from wooden planks 20 mm thick, or from laminated chipboard furniture sheets 16 - 20 mm thick. If a planed board is impregnated with an antiseptic and varnished, then it will stand on the balcony for decades. They are placed on the transverse bars of the frame.
Wooden shelves are considered the strongest and most durable.
On a warm balcony, laminated chipboards behave well, but if you have a room with poor insulation, then it is better to refuse this option. The shelves are fixed to the frame using metal or plastic corners.
Before screwing the self-tapping screw into the slab, the entry point must be covered with an awl.
Stage 4: selection of materials for cladding and doors
Since we are talking about independent arrangement, some of the materials are automatically eliminated. If the balcony is trimmed with wood, then it is better to knock down the doors from planed boards (20 mm) or assemble them from lining. The slats are assembled on a wooden frame, after which the doors are hung on the base.
If the balcony is covered with clapboard, then the doors are also made of clapboard.
It is advisable to order laminated chipboard doors from a workshop. To cut the board without chipping, you will need a hand-held circular saw, but it is expensive, plus it is impossible to laminate the ends properly at home.
It is advisable to make cabinet doors made of laminated chipboard to order.
Stage 5: installing doors on the built cabinet
It is not difficult to hang a wooden door leaf on a vertical wooden beam. It is necessary to mark the installation points of the canopies, then fill the holes with an awl and screw in the screws.
Wooden doors are attached with self-tapping screws.
The installation of four-hinged furniture hinges is a little more complicated. First you need to drill a blind hole in the doors under the canopy bed. A Fortsner drill is used for this procedure. Next, using the template that comes with the canopy, screw the hinges to the doors and base with self-tapping screws.
Installation diagram for a four-hinged furniture canopy.
Advice - if you want to install sliding compartment doors on the facade, but have never encountered this, then it is better to assemble the frame yourself and order ready-made doors.
Where to install the cabinet
The location depends on the design of the cabinet and its purpose. Since the balcony is a narrow rectangular room, it would be logical to place furniture on one of the short walls. This way you can slightly adjust the elongated shape of the balcony and use unused space. If it is not possible to place one large cabinet on the end side, you can hang two - one above the other.
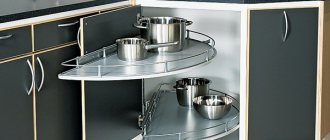
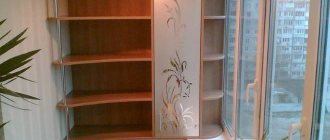
Another option is to build a corner structure. A beveled door will allow you to leave unoccupied space next to the glazing, and light will freely penetrate into the room.
A narrow cabinet can be placed under the window sill along the entire side. In winter it is used instead of a refrigerator.
Similar systems are also located under the window. They will be especially relevant in the summer. You can use the top cover instead of a window sill to grow flowers and vegetables. If the dimensions of the loggia allow, the cabinet can be placed along a long wall. The main thing is that it does not interfere with movement and opens easily. A system with sliding doors is ideal.
Drawings and diagrams
It is impossible to talk about any standards regarding cabinets for balconies. And the sizes and configuration, and the glazing is different for everyone. Therefore, even the size of the shelves has to be determined “on the spot”. But here are a few examples that you can change as you need.
Cabinet made of sheet material (OSB, plywood, laminated chipboard or simply chipboard)
With a compartment for large items
Angular
Of different depths and with different fillings (on both sides of the balcony)
Lots of shelves
Another layout option for sliding doors (the depth of the shelves is less than the width of the bottom rail)
Living balcony
Another option with open shelves and two rows of hinged doors
The design of a folding table, maybe someone will need it)))
Corner wardrobe on the loggia: photo report
At first, the loggia was covered with clapboard. Immediately after this, they began to make a cabinet from the same lining. It was decided to go for a corner one so as not to cover the window so much. On the opposite side, the cabinet occupies almost the entire width, slightly short of the balcony door.
The racks were not attached. They nailed the bars on the ceiling and to the floor, and the walls to them. They turned out to be short - three planks. Planks were nailed to the wall paneling, on which the same paneling, cut to the resulting cabinet shape, was laid.
Stages of construction of a corner cabinet made of clapboard
At the top and bottom of the doorway, clapboard was placed across the opening. We measured the remaining distance, subtracted 1.5 centimeters for inaccuracies, and cut the paneling on the door to that length. It took six of them. They knocked it down using four cross bars and knocked it into the door. Hung using regular hinges.
We hung the doors and made shelves below.
Two shelves are nailed in the free space between the cabinet wall and the balcony paneling. A little later they added a little higher with rounded edges. The last step was to nail the plinths under the ceiling and on the floor (to close the gaps), then sand the lining with sandpaper and paint it with stain.
The result of the work even after three years of operation
Photos of loggias in various styles
When choosing a suitable model, you should think about the style in which you want to fit the cabinet, then it will become a real “highlight” of the interior.
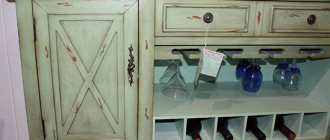
Rough textures of facades and metal are suitable for an “industrial” loft. Laconic but functional shelving, as well as products with glass doors, will fit into the modern style. Homely, cozy Provence, on the contrary, recognizes a wealth of textures: facades that look like shutters, wickerwork and wooden boxes.
The photo shows a cabinet with a beveled door, which adds character to the entire interior.
How to organize things correctly
The basis for success in the distribution of territory is calculation and planning. First of all, the total area is determined, and the possibilities for installing various options for cabinets and shelving are outlined. There is complete freedom of ideas and proposals here. At the same time, functionality and beauty are quite successfully combined. The arrangement of objects should allow easy access to each segment, so that you do not have to constantly shift everything from one space to another. The general principle is that what is needed more often is placed closer. It is worth considering that the vertical is used completely, down to the last centimeter, if a balcony is being installed for storage in a glassed room.
Open
If the option is of this type, it becomes ideal for a summer flower garden combined with a recreation area. Often space is allocated for seasonal inventory. Preserving anything else is problematic if we are talking about a long period, but storing fruits or vegetables intended for winter storage for ripening is quite possible. In cold weather everything will have to be removed. It is worth considering that uncontrolled storage instantly turns a promising area into a kind of landfill. At the same time, it is impossible to find something, there is no free space left, and there is no benefit. Before you take out the first thing, you need to clearly plan where and how it will be placed and what good it will do.
Closed and not insulated
A glazed but unheated space has its advantages. Food can be safely stored in cold weather; it will not freeze, but will not spoil quickly. Boxes and shelves made of wood, chipboard, fibreboard, veneer cannot be used - they will quickly become unusable, since the humidity is high. It is recommended to give preference to plastic or metal. Combined use. In summer there is a recreation area, in winter there is a storage area. By the way, on hot days it makes sense to turn the loggia into another room, which all family members will undoubtedly claim if it is on the shady side. You can even temporarily arrange a sleeping area, without compromising the functionality of the rest of the area.
Closed and warm
The most luxurious option for organizing storage space on the balcony. There are practically no restrictions; furniture is selected according to the same criteria as for any room. If the design requires the presence of niches, they are used in various variations, loading according to the full program, but in compliance with the system. This will leave more usable space for the recreation area. For these purposes, it is advisable to order or buy multifunctional furniture and organize storage space in it. Similar models include:
- armchair and daybed with lower drawers;
- folding table;
- chest of drawers with tabletop;
- sectional wall with a retractable panel for handicrafts or laptop installation.
A functional balcony with a system for storing things, the photo of options of which gives room for imagination, will be a real salvation for decluttering your apartment and organizing the necessary order. Many, in the absence of ways to expand their housing, make major repairs, turning the loggia into another living room. Such changes cannot be documented, but no one will make any claims if you do not take drastic actions in the form of erecting a brick wall, but limit yourself to additional insulation and sound insulation while maintaining the original dimensions.
Using drywall
Assembling a metal frame from UD and CD profiles and covering it with gypsum board sheets is a relatively simple task, but I do not advise you to do this for 3 reasons:
- Plasterboard sheet is afraid of temperature changes and is used only in warm rooms;
- The load-bearing capacity of the shelves of such a cabinet is small;
- After assembling the frame and covering it with sheets, the gypsum board still needs to be puttied and painted, and this is long, dirty and troublesome.
It is not advisable to install plasterboard structures on balconies.
Dressers
They are made mainly of wood and plastic, so when choosing, you should take into account the characteristics of the material. Very convenient for placing numerous small items. Suitable for installation under a window sill or hanging rack. You can place shoes in furniture - there is always not enough space for them. The tabletop is ideal for decorative flower pots or a decorative corner with your favorite accessories.
Upholstered furniture with niches
Can only be installed in a warm heated room. If year-round use is required in an ordinary glassed-in space with high humidity, then you should pay attention to adapted models for placement in a narrow room of a small area, which can withstand temperature changes, do not give rise to mold, are equipped with sliding doors, and have special compartments for installation oversized or tall items.
How to make a balcony cabinet on a wooden frame
First, cut 4 racks to the required height of the cabinet. If you plan to make it all the way to the ceiling, measure each one separately, rather than cutting identical ones. The height is often quite different. The cut racks are fastened. The distance between them determines the depth of the cabinet, but most often depends on the available space. As much as there is, so much is used.
If there are three blank walls there are no problems. The bars are attached to dowels. Place the block against the wall, check its verticality, and drill holes through for fasteners in the right places. The plank is removed and plastic plugs from the dowels are inserted into the holes in the wall. Having installed the bar in place, screw it to the wall.
Examples of mounting racks
If you are making a cabinet on the balcony, one side is attached to the wall, and the other - to the frame elements or only at the top and bottom - to the ceiling and floor (we use reinforced metal corners).
Another option for such a case is if you need to cover the window glass with something - put a wall near the window (for example, from laminated chipboard), fix it at the bottom and top with corners to the floor and ceiling, and then attach it to the wall (and to the flow and the floor) frame bars.
Place a side panel made of laminated chipboard near the glass, and attach shelves to it
Then cross bars are nailed to the posts. They give the entire system a high degree of rigidity and the shelves will rest on them.
Option with shelves extending all the way to the glass
The knot is larger
To avoid wasting space near the glass, this part is also occupied by shelves. Since the width of the furniture varies, two separate small cabinets are often made: for the lower and upper halves. They often also differ in depth: the bottom one can be made wider and heavier and larger items can be hidden there. In this case, the upper cabinet can be made less deep. In this case, the top of the lower cabinet can be used as a tabletop.
Can be made from two parts of different widths, and maybe depths
Another option for a two-part loggia cabinet and an example of its use
Next, it’s just a matter of what and how to make the doors. The best option is to make sliding ones. Their diagram is in the figure. There are a lot of spare parts, but you can figure it out.
Sliding door equipment