Good afternoon friends! Let's continue with you the topic of needlework and homemade creativity that the whole family can do. Original decorative items are sold in many stores today, the assortment is so wide that your eyes literally run wild. Such things can decorate your home, but if you want something exclusive, it is better to make such a thing yourself. Today I suggest you figure out how to make a rose from a napkin in several ways. This flower will easily decorate your table and create a festive mood.
Step-by-step instructions for creating the simplest rose from a napkin
To make such a flower, you only need a plain napkin of any color you like.
Step by step guide:
- Take a napkin folded into four, as it was originally in the package.
- Bend one side a centimeter.
- Wrap the napkin around your index finger. It is very important to point the folded edge towards the base of the finger.
- A neat cylinder was created around the finger.
- The loose material at the base needs to be slightly compressed and twisted.
- At the last stage, it is enough to slightly fluff the petals of the formed bud with your fingers, turning them outward. You can do the same with the top layers of a paper bud to make it appear much more magnificent and lighter.
Pay attention to one very important detail: do not twist the paper too tightly. This will make the bud dense. For the flower to look lush, all layers must be free. Practice a few times and you will get the perfect rose.
Easy way
On a straightened napkin, the top edge is bent a couple of centimeters. With your left hand you pinch the right corner with two fingers, and with your right hand, with a deft movement of the magician, the napkin is wrapped around these fingers, forming an even tube.
With one hand, the tube is pinched immediately under the fingers of the left hand, the upper corner of the napkin is bent to the side - this is the petal of the bud. The napkin is quickly curled to the middle, the lower corner is raised, straightened, and the napkin is twisted to the end, forming a stem. Depending on how long you have to wait for an order, you can make a whole armful of these roses and go sell them to the bored visitors of an unlucky cafe.
Bud on a stem - a simple option for beginners
I offer you another option for creating a delicate flower on a stem. This craft can be made in one copy or several, then you can collect a whole pink bouquet - this is an interesting gift, suitable for a kindergarten or school.
Step-by-step instructions:
- Completely unfold the napkin of the chosen color (it is better to take a plain material).
- Twist one side no more than two centimeters, you should get a small tube.
- Form a bud by carefully folding the napkin. At the same time, pinch the junction of the bud and the stem with your finger.
- Fold the paper completely, form a bud, and roll the rest of the material tightly - this will be the stem.
Look at the photo, how the stages of work are shown step by step; such a hint will be a real find if you are doing such work for the first time.
If you are making one flower, you can additionally form leaves from a napkin, this is also shown in the photo. If you decide to make a whole bouquet, you can do without leaves. In this case, all the flowers need to be collected together, choose beautiful wrapping paper.
It will take you no more than 10 minutes to create this craft. Create with your children, they will definitely like it.
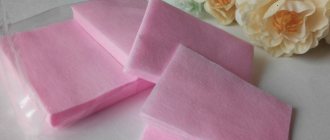
How to make a paper rose using a pencil
If you have colored napkins and a pencil at home, then from this set you can make an original bouquet of paper flowers. Are you still in doubt? Then let's start creating together.
Guide to work:
- Spread the napkin in one layer. You can use red material, so the bud will be as similar as possible to a real rose, but you can also experiment with shades, collecting flowers of your favorite tones in one.
- Place a pencil on one side (which one doesn’t matter), it should be located along the entire edge of the paper.
- Start twisting the napkin tightly around the pencil, you should still have about 4-5 cm of free edge at the end.
- Squeeze the rolled paper with your fingers so that you get an impromptu accordion. To create a full-fledged bouquet, you must have at least three of these accordions. You can add more elements if you wish.
At the end, use glue to connect all the created elements and straighten the bud with your fingers. Additionally, you can make a stem.
Trying decoupage
You can make a picture using three-layer napkins with a rose pattern.
The crumpled white layers are moistened with water and dry in their natural environment.
The base is coated with colored varnish.
Then colored layers of napkins are laid and covered with colorless varnish.
DIY fluffy rose
If you didn’t like the previous flower options, I suggest making a very delicate and fluffy bud. This craft can easily decorate a gift or even a girl’s costume for a holiday in kindergarten or school. Look at the photo, these roses are just as delicate and light. Without further ado, let's get started.
To work you need to prepare:
- square napkins measuring 20*20 cm;
- scissors;
- green corrugated paper;
- stapler;
- floral wire.
Progress:
- Let's start with the napkins. Cut each of them into 4 pieces of the same size. The result should be 8 squares.
- Place all the blanks in a stack and secure them in the center using a stapler.
- Carefully cut out a circle from the napkins using scissors.
- Using your fingers, carefully fluff each petal, giving it a wavy shape. The material is very pliable, easy to work with and you will not have any problems.
- Insert floral wire into the center of the bud, wrap thin strips of green corrugated paper around the top, forming a sepal and decorating the stem itself.
The photo shows each step in detail; when making the first flower, such instructions will be useful to you, but with other flowers you will definitely not have any difficulties. The assembled bouquet looks very gentle, it is light and spring-like. This idea will be relevant at any time of the year for decorating your home or making crafts for various competitions.
Decorative poppies: a simple craft for decorating a festive table
These flowers are very easy to make. To do this you will need to prepare:
- double-sided colored corrugated or velvet paper. But thin tissue paper will also work, which must first be painted with watercolors in red, pink, soft pink and several shades of yellow and orange;
- yellow cardboard for the center of the flower;
- thin aluminum wire;
- scissors, a simple pencil.
To avoid the hassle of cutting out each flower detail separately, proceed as follows. Cut out approximately 6x6cm squares from all colors of paper and stack them in a stack of 4-5 squares together. On the topmost square, draw with a simple pencil an irregular (slightly wavy) rounded shape of the future bud. Cut out the flower. You should get 4-5 flowers at a time. The circles can be the same size or completely different in diameter.
Cut out a circle from cardboard - the middle of the flower. Cut stems 15-25 cm long from the wire and make a decorative leg-stand for it, twisting the wire so that it can stand on the table.
Place 4-6 petals on a wire, a cardboard center and bend the top of the wire. To prevent the flower from sliding along the wire, make a small retainer from the bottom using tape or a drop of hot glue.
Pink topiary
Creating topiary is quite an entertaining activity and not as difficult as many may think. Of course, you can buy such a decorative element in a store, but it’s much more pleasant to make it yourself, taking into account your personal preferences in decor or color scheme.
Using napkins, you can quickly make a beautiful rose topiary for yourself or your loved ones.
Before you start forming the buds themselves, you need to prepare a round base. This could be a styrofoam ball purchased in a store or a piece of newspaper. If you decide to use newspapers, try to make the shape as round as possible, otherwise the craft may end up looking weird.
Make a hole at the bottom of the base ball and insert a pencil or skewer of a suitable size into it. You can also buy such blanks in florist or creative stores.
Now take a flower pot, fill it with gravel or other material, the topiary should stand firmly in it and not wobble, take this point into account.
The top of the pot can be decorated with various pieces of colorful paper, sisal or other material of your choice. At this point, the preparation of the topiary base is completed and you can proceed directly to creating the buds.
In this case, I suggest using multi-colored napkins for roses. This way the composition will look much more interesting.
- From the selected material, cut a large number of strips no more than 5 cm wide.
- Take one piece, bend the edge 1-2 cm and begin to carefully twist everything into a bud. Make sure that it does not turn out too dense, such a rose will not look very attractive, the buds should be light. Remember to twist the rose at the base to prevent it from falling apart as a result.
- Secure the edge of the rose with glue.
- Prepare the required number of flowers. On average, one topiary can take from 30 to 60 buds; everything, of course, depends on the size and base you choose.
At the last stage, transfer the roses to the ball, secure everything using hot glue. The craft should dry well. After this, check again how all the elements adhere, add glue if necessary.
You can decorate the topiary by spraying hairspray with large glitter on top and attaching butterflies. There are plenty of options, use your own discretion here.
Making a flower
Next, you need to read the guide on how to make a rose from a napkin with your own hands using available materials. As a rule, the whole process does not take much time. The main thing is to carry out each action clearly.
It is enough to follow the instructions exactly to get a beautiful flower.
Rosebud
The procedure for making a bud is as follows:
- You need to take one regular napkin in the form in which it is in the package. Next, you need to select one of the sides and bend it one centimeter towards your index finger. The fold line should be directed inward to assemble the required composition. You should not wrap it too tightly; it is better to do it looser so that the bud looks more lush.
- The resulting cylinder must be carefully clamped from the top side. You don't need to use too much force when performing this action.
- Next, you need to form the petals of the future rose. To do this, you need to treat every detail of the napkin in this way. To make the bud look more realistic, you need to lower the top two layers a little.
For beginners, it is advisable to use a simple method of making a rose from a napkin. You can also make a bud along with the stem. To do this, you need to form a tight tube at the base of the napkin. Only after this can you begin to fold the closed bud.
Blooming Rose
To create something more complex and unusual, you can try to make a blooming composition. This will also require scissors and a stapler to attach the parts. The procedure looks like this:
- You need to take two napkins. They need to be carefully divided into two parts using scissors.
- The resulting parts are placed in one pile. Using a stapler, all parts are fastened together.
- A circle is cut out from squares.
- At the last stage, you need to shape the petals with your hands.
Having practiced a little and gained experience, you can begin to create an entire flower arrangement. It is important to process each layer separately to achieve the desired effect. The result will be beautiful and lush rose buds.
Bouquet of roses
You can make a real bouquet from paper roses. You need to do the following:
- You will need to take several napkins. They need to be cut in half, forming square paper pieces.
- Each element is additionally folded in half.
- Each half of the napkin is folded in a similar way with the corners inward. The result should be elongated strips, which will be used as a blank for future roses.
- The resulting strip is twisted inward. In the process, it is necessary to make additional bends to form a blossoming bud. More and more stripes are added. During the process, it is important to hide the ends of the strips so that the composition does not collapse.
- When the bud is formed, it is enough to attach it to the stem. To do this, just use green paper. You can easily form quite dense stems with leaves from it.
Don't wrap the paper too tightly. It is better to wind it more loosely, so the bud at the end will have a more magnificent appearance. After completing the above steps the required number of times, you will be able to create a whole bouquet of homemade roses. You can experiment with different details and accessories.
Rose for topiary
This unusual decoration will definitely deserve the attention of others. Just read the step-by-step instructions for a do-it-yourself rose from a napkin for a small tree - topiary:
- Just take a few napkins, fold them in half and cut them. After this, the product is given the shape of a semicircle.
- The resulting strips are twisted into buds until a flower is formed.
- This must be done with all remaining parts.
Making a rose from a napkin using this method is quite quick and easy. To assemble the topiary, you need to glue the composition into a ball. It is threaded onto a long skewer, for which you can use a pencil or a special mount. The base is placed in a pot. It can be secured inside with other napkins, decorative stones and other details.
Rose in a glass
To create an elegant table decoration, you can use not only paper, but also fabric napkins. Such decor always attracts attention, and you can learn how to make it literally within a few minutes.
To make the flowers as realistic as possible, it is better to use napkins of two colors: green and red or similar shades.
Step-by-step instructions:
- The green fabric needs to be folded like an accordion, tied in the middle with a thread, or even in a small ring and placed on the bottom of the glass.
- Place a red or pink napkin in front of you, wrap a 1 cm strip, and then begin to wind the fabric, forming a cylinder (all stages are shown in the photo).
- The base of the bud must be secured; thread or wire will do.
- Now you need to straighten a couple of petals outward and place the finished bud in a glass.
As a result, a delicate rose will bloom in the glass.
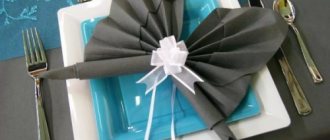
Queen of Flowers
Red and green napkins make a spectacular rose, which can be used to decorate a plate on a holiday table.
The third part is cut off from the red paper napkin. The remaining part is folded in half. The cut piece is placed in the middle and the napkin is twisted around the finger. There is no need to twist tightly. A bud is formed from the resulting cylinder. The corner of the green napkin is wrapped around the stem of the bud and twisted in a spiral. Along the way, one of the corners turns up in the form of a petal.
Rose is ready!
For a romantic dinner, you can decorate the table with a rose from a three-layer napkin in a glass.
We will analyze another method step by step with a photo.
The spread out napkin is wrapped around a pencil, about 1/3 of the way, squeezed from the sides, and the pencil is removed.
At least 4 of these leaves are made. The more petals, the more magnificent the flower. They are collected by twisting at the bottom one after another.
Related article: DIY clothes for the sphinx: diagrams with photos and videos
At the base, the bud is tied with a ribbon; if desired, it is decorated with a napkin of a different color.
You can collect balls from these roses.
Note! When the ball is assembled from roses of different colors and sizes, it looks more elegant.
You can fill a vase with flowers from napkins.
Congratulate Happy Valentine's Day with an original heart.


![How to beautifully fold napkins for a festive table: a variety of options [master classes]](https://1000koek.ru/wp-content/uploads/kak-krasivo-slozhit-salfetki-dlya-prazdnichnogo-stola-raznoobrazie-variantov-master4-330x140.jpg)
![How to beautifully fold napkins for a festive table: a variety of options [master classes]](https://1000koek.ru/wp-content/uploads/kak-krasivo-slozhit-salfetki-dlya-prazdnichnogo-stola-raznoobrazie-variantov-master-330x140.jpg)