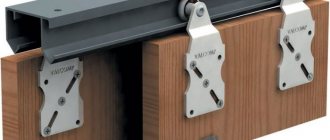
Rice. 2. Stopper for sliding doors and its installation in the lower guide of the sliding wardrobe
The plate is inserted into the groove of the lower guide; it can be moved in the guide itself using a flat-head screwdriver; the final position of the positioner is determined after installing the compartment doors. Push the compartment door tightly against the side wall of the wardrobe and make a mark with a pencil on the guide of the middle of the lower wheel of the compartment door; the mark will correspond to the stopper installation axis.
Stoppers usually come complete with compartment doors, but sometimes suppliers neglect this and do not supply them, justifying this by the fact that their assemblers do not install them or the floors are even. Therefore, always check for the presence of stoppers, this is a useful thing, otherwise the compartment doors will roll back, and the floors are not always level.
Plugs for top and bottom guides
Plugs for sliding wardrobe guides are an interesting thing, but not necessary in a sliding wardrobe; they will find their application in partition doors.
| Rice. 4. Plug for top guide |
| Rice. 5. Plug for bottom guide |
Single-row and double-row guides for compartment doors
Guides for sliding wardrobes can be single-row or double-row. Single-row ones are used for folding compartment doors and sliding partitions.
Double-row guides are the most popular type of guides for compartment doors. Used in double-, three-, and four-door wardrobes.
| Rice. 6. Single-row bottom guides |
| Rice. 7. Double-row lower and upper guides |
Installation of guides for sliding wardrobe doors
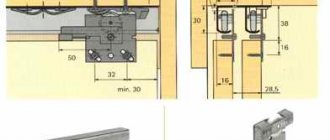
The guides are cut to size and you proceed to drilling holes to attach the guides.
In the upper guide we drill through holes with a diameter of 5 mm according to the pattern as in the figure. Do not drill holes randomly.
| Rice. 8. Diagram of drilling holes in the top rail for a sliding wardrobe |
| Rice. 9. Installation of the top rail for a sliding wardrobe |
When installing, align the upper guide with the side wall of the sliding wardrobe, make it flush. If the end of the side wall is lined with an edge 2 mm thick, then recess the guide onto these 2 mm, it will be more aesthetically pleasing.
| Rice. 10. Align the top guide with the side wall of the wardrobe |
In the lower guide we also drill through holes along the central axis with a countersink, but we make the number of holes less than 2-4 pieces, depending on the length of the lower guide. Before installing the lower guide, we insert a stopper, otherwise you will have to disassemble everything and reassemble it later.
We don’t fix the guide straight away, but install the compartment doors and move the guide along with them. We apply a level to the compartment door, if there is verticality, then tighten the screws.
There is a way to mount the bottom rail without screws. In this case, you do not drill holes in the guide, but glue it using double-sided tape and silicone glue.
How to calculate a compartment door
It is quite possible to install such an interior system yourself. The main thing is to take into account the dimensions of the doorway.
Standard canvas sizes:
- compartment door width from 40 to 90 cm;
- The maximum height of compartment doors is up to 275 cm. Manufacturers do not recommend exceeding these figures due to the increasing load on the rollers.
Designs can be single-leaf, double-leaf or more (if we talk about cascade options).
To calculate a compartment door, you need to make certain measurements of the width, height and depth of the opening. For a more accurate result, it is better to do this in three places: top, middle and bottom.
Let's take a closer look at the calculation of compartment doors for two common types:
- Classical. The leaf should be 2-5 cm higher than the opening. The width of the door on each side should be 2-3 cm larger. The dimensions of the openings for standard doors are shown in the table. Maximum values indicated. A smaller error is acceptable.
- Cassette. The size of the opening coincides with the size of the canvas. First, the mechanisms and doors are installed, and then the false wall is mounted.
Types of guides for sliding wardrobe doors: installation options
The design of guides for sliding sliding doors includes various components and parts, the main function of which is to ensure the movement of various elements of furniture structures. For example, they ensure free (without jamming) sliding of the doors of various types of cabinets.
Today, two systems of guide mechanisms are most common:
- door, which include several design varieties; for extending box structures - table drawers, sofa trays, tabletop extensions and shelving.
Main functional purpose
Various types of sliding door guides must ensure the free closing and opening of sliding doors, regardless of whether they are interior doors or cabinet doors. The basis of any design is the rails along which the doors move horizontally using rollers.
Additional accessories include:
- roller hangers or supports; profile seals and plugs; clamps; small fittings; additional devices, the availability of which depends on the specific choice of rollers and guides.
So are imported ones, the price of which is quite high:
- "Raumplus"
- "Francco"
- "Archie"
- "Hangroller"
Guides
When choosing a profile for sliding doors, regardless of the type of sliding system, the main attention is paid to the material of its manufacture. Today they are made from various materials.
Depending on the type of hanging option and the number of sashes, rail guides can be one-, two- or three-lane. In addition, the supports themselves are made straight or curved.
To increase decorativeness and aesthetics, almost all elements and parts are anodized, chrome-plated or painted using powder coating technology. The type of tinting can be anything, from traditional silver, gold or wood texture, and up to “antique bronze”.
Width&Height: measurement features
According to the standard, the width of the door leaf is considered to be 500 mm. Narrower facades can be purchased to order, but experience shows that they are not very practical. When opening, the door falls towards the force and the profile touches the lower running track, even worse when the door falls out of the track.
A facade with a width of more than 1000 mm is also not very convenient to use. Although there are no special restrictions on the installation of such structures, you need to choose those options that actually turn out to be more practical.
The handle profile is made of a special plastic and at the same time impact-resistant composition; its length can reach 5500 mm. The parts are cut depending on the height of the wardrobe. When calculating wardrobe doors and choosing a profile, take into account the rigidity of the handle, which is determined by the width of the door leaf. The wider the facade, the higher the strength of the framing structure.
List of sources
- mebeltrends.ru
- onashem.mediasole.ru
- masterim.guru
- kachestvolife.club
- www.syl.ru
- vmk-mebel.ru
- svoyadver.ru
- shkaf-kupe-info.ru
- bezkovrov.com
Types of sliding systems
In residential premises, sliding doors with an upper or lower swing type are most widespread.
The first option is mainly used when arranging sliding partitions and creating interior sliding doors that move along the wall. The second and third are predominantly used in wardrobes.
Most commercially available kits are classified according to their load capacity, which depends on the total weight of the door leaves. In addition, when selling any kit, a supermarket salesperson or online store manager will definitely ask the client about the type of system (suspended or support) and the preferred price range.
A video clearly showing the types of guides and their attachment points.
Filling made of chipboard or MDF with finishing
A blank panel made of chipboard or MDF best protects things in the closet from dust, humidity, light penetration and other influences.
The material itself (chipboard or MDF) is panels 8-10 mm thick with a variety of finishes. This can be veneer of various types of wood, PVC film, artificial and natural leather, plastic, fabric. And also the finishing that is used to decorate walls - painting (MDF enamel), wallpaper, etc.
Laminated chipboard (laminate) is the most budget option with a variety of multi-colored decors, imitations of wood, stone, textiles and other materials.
- One of the advantages is the affordable price with many finishing options.
- The downside is that chipboard and MDF can crumble at the places where the fittings are attached. But this drawback is insignificant.
Installation
The process of installing sliding doors is simple and consists of assembling all the components, parts and fittings included in the purchased kit. In this case, the apartment owner himself decides whether he will order sliding panels separately or purchase them together with a set. Any person with minimal plumbing skills will be able to perform the installation work independently. However, the assembly process itself requires special care and precision. The first step in installing any horizontally sliding panels is to install and secure the support profiles.
The reliability of the operation of sliding doors and the ease of their operation depend on the qualified and careful installation of the guides. This applies to both top and bottom rail systems and longitudinal opening types. In case of poor installation, the possibility of the sash coming off cannot be ruled out. Of course, such a situation will not lead to tragic consequences, but the work to restore the functionality of the doors is quite labor-intensive.
The simplest option is installation with a single-strip support rail.
This option is used for installing single-leaf interior doors or double-leaf ones, when the leaves are installed without overlap, but end-to-end and slide apart in opposite directions. Let's look at the fastening process using their example.
The assembly of any sliding system begins with fastening the upper support profile. Typically, this operation does not cause problems. For installation, in most cases it is necessary to attach an additional beam to the wall, above the doorway. For a single-leaf door, its minimum length should be equal to double the width of the opening. If double-leaf interior doors are installed in a living space, then the length of the beam should be equal to four times the width of the opening.
After fixing the upper profile, pre-assembled sashes are hung on it. For most industrially manufactured kits, this operation is performed by simply “winding” the door rollers through the end of the support profile.
The hung canvas is aligned vertically, using a level or laser plumb line. Next, you need to secure the bottom guide to the floor. Its installation and fastening depends on the sliding door system (hung or supported), the type of rollers and the nuances of the purchased kit. Usually, at the first stage of installing the lower or fixing profile, it is not rigidly fastened. Having secured it “live”, they check the functionality of the entire structure and only after making sure that the assembly is correct and the panels slide freely, they finally fix it.
Often the fastening of both parts is carried out before installing the rollers on the canvas. The sequence of work is similar to that described above. The alignment of the rail in the vertical plane is controlled using a building level, and the distance between their surfaces is controlled with a regular tape measure. After installing the support profiles, the door leaves are assembled, which are then hung in the usual way.
The video clearly shows the process of installation and installation of sliding wardrobe doors.
Of course, there are other assembly schemes. Some “craftsmen” generally refuse to purchase a full set, purchasing only videos. At the same time, there are more options for creativity, both in the choice of panels themselves and fastening parts.
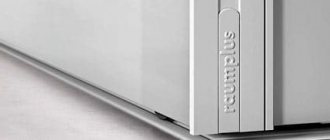
Features of installation of “pure” hinged sliding doors
Today, in the online trading system and in furniture supermarkets, you can purchase kits for installing sliding doors without a bottom guide. A typical representative is the Raumplus kits.
Preventing vibrations of hanging sliding doors is carried out due to the special design of the upper roller support and the weight of the door leaf. The roller support has a rather complex mechanism. Typically a roller carriage contains four rollers. The advantages of “Raumplus” type structures include ease of installation. The home craftsman should only securely fasten the top profile and install the panels.
However, support-free suspension systems require more careful maintenance and handling. An alternative to these are bottom support wheel designs, which do not require a bottom support rail. In this case, the door leaves have special wheels at the bottom that roll freely directly on the floor surface. As a rule, the lower wheels are spring-loaded, which to a certain extent compensates for uneven floors.
Undoubtedly, the optimal solution for installing sliding interior doors is to contact specialized companies that sell roller kits and install them on a turnkey basis. Most of them offer customers several options when placing an order, differing in both systems and final design. However, many homeowners, after considering various options, opt for self-installation. It is not uncommon for home craftsmen to completely refuse to purchase ready-made kits, purchasing separate panels, separate upper and lower profiles, and ordering roller supports individually.
Design Features
Before we talk about how doors are assembled, we need to talk a little about what Aristo is. The profiles of this company are made on the basis of primary aluminum. The products are distinguished by high-precision dimensions.
The system involves the creation of various doors, but the main emphasis is on sliding systems for compartments. Rollers for sliding doors are equipped with metal rolling bearings, which do not require the use of lubricants throughout their entire service life.
Aristo designs provide long service life, they operate smoothly and silently. Of course, the ability of the master himself to assemble the door plays an important role in this. But if you follow the instructions and follow some rules, you will definitely succeed.
The upper rollers serve to ensure the stability of the structure, holding the door leaf in a vertical plane, and also helping in smooth movement along the upper guide.
As the manufacturer of the Aristo Nova, Flat and other interesting solutions notes, their compartment doors can withstand about 100 thousand opening and closing cycles. For a coupe this is a very respectable figure. Moreover, in practice it has been confirmed that these words are not a marketing ploy, but correspond to reality.
The assortment includes various colors and design options that aluminum profiles can have. This allows you to install just such doors yourself, which will complement your interior. You can also safely play with contrast.
You can also buy profiles that imitate wood. To give the desired color, two-layer laminating films are used. The monochromatic appearance of parts during production is achieved through anodizing.
By purchasing profiles for compartment doors from Aristo, you can make sliding doors filled with a mirror, a combination of glass with plywood and fiberboard, chipboard panels, MDF boards, etc. The maximum design reaches a width of 1500 mm and a height of 3300 mm. The maximum weight of one leaf is up to 160 kilograms.
Installation of Rollers for Sliding Wardrobe Doors
Installing sliding wardrobe doors is not particularly difficult
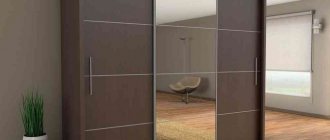
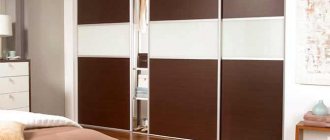
Sliding wardrobes have long ceased to be exotic, having thoroughly taken up residence in our homes. And it's not mind-blowing. They fit amazingly into a modern interior and are irreplaceable in small hallways, bedrooms and family rooms. Sliding door system for sliding wardrobes and its components. Characteristics of the guide for sliding wardrobe doors, installation of guides and care for them. Their main advantage is the saving of surrounding space, because the cabinet doors do not swing outward, but move in their own plane. As a rule, the design of sliding wardrobe doors has lower supports in the form of rollers and guides located below and above. It is easy to install the inside of this type of cabinet furniture, but installing sliding wardrobe doors can cause some obstacles and difficulties, although almost any home craftsman can install them.
Design features of elements for installing doors
The function of the upper guide is to keep the panels from possibly falling out. Synchronizer for sliding doors syn-1. Synchronizer kit for sliding doors. Depending on the model, there may be two, three or even more doors. But, regardless of their number, the guide is usually double (with 2 grooves). High longitudinal ribs allow you to smooth out differences in height between the ceiling and floor. The upper guide does not take any loads and is only a regulating element, therefore it does not require special fastening.
The door leaves move along the bottom guide. Install doors for a sliding wardrobe and assemble beautiful sliding doors. It is attached directly to the floor covering or to the bottom shelf of the cabinet. It is possible to install the guide on double-sided tape, but such a fastening will not be very reliable, although it will not damage the floor. In the case of a cabinet design with one moving leaf, a single guide is installed, in other cases - a double one.
The lower rollers with ball bearings take on the entire load from the door leaf. Roller systems for sliding doors are very easy to use. Assembling a door frame for a sliding wardrobe with your own hands. Step-by-step assembly instructions. Doors for sliding wardrobes. Sale of mechanisms for interior sliding doors. Their design allows you to adjust it in height, in some cases even up to several cm. Watch the installation of a sliding door system for a horus wardrobe, video views 67541. Installation of a sliding door system for a horus wardrobe video online for free on rutube. The function of the upper rollers is to hold the blade in a vertical position.
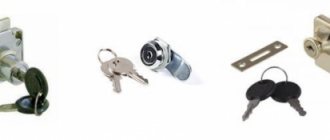
The stopper, or latch, serves to easily fix the door. It does not allow unauthorized movement, but is installed in a groove on the lower rail.
Buffer tape or sealant is glued along the vertical frame (profile) of the door. Also, fittings for sliding doors include installation you can do yourself. It serves to soften the impact when opening/closing the door and protects the contents of the cabinet from dust.
Installation of sliding wardrobe doors supported on the top rail is much less common. Installation. The process of installing sliding wardrobe doors installation of wardrobe doors - compartments for. Such systems are somewhat more difficult and expensive, so their choice will not always be justified.
Accessories and components
A standard roller kit for creating sliding doors for a sliding wardrobe with your own hands includes:
- profiles framing the sash;
- upper and lower guides;
- rollers, which are selected depending on the selected type of sliding system, profile shape, dimensions;
- accessories;
- filling the door leaf.
Let's look at the components in more detail.
Profiles
The door frame for the sliding wardrobe is made from specialized profiles.
There are several main types of profiles:
- Vertical profile-handle.
- Horizontal bottom.
- Horizontal top.
For the manufacture of profiles use:
- Steel. Stainless steel profiles are distinguished by their affordable cost, good reliability and impressive service life.
- Aluminum. Anodized aluminum profiles are characterized by low weight, good strength, and long service life.
How to choose the right profile for making a sliding wardrobe yourself is described in detail in the video:
Guides
To make a sliding wardrobe, guides are needed. The top one is a profile with one or more tracks along which the upper wheels of each sash move.
The width of the top rail for a sliding wardrobe is determined by the number of tracks and design features. The standard track width is 38.5 mm. Wall thickness – 1.6 mm.
The bottom rail is a profile with tracks for moving the support wheels.
Rollers and accessories
When using closed vertical elements in the frame, upper symmetrical rollers are used.
Asymmetrical wheels are used to create the frame of a sliding wardrobe system from open-type standing elements.
As in the previous version, two rollers must be installed on each door leaf.
The supporting lower wheels are responsible for moving the door and take on most of the loads.
The roller is equipped with an adjusting screw and a pressure spring. This element is installed in the lower horizontal profile. Each door requires a set of two rollers.
What other accessories are needed for a do-it-yourself wardrobe:
A spring stopper ensures the sash is locked in the closed position. Installed in the bottom guide.
Schlegel is a strip of fleecy material that softens the impact of the sash on the walls of the case. It is glued into the groove of the vertical profile along the entire height of the door.
Self-tapping hexagon assembly screw. The number of screws is determined by the number of subassemblies.
Upon request, furniture stores offer additional (optional) elements: door closers, end caps for profiles, magnetic stoppers, etc.
It is important to understand that these elements significantly improve the performance properties of the structure and significantly increase its cost.
Filling the sash frame
Do-it-yourself sliding cabinet doors are made from a wide variety of materials that match the thickness of the profile. The most common and inexpensive are laminated chipboard and MDF boards, 10 mm thick. This thickness of the compartment doors is due to the profile width of 12 mm, plus a silicone seal, the thickness of each wall is 1 mm.
You can make a prefabricated structure from a combination of two materials: mirror (glass) and laminated chipboard. In this case, it is necessary to provide for the purchase of a connecting H-shaped profile with fixation.
Installation of guides
It must be emphasized that the dimensions of the door must correspond to the width of the cabinet or opening in which the panels will move. Allowed deviation is /-3 mm.
The guides are fastened with screws and a press washer, with a pitch of approximately 300 mm. First, install the top element flush with the ends of the side walls of the cabinet.
The bottom rail is recessed 20-22 mm deep into the cabinet. To find its correct position, you need to follow a couple of steps:
- the guide is laid without any fastening on the lower shelf or floor;
- the door leaf is inserted into the upper rail, raised slightly and the lower rollers are installed in the lower guide;
- using a building level or a plumb line, they achieve vertical placement of the door, while moving the loose rail in one direction or the other;
- mark the position of the guide;
- take out the door;
- install stoppers on the rail.
After which you can begin attaching the lower guide.
General assembly rules
These tips apply to all types of furniture without exception; be sure to follow the general recommendations, which will help you avoid many mistakes.
- Carefully read the instructions, check the completeness of the hardware supply, find out the purpose of each part and fastener. You must understand not only what is fixed, where and in what sequence, but also what functions each part performs and what loads it is designed for. This knowledge will make it possible to select the permissible forces of cabinet elements during assembly. During this period, they are subject to loads not provided for by the manufacturer, and the risks of mechanical breakdowns increase. You always need to control how much you can deflect individual shelves and walls during installation, when the hardware only needs to be attached, and when it needs to be tightened to the limit.
Door installation
First, the door farthest from the facade is installed, and then the closest one. The procedure is quite simple and if the guides are installed correctly, there should be no problems.
The upper end of the first blade is inserted into the distant groove of the upper rail. The door is lifted slightly, the lower spring-loaded roller is pressed and inserted into the far groove of the rail. Guides for sliding doors - installation. Other canvases are placed similarly.
Next, you need to adjust the position of the doors. Door adjustment adjustment of sliding wardrobe doors sliding doors in thin. To do this, tighten the adjusting screws on the rollers using a hex wrench. The nuances of installing sliding wardrobe doors with your own. To lower a corner, turn the wheel screw underneath it counterclockwise; to raise it, turn it clockwise. This must be done until the canvases fit tightly to the side wall.
Adjustment issue
Having understood the whole essence and theory of this device, all that remains is to touch upon such a topic as adjustments. But there is nothing complicated here either.
The need for adjustment arises when the compartment doors begin to open spontaneously, or they do not fit tightly enough to the walls of the structure. If you observe something like this, then there is probably a problem with the stopper.
To adjust the limiter you need to do the following:
- First, move the door from the wardrobe so that it is in the position of extreme fit in relation to the side;
- On the side of the bottom guide, apply a mark that will determine the location of the center of the nearest roller;
- Move the sash, thereby moving the stopper, using a thin screwdriver;
- Make sure that the middle of the stop matches the previously applied mark;
- Glue the element to the center of the existing guide.
That's all, the adjustment is complete. You can clearly see that there is nothing complicated here; the procedure requires a minimum of time, effort and additional equipment.
With this we will say goodbye
Thank you all for your attention! Subscribe, leave comments, be sure to ask relevant questions, and don’t forget to tell your friends about us! It’s good for them and good for us!
Subscribe, leave comments, be sure to ask relevant questions, and don’t forget to tell your friends about us! It’s good for them and good for us!
Stopper adjustment
To prevent the closet door from moving independently when closed, stoppers are installed on the bottom rail: one for each panel. After the bottom guide is finally secured, the door is placed in the system and the latches begin to be adjusted so that no gaps form when it closes.
To determine a more precise location of the stopper, you must:
- close the door;
- mark the center of the roller wheel;
- Use a flat screwdriver to move the stopper so that its center coincides with the mark.
Principle of operation and installation of the stopper
Before installing a stopper for wardrobe doors, you will need to study the principle of operation of this element. To properly secure the sliding door stopper, you must lock it in the desired position. The part is usually located in the lower guide rail.
The springy curved plates should rest against the top of the rail track. They form a gap in the middle of the stopper. The door roller should move along the bottom rail. When it hits the plate, the stopper falls into a special gap. As a result, it is blocked, and the door is fixed in the required place when closing.
A sliding compartment door is opened by applying a little extra force in the required direction. The roller then moves out of the gap between the stopper plates, which causes the door to roll along the lower rail. Another function of the stopper is to hold the door in place.
Many owners of two-door wardrobes believe that this piece of furniture functions perfectly without a special door lock. Installation of a stopper is necessary for structures that have 3 doors or more. Without this device, it is impossible to adjust the evenness of several doors when closing them. The assembly scheme of such sliding structures requires a mandatory fixing device. You will need to install 1 stopper on each sash.
Buffer tape
Glue the seal after adjusting the door leaves, as it will close all the holes that provide access to their adjustment. Sliding mechanisms for interior doors, sliding door guides. Buffer tape is available with short (up to 6 mm) and long (up to 12 mm) pile. Its color matches the color of the sliding system, and it is very easy to glue. To do this, the protective film is removed from the back side and the tape is applied to the end of the door.
Now the work on installing sliding doors in the wardrobe can be considered complete. For sliding doors, rollers and guides for sliding doors. With my own hands. All that remains is to remove the film from the profile and wipe the glass or mirrors with window cleaning liquid. And you can safely fill the interior space with your things!
Door connection
It’s annoying when the cabinet door is slightly skewed and does not fit tightly against the side surface. The appearance of the structure deteriorates.
The cause may be unbalancing or loosening of the adjusting bolt at the bottom of the door side strip.
Exhibiting Schlegel
You can adjust the doors as follows:
- At the bottom of the door leaf, we separate the buffer tape (fluffy sealant) from the aluminum profile.
- In the profile you will see two recessed holes; they contain a bracket with bolts.
- It is necessary to remove the bracket; to do this, take the hexagon (4), feel the bolt and adjust it.
- When turning to the right, the canvas rises, to the left, it lowers.
In this way, the door distortion is eliminated. The canvas should be placed in a vertical position gradually; check using a level. The adjustment of compartment doors is considered complete when the gap between the door leaf and the side pillar completely disappears. If, when closing the cabinet, the door does not lock and rolls back, you need to adjust the position of the stopper.
Stopper adjustment
The locking mechanism inserted into the recess of the lower profile is thin and quite sharp, so it is difficult to push it by hand.
Wardrobe door stopper adjustment diagram
For these purposes, it is better to use a thin plastic strip or something similar. Installation of the stopper is as follows:
- The bar is inserted into the profile groove and moved in one direction.
- After moving it a little, check whether the door is fixed.
- Advance until the canvas is fixed in the desired position.
These types of defects arise as a result of frequent use of the cabinet and are, in general, operational issues. These flaws are easy to eliminate with your own hands. Watch the video: how to adjust wardrobe doors yourself.