“Can you put together a box? Yes? Okay, you’ll make stools for now.” This is from a conversation with a new job seeker in a small furniture company. Indeed, making a simple stool with your own hands is no more difficult than making a box. That one may be more difficult if it is retractable in a nightstand. Therefore, for those interested in carpentry, it is better to master it by starting with a stool. You won’t save a lot of money on this, stools are inexpensive. But the acquired skills will allow you to start working on large cabinet furniture, which will give you significant savings, plus unique items in the interior.
A stool as a starting object in the furniture business has another advantage: it requires little planing and sawing work with the inevitable debris, you can test your carpentry abilities on the balcony or even in the kitchen. Having made sure that things are going well, we will think about a carpentry workshop with a workbench and other things; Without it, you won’t be able to make the furniture more impressive.
Simple round stool
To make an original wooden stool with a round lid you need:
- Before you make a simple stool from wood with your own hands using a hacksaw and a set of chisels, you will need to mark the bars.
- Cut out blanks for legs and connecting jumpers, on which it is necessary to provide protrusions.
- Connect the frame elements using the technology used when assembling a square stool with your own hands from wood.
- Mark with a compass a circle corresponding to the diameter of the lid on a sheet of thick plywood, a monolithic board or a package assembled from several plates.
- Cut the workpiece with a hacksaw or jigsaw, and then process the edges with an abrasive tool.
- Place the cover on the base and finish the surfaces.
A simple round stool is a very comfortable piece of furniture.
For country houses, they use the technology of manufacturing round stools of a simplified design. Instead of separate legs, use 2 sheets of plywood or chipboard with connecting grooves. The supports are joined at right angles, and then a round lid is attached on top using wooden pins and adhesive. To increase rigidity, screws and metal corners are installed.
How to make a classic stool?
So, let's start looking at the process of creating the product in question with the possibility of creating a classic stool. To create it you will need to have the following components.
- 4 beams for legs that have perfect smoothness. They can be straight or tapered downwards from the inside.
- 2 or 4 boards or a plywood panel from which the seat will be made.
- 4 legs, drawers or both options at once.
- Various kinds of connecting parts in the form of medium pieces of timber, if necessary.
- Timber for creating so-called “crackers”, if they are provided for in the design of the chair.
- 4 wooden choppers, which will be used to secure the seats to the finished base.
- Special adhesive composition.
- Self-tapping screws.
So, first, it will not be superfluous to glue the boards for the seat if the design assumes that it will be formed from several parts. To do this, you will need to coat the perfectly fitted and sanded end parts of the boards well with glue, then connect them and tighten them with clamps. Now this part of the structure should be allowed to dry thoroughly, but for now you should work on the frame of the stool.
You can begin preparing the bars from which the legs will be made. Their cuts should be as smooth as possible and have the same height level within a certain range at the request of the person. We mark the legs, after which we determine the location for selecting the joint grooves for mounting the tenons of the legs and drawers or something else there. Holes can be selected using a chisel or router. Now you should process the edges of the drawers and legs. It is necessary to cut the tenons of a certain size, which should be slightly smaller than the grooves in the legs. This is done so that the tenons are inserted relatively freely into the grooves, but as tightly as possible.
The legs are collected in pairs, we fasten them with drawers and legs. This is done by gluing tenon elements into the grooves of the legs. The resulting frames should be tightened with clamps. When they are dry, it is necessary to connect the legs connected in this way with drawers and legs into one structure of the base of the product, and then compress them again in clamps until final gluing. When the glue dries, the connections should also be secured with self-tapping screws to be more sure.
If the structure of the product will be strengthened with the help of “crackers”, then they should be screwed to the leg and hags. This element will provide additional support for the seat.
Now you should secure the seat of the stool directly, having first marked everything. To do this, first apply glue along the markings to the other side of the seat, then lay it on the base of the product, level it and press firmly.
After this, a hole should be drilled in the corners through the seat panel. Their size should be slightly larger than the finished dowels by about a couple of millimeters. And the depth should be about 5 millimeters less than the height. Glue should be poured into the hole made, and then the dowels should be driven in. Any glue that comes out must be wiped off immediately. The top of the dowel must be cut using a router, after which this area must be sanded until smooth.
Now the seat should be pulled together with the drawer using clamps until the glue is completely dry. It should be added here that different adhesive compositions will have different drying times, which is why you should carefully read the information on the packaging as indicated by the manufacturer. The product can be used for its intended purpose only after the adhesive composition has dried completely.
Manufacturing procedure
Is it difficult and how to make a stool with your own hands? First you need to decide on the drawing and choose the optimal design. The next stage is preparing the material for manufacturing. Wood, chipboard or plywood must be dried and checked for defects
Then the workplace is set up, special attention is paid to lighting
As an example, we can consider how to make a stool from chipboard.
Production stages:
Sheet marking. This is necessary for the formation of blanks. Beginners are recommended to make patterns from paper or thick cardboard. This way you can avoid sizing errors.
It is important to consider the kerf width tolerances. Formation of blanks. The optimal tool is an electric jigsaw
The edges need to be sanded with sandpaper or a sanding machine. Fastening components. Depending on the design, you can use the slotting method, joining with furniture corners or using wooden tenons. If the structure is made of wood with your own hands, you can use confirmations. This screw fastener secures various components well and improves stability. Painting and varnishing. The finishing surface can be matte or glossy. If it is important to preserve the original texture, use translucent or transparent varnishes. Acrylic compounds are most often used. Additions. Often special shock absorbers are installed on the legs. They minimize the appearance of scratches on the floor and reduce noise when moving furniture.
Some general information and history
A stool, or, as this piece of furniture is commonly called, a stool, is a product designed for sitting, which has neither a back nor armrests, and can accommodate only one person. That is, the stool has only the seat itself, as well as support legs connected to each other by drawers and legs. There are usually 4 legs, but some types of stools may have 3 or 1 leg.
The dimensions of the classic stool are standard. The seat has a width of about 30-45 cm for an adult, and for a child this parameter is approximately 25-28 cm. The height of the product is on average 42-48 cm for an adult, and 26-28 cm for a child.
Scheme of a classic stool
The history of the stool goes back many centuries, if not millennia. The first product in history was created according to the principle of building a dolmen, when one was placed horizontally on two vertically installed stones and acted as a roof. In general, the history of this modest piece of furniture officially began with Ancient Egypt (about 5000 years ago). The first stools were very low, which is directly related to the short stature of people of that time (men of that time rarely exceeded the height mark of 159 cm).
On a note! Stools served a variety of purposes at the time. Even the appearance of children, according to some frescoes, took place on a stool.
For a long time, an ordinary stool was considered an attribute of the interior of the rich. Even pharaohs sat on it, although soft pillows were placed on the seat. A little later, the stool “evolved” into the prototype of a chair - it had a small back.
Design features of the stool
Also, stools conquered Rome and survived until the Middle Ages, not disappearing even in the midst of wars. Medieval products were assembled without nails and had wide legs. Then stool-chests began to appear in which something could be stored. The same seats with storage drawers appeared in Rus'.
It’s interesting that for a long time she could only sit on chairs and stools. The low-born were located directly on the floor and ground, without experiencing any discomfort. The monks also contributed to the development of furniture in their time, thanks to whom stools began to be used for sitting at desks. To facilitate intellectual work, a rotating stool was invented, which appeared around the 14th century.
Antique stools
Thus, the stool, changing, survived until the twentieth century, and then to the present day. And it still continues to be in great demand, remaining a convenient and functional product. So, it is convenient to sit on it at the table; if necessary, it can be pushed under it so that it does not interfere. And in some cases, you can safely stand on a stool to reach something from above. This is a very stable, practical and interesting product, despite its apparent simplicity and modesty.
On a note! In Soviet-era schools, almost all boys made stools during labor lessons. And the girls coped with this task perfectly if necessary. Such lessons helped lay the foundations of carpentry skills.
How to make a three-legged stool
Decoration
If we talk about decorating stools, there are a lot of ideas that will allow you to turn them into something unique and interesting. Ideas for decorating such products can be divided into 3 large categories:
- woodworking;
- use of various types of pillows;
- the use of various types of capes.
If we talk about the first category, then a very popular type of decoration is the creation of antique stools. For this purpose, there is a special coating for wood, as well as its special processing. Carved models of this type, which are made by professionals, have a fairly high price. But it is not always possible to make such a stool yourself.
But the use of various kinds of pillows is one of the most commonly used methods of decorating such furniture. In addition to the fact that various original pillows make the stool truly unique and interesting, it is also soft and comfortable. After all, often the problem with any stool is that you can’t sit on it for a long time due to the hard surface. And so this problem is solved, and you can enjoy sitting on such a beautiful chair. Another decoration option is the use of various capes. Well, here everything is limited only by the imagination of the owner of such furniture and his financial capabilities. As you can see, today there are many options for decorating wooden stools made with your own hands.
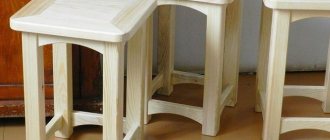
Simple kitchen
A simple full-size utility stool can also be made from scraps of timber, plywood or chipboard, see fig. It is more suitable for a seasonal garden. When used in the kitchen of a residential building, the design turns out to be rather weak, where this stool lasts for 3-5 years. The second option for using the same design is a smaller children's stool, see above; the dimensions of the parts are then proportionally reduced, except for the width of the connecting grooves.
Simple utility stool of lightweight design
Tools and materials
So, in order to make a wooden chair yourself, you need to prepare a number of tools and materials. If we talk about tools, we should name:
- plane;
- Circular Saw;
- drill;
- screwdriver;
- wood hacksaw;
- milling cutter;
- roulette;
- pencil;
- clamps.
If we talk about materials, then you will need to have on hand:
- screws;
- furniture glue;
- sandpaper;
- stain or drying oil;
- masking tape;
- cardboard for stencil;
- dowel or lumber.
Here it should be understood that the choice of wood and the final processing technique will determine the ability of the chair to cope with the effects of natural factors, its stability, reliability and ability to withstand physical stress. For some reason, many people choose chipboard to create a chair, although this material is completely unsuitable for chairs. And especially for garden-type models. The reason is simple - extremely low resistance to moisture. And the strength of chipboard models will be lower than that of solid wood or timber models.
But natural wood, although not the most affordable material, is environmentally friendly and completely harmless. It will be the best solution if you want to make homemade chairs with your own hands. Before starting work, you should inspect the boards and bars for defects - cracks and knots. After this, the material is polished, protective materials are applied to it, and assembly is performed. If we talk about wood, then it would be best to take alder, ash, birch, and oak for such purposes.
There are two reasons here. The first is the presence of an unusual fiber pattern. The second is the high wear resistance of a product made from these materials. And the durability of such products will be high. The only drawback will be deformation under the influence of moisture and low resistance to fire. And one more important point that should also be prepared is drawings and diagrams. This issue should be decided when it is already known what material the furniture will be made from. There are several options to solve this problem:
- make a drawing with your own hand, which will indicate the dimensions and features of this chair;
- do it on a computer;
- download the finished version on one of the specialized sites.
Which option is better to choose will depend on your drawing and computer skills.
Spreader
A step stool with 2 pairs of X-shaped legs is also quite popular due to its low material consumption and good decorative qualities. However, in reality it turns out to be not so simple.
Take a look at the subassembly marked in red in the fragment at the top left of the figure. Performing a strong and reliable insertion of 3 beams in 2 mutually perpendicular planes is not an easy task even for an experienced carpenter; putting a dowel there would be unreliable, and the self-tapping screw in this case is outright hackwork: the double crosshair is heavily loaded and the steel hardware will tear the wood.
Decorative stool with drawer for small items
These problems can be circumvented by combining the beam and box-type load-bearing circuits of the supporting structure. We will leave the openwork of the beam frame in the most noticeable place - at the bottom - and we will achieve overall strength with an “oak” box-shaped top. Technically, this is achieved by reducing the angle between the legs to 60 degrees. Then, in order to maintain the overall height of the stool and the width of the contour of the supporting surface within acceptable limits, the crosshairs of the legs move upward. The V-shaped part of the now asymmetrical X is high and wide enough that a strong box can be made from 20 mm or thicker pine boards, chipboard or plywood, see left in figure.
Note: the missing overall dimensions can be taken from the figure; it is drawn to scale.
The longitudinal walls of the box do not have to be inclined; This is done to reduce the visibility of the box while maintaining maximum volume. If the longitudinal walls of the box are straight, it can be made narrower, as long as the V-shaped part of the legs fits inside. It also doesn’t hurt to deepen the box by moving its bottom down; the whole stool will only be stronger. In this case, 1-2 attachment points are added to the Λ-shaped parts of the legs, similar to the V-shaped part, marked in green in Fig. The box is assembled on dowels (see below) and glue or on steel corners applied from the inside. In this case, the box is first glued together, and after 1/4-1/3 of the time the glue has completely hardened, it is finally fastened with steel.
The bottom of the box is sewn up with fiberboard; a spacious drawer for useful rubbish is formed under the seat: the supporting structure provides the stool with full strength and its seat can be removable or folding. The last option is better, because... When rearranging the stool, take it by the seat. Fastening the folding seat is a piano loop or a pair of small card loops. The latch in the lowered state is any suitable: a tight ball latch, a hook and a bracket on the underside of the seat, even a secret lock, if you so choose.
When making this stool, you will have to master at least one carpentry joint - cutting into half a tree, this is how the parts of the legs are connected. As they would say in America, President Obama’s youngest daughter (Jane Psaki’s grandmother, they say, is a smart and skillful lady) can cut two pieces of wood into each other using a router. Using a simple hand tool, a half-tree cut is made by making cuts according to the markings and selecting the excess between them. Working “only with your hands”, you need to take a closer look at how the layers of wood go on both sides and place a chisel to knock out the excess, so that the chip does not go deep into the mass of material, see above in Fig. The remainder is removed with the same chisel, acting as a chisel, without hitting with a mallet, and, if necessary, the bottom of the groove is smoothed with a rasp. There is no need to smooth it clean with sandpaper; rough surfaces will stick to the glue more tightly.
Note: please note that the details of the legs of the step stool are a mirror image of each other both horizontally and vertically, at the bottom right in Fig. If you do not have experience in design work or have a naturally developed (convex, as they say) spatial imagination, it will be useful to first model the legs to scale or life-size, assembling their models from 2 layers of cardboard.
Tips for safe use
When using any lifting mechanisms, it is important to remember several rules:
- Before installing the structure, make sure it is suitable. Inspect for damage, loose fasteners and damaged rubber parts and supports.
- Place the product on a flat surface.
- If you are working on the site, check that there are no holes or stones under the legs.
- Follow the manufacturer's installation recommendations. Extension ladders, for example, need to be installed at an angle of about 75 degrees.
In the assembled product, check all fasteners, clamps and adjusters
It is necessary that everything is tightly latched and closed. Please pay attention to the maximum permissible weight for the product. If there are no rubberized pads on the steps, try to work in non-slip shoes. Store the stepladder according to the manufacturer's recommendations.
To learn how to make a ladder chair with your own hands, watch this video.
Other types
There are stools that are much easier to make than classic ones. A very common option now is a stool, consisting of four parts: a seat, two wide legs and a reinforcing crossbar (or jumper). This option should not be difficult, especially in assembly. Wood, thick plywood, and laminated chipboard are suitable for it. This structure is secured with furniture screws and glue for additional fixation. This option is very simple, but there is one subtlety: the reinforcing crossbar should be in the shape of a trapezoid with a 5mm bevel. This is necessary to make the structure more stable.
You can try your hand at making a lightweight stool. In this version, there are no side drawers and the legs are attached directly to the grooves of the seat. For this purpose, the seat cover is made of thick material. The grooves are made directly into the seat or bars are attached to it. In this case, the legs are made thicker than usual. Of course, such a stool will take much less time than a regular one.
Another type of stool is a seat and two legs arranged crosswise at an angle of 90 degrees. In this version there are no additional parts, where the structure itself consists of 4 parts. In this case, we can again use wood, plywood, and pressed boards. If we settle on a wooden model, then we do the final touch after final assembly. We carefully sand the stool again, and then treat it as desired with stain, varnish or paint.
Drawing of a kitchen stool. Click to enlarge
Other decor ideas
If there is a tapestry on the cover with an image in its middle, you can place a floral pattern with flowers. Due to the fact that the combinations of shades look dim, this option will not be pretentious, but stylish.
The seats can be decorated with embroidery on the cover. A large flower made using the satin stitch technique will look nice like a tapestry. An interesting option is an ornament along the perimeter or an abstract type of picture. They use strong, non-fading threads that will not wear out due to frequent washing.
Knowing how to make a wooden stool with your own hands, you can create beautiful furniture and save money.
Recommendations for caring for wooden furniture
If the product is not painted or varnished, it is not advisable to expose it to moisture. Even moisture-resistant plywood can peel or warp when water is constantly pouring onto the surface.
It is not advisable to place hot objects on wooden stools for the kitchen. This contributes to the formation of scorch marks and gradually renders the stool seat unusable.
Caring for painted or upholstered kitchen stools is simple:
- dirt can be removed with a damp cloth and detergent;
- The soft seat is cleaned with a brush and a special product suitable for the type of upholstery.
What do you need for work?
Regardless of the type of structure being manufactured, work must always begin with a drawing of the future project. It is advisable to consider several options so that you have something to compare with and ultimately choose one. The preparatory stage does not end here. You also need to take care of the tools.
Woodworking tools
So, to make a stool you need to prepare the following:
- softwood boards;
- furniture stapler;
- set of self-tapping screws;
- seat upholstery material;
- PVA glue for working with wood;
- sandpaper with different grain sizes;
- hand saw or jigsaw;
- plane;
- screwdriver and electric drill;
- safety glasses and work gloves.
Hand wooden plane
Be sure to prepare paint and varnish materials and decorative finishing products. It is also necessary to purchase various stencils, rollers and brushes for painting the finished product. Once everything you need is at hand, you can get to work.
Putty product
Any homemade stool will differ from the factory one in certain roughnesses introduced during manufacturing. In order to minimize all the mistakes made, it is necessary to use putty.
Note!
First of all, you need to putty the joints of the structural elements, then you need to cover the heads of the nails and screws with putty.
There is a wide selection of products for this purpose in hardware stores, but for supporters of environmentally friendly materials there is a simple recipe for making it yourself. Collect as small sawdust as possible and mix them in a 2 to 1 ratio with ordinary glue used in construction. After thorough mixing, the putty is ready. We must not forget about sanding all putty surfaces.
Manufacturing
As mentioned above, there is nothing particularly difficult about making your own inexpensive but attractive chipboard stool. The main thing is to first draw up detailed drawings and indicate on them all the dimensions of the future structure. Having such an “action plan” in hand will make your work much easier and more convenient, because at any moment you will be able to check whether you are doing everything correctly.
Preparation and cutting of material
The first stage of making a stool from chipboard yourself will be preparing and sawing the specified material that imitates wood. Different craftsmen use different tools for this, but an electric jigsaw is considered more convenient and practical - it’s easier to work with. It is advisable to use a tool with short teeth. The jigsaw should work at the highest speed - this is the only way all the cuts will be clean and even.
Having at hand a template (a detailed drawing with all the details) of the future stool, you can proceed to its creation. The paper or cardboard blank must be attached to the wood boards and outlined with a pencil. This way, it will be easier for you to cut out all the parts efficiently and accurately. All small irregularities remaining after cutting should be removed using sandpaper or sandpaper.
The cut bars must be carefully polished and tried on each other. Sanding is especially important if small households will use homemade furniture in the future. Having prepared all the necessary parts for the future structure, you can move on to the final stage before assembly - drilling all the necessary holes. Make sure that they are all at the same level.
Assembly
When all the parts are cut and prepared, you can begin to directly assemble the stool. Before you start assembling the furniture structure, you need to treat all cut edges with a special ribbon. It should be selected in accordance with the color of the material itself. Ribbons of contrasting colors are also appropriate.
The tape should be applied to the edges of the legs and seats, and then glued using a hot iron. The latter should be applied quickly, making short movements. The heated tape must be pressed down with a clean rag. The glue located on the back side of the applied coating sets almost immediately - it will not heat up or cool down for a long time.
All parts of the stool must be assembled using screws and confirmations. Some craftsmen first glue all the parts and then fasten them with self-tapping screws - it’s easier that way. The seat of the resulting stool can be made soft by installing foam rubber and upholstery.
Decoration
The stool will look more attractive if you equip it with padding and upholstery. The upholstery of such furniture can be oilcloth, woven or leatherette. Each master chooses the best option himself. Foam rubber is often used as filling.
Requirements for homemade stools
The item in question is a universal piece of furniture that can be easily removed or simply moved if desired. If necessary, a stool can serve as a coffee table or some kind of not very large stand. But in order for a simple stool made by yourself to be as functional and high-quality as possible, it must meet a number of standards and have certain characteristics.
The first important point is that the structure must be as durable as possible. The fact is that as the stool is created, all parts made from solid wood or cut wood must be fixed to each other using high-quality carpentry adhesive. If such a stool has high strength, then it will withstand even obese and overweight people and will not break under heavy loads.
The second important aspect is the correct sizes and proportions. The fact is that the design of such products must be proportional to the size and height of the people who will use them. For example, a stool for children should be selected as carefully as possible so that the child’s feet touch the floor or at least a special crossbar.
The third point concerns convenience and compactness. It is imperative to make upholstery for such a product to make it much more comfortable to sit on. To create upholstery for a stool, materials such as leather, velor or leatherette are suitable.
Drawing of a wooden stool
As usual, at the very beginning we need to draw our future stool on a piece of paper, with all sizes and shapes. Since we will be making the product according to our sample, its drawing will look like this. We purchase dry timber Let's immediately make a reservation about the timber and slats, you need to buy them in the store, already processed and definitely from the dryer. You can find out whether the slats are dry or not from the store salesperson; as a rule, you can find them in a hardware store. And one more thing, the length of the slats and the length of the timber in the store will differ from the one we need. Don't worry, you'll just need to calculate according to the dimensions above and then cut them to the size you need.
And one more thing, if you are already planning to make a stool with your own hands, then make a set of 4-5 pieces at once. The only adjustment will be in the amount of material needed for the required number of stools.
Gluing the shields
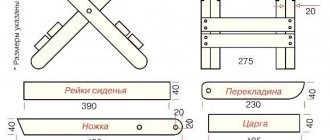
Let's get started, first we need to glue the shield for our seat. To do this, take 9 slats and place them on a flat surface, width apart from each other, and apply PVA glue to one side of each slats. We tighten them tightly with clamps, as shown in the photo. Making the legs While the glue dries, let's start making the legs. In principle, we won’t have to do a lot of work at this stage; we need to make a cut on the legs of our stool for beauty. To do this, all the legs need to be trimmed (sawed off) to the net size, namely: 4.5X4.5×45 cm. This will be our net size in length, but not yet in width and thickness, we’ll get to that a little later.
In order to make a beautiful cut, you need to measure 20 cm from the bottom of the leg to the middle and make the cut thickness 1.5 cm, this is done something like this:
And we trim (saw off) along the entire length. That is, it turns out that at the bottom of the leg the size will be 3x3 cm and smoothly towards the middle it will change to its initial size of 4.5x4.5 cm. In the end it will be as shown in the photo.
Manufacturing and assembly of the product frame
To manufacture and assemble the frame, you need to make 8 drawers, otherwise the drawers are called stability diameters, 4 drawers to the top of the frame and 4 to the middle. We take our slats and cut them to length, that is, we need to cut 8 drawers of 21 cm each. Then we take the legs and make through holes in them using a screwdriver and a wood drill, the drill should be 8 mm in diameter. at the same moment we attach the drawer.
It turns out that we have a through hole in the leg, and the drill enters the side by 2-3 cm. The side must be applied first from the top, and then to the middle. Next, we smear the chops with glue and hammer them with a mallet one by one into each leg and drawer, in the end you should get a frame like this. We disassemble the panels and polish the irregularities. Now we disassemble our glued panel and prepare it for the seat. First, we trim the shield to a size of 35x35x2.5 cm. After trimming, we take a manual grinding machine and put an 80 belt on it, sand our shield a little, removing rough irregularities and dried glue, that’s what we’re talking about:
As soon as the rough irregularities are sanded, you need to put on a tape number 120 and sand it clean. If chips or unevenness still remain, then putty and after the putty has dried, sand again, thereby you will get a perfectly smooth and clean seat, something like this.
Gluing the seat to the frame Now we will glue our seat to the frame. To do this, take the frame and apply glue to the upper part of the end along the entire length. We measure 5 cm on the seat on all sides and measure it with a pencil and apply it along the marked lines of the seat to the top of the frame. You can also fix it either with clamps, or put something heavy on top. You need to wait 24 hours until it dries completely. Carrying out paint and varnish work Well, now you can move on to varnishing, painting or staining (at your discretion). To do this, first take sandpaper number 180 and manually process the stool with your own hands, remove the remains of dried glue and minor irregularities, and bring the product to perfection! Afterwards, if you are going to varnish, take the varnish and mix thoroughly and, if necessary, add solvent 646.
We apply a thin layer of varnish to the product, we recommend using a quick-drying varnish, otherwise such varnish is called (nitro). We wait 2-3 hours, take sandpaper No. 180 and remove the pile raised after varnishing, this pile looks like this:
But don't get carried away, as you can remove the varnish from the product. Then we open it with varnish a second time, at this stage the pile will not rise significantly, but still go through it a little with sandpaper and remove the rest of the raised pile. And with the third layer we complete the varnishing; at this step there is no need to remove the lint. Final photo Our DIY wooden stool is ready, enjoy it to your health!
Making a Simple Wooden Stool
Let's look at how you can make the most ordinary wooden stool, which all the boys used to make in labor lessons. In this case, the furniture will be made from wooden boards, and the seat will be made from two pieces of board. Let's see how the process goes.
Important! Before you start working on creating a stool, you must find or draw a drawing of a stool yourself with the dimensions of the future product marked on it and, focusing on it, make all the parts.
Step 1. The first thing you need to do is create the seat. As we remember, it will be made from two pieces of board. You need to take two pieces of board of the same length (as a rule, the seat is made square, and the sides of the resulting square seat should be equal).
The seat will be made from two pieces of board
Step 2. You can glue two boards with PVA glue (construction glue). So, you need to carefully coat both end joints of the boards with glue, and then press them tightly against each other, placing them between any objects (in this case, between fixed bars with additional sealing with wedges). You need to leave the boards like this until the glue dries.
Applying glue Gluing boards
Step 3. Next you need to start making the upper drawers for the stools. To do this, you need to take bars of the required length and sand them a little.
The upper drawers are polished
Step 4. Then, using a circular saw or a router, you need to make protrusions on the drawers that will help fix them between the legs. The length of the protrusions should be equal to the width of the stool leg. They are simple to make - you need to install the support ruler so that the distance from it to the saw blade is equal to the width of the leg, and the height of the disk should be small. And you just need to move the block along the running saw until the excess part of the tree is cut down. The block must be turned over periodically. You need to make 2 tsars. The legs for the lower part of the stool are made using the same principle.
Protrusions are created
Ready-made tabs for fixing between legs
Step 5. You also need to make 4 legs from the timber, 2 prongs that will be installed between the legs at the bottom of the stool, and you will also need one support beam to strengthen the joint between the two seat boards.
Installing the feet
Step 6. Each detail of the stool must be carefully sanded, and all sharp corners and edges of the elements must be rounded.
All corners need to be rounded Sanding the seat Finishing the ribs
Step 7. In each leg of the stool in the upper part you need to make grooves into which the drawers will be inserted. The same circular saw comes to the rescue. The grooves should be the same size as the inserted parts of the drawers.
Grooves are formed
Step 8. You can start assembling. First you need to connect the legs and drawers to each other. If the drawers do not fit into the grooves well, then the inside of the grooves can be slightly widened with a chisel.
Legs and drawers are connected
Expansion of grooves
Step 9. On the legs you need to mark places to strengthen the legs. They should be located at the same height.
The places where the legs are attached are marked
Step 10. You need to make holes in the legs where the markings are made for installing the legs.
Drilling holes
Step 11. Now you can connect the legs, drawers and legs together to form the lower part of the stool.
Assembling the lower part of the stool
Step 12. You need to drill holes in the drawers for screwing in self-tapping screws, with which the seat will be fixed.
Holes for self-tapping screws
Step 13. The seat also needs to be finalized. The prepared block (slightly shorter in length than the length of the stool) must be placed in the middle of the junction of the two halves of the seat and secured through previously drilled holes in it with self-tapping screws.
Screwing in self-tapping screws
Step 14. The seat of the stool must be screwed to the base of the product with self-tapping screws. All joints between wooden elements, and especially at the junctions of legs, legs and drawers, must be coated with PVA glue to create a certain level of strength.
Seat attachment
Step 15. Additionally, the junctions of the frames and legs need to be connected with bolts, drilling through these places.
Additional reinforcement with bolts
Step 16. You can further strengthen the seat by installing a pair of wooden supports under it, located at a slight angle and resting on the legs. Then the seat will definitely not collapse under the weight of an adult.
Installing supports under the seat
Step 17. Now the stool can be varnished or painted, depending on the wishes of the master. After the layer of paint and varnish material has dried, the stool is ready. If desired, the seat can be decorated with fabric.
Painting the finished stool
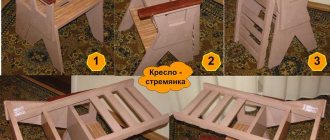
DIY transformable stepladder chair.
THIS IS FANTASTICALLY USEFUL FURNITURE
Let's consider making your own transformable chair, which is very practical for household use and which, with a slight movement of the hand, folds out into a stepladder, ladder or shelf and back. Below in the gallery are drawings and photos of a master class on making such a chair with your own hands.
This chair, originally designed by Benjamin Franklin, was created for libraries. But later, due to its incredible usefulness, this transformable chair became very popular in ordinary American families. One such thing replaces three, a chair, a shelf and a ladder. Very practical in small apartments or dorm rooms.
Drawings and master class
Where to begin
You can make absolutely any piece of furniture yourself. It all depends on the skill, experience and capabilities of the master. It is best to start mastering this business with simple things. One of the best options is a stool.
There are many types of stools, as well as the materials from which they are made.
The most common are wooden and metal stools (they are best suited for houses and apartments), as well as plastic ones (this type has proven itself in garden plots and other open spaces).
Preparing for work
Before starting work, you should create a drawing of the stool. When drawing up a sketch of a future structure, you should immediately apply all the necessary parameters.
It is absolutely not necessary to carry out a drawing in strict compliance with all the laws of drawing. It will be enough to draw the diagram by hand. The main thing is that the master himself can understand how and what needs to be done.
You can use the drawing diagrams available on the relevant websites.
For beginners who are getting down to business for the first time, let us explain a few specific terms:
- drawers - wooden scraps that fasten the legs of the structure;
- leg - an element that gives stability to the stool. It is located at the bottom of the legs and holds them together;
- “crackers” - corners made of metal or wood, located in the inner corners of the stool under the seat.
When drawing up sketches, be sure to clearly indicate not only the external dimensions of the stool, but also the parameters of all internal elements.
Creative stage
At the very first stage, every creator must imagine in his imagination what he wants to create. The shape of a home stool should be quite stable and therefore you should not get carried away with the elongated shapes of their fellows standing near the bar counters.
Note!
The stool should be low - no higher than 500-600 mm from the floor level and slightly different from the cubic shape.
Then it will be both a wonderful resting place and a stand on which you can pick apples or paint the ceiling. The seat area should be from 350x350 mm to 500x500 mm. Therefore, creativity should end with the design of a drawing of a stool with dimensions that allow one to accurately calculate the need for materials (Figure 1).
Stool legs