A room covered with wallpaper butt-to-edge takes on a more sophisticated look than when using the overlap method. This creates the feeling of a complete wall covering without visible joints of wallpaper strips. But novice masters do not always manage to achieve the desired effect. Noticeable gaps form. There may be several reasons for this. As a result, time and money spent on materials are wasted.
Wallpaper
What equipment will you need for your work?
If you hire experienced workers to complete the work, you will have to spend about the same amount on services as on material. You can save money by gluing yourself, but you will have to familiarize yourself with the process of performing the work and everything necessary.
Seamless wallpapering
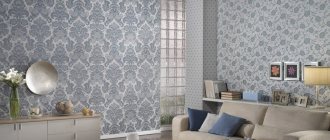
Joining plain wallpaper
Inventory:
- wallpaper;
- wallpaper cutting knife;
- glue;
- glue bucket;
- brushes of different widths for applying glue to wallpaper;
- wallpaper spatula;
- plumb line
You can start working on wall coverings only if you have all of the above.
Joining wallpaper with window casing
Detailed instructions for gluing internal corners
When performing finishing work, uneven walls can be a serious problem, which can cause wrinkles to form when gluing wallpaper. If the walls have a curvature, then as a result the wallpaper sheets may not fit together and will diverge:
- Having glued the last sheet in front of the inner corner, the length of the un-glued area is then determined. It is necessary to measure the distance starting from the edge of the glued canvas and to the boundary wall. Next you need to add about 10-15 millimeters to the result obtained. If the walls are strongly curved, you need to increase the number of additional millimeters.
- Cut a strip of wallpaper equal to the calculated result.
- Carefully treat the surface of the wallpaper and the wall. Based on the type of coating, you can treat two surfaces at once or just the wall.
- The cut part of the wallpaper strip should be located towards the wall. The canvas should be located on two planes at once.
- When wrinkling pasted wallpaper, you need to make a couple of perpendicular cuts to the folds.
- Using a level on the boundary wall, you need to draw a line vertically. It should be located at a distance equal to the width of the previously cut web, without taking into account additional additives.
- Lubricate the surfaces with glue, then place an even part of the wallpaper to the drawn line, and the cut part should go to the adjacent side.
- If the coating is thick, the wallpaper must be cut along the superimposed line.
Possible problems when joining wallpaper
When gluing walls, most people encounter the problem of uneven corners. This will be especially scary for those who do not know how to join wallpaper when gluing. In fact, there are no perfectly straight corners, so during the work, distortions or unevenness of the pattern may form. It is possible to avoid such errors, but effort must be made.
The complexity of the work of joined wallpaper also depends on the type chosen. When working with paper, apply glue and glue the wallpaper to the wall as quickly as possible, otherwise they may fall apart. It will be especially difficult if there is a drawing. You must be prepared for the fact that more than one canvas will be damaged in the process.
It is permissible to overlap, but it depends on the density of the fabric. You must adhere to the following rules: higher density wallpaper requires less overlap. If glass wallpaper is used, even the slightest overlay will be visible.
Adjusting the wallpaper pattern
Vinyl wallpaper is glued in a different way. The glue is applied only to the wall. A rubber roller is used for fixation, since the use of other types threatens to remove the coating from the vinyl wallpaper and deteriorate its excellent appearance.
Non-woven wallpaper has its own characteristics. Next, let's get acquainted with the nuances of working with them.
Trimming wallpaper
Wallpaper selection
Don't skimp on the quality of wallpaper. The final result depends 70% on this. You need to pay attention not only to the design and price, but also to the material from which they are made.
- Paper wallpaper. Despite the environmental friendliness of the material and its low cost, this choice is not the most suitable for butt gluing. They quickly absorb glue and shrink in size when dry. Therefore, it is impossible to predict the result of the work. If, however, other options are not even considered, then it is better to take multi-layer ones.
- Non-woven wallpaper. They are made from cellulose and synthetic fibers. When dry, they do not deform. For small defects, the walls hide the unevenness well.
- Vinyl wallpapers. Foamed vinyl applied to interlining is easy to glue. In addition, it hides wall imperfections well. Wallpaper with silk-screen printing is only suitable for a perfectly smooth surface.
- Fiberglass wallpaper. Their texture resembles fabric. They need to be glued with special care, as they are ready for painting. It can be applied multiple times. Therefore, to change the interior, you don’t have to re-paste the wallpaper.
Regardless of what wallpaper you choose, there are general operating principles that will help you get the job done efficiently.
Non-woven wallpaper, features of working with them
The reason for the popularity of non-woven wallpaper is that it has qualities not inherent in other types. These include:
- tensile strength;
- fire safety;
- excellent heat and sound insulation;
- do not change color when exposed to sunlight;
- There are both cheap and quite expensive versions.
Glue for non-woven wallpaper is a powder that must be diluted in water. In this case, you must strictly follow the instructions on the packaging. Otherwise, the wallpaper may not adhere well to the wall or develop blisters. After applying the glue, you need to let it soak into the canvas.
Wallpapering
Wallpaper cutting
To properly join wallpaper, you need to pay attention to the manufacturers' icons. The scheme depends on the type of drawing.
The most economical option is an arbitrary connection. The pattern elements do not require alignment, so there is virtually no waste left. The icon on the wallpaper instructions will look like this – →¦0.
Direct joining implies a symmetrical pattern, which needs to be combined only in height. A number is indicated next to the →¦← icon. It indicates how many centimeters later the pattern is repeated.
With offset joining, in order to combine the ornament, you need to take into account rapport (pattern step). The instructions indicate two numbers, for example 64/32. The first indicates at what distance the pattern is repeated, the second indicates how much the next strip needs to be moved relative to the first strip.
It is better to work with two rolls at once to avoid large waste.
You can achieve an original design by combining different wallpapers. But you must follow certain rules:
- It is better to take the same material from which they are made.
- The thickness of the wallpaper should match.
- It is desirable that the pasting technology be the same.
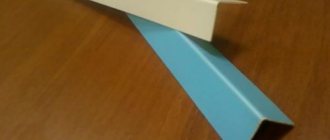
Using wall moldings will help hide the joints.
Work algorithm
The following algorithm will help you learn how to do the job correctly.
- Pasting the wall should begin with a vertical line drawn using a plumb line. It should be at a distance of 15 cm from the corner.
- Stripes can be cut immediately, but only if the wallpaper does not have a pattern.
- Prepare the glue required for the day of work. Excess glue may deteriorate the next day.
- Cut the fabric, leaving a little margin.
- Place the wallpaper with its front side facing the table and apply glue. After this, the fabric must be folded with the edges toward the center and allowed to soak.
- Start gluing from the ceiling, moving towards the bottom of the canvas. Use a spatula to expel the air from the center to the edges. Remove excess glue with a damp cloth.
- The new fabric must be glued joint-to-joint in relation to the previous one. This technique will help to avoid curvature and discrepancies in patterns.
- After the wallpaper has been joined, it must be carefully passed with a spatula.
After pasting is completed, it is necessary to maintain air humidity and a stable temperature in the room. Otherwise, the joints may begin to peel off.
Joining wallpaper on the ceiling
Causes of problems
Difficulties are often inherent in inexpensive wallpaper, although they are not excluded when choosing expensive materials. The reasons for this may be non-compliance with the rules for transporting and storing wallpaper. When purchasing, you should carefully inspect the edges of the rolls. If they are wrinkled or damaged, this will definitely be visible after gluing the strips to the wall.
Incorrect gluing is the main cause of defects at the joints of wallpaper
The unpacked roll should only be stored in an upright position.
If dark wallpaper has an unpainted edge, this oversight must be corrected using a dark pencil.
How to join wallpaper at corners?
The following algorithm will help you correctly paste wallpaper in the corners.
- Preparing the corner. Such work is carried out when plastering walls. Special plastic corners are installed in the corner of the wall. They are attached to putty. Next, alignment is carried out.
- Wallpapering corners. If the wall is uneven, trimming it in the corner will help preserve the pattern on the canvas. The corner area is smeared with glue. They start gluing from top to bottom from left to right.
- Leveling the canvas. Responsible leveling of the canvas on the wall will help get rid of defects and achieve good adhesion to the surface. The joint should not be more than 5 mm. After the wallpaper is glued, the remainder, if any, is cut off with a stationery knife.
Smoothing wallpaper
Wallpapering with a pattern
Aligning wallpaper on the wall
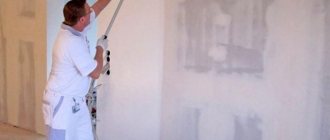
Preparing walls for gluing
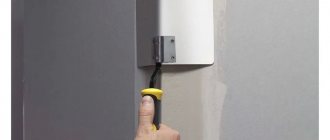
Wallpapering at the joint requires careful preparation of the walls. It is necessary to remove old wallpaper, fasteners used for hanging shelves, and decorative elements. The cracks and irregularities are puttied, and then the walls are coated with a primer. After the coating has dried, you can proceed directly to gluing, after first turning off the power to the sockets.
When doing this kind of work for the first time, it is better to choose light wallpaper. Even if a small gap appears at the joint, the white primer underneath will make the flaw invisible.
Wallpapering
Wallpaper with a pattern
The presence of a pattern on the wallpaper complicates the process of pasting both corners and walls. In the presence of vertical lines, distortions in the corners of the room immediately catch the eye; with horizontal patterns, there is an overlap of the canvases or a skew in the ratio of the ceiling to the floor.
Matching the wallpaper pattern
Wallpaper flattening
The following tips will help you avoid such troubles:
- it is necessary to make a slight overlap on the previous canvas;
- if a curvature has formed, you need to move it to the upper part, then hide it behind the panels;
- The smooth edge must be glued plumb, the excess part must be cut off using a stationery knife.
Following these tips will help minimize distortion and make the wallpaper fit together more successfully.
Joining wallpaper in the corner
Useful tips
Joining wallpaper has its own subtleties, familiarity with which will provide you with a high-quality result after pasting. Let's look at some tips on this issue:
- Peeling and curling of the edges of the canvas can be avoided using wallpaper joint tape. It increases the degree of adhesion and strengthens the joint area. The tape is simply glued to the joint and waited for it to dry.
- Carefully coat the edges of the strips with glue to prevent the joints from opening in the future.
- When joining with an overlap, you can only glue thin paper wallpaper - then the seam will not be noticeable. Butt jointing is done with thick wallpaper, which includes vinyl and fiberglass.
- After joining, do not forget to go over the seams with a rubber roller - this way the edges of the strips will lie on the wall more tightly, and the likelihood of the joints coming apart will be significantly reduced.
- Do not stretch the wallpaper across the wall, as this may cause the precisely fitted joints to come apart after the glue dries (how to repair loose joints?).
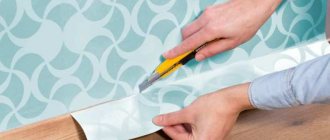
- If you are joining strips with uneven edges, it is better to overlap them. While the glue is still wet, use a utility knife to cut through the joint. After this you will get a perfectly fitted connection.
- Maintain the optimal temperature in the room where you are wallpapering. It is better to turn off heating devices, fans, central heating and air conditioners. Also, do not allow drafts, because any deviations from the normal temperature will cause the seams between the strips to diverge.
- When wallpapering in the area of doors and windows, it is better to make the joint above the openings.
Joining is one of the most important stages when wallpapering. This step must be approached carefully and competently in order to avoid serious mistakes, and the joints do not separate in the future and the edges do not peel off. The level of your responsibility in joining the wallpaper will be reflected in the result after the work done.
Various customization options
If there is a pattern on the wallpaper, then you should be prepared to match it when applying it to the walls. There are several ways to match wallpaper and adjust the pattern.
Direct docking
For the convenience of gluing wallpaper using this method, it is important to correctly calculate the length of the strips for further adjustment. This is done according to the following algorithm:
- The wall is measured in length and height. We record the results obtained, for example, the width of the wall is exactly 4 m, and the distance from floor to ceiling is 2.5 m.
- We measure the repeat (repetition of the pattern on the wallpaper sheet), let’s say it is 54 cm, given the length of the roll is 10 m, and the width is 53 cm.
- Now you need to calculate a number that is a multiple of the rapport (in our case 54 cm) and as close as possible to the height of the wall (in our case 2.5 m). To obtain this number, the possible value of the rapport number is determined at which all parameters will be met.
- As a result, if the step is four (4*54), the full cut will be 2.16 meters. This value is not enough for a given ceiling height of 2.5 m. Therefore, we increase the step to 5 (5 * 54), and this number is already suitable, it will be 2.7 m.
- Having calculated from the length of the roll (10-2.7 * 3) we find that 3 whole strips can be used for further use.
In this work, the first tape plays a very important role. After all, if you glue it crookedly, in the future the joints of the wallpaper will go at an angle and the whole picture will deteriorate. To prevent this, a plumb line is often used, which can serve as an accurate guide for evenly gluing both the first strip and the next ones. This measure, although optional, is recommended, because neglecting this little detail increases the risk of beveled blades.
It is necessary to glue the first strip so that the selected edge is the beginning of the pattern. The glue should be applied evenly and uniformly to avoid unnecessary drips. If suddenly the glue is squeezed out at the joints, then it must be promptly removed.
Offset docking
With this method of gluing the joints of wallpaper, the pattern shifts along the second strip. It turns out that with the indicated shift of ½, the repeat length will be 2 times less than the original value. Consequently, a drawing 54 cm long will be reduced to 27 cm.
The pattern is adjusted so that every second strip is 2 times smaller than the first (in our case, 27 cm). But the multiplicity of the pattern in height is now determined to be 54 cm for the first, third and remaining odd stripes, and 27 cm for the second, fourth and subsequent even stripes.
Free docking
This gluing method will help you properly glue the wallpaper end-to-end and reduce material loss to a minimum. But it should only be used for canvases with small and symmetrical designs. Of course, it is worth calculating the length and height of the walls, but adjusting the design is no longer required, which saves resources and effort.
Counter joining method
This method is often used to simplify work. After all, as a result, the seam will not increase and the canvases will fit tightly to each other. To do this, the wallpaper is laid overlapping, and after adjusting the pattern, it is cut at the border in a straight line.
We deal with undefined edges of canvases and external corners
I’ll say right away that the method I propose is the most natural collective farm, but it works, it has been tested repeatedly.
So, it happens that you glue a strip, everything goes fine, but for some reason its edges just don’t want to stick to the wall. Accordingly, the wallpaper seams look simply terrible. Or, for example, glue a wide sheet to the outer corner, but it always sticks out, no matter how hard you try. Liquid nails or (which is better) acrylic sealant will come to your aid. For non-stick edges, you will only need to apply the sealant evenly to the wall below the edge. That’s it, he’ll stick to you like he’s cute. In the case of an external corner, glue the entire sheet heightwise first to one part of the wall, then also apply a strip of sealant to the corner (here it’s already quite generous) and you can glue the rest of the sheet. Now it’s not the wallpaper that will stick to the corner, but the corner to the wallpaper)) It’s a joke, of course, but acrylic sealant really works.
There is a hypothetical risk that the sealant will show through the wallpaper if it is thin and light-colored. I don't know if this is possible. Most likely, no, because it is distributed under them in a very thin layer and is unlikely to affect anything.
In general, there are special types of glue for corners, borders and joints in the form of a thick paste. But no one really buys them. I’m not advocating my method, but it works.
Joints on different types of wallpaper
Before you begin applying cladding, each manufacturer advises you to read the instructions, as well as the description of the trellis. Taking into account the characteristics of the canvas, many problems can be avoided; these points are important for beginners who have no experience in working with wallpaper.
The joint should not be visible, regardless of the chosen connection method, counter method or any other. To perform the manipulations efficiently, you should familiarize yourself with the sequence regarding all common types of trellises; each approach will be analyzed separately.
Paper
When executing an order, professionals adhere to a certain algorithm of actions, you need to take note of it, the situation is like this:
- The best fixing mixture is considered to be a starch-based model, in which antibacterial additives are introduced.
- The composition must be diluted according to the description on the packaging; lumps in the finished raw material are unacceptable.
- The piece cut to size is coated with glue starting from the middle, after which the sheet is folded in half and waited for 7 minutes, during which time the specialized solution has time to be absorbed into the structure of the canvas.
- Guided by the markings, the strip is leveled, the edges are connected as tightly as possible.
When drying, paper models shrink a little; you should always remember this point; each workpiece will need to be worked slowly at the seam.
Single-layer samples are most often fixed with an overlap to avoid excessive shrinkage, and multi-layer models are connected using any of the above methods; they are much denser.
Vinyl
The material has a paper base, which is coated at the manufacturer’s factory with specialized polyvinyl chloride components; there are several types of canvases, including:
- For painting.
- Foamed.
- Hot stamped.
- With embedded silk thread.
- Compact vinyl.
- Compacted.
It is worth mentioning the increased sensitivity of the material to the state of the microclimate in the room; it is better to prevent the occurrence of a draft until the adhesive mixture has completely hardened.
Wet sheets of vinyl trellises are not recommended to be cut and adjusted to size; they easily tear, which will lead to increased consumption of components for repairs.
The joining principle is simple: a 30 cm section of the wall is coated, a part of the workpiece is placed on it, after which the master moves further using the same method.
Non-woven
Working with this cladding model is simple and fast; the material is quite dense, which minimizes the presence of tears or other defects. The glue is evenly distributed on the partition, hard-to-reach places are coated with a brush of a suitable size for the specific case.
In a few minutes, the mixture will soak into the structure of the base, which ensures good adhesion between the wall and the canvas; when gluing the first section, follow the pre-drawn markings.
Air masses are immediately expelled from under each sheet; a plastic spatula or roller is suitable for this, which will be more convenient for the master performing the manipulations. The edges of the joints can be additionally impregnated with glue in order to achieve maximum fixation of the edges.
The help of a partner will not hurt, especially when it comes to meter-long trellises; in this case, one person adjusts the top point of the partition, and the second person works on the bottom.