An alternative to metal products for preparing barbecue is a brick grill. It can be used as a separate device or with additional functions of a stove, smokehouse, or barbecue grill.
Masonry of massive structures is labor-intensive and requires knowledge and experience. If the owners want to manually master the principles of brick laying, then it is better to do this under the guidance of a master, following his instructions.
A brick barbecue will be a beautiful and practical addition to a summer cottage or estate in the private sector.
We recommend reading:
- How to make a tandoor at the dacha with your own hands
- How to build a tandoor from brick
Varieties by location
Installation is permissible both indoors and outdoors. Taking this factor into account, barbecues come in two types.
Street (garden)
It is mounted under a small canopy so that precipitation and moisture do not get inside the chimney, and you can cook in any weather.
Another option is to do it outdoors, in the garden, near a gazebo, near the house. In any case, a reliable foundation is poured under the structure. A monolithic slab is considered optimal.
The masonry of the barbecue is made of fire-resistant bricks, the cladding is made of moisture-resistant materials.
It is important to choose the right location for the garden structure, taking into account the direction of the wind, so that there are no dry trees or wooden buildings nearby. To avoid conflicts with neighbors, it is better to first familiarize yourself with the SNiP standards.
To the gazebo (veranda or terrace)
Installed in open and closed buildings. At the project development stage, fire safety requirements are taken into account, and the location for the chimney outlet is carefully considered. Requires pouring a separate foundation.
It is recommended to lay out the floor covering near the stove from non-flammable materials:
- paving, ceramic tiles;
- clinker bricks;
- artificial, natural stone.
An alternative is to place a sheet of iron or steel on the floor at a distance of 1.5 m from the stove.
Visually, the room is divided into zones: kitchen and dining.
Summer kitchen with polycarbonate roof.
This is certainly not a gazebo, but here we want to draw your attention to the roof. This idea can serve as food for your future plans for making gazebos
Let us note that they are now making polycarbonate that can withstand a sledgehammer (this is said for skeptics). Photo source: pechnik-pech-kamin.ru/galery-pechnik-pech-kamin-v-sankt-peterburge/p/6
Brick grill in the gazebo. Master Class
Brick volume = “three fields”
This is a simple model of a small barbecue grill for a summer house. The author got tired of frying meat on the courts, and he decided to raise the level of the grill so that he could fry while standing. In fact, it turned out to be a beautiful brick stand for a metal grill with a chic chimney. As you can see, the grill is installed on a solid foundation and the entire structure is made very aesthetically. Author's comment about the glue used instead of cement: “Special glue for stoves and fireplaces, the packaging indicates what temperature it can withstand, 600-800. To save money, I added tile adhesive for warm floors a little higher from the firebox.”
Tests have shown that the grill receives enough air, despite the closed structure. The brick is ordinary, facing.
The cross-section of the chimney for good draft should be 250mm x 380mm, then there will be no smoke in your eyes.
Furnace configuration
In any type of stationary furnace, it is necessary to have a reliable foundation, which will ensure long service life.
You should also be responsible when choosing fuel. It is unacceptable to use firewood from coniferous trees, resinous fruit trees (plums, cherries), lumber impregnated with resin.
To ignite, take matches and a special liquid. It is prohibited to use gasoline or kerosene to create a flame. There will definitely be no benefit from adding such components to food. But it can cause harm to health after consumption.
Simple design
Such buildings are often used in summer cottages. This is the most popular option for homemade structures, as they do not require in-depth knowledge of masonry techniques.
To protect against rain, it is recommended to supplement them with a dome-shaped smoke collector. For ease of use, a medium-sized tabletop is built in. The optimal building material is fireclay brick. Fuel – charcoal, firewood.
Photo: small barbecue with a rain cover
If you follow the step-by-step masonry technique, the fire will not come into contact with metal elements, which means that the walls and bottom will not burn out and the grill will last many times longer.
Such designs do not have holes for air access, which significantly saves firewood. They do not burn out quickly, but smolder.
The finished grill will not take up much space on the estate. This is a budget stove for seasonal use.
With smokehouse
Standard factory kits of fire-resistant brick barbecue stoves do not include a smokehouse. It can be purchased additionally if the product model includes a built-in wood-burning stove.
The smokehouse is made of stainless steel sheets with a thickness of 2 mm. Inside there are 2 levels of grates on which products for smoking are placed. Equipped with a groove for a water seal. If water gets in, the tightness of the shutter prevents smoke from escaping.
Layout diagram of a compact barbecue
The smokehouse is attached to the place where there should be a stove or cauldron on top of the stove. To start the device, the VFS (built-in wood stove) is ignited. Wood shavings smolder inside the smokehouse and hot smoke begins to form.
With cauldron, stove
A cauldron with a stove can be equipped independently with a built-in wood-burning stove or be part of a barbecue complex, complemented by a countertop and sink.
A red brick grill is laid out. The side, rear and front brick walls form the oven chamber. From the outside of the structure, only the firebox door and the ash pan handle are visible. At the top of the stove there is a round hole for a cauldron or stove, at the bottom there is a grate, an ash pan that extends.
Built-in wood stove - source of heating for the cauldron and stove. For the firebox, it is better to take firewood and chipboard briquettes.
The complexes are equipped with an 8-liter cauldron, but it is possible to install containers with large dimensions up to 12 liters.
The chimney is made from a double-circuit sandwich pipe of rectangular cross-section. The upper part of the pipe is discharged into the smoke collector.
With grill, barbecue
The usual grill shape is a deep, round frying pan with a barrel-shaped lid. If the lid is closed, the food is cooked evenly on the sides, bottom, and top.
Barbecue differs from grilling in that the product is fried only from below, and not from all sides. This is due to the lack of a lid.
The inside of the device is very similar. The main detail is the gratings. Fish and meat are laid out on the top grate, fuel is placed on the bottom grate. For comfortable cooking, the upper grill can be adjusted to 3 positions.
Unlike a barbecue, the grill has openings with dampers so that air access can be regulated.
There is a retractable ash pan where ash and ash accumulate. Many factory models are equipped with a spit and folding table. There are grills with double clamping grates.
Before the first use, the grill or barbecue is thoroughly lubricated with vegetable oil, pierced and allowed to cool.
With canopy (roof)
Photo: garden barbecue with a canopy made of metal and polycarbonate.
A covered canopy is an excellent protection from precipitation, especially in winter, when the water begins to freeze and melt. It is recommended to assemble the canopy from fireproof materials - metal racks and corrugated sheets, metal tiles.
If it is not possible to build a shed, then it is necessary, at least temporarily, during the period of precipitation, to cover the grill with thick plastic film.
Precipitation falling on the structure at an angle will not cause harm.
Angular
This barbecue design is becoming increasingly popular. Placing the device along the walls, adjacent to the corner, allows you to significantly save space. This is especially true for small summer cottages and gazebos.
The requirements for materials are unchanged - moisture resistance, fire safety.
Corner placement is an excellent option for barbecue complexes, where it is convenient to place a tabletop, sink, niches for firewood and utensils on the sides.
However, such a structure cannot be built by beginners. It requires competent calculations and knowledge of masonry techniques, so it is better to invite a specialist.
Fireplace-barbecue
Interesting type of combination. The fireplace is:
- built-in;
- free-standing.
The built-in fireplace is an element of the barbecue complex. The fireplace module is installed instead of a barbecue or vice versa.
When using a fireplace insert, a large load of firewood is allowed at one time. It is carried out into the firebox. When installed indoors, the fireplace barbecue will become a source of heating in cold weather.
With countertop, sink
The working surface of the tabletop is built-in or can be placed separately. Collapsible models are available.
Installation is carried out on the left or right side (at the discretion of the owners).
It is necessary to determine the location at the stage of developing sketches, so that the factory can make a high-quality product that will be closely adjacent to the structure.
By adjusting the length of the tabletop, the complex can be adjusted to specific room sizes.
Equipping the complex with a sink simplifies and makes food preparation comfortable. For installation, attention is paid to the correct water supply and sewerage.
Barbecue complex
Multifunctional design. Difficult to build on your own.
It has several departments:
- built-in wood stove;
- plate;
- oven;
- barbecue;
- B-B-Q;
- smokehouse;
- cauldron;
- spit;
- tabletop.
The set of elements differs depending on the model.
It can be installed both for outdoor use and in closed buildings such as a summer kitchen or gazebo. With the right choice of material for cladding, it looks very beautiful.
Users often search for:
- How to make a patio
- Vertical barbecue grill
DIY square gazebo
Here are detailed diagrams and instructions for building a square gazebo.
The simple design and construction of this gazebo might interest you. The dimensions in the drawings are in inches and feet (1 inch - 2.54 cm, 1 foot - 30.48 cm), you can of course set your own dimensions while maintaining the proportions. Construction begins with markings; measure the diagonals so that they are exactly the same.
- Dig holes for the posts and place the forms in the holes.
- Fill the pipe forms with concrete and let dry for a few days.
- Install the horizontal beams and secure them to the posts with screws. Use a spirit level to make sure the joists are level.
- Next you need to install the middle logs to the gazebo floor.
- Match the edges and make sure the corners are square.
- Then install the intermediate beams on the gazebo floor. Lay the floor, securing the boards with screws.
- Using a level, install the top beams.
- Align the edges and use the corner jacks to secure the top ridge.
- Do not leave any gaps between parts.
- To protect the gazebo from dampness and improve its appearance, varnish or paint it.
Photo source myoutdoorplans.com/pergola/wood-gazebo-plans
Step-by-step instructions in the diagrams for creating a gable roof for a square gazebo.
- The first stage of the project is to manufacture the rafters. Trim both ends at a 60 degree angle as shown in the plans. Make grooves in the bottom of the rafters to fit the support beams. Mark the lines and cut with a circular saw. Sand the edges with sandpaper.
- Install the rafters at the top of the gazebo. Make sure they are evenly spaced. Make holes and insert screws to secure the rafters to the frame.
- To assemble the gables, cut sheets of plywood to shape and size and sand the edges. Install the sheets on the gable ends of the gazebo. Align the edges and nail in place, leaving no gaps between the sheets.
- When installing roofing sheets, lay the plywood sheets against the rafters using the template shown in the diagram. Using a drill, drill pilot holes and insert screws along the rafters, leaving no gaps.
- Cover the roof with roofing felt, making sure that the strips overlap by at least 2 inches. Secure the roofing felt to the plywood sheets with roofing staples. In addition, you need to cut out a piece for the top ridge.
- Attach the grouser balusters, making sure you place them at equal distances. Use a drill to make holes and secure the balusters to the slats using screws.
- Lastly, attach the handrails to the top of the components. Drill holes and insert screws to secure the slats in place. Fill the holes with wood putty and smooth the surface with sandpaper.
- Coat the wood with paint or stain to protect it from damage and improve the appearance of your gazebo. The necessary materials for construction are not listed here, there are a lot of them, if you are interested, look at the website, link under the gallery.
Photo source myoutdoorplans.com/pergola/wooden-gazebo-roof-plans
Choosing a suitable location on the site to install the stove
To determine the installation location, it is recommended to consider the following points:
- The structure should be located near the recreation area (gazebo, veranda, summer kitchen).
- The terrain should be smooth, without sudden changes.
- Convenient approach to the grill. If possible, one or more paths are developed.
- Communications supply. If, according to the plan, the product will be equipped with a sink, then the proximity of water pipes and sewerage will be taken into account. In winter, the access to water in garden barbecues is blocked so that the pipes crack in the cold.
- Direction of the wind. Smoke should not be directed towards the recreation area. You need to build it so that the smoke goes to another part of the yard.
- Presence of a canopy. Let’s assume the option of combining outdoor stoves with a table and chairs standing next to them.
Compliance with fire safety requirements requires that the device be located at a sufficient distance from green spaces, dry trees, and flammable outbuildings.
Construction Features
Gazebos with stoves can have various design features. The main manufacturing materials are brick, stone, wood. With your own hands you can build a closed house with windows and a door or equip an open terrace with a stove.
Before choosing the type of gazebo, you should decide on its purpose and functionality. If the main task is to protect your vacation spot from the sun, a small canopy and a mini-barbecue oven will be enough. The walls of a permanent structure will protect from wind and precipitation in spring and autumn. For such a gazebo, you will need to pour a foundation and glaze.
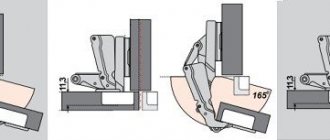
Even before the construction of the building begins, when drawing up the project, it is necessary to take into account the design features and ensure fire safety. Any stove must be installed on a brick base or a thick sheet of metal. Wooden decorative elements or parts of the prefabricated wall itself should be no closer than 80 cm from the furnace firebox. You should also consider the design of the chimney, its thermal insulation, and the presence of dampers.
Modeling a barbecue
The modeling process allows you to visually design the future product, depict the design in detail, and figure out how the elements will be connected.
With a correctly assembled layout, you get a mini-version of the barbecue. It can be conveniently made from polystyrene foam and other lightweight materials.
Depending on the model, the standard design can be supplemented (optional):
- fireplace cassette;
- countertop with sink;
- built-in wood stove;
- oven (Russian oven);
- a work surface that can be raised (folding table);
- tandoor;
- cauldron, stove.
Arrangement of the furnace complex
Each of the listed modules is built-in or, at the request of the customer, installed separately.
Do-it-yourself wooden gazebos 300 photos, drawings, diagrams
Here is a small gallery of wooden gazebos made by yourself. Of course, you can collect more photos, because there are millions of options. Each gazebo, made not according to a template, but with your own hands, even according to standard drawings, is still a work of art. Here you can find relatively simple designs that can be done by anyone with little experience. There are, of course, examples of industrial products that may be useful.
Drawings of a square gazebo
Square gazebos 150 photos
Drawings of hexagonal gazebos
DIY hexagonal gazebo 50 photos
Drawings of octagonal gazebos
DIY octagonal gazebo 100 photos
Brick selection
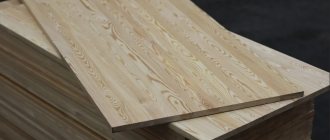
Expensive, but the most suitable for masonry is clinker, another name is refractory brick. The main raw material is special clay, which is fired at high temperature.
Comes in different colors:
- red;
- sandy;
- dark brown;
- red with tan marks.
Clinker bricks differ from inexpensive ceramic bricks in their high strength and long service life. It is resistant to moisture and frost.
The good thing about clinker is that the finished structure turns out beautiful and does not require additional cladding.
It is allowed to use cheaper ceramic, red fireclay bricks. Feature article: “Brick for masonry stoves.”
It is important to take into account that silicate (white) brick is not suitable for creating a barbecue at home, because it begins to quickly deteriorate under the influence of moisture, temperature changes, and cannot withstand high temperatures.
Interior design
The interior content and decor of the gazebo are of great importance both for maintaining the chosen style and for creating comfortable conditions for relaxation. You can do a lot of things to decorate it yourself, find it in the attic and even in a landfill.
Furniture
Distinctive features of furniture for gazebos in the loft style are simple design and massiveness. The upholstery of upholstered furniture is preferably plain, made of leather or leatherette, textiles with a rough texture.
The central element and bright accent of the decor will be the sofa. You can make it yourself from construction pallets, assembled into a single structure and fastened together with self-tapping screws. The wooden frame is impregnated with tinting stain or painted in light colors. For convenience, fabric-covered foam mattresses and pillows are placed on it.
Side tables made from pallets
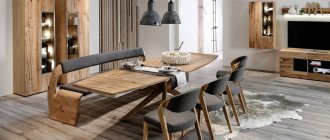
If family or friendly feasts are expected in the gazebo, you need a large and massive dining table. There are any manufacturing options - from the already mentioned pallets to knocked down boards or wood cuts.
Metal rack
It would be very appropriate to use hanging chairs in such a gazebo - there is enough space, the ceilings are high, and the attachment to the ceiling beams is simple and reliable. You can use different models: wicker, forged, made of transparent plastic.
Hearth
What is a gazebo without a stove, fireplace or barbecue? This necessary and useful design element fits perfectly into the loft style. It can be brick, stone or metal, wall-mounted or free-standing, floor-mounted or suspended.
The main thing is to think about the form and execution, since a Russian stove or a classic fireplace with a portal will blur the impression of a carefully thought-out style solution.
Lighting
There should be a lot of lamps in such a gazebo, if only because of its large size - this style cannot be implemented in a small and low room.
The simplest solution is spotlights and spotlights on rods or tires. You don’t have to think too hard and just hang large incandescent lamps without shades. Although the stores have a large selection of lamps suitable for this style.
Pendant lights in the form of industrial lamps
But designer lamps made of wood, metal and improvised materials will look much more successful in the gazebo. Simple geometric or unusual shapes are welcome.
Lamps are hung on chains or ropes and attached to the walls with brackets. This is where everyone can show their talent as a designer by creating a chandelier with their own hands from water pipes, glass jars, boards, and even from concrete poured into a mold.
Here are some interesting ideas:
Decor
All kinds of art objects will not only decorate the gazebo, but also emphasize its unusual style.
In addition to original lamps, non-standard things can be used in the interior of this street building:
Decorate the gazebo with stands for flowerpots made of profile pipe, a large clock on the wall with an open mechanism, floor hangers made of driftwood, and animal skins on the floor.
Textile
If you use textiles in a gazebo of this kind, then only natural ones made from coarse fibers - matting, burlap, linen. There shouldn't be a lot of it. Instead of classic curtains, it is better to hang blinds or roller blinds in the openings to protect from the sun and wind. The color should match the furniture upholstery, rugs and other items.
Brick cutting and chopping
A grinder with a stone cutting disc is perfect for cutting brick. During operation, a lot of dust is generated, so it is recommended to protect your eyes and respiratory organs with goggles and a mask.
The process takes place in the following sequence:
- Marking bricks with a pencil, ruler or tape measure.
- Cutting (splitting) elements to the required sizes.
- Teska (grinding) of the resulting blanks.
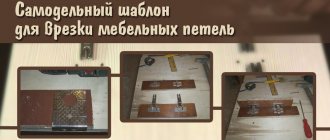
To speed up the marking process, experts recommend making templates. This is especially effective in cases where it is necessary to cut parts of the same size in large quantities.
Material for templates - pieces of roofing felt, parchment, thick cardboard.
To make templates of non-standard shapes, you need to use ingenuity. For example, to get a longitudinal half of a brick, it is enough to bend the template of an ordinary half lengthwise. This will reduce the number of templates and speed up the cutting process.
Parts for which templates cannot be made (bevels, oven appliances) are marked during preliminary dry laying.
When cutting, you need to work at high speeds, otherwise even a new disk will quickly wear out.
It is not necessary to make a full cut, just a cut is enough and then carefully split. But this applies to cases of obtaining parts of simple shapes. For complex elements, it is better to cut the workpiece to the end.
Experts recommend using a new disk to first cut off complex parts, then simple ones, since standard parts can be cut off even with a worn disk.
It is worth saying that cut parts have a smooth surface, chipped parts have a rough surface, sometimes even with defects. You can smooth out the roughness:
- processing with a grinding disc;
- grinding the chopped parts against each other;
- with a pick.
It is better to place bricks with chipped edges against a thick seam.
Finishing
Decorating the stove is at the discretion of the user. You can do without this, but sometimes it comes in handy. A simple and effective way: plaster the stove and cover it with tiles. There is an exception when finishing processing is not necessary. For example, a stove made of smooth bricks.
The rest is all up to your taste.
One oven is good, but the whole complex is even better. The hearth goes well with the smokehouse. Simple designs provide optimal conditions in the smoking compartment. Sometimes you can’t do without installing fireclay in the furnace. It is more difficult to build a complex structure, but it is easier to do if the construction is carried out simultaneously with a permanent gazebo. For high-quality smoking, the smoking cabinet must be high.
Preparation of the solution
The main components of the masonry mixture are clay and sand. The recommended proportion is two parts sand to one part clay. The day before mixing the solution, the clay is soaked in water.
An important feature of clay is that the fatter it is, the greater the sand consumption.
If the consistency is correct, the solution will slide off the trowel, leaving a small mark on it. If it falls off without any traces, then a lot of sand has been added; on the contrary, it smears a lot - there is an excess of clay in the mixture.
For laying the main parts, cement is not added to the mixture due to low heat resistance. But it is permissible to cover the grill with facing material using cement mortar.
Rules for drafting a project
Of course, it is better to set up a barbecue at the same time as building a gazebo. The first step is to draw up a project, indicating on it the location and dimensions of all elements. It is important to provide for even the smallest details, such as an easy-to-use fryer and countertop, the placement of kitchen utensils, the presence of running water, etc.
Read how to create a fire pit on your property for a cozy getaway.
The placement of the building should also be considered. So, if you plan to install it near trees, then you need to pay attention to whether branches will interfere with the chimney. They must be removed before construction begins.
It is important that the stove is not built next to the wall of the house. This will negatively affect its condition and service life. Besides, it's not safe. If the gazebo in which the stove is installed is wooden, then you should take care of laying heat-insulating materials.
Example project:
Required Tools
To work you will need:
- shovel;
- Master OK;
- a trough for mixing mortar or a concrete mixer;
- buckets;
- building level, tape measure, plumb line;
- Bulgarian;
- reinforcing mesh;
- cement, crushed stone, sand, clay;
- fireclay brick;
- boards, plywood (for formwork assembly);
- metal corners, doors, grates, grates;
- hammer;
- mallet;
- rope and pegs (for marking under the foundation).
In order to save money, it is allowed to purchase fireclay bricks only for laying the firebox. For other areas of the oven that will not be exposed to high temperatures, you can take regular brick (not necessarily new).
We will analyze step by step the process of independently erecting a small outdoor barbecue, and clarify the nuances of each action.
Schemes and drawings
The work process reflected in the drawings
is developed at the planning stage. The drawing is a visual representation on paper of the future structure, where the shape, dimensions, and cross-sectional view are clearly visible. Created on a scale with a reduction several times from the actual dimensions.
For example, when specifying a scale of 1:10, it means that the design drawing is reduced by 10 times. For every 1 mm of drawing there is 1 cm in reality.
Corner barbecue diagram
It is customary to use a thick solid line to show the outline of the product. Thinner lines indicate the sizes of the elements.
Block barbecue diagram
Conventional shading in the drawing indicates the raw materials used for construction. For example, under an ordinary red brick, hatching is drawn at an angle; fireclay (fireproof) is marked with a check.
The drawing description includes the following details:
- general view of the product;
- outside view - facade;
- structure in a vertical section, where the internal structure is visible;
- horizontal section showing the principle of masonry.
Recommended oven dimensions
The width of the grill when folded should correspond to the width of the skewers - 47-62 cm. The height of the frying platform is made slightly higher than the waist, so it will be more convenient to cook. The length of the firebox should be such as to simultaneously accommodate from 8 to 10 skewers.
Preparatory work
They consist of clearing the construction site of debris, vegetation, and marking. For the last step, rope and wooden pegs are used.
Foundation installation
A brick barbecue is a heavy structure, so it is recommended to pour a monolithic concrete slab under it.
Briefly, the procedure for constructing the foundation looks like this:
- A hole is dug with a depth of 30 cm. The dimensions should be 20 cm larger on each side than the future product.
- The bottom is carefully compacted.
- A 15 cm thick cushion is poured from layers of sand and gravel. It's being compacted. Moisturized with water.
- The formwork is assembled from boards. The knocked down frame is placed around the perimeter of the dug hole.
- The bottom of the pit is reinforced with metal mesh.
- Cement mortar is being poured. The M500 brand is best suited for cooking.
- The poured mixture is pierced with a piece of reinforcement to remove air bubbles.
- The slab should extend above the ground level.
- Curing time is up to 4 weeks.
- In dry weather, to avoid cracks, the surface is moistened with water.
The frozen slab is covered with waterproofing (dense polyethylene, roofing felt) on top.
While the foundation hardens, you need to soak the clay for the solution. The finished solution should not crack when compressed.
You can get acquainted with other types of foundations for the furnace by clicking on the link.
It is important to think through the supply of communications even before the foundation is poured.
The day before laying, the brick should also be prepared. It is thoroughly watered so that it does not absorb moisture from the solution. The adhesion to the surface will be better.
Order of brickwork
The order should be carried out in the following sequence:
- It’s better to start by laying out the first row dry. This will allow you to adjust each brick to size if you need to trim it. The gap between the elements is 1 cm. The evenness of the diagonals is checked.
- Laying facing bricks can be done using a solution of cement and sand (in a ratio of 1:3). To improve the plasticity of the mixture, you can add a little lime. The recommended seam size is from 8 to 10 mm.
- In areas where bricks pass without dressing, it is necessary to carry out reinforcement with metal wire.
- Each subsequent row is shifted by half a brick. To adjust the elements to size, use a grinder.
- Every 3 rows, compliance with the masonry level is checked, and preferably more often.
- After 8 rows you need to create jumpers for the grill and countertop. To do this, take metal corners measuring 45*45 mm and set them up like an inverted letter T. Half of the shelf is sawed off. The metal should not come into close contact with the brickwork.
- Afterwards you can start laying the firebox. Fireclay bricks are connected to each other with clay-sand mortar. The thickness of the seams is no more than 4 mm.
- Metal corners are also used to form support for the bottom.
- The second row of bricks for the firebox completely covers the first. This way the seams will not burn through. Some craftsmen replace the first two rows of masonry with a concrete slab, but the creation will cost many times more, although it will be no less reliable.
- Parallel laying of the firebox and facing bricks is allowed. But between the lining and the firebox there is always a gap of 1 cm so that they do not touch.
To improve the decorative appearance, stove makers resort to constructing a combustion arch. To do this, a wooden blank is first made in the form of a semicircle and placed in the barbecue portal. Next is the masonry. Bricks are cut to the required sizes using a grinder.
The arch made of facing bricks must be covered from the inside with a fire-resistant lintel. Placed on a metal corner.
Roofing system installation
When starting to install rafters, it is very important to correctly determine their size. Determine how far they should be from each other
With a length of 3 meters, a section of 50x150 mm will be the most acceptable option.
The installation itself is carried out in stages. The drawing drawn up earlier will help with this. Initially, the rafter frame is installed. It would be wise to assemble it at the bottom. To make the work faster and easier, a template is initially prepared. Subsequently, the finished frame rises to the top and is attached to the Mauerlat.
Then they begin to install the sheathing. It can be either continuous or sparse. It is rational to use a solid roof in the case of a soft roof. The use of sheet materials involves the use of sparse lathing.
Installation of roof truss system
At the next stage, the lining carpet is arranged. For soft roofing, moisture-resistant plywood can be used as a material. At this stage, the cornice strips are attached.
The finishing coating is installed according to the manufacturer's instructions. The procedure and rules of work may vary. This depends on the roofing decking chosen.
a84c75cc77e6c0a4e02b71e4279dfcd5.jpe
c834dd0ae61c7d8116da48b3424b2188.jpe be6277ec7805d85200462a6c962e2626.jpe
The final stage is the installation of the ridge and end strips. These elements are easy to make with your own hands. After this, it is advisable to treat the entire frame of the shelter with a tinted protective impregnation. Its color can be selected taking into account the design features.
A garden gazebo made in this way will delight the owners and their guests with warm summer evenings for many years.
A gazebo is actually a very useful structure. Here you can enjoy your holiday alone, arrange family gatherings, receive guests and even grill delicious kebabs. When drawing up a project for this structure, you first need to decide on its design.
The correct choice of these parameters will determine how much, as well as the ease of use of it. We will talk further in the article about the advantages of courtyard structures of one design or another.
Chimney device
When the chimney continues to be laid out of brick, the order of work is as follows:
- The top of the combustion and facing parts are brought out to one level.
- To lay the smoke collector, a solid brick is taken. The solution is cement-sand. Cement grade – from M150.
- The first row is flush with the inside of the firebox. All subsequent ones are shifted by ⅓ of the brick.
There is no need to shift it over a greater distance, otherwise the bricks will simply fall inside the firebox over time.
- The laying is carried out until a small opening remains (30*30 cm, 25*25 cm).
- The finished brick chimney is covered with a protective cap on top to prevent moisture and precipitation from getting inside.
There is an option for mounting a chimney made of heat-resistant concrete or a double-circuit chimney made of sandwich pipes.
Read step-by-step instructions for installing a chimney made from sandwich pipes.
How to make a foundation?
First you need to dig a shallow (30-50 cm) U-shaped trench, pour and compact gravel, put a reinforcing mesh or lattice of rods on it and mount the formwork. Then fill everything with concrete mixture. In order for the base to dry well and acquire the necessary strength, it will take from several days to one week. Only then can you begin building the barbecue itself. In order for the solution to harden equally over the entire area of the base, concreting must be done at one time. The concrete mixture must be compacted to avoid the appearance of air bubbles.
If you need a complex
A complete summer culinary stove complex for a gazebo, garden, cottage (on the left in the figure below) is not just bulky, complicated and expensive. It makes sense to build it for individual use only on a personal plot, when the family literally lives in a gazebo in warm weather.
Culinary complexes for gazebos, gardens and cottages
Anyone, let alone a stove maker—a stove user—knows that a stove exhibits all its qualities only when it is warm and regularly fired. In order for such a giant to enter the regime, it needs to be heated for a day, or even more. At a weekend dacha, it would be more rational to build a barbecue oven in the gazebo; it heats up in less than half an hour. You can equip the kitchen corner with a sink, etc., with furniture; everything together will look no worse, in the center. If the gazebo is used in warm weather only as a summer kitchen, the optimal solution would be a barbecue oven or barbecue with a hob, on the right in Fig. How to build a barbecue oven with a hob for a gazebo, see the video guide (from there on YouTube you can download a detailed project with specifications for free using the link):