Home / Components and accessories / Installing a plastic cornice - how to cut corners correctly?
The concept of “plastic cornice” is perceived differently by many. It can be a hanger for curtains, or it can be perceived as a decorative overlay that hides the junction of the ceiling and the wall. In any case, it may be necessary to join two planks together or create a corner connection. Therefore, below we will talk about how to correctly cut the corners of such a plastic part as a cornice.
MDF cornice for the corresponding kitchen is an excellent solution
Today we will talk about very beautiful decorative elements that are installed, as a rule, on sets whose facades are made of a frame profile.
The profile from which such decorative elements (cornices) are made can come in different decors and configurations (there is a large choice, so choosing suitable elements to match the color of the kitchen is never difficult).
They are attached to the box using 4x30 (mm) self-tapping screws.
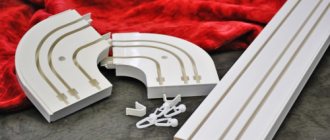
To make such a cornice for a kitchen set, you need to have the dimensions of the top of the kitchen along the perimeter with designated corners.
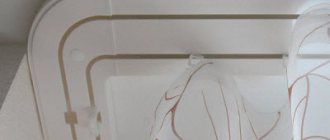
As an example, I will give a diagram of a cornice installed on a kitchen set, photographs of which are given in this article (according to this diagram, they cut a profile for me, which I installed on the kitchen set).
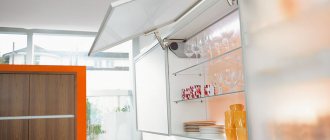
After the kitchen set has already been installed (at the end of installation), such a cornice is attached to the upper boxes.
It is better to fasten it with helpers, as it is not convenient to do it alone.
I attached it like this:
First, I laid out all the elements on the upper kitchen boxes the way they should be installed (I made sure the profile was cut correctly).
Then, in each element I made several holes (on top of the profile), through which they should be fixed to the boxes.
After that, I again laid out these elements on the upper boxes and began to fasten them.
The most important thing during installation is to arrange the elements so that there are no gaps at their joints during fastening. At the moment of fastening the profile, the assistant must firmly fix the corner joint, the elements of which are attached.
In this case, when attaching adjacent elements, there was a small gap in only one place, which was immediately covered with wax (when you are dealing with framed MDF, buy wax of the same color as it, sometimes it helps a lot).
One more point: If a profile cornice is to be installed on the kitchen set, the following things must be observed:
- When assembling the upper kitchen boxes, the upper horizons must be strictly flush with the sides (so that there are no “steps”).
- When installing such a kitchen, the entire upper base must be strictly vertical.
In this example, the upper corner frame was assembled in such a way that its upper horizon was slightly lower than the top edge of the sides (this very “step” was obtained), and during installation, the part of the profile that is attached to this corner frame turned out to be lower than the other parts. In order to “bring it” to the general level, I had to put what was at hand under this part of the cornice (and I had plain paper at hand).
These are the nuances that may occur during installation.
In general, a kitchen with such a cornice and MDF facades looks quite interesting. It would seem like such a small thing, but “it” changes the overall appearance of the kitchen for the better quite noticeably.
So, use the elements we are considering when making similar kitchen sets.
Yes, I forgot to add that profile cornices are installed either in straight kitchens or in corner ones, in the case when the corner modules of these kitchens have beveled ends (as in this case).
Naturally, such curtain rods will not work in kitchens with corner open shelves or with corner radius facades.
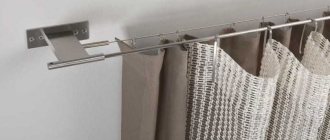
Types of bracket fastenings
All brackets are distinguished by two main parameters: the type of installation of the protruding part and the design of the protruding part itself.
Depending on the type of attachment to the wall, the following structures are distinguished:
- Vertical mount above the window. Such brackets are a conventional lever structure or angle. The long part of the bracket is located at right angles to its support. The support is screwed to the wall using self-tapping screws. Length
- Ceiling mount. Double brackets for curtain rods often have this design. They usually look like an inverted letter P or T or a regular letter Ш. The bracket support is screwed to the ceiling, and one or two cornice rods are installed on the lower part.
- Mounting on opposite walls. This is one of the most reliable types of fastenings. There are several options here. The cornice can be sliding, and its ends can be fixed to the walls using self-tapping screws. The bracket can have a conventional design in the form of a corner with additional ring elements into which the cornice is inserted.
Fastenings are selected depending on the length of the rod, the features of the window or ceiling. If you plan to place curtains from wall to wall, then it is better to choose the same curtain rod mount. Typically, such a cornice is installed on a wide, double or triple window.
If you plan to leave the window wall free or place some furniture in this gap, then it makes sense to choose a ceiling mount. This design is most often used for a small single window.
Important! The design of the cornice should be such that its rods are placed 3-5 cm further from the edge of the window sill. Otherwise, if you close the curtains completely, the edge of the window sill will be visible in the form of ugly corners.
How to install a kitchen overhead cornice?
Dear forum users. I'm assembling the kitchen myself. I stopped at the stage of installing the upper cornices on the wall cabinets. I can’t figure out how to cut the cornices for installation on the corner cabinets. I ask for urgent help. I have it at the moment
Thanks in advance for your answer.
22.5 degrees on the crosscut.
C2p-OH If it’s not difficult, then please give more details. Do you cut both ends or just one and on which side? Preferably a drawing or photo.
both sides of each cornice are cut at 22.5 degrees. on the crosscut. The cornice should be on the end of the trim on the same side that will be on the kitchen cabinet. 22.5 is the bisector of the joining angle. It's hard to draw on the touchpad.
C2p-OH, Thank you very much for your answer, but it’s still not very clear (I’m slow). As I understand it, it can’t be done without trimming and a miter box won’t help. Maybe someone has a photo or drawing.
not in a miter box - worse, but possible. Also, set it to 22.5 degrees. and saw all mating sides
vera2010 wrote: If it’s not difficult, then please give more details. Do you cut both ends or just one and on which side? Preferably a drawing or photo.
If you have never sawed a cornice, then it is better not to start. Moreover, there is no trimming. Even with her it’s quite difficult. And it is important in your case not just to saw off the desired corner, but also to choose the location of the checkers (squares), otherwise it will not be beautiful.
For such a cut as in the bottom photo, they usually castrate and cut off not only the organs below the waist, but also the arms.
If it’s not long, bring it, I’ll cut it off.
Thank you all so much for your answers
C2p-OH, How can I contact you?
EV.SA wrote: For such a cut as in the bottom photo they usually castrate and cut off not only the organs below the waist, but also the arms.
C2p-OH wrote: if it’s not long, bring it, I’ll cut it off.
Quite risky. The cornice is quite large even if the angle is not 45. Usually such things are adjusted according to the location, including the overhang and length.
Tell me, please, how are these cornices attached? Only from above? Are there any mounting plates to make installation easier? Otherwise, we don’t have much space left between the edge of the upper cornice and the ceiling. And another question: do all the parts have to be secured separately? You can fit them, join the corners at the bottom, and then mount them all the way up. How, for example, are ceiling moldings made (several strips are glued together neatly at the bottom, and only mounted at the top).
What you need
Regardless of the type of element being trimmed, a miter box is an excellent tool, allowing you to evenly trim narrow objects at different angles. The most commonly used values are 45 and 90 degrees. A simple device and very inexpensive. Therefore, you can purchase it simply so that now and later you can make cuts at different angles.
A hacksaw for metal with several spare blades. This is a universal tool that is suitable for working with a wide variety of materials, not just metal. Spare blades are needed, as they tend to break, but they are very cheap, so this will not be a problem.
The tape measure and pencil need no introduction. Of course, if you have the opportunity to use a miter saw or cutting machine, then all questions are automatically removed, but not everyone has such equipment, and besides, if you know how to use such machines, then you will not have any questions.
Cornices for kitchen cabinets
Cornices for kitchen cabinets in Moscow
Cornices for kitchen cabinets and other products can be purchased at Leroy Merlin in Moscow at low prices. Select the product you are interested in on the website and buy it in our online store. The range of products presented in the catalog is extremely wide. Among them there will certainly be a position suitable in all respects.
All products presented in the section “Cornices for kitchen cabinets” are produced by well-known companies that have proven themselves to be of high quality for their products.
You can always place an order and pay for it online on the official website of Leroy Merlin in Russia. For residents of the Moscow region, we not only have low prices for products in the “Cornices for kitchen cabinets” category, but also fast delivery to cities such as Moscow, Balashikha, Podolsk, Khimki, Korolev, Mytishchi, Lyubertsy, Krasnogorsk, Elektrostal, Kolomna, Odintsovo , Domodedovo, Serpukhov, Shchelkovo, Orekhovo-Zuevo, Ramenskoye, Dolgoprudny, Pushkino, Reutov, Sergiev Posad, Voskresensk, Lobnya, Ivanteevka, Dubna, Yegoryevsk, Chekhov, Dmitrov, Vidnoye, Stupino, Pavlovsky Posad, Naro-Fominsk, Fryazino, Lytkarino , Dzerzhinsky, Solnechnogorsk, Istra and Zhukovsky.
Types of brackets
Brackets also vary in the way they grip the cornice. There are only two options here:
- Open holders. In this case, at the end of the cornice there is a semicircle loop into which the rod is inserted. Typically, such models are designed for round curtain rods, on which curtains are hung using rings or eyelets. This fastener is very convenient, as it allows you to remove the curtain along with the cornice.
- Closed holders fix the curtain rods more securely. However, in order to change the fastening of curtains or the curtain rod, you will have to disassemble its fastening. Such fasteners are used for any type of curtain rods: both with fastening curtains on hooks and on rings.
Cornices can have several rods or rails: from 1 to 3. Brackets should also have the same number of places for installing rods, which must be taken into account when selecting them.
Kitchens with decorative cornices
A decorative cornice for kitchen furniture (also called a baguette) emphasizes the overall style of the set, gives it a finished look and further reveals the overall color scheme. It should not be confused with a curtain rod. This is a decorative element that is a harmonious cut of the kitchen set. It carries not only the aesthetic function of decorating furniture. If it is placed correctly, you can hide the empty space at the top and bottom of the set, build in rods for storing utensils, etc. The designers of the Maria Kitchen Studio will offer you all possible options for using a cornice for a kitchen set when creating a free individual design project .
Advantages:
- Air
Thanks to the cornices, even massive furniture looks lighter and airier thanks to the “broken” top edge. - Height
Cornices in interiors and furniture visually raise the ceiling, making the room taller. - Acoustics
Cornices “dampen” unnecessary noise and improve the acoustics of the room, which is important in the kitchen: the sounds of a microwave operating, oil sizzling in a frying pan and water flowing from a tap will become much quieter. - Compatibility
Simple straight for minimalist kitchens, luxurious gilded for Empire style kitchens, ornate and massive for Baroque: no matter what interior style you choose, the cornice will always be appropriate.
Kitchens with cornices
- Style:
classic style - Material:
Solid and veneer - Coating:
enamel - Processing:
varnishing
- Style:
neoclassical style - Material:
MDF - Coating:
thermoplastic, enamel
- Style:
classic style - Material:
Solid and veneer - Coating:
enamel - Processing:
varnishing
- Style:
classic style - Material:
MDF - Covering:
thermoplastic - Processing:
varnishing
Completed projects in Moscow
- Style:
Neoclassical - Dimensions:
4.9m x 2.15m
- Style:
Classic - Dimensions:
4.1m x 2.43m
- Style:
Classic - Dimensions:
3.835m x 0.91m
- Style:
Neoclassical - Dimensions:
2.55m x 2.35m
- Style:
Neoclassical - Dimensions:
3.98m x 2.67m
- Style:
Neoclassical - Dimensions:
4.69m x 2.505m
- Style:
Neoclassical - Dimensions:
2.85m x 2.57m
- Style:
Classic - Dimensions:
2.4m x 2.19m
- Style:
Neoclassical - Dimensions:
3.438m x 2.455m
Choosing a baguette for the kitchen
The material and color of the curtain rod profile depend on the same characteristics of the kitchen unit itself. If the kitchen facade is made of MDF or solid wood, then the baguette must also be selected from similar materials. MDF cornices can be made of several layers that differ in width. Baguettes made from solid wood can be milled. Due to this processing, completely different designs can be applied to them - from straight lines to curved intricate patterns. These furniture accessories can be subjected to various finishes: patination, varnishing, painting in the required color, etc. If you decide to decorate your kitchen set with such a cut, you can be sure that it will be fully compatible with all other elements of the furniture.
Types and purpose
Its functionality depends on the size of the furniture cornice for the kitchen. Thus, wide models can play the role of shelves into which additional lighting can be built or hidden behind them are pipes and wires that spoil the appearance. Both wide and narrow models can cover the visible part of the wall above the upper cabinets. With their help, you can hide the wall partially or completely. When the ceiling is completely covered, a wide cornice is installed, and the distance between it and the upper boxes can be covered with a back wall made of the same material. The curved shape of the cornice can follow the shape of the kitchen bar counter and make the interior more holistic. The baguette can be installed directly above the kitchen “island” or bar counter. In this case, it is mounted on the rack column.
Our works
The catalog on our website presents many design options for kitchens with cornices. These are headsets in classic, neoclassical, modern and other styles. Some of them are made from MDF. It can have different coatings (thermoplastic, enamel, tinting. Kitchen units made of solid wood and veneer are also offered, the facades of which are treated with tinting. The gallery of completed projects contains many real photos. They will help you determine what kind of kitchen you want to see in your home.
Tags: #How to install a cornice on a kitchen set
We install the cornice according to all the rules: selection and installation procedure
The desire to bring comfort and warmth into the environment of your own home is natural, so any little things are used to decorate the premises. Curtains are a necessary piece of furniture that serve as an excellent addition. Selected according to the style and current colors, it will add completeness and beauty to the overall decor of the room. How to hang a cornice? Despite the simplicity of the question, it is unlikely that any person will be able to answer it correctly and there are several reasons for this. In the first case, the owner of the premises counts on the help of a construction and repair team; in the other case, he is unfamiliar with such work. So, it’s time to lift the curtain of secrecy and tell you how the installation of cornices takes place.
The cornice is an important attribute of the room
Any curtain cannot be considered only a mechanical device for hanging curtains. It serves as a worthy decoration of the room and emphasizes its style. Cornices in the kitchen are always visible, which is why their appearance is so important for the overall design of the room. From the general variety of products offered, you should choose the most presentable, high-quality, convenient and practical samples. The fastening system and installation of the cornice is taken into account first.
Curtains are attached in different ways:
- on the ceiling;
- on the wall.
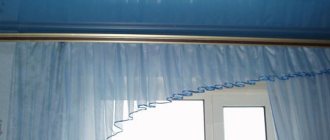
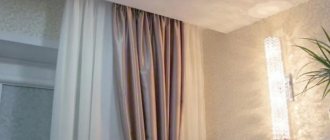
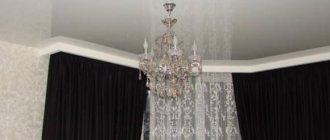
Any cornice in the kitchen looks elegant and attractive if it matches the overall interior design and type of curtains. Ceiling curtains look much nicer than wall models. This kitchen cornice has a hidden fastening system.
What to consider when choosing curtains:
- types of curtains, their length: massive curtains are not hung on strings, and thin tulle is not suitable for forged products;
- system for fastening cornices in the kitchen;
- type of ceiling;
- installed furniture, household items: curtains should not interfere with cabinets, shelves, household appliances.
How to choose the right curtains for your curtains?
The installation of the cornice must necessarily coincide with the competent selection of curtains, so it is advisable to select them together. Before making a purchase, it is important to choose a model and color.
Attention! Metal models are completely unsuitable for a plastered ceiling: a piece of the covering will easily fall off along with the attached cornice.
The kitchen cornice allows the use of curtains:
- Roller blinds rolled into a roll.
- Japanese, with vertical folds.
- Eyelet, draped with special devices (eyelets).
- Austrian, collected in a roll of canvas.
- Roman, folded into rings.
- French silk or thin fabrics gathered in scallops.
- Italian, draped with lace tiebacks.
It is advisable to install cornices in the kitchen according to this principle:
- Combine metal curtains with classic curtains and tulle.
- Japanese curtains will be perfectly set off by a forged cornice.
- Italian linens look perfect with a baguette.
- Roller blinds and profile cornices go well together.
Important steps before installation
Before buying cornices for the kitchen, take the appropriate measurements:
- width of wall with window;
- length from sides to curtain;
- the protruding part of the cornice above the wall;
- height from the edge of the curtain to the floor.
Regardless of size, the cornice in the kitchen should be installed freely, without interfering with the movement of the window sashes. Install the structure 5 cm above the opening.
- When choosing anchor bolts for fastening, it is important to accurately determine their length. You should be especially careful if insulation is installed with a sheet of plasterboard and the wall.
- In order for the curtain to acquire a more elegant look, its edge should not protrude forward more than 20 cm. A design with one rod would be an excellent example.
- For better fastening of the cornice to the drywall, you can use special dowels - butterflies, snails, umbrellas.
Installation features
It is not difficult to install the curtain rods yourself; the main thing in this matter is accuracy. To install cornices you will need materials and tools:
- Self-tapping screws with dowels
- Drill with hammer
- Long water level or laser device
- Ruler, pencil
Important! For curtain rods up to 1.5 meters long, two brackets are enough. If the cornice is longer, 3 or 4 fastening elements will be required.
The procedure for installing the brackets step by step:
- Mark the mounting locations for the brackets, starting from the top points. Check the level of the brackets.
- If you plan to leave free space from the curtains to the wall, then this space should be the same on both sides.
- After all checks, mark the locations for the screws and drill holes.
- Insert dowels into the holes. Attach the brackets to the wall. After this, you can install the cornice.
The entire appearance of the room depends on the selection of the cornice and the accuracy of its installation. Beautiful, stylish brackets will add originality and originality to any interior.