Any board, be it laminated board or solid wood, is subject to swelling and shrinkage depending on the time of year and fluctuations in humidity. Tightly fixed countertops, deprived of the ability to freely contract and expand, begin to deform under the influence of internal stresses - warp, bend, twist and eventually crack.
With seasonal changes in humidity levels, wood expands and contracts predominantly across the grain. The countertops of a room or kitchen set vary in width within 1 cm, depending on the size of the lid and the type of wood. Linear changes along the fibers are insignificant.
How to strengthen the countertop in a kitchen unit - all aspects of installation
If you have received a kitchen set and plan to install it yourself, then pay special attention to fastening the countertop - perhaps its central element. The stability of the structure as a whole depends on the installation properties of this part. In addition, there are a lot of pitfalls in the process itself, which will be difficult for a newbie to cope with. We talk about all the aspects related to attaching the countertop to the kitchen set - depending on the type of material and the installation method you choose.
Types of countertops
This point will be especially interesting to those who are still at the selection stage. Those who have already made a purchase can only rejoice for their correct decision.
Plastic
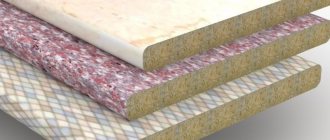
The technological process for producing similar products does not differ in complexity: a layer of plastic is applied to an MDF panel (or chipboard - not so important). It is this that forms a matte or glossy film on the surface.
Pros:
- beautiful appearance;
- low cost;
- ease of care;
- variability of colors and textures.
Minuses:
- they are afraid of high temperatures, so contact with hot dishes is a hard no;
- mechanical action and sharp objects can damage the integrity of the film;
- Moisture can accumulate in the seams and near the edges, causing the board to swell.
Laminated
The chipboard panel is pressure-coated with laminated plastic in both the upper and lower parts. A real water-resistant layer appears, preventing bloating.
Pros:
- the highest level of protection against water and damage;
- still affordable;
- simple cleaning;
- Most options have special drip trays.
Minuses:
- the same as for plastic ones
Iron
Made from stainless steel sheet and chipboard. All connections are folded around and tightly welded, preventing water from getting inside.
Pros:
- ideal resistance to contact with hot water and dishes;
- reference impact resistance;
- are not afraid of blows;
- do not allow water to pass through;
- pretty cheap.
Minuses:
- fingerprints and stains may remain on the surface;
- they just scratch.
Woody
They are made from hard types of wood by gluing wood planks. Everything is painstakingly sanded, impregnated with special oil to protect it from water, and then varnished.
Pros:
- relatively reliable and look beautiful in the interior;
- they do not get dirty and are “peaceful” in relation to the highest temperatures.
Minuses:
- poor resistance to food acids;
- moisture still seeps inside and spoils the countertop;
- the cost still does not correspond to the level of reliability.
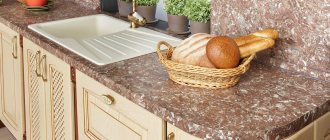
From stone
Most often, marble or granite is used for the production of countertops. They are distinguished by their highest strength and perform well in operation.
There are also options for acrylic stone countertops. This is an artificial material, which in terms of wear resistance and strength is actually not inferior to its natural counterparts. True, it has one drawback, which we will discuss separately so as not to confuse you - it simply scratches terribly.
Pros:
- do not scratch or form cracks or chips;
- are not afraid of water;
- excellent interaction with high temperatures;
- have a magnanimous, “thoroughbred” appearance.
Minuses:
- may change color over time;
- marble often gets dirty;
- very expensive;
- difficult installation.
Classification
There are a huge number of types of kitchen countertops on the market, but not all of them can be installed with your own hands. For example, stone products for installation require the use of expensive professional tools that not everyone can afford. At the same time, products made from laminated chipboard can be easily installed independently. Depending on the material of manufacture, these types of countertops are distinguished.
Plastic
They are not made from a single piece of plastic, but from chipboard sheets with a high-strength laminated coating. This is a relatively inexpensive material that does not cause problems during installation. The cost of laminated coating is low. In addition to the affordable price, consumers are attracted by the variety of color options.
Important! The laminated surface is not without some disadvantages. For example, the material does not tolerate high temperatures well, quickly losing its attractive appearance. All damage on such a surface is very noticeable and quickly becomes clogged with dirt.
Wooden
Kitchen and cabinet furniture made of solid wood looks very beautiful and elegant. However, wood also has a number of disadvantages:
- it is afraid of moisture, temperature changes;
- unstable to mechanical stress.
To extend the working life of wood, it is treated with special substances and then polished.
Important! A positive quality of wood is maintainability. If the surface has lost its attractiveness over time, then grinding and polishing will return it to its original “brand new” appearance.
Metal
Metal countertops appeared on the market relatively recently, but in terms of their popularity they are beginning to decisively displace laminated chipboard. The metal is practical, not afraid of high temperatures, and there are no traces of a knife left on it. At the same time, the cost of such a product is small. The countertop is easy to install and does not require complicated maintenance.
Stone
This product is expensive and difficult to install. But after installation, you can forget about repairs for decades. Countertops are made from natural or artificial material. Artificial stone is cheaper, but in appearance it does not differ from natural material. In addition, the surface of artificial stone is easy to clean, resistant to high temperatures and unattractive to bacteria.
Individual fastenings
How you need to strengthen the countertop to the kitchen floor cabinets directly depends on the material you have chosen. So, for products made of plastic, stainless steel and laminated chipboard panels, the installation flow chart is actually similar:
- place the panel on the lower pedestals and check with a building level for any distortions;
- mark the proposed locations for the screws;
- treat the ends of the tabletop with silicone and fix them to an alloy strip to protect them from water (for iron versions this advice is no longer relevant);
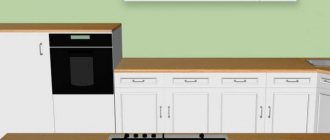
- drill 2 holes in the upper crossbars of the kitchen cabinets - in the front and back, this must be created for each module of your set;
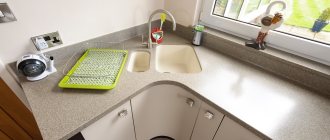
- fastening is carried out with ordinary screws, at the location of the sink - with special triangular plastic fasteners with 2 screws, and the joint space is closed with a plug.
But with wood and stone there are certain aspects to the method. About them - a little lower.
Attaching a wood table top
The main highlight is that the wood panel is not screwed to the lower cabinets with screws, but is glued to the joints. For this you can use regular silicone.
Why is that? It's simple: wood can expand during use, which will lead to inevitable chips and cracks if you work according to the classic principle of ties with screws. Silicone, even after hardening, is quite plastic and eliminates this mobility.
That is why such a tabletop is installed using the floating method, and it is recommended to create a reserve at the edges of the wall - at least 1 cm. This is an option if the material becomes larger.
Interesting read: The walls in the apartment are turning black, what to do?
Fastening a stone countertop
The same goes for marble, granite and other types of stone. You need a lot of silicone - it plays a shock-absorbing role.
Such a system is installed on an iron base: supports are placed around the perimeter, which take on the main weight of the stone panel.
Advantages and nuances of using the design
A folding table with wall mounting is a tabletop fixed with a special triangular or rectangular fastener. When closed, this design looks like a small bar. When unfolded, it looks like a regular dining table extending from the wall.
This model of furniture would be quite appropriate in the kitchen or on the balcony. Wall mount tables are popular due to the following advantages:
- Compactness. Such products, when folded, do not occupy a large area.
- Functionality. When unfolded, wall-mounted folding tables perform all the functions of stationary products.
- Stylish appearance. The models fit organically into almost any interior.
- Ease of installation. Folding tables with wall mounting are delivered to the buyer ready-made with full instructions. The owner only has to fix the product on a vertical surface, which does not require special skills.
A transforming table is more relevant for a kitchen where it is not possible to install stationary models, since it folds up and saves usable space. You can install a folding table in the kitchen on any part of the wall; the main requirement is that nothing prevents the product from folding and unfolding freely.
Transformable furniture will not hold tightly to plasterboard structures.
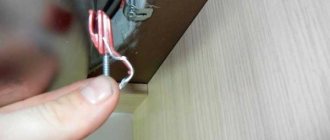
How to attach a baseboard to a tabletop?
If you do not want water to flow in at the junction of the fixed panel with the apron, then you can fix the baseboard to the wall. Together with plugs, screws and corners, it is purchased at the store.
- connect the plinth to the inner corner and attach it to the wall;
- Mark the cut space with a marker on the plinth;
- cut off the excess with an alloy hacksaw or a stationery cutter;
- remove the decorative strip from the baseboard;
- attach the plinth to the wall along with the corner;
- alternately screw the screws to the tabletop through the baseboard strip - beware of any displacement of the material;
- the best option is 1 screw every 20-30 cm;
- then insert the decorative strip that you separated earlier - it should fit into the groove and snap into place;
- the ends are covered with a cap - it can be glued to the baseboard with watery nails.
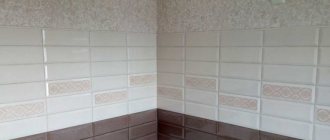
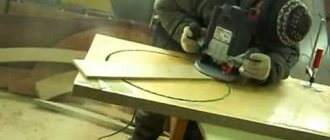
Options for installing a kitchen apron
To make the kitchen furniture and the room look like one whole, decide on the type of apron in advance. If the project has a common backsplash for the kitchen and work area, that is, floor-to-ceiling tiles or a tiled panel, the end of the countertop may need to be treated for the tightest possible fit. Sometimes a slight bevel is needed due to the general collapse of the wall, sometimes the tiles are laid in waves. It is easy to give the desired shape to the cut using a belt sander with a grit size of P180; it is guaranteed not to leave chips.
If you plan to lay the apron only between the lower and upper tier, or only above the tabletop, it is strongly recommended to fix the latter on corner brackets. Fastening with anchor bolts will allow for harmless dismantling, so that the tabletop can be easily replaced if damaged. To do this, you will have to make several holes in the LDF of the rear skin for access to the anchor nuts.
Loose countertops can sag over time, causing a crack to form under the tile backsplash. When installing a countertop, you should not expect that the plinth will hide all installation flaws, because it is attached to the wall and a gap from subsidence will still appear. In addition, the plinth does not perform any function, it only hides imperfections, so the thinner it is, the better.
Attaching the table top to the wall
To give the structure the greatest durability, craftsmen often advise strengthening the tabletop to the wall with fasteners or a support. Both options have the right to life, but the first one still occurs even more often:
- select a space to mount the bracket on the wall;
- using a building perpendicular, select a space on the panel where its vertical part will be placed;
- attach the bracket and mark the points for the screws with a marker;
- drill holes and hammer in dowels;
- For fixation, use small screws - up to 2.5 cm; when choosing them, take into account the thickness of your panel.
Fastening it to a support aims to quickly immobilize the laid tabletop. To do this, use wood beams that have been previously treated with a disinfectant liquid. It is attached to the wall with anchor bolts along the strip of the upper edge, and after that the panel itself is laid on it.
When is additional fixation necessary?
The countertop in the kitchen sometimes takes on very significant loads. When slicing food, it only requires sufficient area and a flat surface. But often we also load the table with small household appliances. Microwave, oven, portable dishwasher, coffee maker, mini-bar - all these items in the kitchen often “settle” on the table, and here you will need to secure it well.
Related article: What equipment cools the room hanging on the wall
You should not discount the neat appearance of the kitchen - an unfixed countertop can sometimes move, forming a noticeable gap in contact with the wall. Not only does this spoil the picture a little, but also food particles will accumulate there. It is useless to attach a decorative plinth to such a moving surface. And if the design of the set is such that the tabletop has freely hanging ends, instead of a reliable working surface you become the owner of an analogue of a children's swing. So it’s better to attach the top plate even on the cabinets to the wall so that it doesn’t “play.”
Sometimes the only way to increase the functionality of a small kitchen is to make additional surfaces with your own hands where you can place equipment or process food. You cannot provide support for such tabletops from below, but fixing them on the wall is quite possible. And of course, you can’t do without this if there is built-in appliances hidden under the work surface - a refrigerator or a washing machine.
On the structural impact of seasonal deformations
No matter what kind of board, be it a laminated board or a solid piece of wood, it is subject to swelling and shrinkage depending on the time of year and fluctuations in humidity. Tightly fixed countertops, deprived of the ability to freely contract and expand, begin to deform under the influence of internal stresses - warping, bending, twisting and eventually cracking.
With seasonal changes in humidity levels, wood expands and contracts more across the grain. The countertops of a room or kitchen set vary in width within 1 cm, depending on the size of the lid and the type of wood. Linear configurations along the fibers are nonsense.
Fastening the tabletop with screws
This is a common and time-tested option for attaching the tabletop to the table frames without the use of additional fittings. The special conical expansion chosen in the frame ensures little mobility of the screw when changing the size of the table top. The cover itself is firmly attached to the body.
Having made the basic markings, an end hole is drilled in the drawer. After this, using a wide semicircular chisel, select a pocket for concealed installation of the screw.
Using a narrow chisel, make an angular expansion on the upper edge of the drawer. The extension of this groove is constantly done across the grain of the tabletop, since the wood expands and contracts specifically in this direction.
Installation using screws in such pockets allows you to get rid of unnecessary structural parts under the table cover. It is usually used in traditional style furniture, where they prefer to use only wood parts. With all its advantages, this method of covered fastening is quite labor-intensive.
Introduction of Z-shaped holders
Using small iron Z-brackets is another popular method of securing a countertop. The main advantages of this method are its low cost, the greatest simplicity and accuracy of installation, and the absence of the need for additional structural elements.
One end of the iron holder is screwed to the table top with a screw. The second is inserted into a groove sawn in the upper edge of the drawer. The recess is made such that the edge of the bracket does not rest against the wood and moves freely in the groove as it expands. Thus, the fasteners allow the tabletop to change its dimensions in any direction without consequences.
Interesting read: Exclusive shelves for the wall
Assembly before fastening
Fastening the tabletop is necessary to give the lower tier strength and fix it from displacement due to vibration. Steel corner brackets that connect the side walls of the box and the back surface of the slab are well suited for this.
First, the tabletop is attached to the surface. If the table top is made of chipboard, the corner is attached to it with 4.5 mm screws through pre-drilled holes
1.7 mm, the length of the screw is 10–12 mm less than the thickness of the tabletop. Corners are attached to stone and composite countertops differently: the sections of the slab and the edges of the corners are first thoroughly cleaned and degreased. Then the corners are glued exactly at the installation site to 3-4 small dots of high-quality two-component adhesive that retains plasticity after drying (Sika, Hilti). The brackets must be firmly pressed into place when they are put in place; the tabletop can be attached to the body after 24 hours.
A properly made adhesive joint holds even better than screws, so fewer attachment points will be required - 2 for each section in a checkerboard pattern. You should not refuse the opportunity to make fastenings to the tabletop at the manufacturer’s factory. The exception is tabletops, on the reverse side of which metal bars are fixed, which, when installed, “drive” into the grooves at the ends of the side walls. This method of fastening should be avoided at all costs.
Mounting on wood clamps
The introduction of homemade wood clamps is a common and reliable method of attaching a tabletop to a tabletop without purchased fittings. Clamps work on the same principle as iron Z-clamps. They are easy to make serially from scraps that can be found in every workshop. Naturally, this takes time, but often not much more than it takes to go to the store for accessories.
When making wood clamps, remember to maintain the correct orientation of the fibers, as shown in the diagram, to give the bracket adequate strength.
Necessary materials
To attach the table legs, depending on the chosen method, the following materials are required:
- Platform for attaching the tlb60 leg, screws and bolts for the plates.
- Nuts, bolts with lugs and lugs - for T-nuts.
- Tsar and screws – for fastening with screws.
- Holders and screws – for Z-shaped holders.
- Clamps and wood screws of the appropriate length - for fastening using wooden clamps.
- Holders and screws (there are exactly twice as many screws as there are holders themselves) - for figure-eight holders.
- Tsarga, spacers and screws - for spacers.
Installing a tabletop using figure-eight holders
Iron figure-eight fasteners are another popular option for fittings used for fastening countertops. The bracket is installed in a small recess drilled with a Forstner drill or a square recess selected with a chisel so that it is flush with the upper edge of the drawer. The holder is fixed with 2 screws: one to the body, the second to the back of the tabletop as shown in the photo. When the board swells or contracts, the bracket rotates slightly, preventing the wood cover from twisting. The recommended distance between fasteners is 15-20 cm.
Figure-eight holders come in two types: with washers of similar and different sizes. As a last resort, a washer with a huge diameter is attached to the drawer. Having decided to attach the tabletop to a kitchen or room set using this method, you need to make sure in advance that the thickness of the drawer matches the diameter of the washer.
Introduction of spacers with grooves
In this case, two or three additional spacers with rectangular grooves 10-15 mm long are strengthened to the sides of the headset. When changing the width of the tabletop, the screws will move freely in the grooves, thus preventing structural deformations of the wood. Additional strips act as a tie; they increase the hardness of the body and protect the drawers from deformation.
Fastening the table legs
The legs of the table are secured to the sides of the supporting frame, and the tabletop is, in turn, secured to them. In order to ensure a tight connection between the drawers and the legs and compensate for the shrinkage of the wood due to fluctuations in humidity, the following fastening methods are used.
Joiner joint tenon-socket
Advantages : highest strength, lack of additional fittings and unnecessary fastening parts, ease of production.
Disadvantages : the connection is non-separable and does not compensate well for shrinkage.
Wood corner ties
Advantages : adequate joint strength, ability to disassemble, excellent compensation for seasonal deformations of wood, suitable for purchased fittings.
Disadvantages : difficulty in manufacturing, occasionally used for mass production of furniture.
Connections on dowels
Advantages : reliable carpentry connection without visible fastening parts, very easy to manufacture.
Disadvantages : inseparability, poor compensation of deformations.
Iron corner ties
Advantages : they perfectly compensate for shrinkage, are easy to disassemble, provide a permanent tight connection, and strengthen the entire base.
Disadvantages : relatively labor-intensive installation development, presence of protruding iron parts under the table cover.
In which situations is it possible to install the countertop yourself?
If you understand the installation process, you will understand that there is nothing complicated about it. But we do not recommend immediately abandoning the work of professionals. Weigh the pros and cons.
Self-installation of the countertop is justified in 2 options:
When you do not change the entire set, but only the work surface.
When you have the ability to work with chipboard, MDF and wood. You can cut a slab evenly and accurately, process its edge, know how to use sealant, and understand the principles of joining and fixing different materials.
Installation should be entrusted to specialists if:
You have no ability to assemble furniture.
The service is included in the cost of installing the entire headset.
You ordered unusual furniture, for example, the design involves a figured cut of the table.
The product is made from precious raw materials. Let us remind you that artificial and natural granite are languid, dense, but at the same time fragile. Without special tools and experience, it will not be possible to install a stone surface. The smallest chips will spoil the entire appearance of the kitchen. Don't take risks and use the services of experts.
If you order cutting and installation of a countertop from a furniture manufacturer, you will be given a guarantee for the installation work. With self-assembly, the company will not be able to help in any way, even if factory defects are discovered.
In this article we will talk about installing a countertop using the example of laminated chipboard (chipboard) or fibreboard (MDF). Now these are the most needed materials among consumers. The development of fastening surfaces made of wood and alloy is no different from that described below.
Interesting read: How to calculate the amount of paint for walls
Comments: 17
Art Atelier
In your case, it is better to rest the tabletop on the floor (it is generally undesirable to hang and sit on them). Usually, if the structure or installation conditions are complex, then those people who will supply and install the stone product themselves go to the site and calculate the weight of the structure (how thick will it be - with a glued side? How exactly is the sink installed, etc. ) then they develop a welded structure for themselves and issue an order for the installation of embedded parts / Or maybe they just sacred an L-shaped frame, where the vertical part will be in the plane of the wall. Probably no one will answer in absentia.
- Like | 3
- Save
- Like
- Save
ryllova
I just don’t want what you sent. That's why I turned to the experts
- Like
- Save
Dmitry Evgenievich
Just attach the tabletop to the wall, in the corner. To do this, even at the stage of wall construction, it was necessary to provide fastening elements. Otherwise, you won’t be able to do what you want.
- Like
- Save
ryllova
It's not too late for us to make these fasteners in the wall. It was just laid out to us. Yes, we planned to mount it in the wall and on the corner, where it would be adjacent to the cabinet wall. I'm worried about the other corner that will hang up, near the bathtub. What fasteners do you recommend? It seems to me that the letter G is a little dangerous, the edge will be hanging
- Like
- Save
SOS REPAIR
- Like
- Save
ryllova
Thank you very much for the recommendations. Some are just a mystery to me: “do it on the floor, but make the very bottom mirrored and a little ruined.” I can’t even imagine what it is and how it is :)
Do you have an example?
And about the lighter analogue. What did you mean? What could be lighter and more like a stone?
- Likes: 1
- Save
Galina
- Like
- Save
SOS REPAIR
- Like
- Save
- Like
- Save
ryllova
Thanks for the advice. But in your example, the wall in which the frame is embedded is most likely concrete. In my case, both the side wall and the back are made of tongue-and-groove slabs :(
- Like
- Save
Evgeny S
In 1 comment they wrote to you the best solution to your problem, contact the countertop manufacturer so that they issue a technical specification for the installation of embedded parts. Or so that they themselves prepare a welded structure, for example, under a tabletop.
- Likes: 1
- Save
Tabletop Installation Tools
Before you start work, make sure that you have all the necessary equipment for installation. You will need:
Pencil, tape measure, level.
Silicone sealant and a gun for it.
Wood saw or jigsaw. The 2nd option is better, because the cut will be even and there is less risk of deforming the surface.
Fasteners to secure the tabletop to the cabinets.
Aluminum strips to give the kitchen a finished, discreet look. They come in 3 types. End caps are used to decorate the raw edges of MDF or fiberboard boards. To connect the parts of the table at an angle, use angular standards. If the tabletop consists of several parts arranged in one row, the joints are masked with connecting strips.
If you intend to cut the front part of the tabletop, the edge must be treated with adhesive tape. It is ordered together with the table from the manufacturer. We will describe the technology for gluing it below; this will require an iron and fine sandpaper.
How to install a countertop in the kitchen: step-by-step {instructions}
The table is fastened only after all the floor boxes have been assembled and tied together. They need to be leveled so that the weight of the surface is moderately distributed around the entire perimeter.
Some manufacturers include a countertop with any kitchen module. This is vital for small headsets. In this case, cuts are not necessary; you immediately move on to the step of fixing the surface at the ends of the furniture.
But more often the design of the room involves several cabinets arranged lengthwise and a solid tabletop on top. If the kitchen is corner, they will bring you one piece of the slab, which will need to be cut to size and joined together. How to create it:
Use a jigsaw to cut the tabletop into the required number of pieces. When measuring, take into account not only the size of the tabletop, but also the width of the slats.
Place masking tape on the cut line. It will protect the laminated coating from chipping.
Sand all untreated plastic ends to remove dust and lubricate with sealant: it will prevent the formation of mold and swelling.
When the silicone has dried (after approximately 20-30 minutes), secure the end and, if any, connecting and corner strips with screws.
Place the parts of the table top on the cabinets and drill holes in the special tie rods of each module. Using their screws, you will later attach the tabletop to the cabinets.
While the table is not fixed, it is necessary to prepare a hole for the sink.
To cut the hole, use the template included with the bowl. If it is not there, outline the outline of the sink, which will outline its boundaries. Step back 13-15 mm from it and draw an internal contour along which you need to cut a hole.
Seal the resulting edges with sealant.
The preparation of the area for the hob is similar.
Secure the sink with fasteners. First tighten the screws located on the sides diagonally by ⅔, then the central ones. Next, tighten all the screws until they stop.
When the space for the sink is ready, we move on to fixing all parts of the countertop. To do this, place it on the cabinets and attach it with screws. From time to time, during transportation or if storage conditions are violated, the MDF board may bend slightly. If the lower cabinets are level but the stove is warped, press it down.
The surface can be fixed flush to the wall or by retreating 5 mm. In any case, do not forget to seal the joint and the wall.
Final assembly
Before final fastening the countertop to the body, it is necessary to cut holes for the sink, hob, socket and other appliances. All open sections of chipboard must be treated with a 0.2–0.5 mm layer of sanitary silicone to limit the core from contact with air and thereby prevent any shrinkage.
When fixing the tabletop, while an assistant presses it against the body with his weight, the brackets are attached to the walls with 15 mm furniture screws with preliminary drilling of holes 8–10 mm deep.
After fixing the tabletop, final processing is carried out: the junctions with the walls are coated with sanitary silicone and covered with a thin plinth; a drip tray is installed under the protrusion 5–7 mm from the edge of the tabletop.
Source: rmnt.mirtesen.ru