When replacing a kitchen unit or sink, the inevitable question is how to embed the sink into the countertop. You can do this work yourself. It is not too labor-intensive, but requires precision and quality workmanship. We will figure out how to properly install sinks of various types, learn about the features of working with various materials, and prevent possible mistakes in order to avoid water leaks.
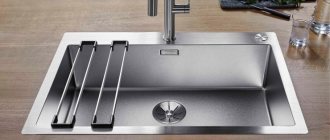
Corner mortise sink made of stainless steel Source bft.by
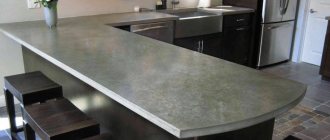
Installation of a sink in an artificial stone countertop
Product Catalog
- Artificial stone countertops
- Window sills made of artificial stone
- Artificial stone tables
- Artificial stone sinks
- Bar counters for cafes and restaurants
Fake diamond
It's hard to imagine a kitchen without a sink. This is an element of primary importance, the quality of installation of which determines the comfort of all kitchen processes.
The kitchen sink should be deep enough to make it convenient to wash dishes. Kitchen sinks are usually made from stainless steel or artificial stone.
Types of kitchen sinks
To install the sink, you will have to cut a hole in the countertop for the sink yourself. When performing this process, various product manufacturing technologies should be taken into account. To cut correctly at home, you need to rely on the design of the sink.
They are like this:
- Invoices. This type usually has a rectangular or round apron (corner is less common) and is the most budget option. Such sinks are most often made in a metallic color. No special precision is required when cutting. The main disadvantage is that after installation they remain between the gaps in the cabinet and the kitchen sink, regardless of the size of the product.
- Mortise. To place this type, you need to cut an opening directly into the tabletop itself. In this case, for insertion, it is advisable to have at least theoretical knowledge of how to perform the work.
- Under-table. This is the most expensive option for a kitchen sink. Such a sink must be placed below the countertop, where the fasteners are made. This allows for excellent sealing and excellent appearance.
The under-table type of installation is very difficult to implement. To perform such work, you must have a special tool and preferably a lot of experience. It will be necessary to treat the ends of the tabletop with waterproofing compounds so that it does not swell from water.
You will have to cut it twice . First you need to make the hole a little smaller than the sink itself. Then a kind of wing or step is made in this place so that the sides of the product can be fixed at the required distance.
Before installation, it is advisable to think carefully about the choice of the kitchen sink itself. The best option would be a deep sink with a low faucet. This will create a minimum amount of splashes during use. This will also avoid discomfort when stacking a large amount of dishes.
You should also pay attention to the material when choosing a product. Stainless steel can be considered the best option, as it has a good appearance and a long service life.
Options for installing a sink in a countertop
There are several ways to install kitchen sinks:
- Overhead. With this installation option, the sink is placed on top of the countertop. The installation process is simple, but there are gaps between the countertop and the sink into which water and food debris can get in.
- Mortise. This technology involves inserting the sink into a special hole in the countertop.
- Podstolny. An interesting mounting option in which the sink is installed below the countertop.
When choosing a sink installation method, you should rely not only on the complexity of the procedure. But also take into account the materials used to make the countertops and sinks.
An overhead sink is a budget option. It is more suitable for the bathroom than for the kitchen. The installation process is limited to securing the product with self-tapping screws and sealant in specially prepared places in the cabinet.
Installing a sink into a stone countertop
Carefully installing a sink into an artificial stone countertop is not so easy. If experience and knowledge are not enough, it is better to use the services of specialists.
In other cases, first you need to prepare the tools:
- grinder;
- self-tapping screws;
- metal drill and drill with a diameter of 10 mm;
- colorless silicone sealant;
- building level and tape measure;
- Phillips screwdriver;
- construction knife, ruler, pencil, corner.
The first step is to mark the location of the future drain on the countertop. After this, you should outline the contours of the sink on the table surface.
Before cutting the hole, it is advisable to make holes in the corners to make the process easier. When cutting through the tabletop, you need to make sure that the cut piece does not fall out at the end.
For countertops made of plastic or other materials, you can use an electric grinder. A grinder will only be needed for stone products.
The cut on the countertop made of artificial stone is treated with sandpaper and sealant.
A sealant is glued to the sides of the sink, and fastening devices are not completely installed on the inside. At this stage, you can carefully insert the sink into the hole until it meets completely and completely fix the fasteners.
The final stage is connecting hot and cold water.
Installing a sink under a stone countertop
Washing option. Placed below the countertop level is good. That the entire load to which the product is exposed during use falls on a special substrate made of chipboard or MDF, resting on the frame of the kitchen module.
The installation process is as follows:
- in the base of the countertop (up to the layer of artificial stone), a hole is cut about 2 cm larger than the sink (for a round sink, the hole is also made square);
- the upper side of the sink is processed with a grinding machine;
- a square is cut out of the prepared plywood base, as in a tabletop, inside of which a hole is cut according to the internal dimensions of the sink itself;
- the sink is glued to the cut hole in the countertop;
- a prepared sheet of plywood, chipboard or MDF is glued on top;
- a hole is cut out in the artificial stone from the front side, the edges are processed with sanding paper.
The process of installing an undermount sink in an artificial stone countertop is clear to everyone, but doing it yourself is quite difficult. Especially. That you will need a special tool. Therefore, it is better to resort to the help of craftsmen and be confident in the quality of installation of the product.
Video description
Watch the video on how to embed a stainless steel sink into a countertop:
Connecting communications
At the final stage, communications, cold and hot water are supplied to the plumbing product. First, use a fixing screw and a rubber seal to secure the tap. Experienced craftsmen assemble the faucet before cutting out the countertop for the sink, connect hoses to it and fix it to the bowl.
Water hoses are pulled to the water supply system. Check the reliability of all connections. If necessary, use fum tape. Start the siphon and connect it to the drain corrugation.
After the communications are connected, it is important to check whether there will be a leak Source rudmar.ru
Installation of a sink in an artificial stone countertop
Installation of a sink in an artificial stone countertop
Sinks made of artificial stone differ in shape, material structure, surface texture and design.
They are designed to replace less practical and more expensive natural stone models. A natural sink is carved from a single piece of natural stone. The process is labor-intensive and requires a large amount of high-quality material.
The artificial sink material includes quartz or granite chips, binder resins and dyes. Depending on the type of stone, the percentage of natural stone chips and binding resins, as well as the method of producing a slab of stone, differs.
According to the manufacturing method, shells are divided into two types:
- Factory production. They have standard sizes and shapes.
- Made to order from a slab of artificial stone according to individual drawings. They can be integral with the tabletop, being made from the same material.
Installation of a kitchen sink made of artificial stone, made according to individual drawings, is carried out at the factory, simultaneously with the production of the countertop itself.
Serial sinks are usually installed where the countertop is installed.
Plumbing for shower system- Electric heated floor
Installation of ventilation systems
Distinctive features of overhead models
If we do not take into account sinks that are a thing of the past, which are attached directly to the wall on special brackets and do not require a cabinet or countertop as a support, all products for washing kitchen utensils can be divided into 2 categories: overhead and mortise.
The main difference between the two types is the installation method. The first ones, chosen exactly to size, are “put on” the top of the cabinet, and to install the second ones, you need to cut a hole in the tabletop.
From here follow the distinctive features expressed in design, material, and shape.
Image gallery
Photo from
Overlay two-cup rectangular model
Sink made of sheet steel
The edges of the sink are curved down
Typical square sink
Products that do not require additional processing of the base are preferable for self-installation, and they are on average cheaper.
However, design features rarely allow the use of “overlays” in modern kitchen sets with a single countertop and built-in appliances. Overhead models are also quite often chosen for installation in the bathroom, but these plumbing fixtures have a more attractive design, material and size than kitchen fixtures.
For installation, you need a separate cabinet without a table top, which you can make yourself by cutting parts from a sheet of laminated chipboard or MDF and connecting the parts with self-tapping screws
But there are similarities between the two types of sinks. For example, installation of a tap and siphon, as well as connection to water supply and sewerage, is carried out using the same technology.
Sink material
Features of installing an artificial stone sink into a countertop directly depend on the type of material from which it is made.
Factory sinks are made of composite material. Each manufacturer uses its own recipe, which, as a rule, is not disclosed. The approximate composition looks like this: 80% quartz or granite chips, 20% binder resins, a small amount of dyes. Using a vibratory casting installation, a material with the required properties is produced, which is cast into a matrix of the desired configuration.
The best sinks are those that contain granite and quartz chips (sand). There are several main large productions with a similar recipe, but different names:
- silgranite sinks (BLANCO);
- fragranite sinks (FRANKE);
- CRISTALITE+ and CRISTADUR (SCHOCK);
- ceramic sinks (BLANCO and SCHOCK) made of porcelain stoneware;
- quartz sinks from quartz agglomerate manufacturers. They are made from the same material as quartz slabs. During installation they can form a single monolithic structure with the tabletop
Acrylic sinks and sinks made of cast marble stand out.
Acrylic sinks contain a large percentage of acrylic resins and less mineral filler, and therefore have more modest technical characteristics. They require careful operation due to their higher porosity and lower hardness than the above materials. They can irreversibly absorb dyes; over time, visible scratches and stains appear on the surface from contact with hot cookware.
Cast marble is made from marble chips and polyester resins. Loses in technical characteristics to its competitors. One of the advantages is the ability to manufacture a product of any shape. The cost of producing an individual product is not high, since it does not require complex production equipment.
Video description
Watch the video on how to embed a stone sink into a countertop:
We install ceramic products
Ceramic sinks have the following feature: one part of the sink is overhead, the other is cut into the countertop. Such models are fastened using a combined method. To ensure the reliability of the structure, both sealant and mechanical fixing devices are used.
In addition, to secure the sink, load-bearing structures are made from wooden blocks. You can do this yourself. Wood should be treated with antiseptic agents.
Products made of ceramics and natural stone are very heavy, so when installing them, durable countertops and cabinets are required Source www.build2last.ru
Installation of an integrated sink
Installation of a sink made of acrylic stone or quartz agglomerate, made according to individual drawings, is carried out under production conditions.
There are 2 types of integrated sinks:
- bottom mounting, with a slight overhang of the countertop over the sink;
Sinks made to order from countertop material are visually very attractive. There are 2 important points to consider. The corners and edges of sinks cannot be rounded, which complicates maintenance. The design of the sink is not monolithic, like factory sinks, but is glued together from segments, which makes it less durable. This type of washing requires careful operation. Increased load should be avoided. The installation of a waste shredder that creates vibration is highly undesirable.
Conclusions and useful video on the topic
Video instructions for installation on a kitchen sink:
An overhead sink is not the best solution for improving the kitchen. But when a suitable cabinet is idle at the dacha and you need to quickly create comfortable living conditions, it is considered one of the most successful options. It is also attractive that installation work does not require special skills, time and effort - everything can be done with your own hands.
Would you like to supplement the step-by-step instructions outlined above with useful tips or point out nuances that we did not mention? Please write your comments and recommendations under this article.
Or maybe you want to share your personal experience of installing a sink in your dacha? Tell us how difficult this work was for you and how much time it took you to assemble the structure.
Installation of an artificial stone sink into a countertop
Today we will talk about how to install an artificial stone sink. Everything is extremely simple.
- Covering the drain hole with your own hands
- How to lay flexible tiles on the roof?
How to properly lay a vapor barrier on the ceiling?
Approximate marking and installation time: 20 – 30 minutes
Sink gluing time 4-6 hours
Method of attaching an overhead sink
The peculiarity of an overhead sink is that it is not fixed to the countertop, but is placed on a cabinet of the appropriate size. If you pay attention to the inside of the sink, you will see that the structure has the appearance of a rack profile - it is to this that you will have to attach the fasteners.
Fastening elements for overhead sinks
Step-by-step instruction
Step 1. It is necessary to make preliminary markings for fasteners on all four sides.
Marking fasteners
Step 2. From below, the edge of the fastening element is attached to the wall of the cabinet using screws. At this stage it is important to ensure that they do not stick out.
Installation of fasteners
Next, you will need to install fasteners on all sides and make sure they are strong. In addition, you should attach the faucet to the sink.
Step-by-step installation of an artificial stone sink
It is much easier to embed and install a sink made of artificial stone than one made of stainless steel. Or rather, it’s easier to attach it, but the rest is still the same. But the fact of the matter is that attaching a stainless steel sink can sometimes be very difficult.
I already wrote about the step-by-step installation of a stainless steel sink, now about the step-by-step installation of a stone sink.
The first stage of installation is marking, the second is sawing, the third is covering the cut with silicone sealant. I will simply copy all these three stages from the previous post.
STAGE 1. Looking for a location
The first task is to decide where it is best to place the sink. Let me explain - in our example, the sink is round, 51 cm in diameter, and the cabinet itself is 80 cm, therefore, it can be moved to the left or right, or embedded in the center.
When marking the sink, pay special attention to the corner version (90 gr. version) of the kitchen, since the convenience of approaching the sink depends on your choice.
STAGE 2. How much to retreat from the wall?
Having decided on the location, place the sink on the countertop with the bottom facing up. Now you need to decide how much you need to retreat from the wall.
This point is especially important if your sink is 51 cm deep. If such a sink is placed exactly in the middle of the countertop, then there is a high probability that your saw will pass along the front plank of the cabinet (this depends on the design of the cabinet itself).
The easiest way is to place a kitchen plinth against the wall and move 1-2 cm away from it. This place will be the outer edge of the sink. If the sink is shallower, then it makes sense to move the sink further away from the wall.
TIP: If the cut line still goes along the body of the cabinet, then you need to either pull off the bar of the cabinet, or remove the tabletop from the body, cut it out and put it back in place.
Take a pencil and outline the outer contour of the sink.
STEP 3. Draw a cutting line
We have outlined the outer contour of the sink. Now we need to decide on the line of the cut itself.
To do this, you need to measure the distance from the outer edge of the sink to the beginning of the installation edge (sawed groove along the edge, from the bottom of the sink). Usually this size is 1-3 cm, but it may vary for different sinks.
We already have a drawn line of the outer contour of the sink. Now we measure the just measured distance from it into the future sink and draw the internal contour. This is the cutting line. It happens that the installation edge on the sink is not level. Then you can take the smallest edging size.
It's okay if the sink doesn't fit tightly into the hole. After gluing it will stand like a glove.
Stage 4. Ewing
Using a drill, from inside the contour, next to the cut line, we make a through hole. We do it so that the jigsaw blade can pass through.
Use a jigsaw to cut along the contour of the cut. When cutting, do not rush and do not press forward with the jigsaw, but press the jigsaw against the tabletop.
It is better to cut with a “Clean Cut” blade. If the sink is rectangular, then to prevent chipping, you can use masking tape. When choosing a file, consider the cutting height.
Stage 5. Preparing the cut
After cutting, you need to process the edges of the cut.
We level the cut with coarse sandpaper and try on the sink.
If everything is fine, then we clean the saw cut from dust and coat it with silicone sealant. Silicone will subsequently prevent the tabletop from absorbing moisture and swelling.
Stage 6. Glue the sink
This is the easiest installation step. On the very edge of the cut we squeeze out a small path of silicone sealant (for kitchens and bathrooms). Next, we install and center the sink, that is, we place it the way it should be.
Tip: Before gluing in the sink, you need to install the faucet, screw the hoses into it and install the overflow hose on the sink. These elements are very difficult to install on an already glued sink.
Next, we press down the sink with a weight, for example, a bucket of water.
We wipe off the squeezed-out excess silicone from the tabletop with a rag (it can be washed off well with polyethylene film). And wait several hours until the sealant dries completely.
If you have not completely installed the fittings (siphon, drain...) on the sink, then install it on the already glued sink. We check the joints for water leaks and rejoice at the work done.
—>
- Like
- Tweet
- Pin It
My name is Oleg, I created and am leading this project. My work is related to interior design and furniture production. I want to share my experience and cool ideas with you, I can help you with choosing an interior design or furniture.
How to install a countertop sink
The method of installing overhead products has its own peculiarities. The sink is mounted on a separate kitchen module so that its upper part is completely covered. This work is usually not difficult even for beginners. The sink is fixed using L-shaped elements with oblique slots.
Before installing an overhead stainless steel sink on the cabinet, you need to complete the following preparations:
- Purchase at least 4-5 parts for fastening, as well as 15 mm self-tapping screws.
- Connect the mixer in advance.
Instructions for installing an overhead sink:
- Take the prepared fasteners. Attach them to the inner surface of the cabinet. Place marks.
- Focusing on the markings, tighten the screws. They should be located 5 mm above the markings.
Installation on a wooden frame Source remontkit.ru
Treat the end part of the cabinet with sealant. This will make the sink mounting location more reliable and protect it from moisture and dirt.
Place the product on the screws. Before attaching a stainless steel sink to the countertop, you need to check that it fits as tightly as possible to the cabinet.
Fasten the fasteners firmly. If excess sealant appears, clean it from the cabinet. Connect the water supply.
See also: Companies specializing in decorative forms and engineering communications.
The procedure for installing an artificial stone sink into a countertop
In the process of renovating a kitchen, furnishings are chosen not only by visual perception, but also by their functionality, practicality and durability. No kitchen is complete without a sink. But the choice of their models is so large that it is difficult to settle on the right model. If you take durability as a guide, then you should choose a sink made of artificial stone, and not stainless steel or ceramics.
Artificial stone is made using vibration casting, thereby obtaining a durable and homogeneous material. Its composition includes 80% chips from natural granite or marble and 20% adhesive resins, and also adds various dyes for beauty. To close all the pores, the top is covered with a special gelcoat substance.
Sinks made of artificial stone vary in texture: plain, contrasting, coarse-grained and fine-grained. According to texture - matte, glossy, shagreen, silky matte.
Texture affects not only the visual appearance, but also the difficulty of cleaning, the appearance of scratches and other things.
It is sinks made of artificial stone that have a wide variety of shapes to suit every client’s taste. They come in classic shapes, “shell”, “butterfly”, with one or two bowls.
According to the method of installation, sinks made of artificial stone are divided into the following: overhead (they are the simplest, they are placed on a floor cabinet without a countertop), mortise (to match or in contrast with the countertop) and integrated (the most modern, they are mounted flush with the countertop, made from the same material, this composition looks like a single whole).
There are many advantages of artificial stone when choosing a sink material. First of all, it is resistance to temperature changes from -30 to +150 degrees and to the effects of chemical elements - acids, solutions and other reagents. And there’s no need to talk about durability; the stone will withstand a blow from any kitchen item.
The main advantage of such a product is that it is easy and simple to care for, so the appearance will always be perfect.
Caring for such a sink is easy and simple; there will be no bacteria, plaque, odor, or radiation. Even if a scratch or pothole appears somewhere, these defects will be very easy to eliminate. The service life of an artificial stone sink in your kitchen will be more than a dozen years.
In order to install a countertop made of artificial stone and a sink made of the same material with high quality, you need to very carefully monitor the tightness of all joints of these components.
Marking
The sink should be centered in the middle of the depth of the countertop, shifting to the left and right for the most convenient location. The distance from the side of the sink to the edge of the countertop should not be less than 50–70 mm, otherwise the sink should be moved slightly deeper. It is not recommended to make an indentation from the corner plinth less than 30–40 mm, otherwise it will be difficult to wipe the surface in this place. When installing a sink in a corner section, it is useful to leave a space of 100–140 mm from both walls in order to obtain a small space for convenient placement of household chemicals and cleaning accessories.
Some manufacturers provide their products with installation templates, others do not. If there is a template, it must be glued to the front side of the tabletop, lightly moistening the surface with water. This will help you avoid accidental shifting and complete the marking without assistance. The template usually indicates the width of the sink side; otherwise, it needs to be measured and marked for visual control of the rebate.
If there is no template, the sink must be turned over and installed on the countertop, carefully observing the indentations. The sink should be outlined in a circle with a water-soluble marker and removed, and then the contour line should be shifted inward by the width of the side. If the bowl does not follow the external contours, which is the case in sinks with a drying tray, the marking lines must be shifted a certain distance on each side. If two sinks or a waste compartment are combined in one block, a common hole is cut for them.
Preparation
Before starting installation you need to go through the following steps:
The first is to prepare the entire necessary set of tools: electric drill, 10 mm drill, jigsaw, self-tapping screws, tape measure, pencil, ruler, knife, Phillips screwdriver, construction angle, silicone sealant.
The second is to measure the sink as accurately as possible to cut an opening in the countertop.
And that’s it, now you can start installation!
Regardless of the shape, installing an artificial stone sink into a countertop begins with markings:
- Most often, the manufacturer completes the stone sink with a template for cutting out a hole for it. If there is no such template, the sink is placed on the countertop and traced along the contour with a pencil or marker.
- For a mortise sink, which is installed on top of the countertop, it is necessary to apply a second contour along which the cut will be made. The difference between the lines is the width of the sink rim, usually 12 - 15 mm. With the correct shapes of the sink, there are no difficulties in applying the 2nd line, but for curved ones it is better to make a template. A fragment of a thin lath can be used as a material. By methodically applying it to the contour, you will be able to draw its exact repetition.
- First, glue the area where you drank it with molar tape; this simple step minimizes the likelihood of chips appearing on the surface of the tabletop.
- Holes are drilled in the corners of the internal contour for inserting a jigsaw file.
- Use a jigsaw to cut out a hole for the sink. The piece being cut should be supported from below to prevent it from splitting when it is almost sawn off.
- To protect the countertop from swelling in the event of accidental moisture getting under the side of the sink, the edges of the cut are treated with silicone sealant, distributing it over the entire cut area. Aquarium sealants are best suited for this purpose; a thin layer of which will reliably protect the MDF board.
- Attach the brackets to the sink. Each of them has 2 legs in its design, which must be carefully driven with a hammer and a punch into specially designed holes.
- Depending on the manufacturer, the sink may be equipped with holes for the mixer. In this case, it is necessary to apply a chipper or a screwdriver to the place of the drink, and knock out the cork with a light blow of a hammer.
- But not all samples provide such a service, so if it is not there, you need to arm yourself with a Forstner drill or a bimetallic cutter. Using a conventional ceramic drill, a small recess is drilled to support a Forstner drill or crown. In non-impact mode, drills drill a hole of the required diameter, the edges of which are then polished.
- Apply a layer of adhesive sealant around the perimeter of the cutout and install the artificial stone sink, pressing it tightly to the surface.
- I snap the brackets into place at the bottom of the sink and securely fix them with the installed hardware.
- After this, the mixer and sewer siphon are installed.
- Remove excess sealant from the front side of the countertop.
The installation of a sink made of artificial stone into a countertop made of marble and quartz agglomerate is carried out in a similar way.
Step-by-step tapping process
The preparatory work is quite simple, but it takes quite a lot of time. If you properly embed the sink into the kitchen cabinet, then there will be no problems with leaks or swelling of the countertop material.
To get a neat hole you should follow these rules:
- For marking, it is better to use a factory or homemade template.
- You should take a responsible approach to choosing the installation location. It is advisable to decide in advance where the sink will be installed in order to correctly install the pipes. This will also allow you to see which elements need to be trimmed. It should be remembered that the load-bearing elements cannot be touched.
- When using a template, it must be firmly secured to the tabletop so that it does not accidentally move. You will need to cut along the drawn line. When indenting from the contours (if a homemade template is used), the distance to the fasteners must be taken into account. This will allow you to make a hole as close as possible to the parameters of the bowl.
- Some people don't draw the outline when using the bowl template. This is acceptable, but such work is more complex, so it is worth spending more time and drawing an outline on the countertop.
- While making a cut along the cutting line, chips may occur. To avoid this, you can stick masking tape along the contour in advance, which can then be easily removed.
- After cutting is completed, the edges of the hole are processed. For this it is better to use sandpaper.
- At the last stage, it is necessary to treat all edges with silicone sealant. This material will perfectly protect the cut ends from water, which will prevent the tabletop from starting to collapse.
It is advisable to make the minimum distance from the wall to the edge of the sink 10 cm. This will prevent vulnerable areas from being damaged during installation.
The location of the sink in the countertop can be chosen in several ways. But the basic principle that unites them is to respect the geometry of the bowl and hole. It is imperative to take into account the individual characteristics of a particular model.
What to look for when choosing a sink?
In order to choose the optimal washing option, you should pay attention to the following criteria:
- Functionality. The presence of additional design elements allows you to simplify the process of manipulation during cooking.
- Size. Here you need to consider how many dishes will be in the sink every day.
- Combination with the overall design of the room. It is important to choose not only a model that matches the color, but also the texture, then the sink will be in harmony with all the interior items.
In addition, modern models include such additions as drain adjustment and dishwasher outlets.
The size of the sink must correspond to the dimensions of the countertop
Method of attaching an undermount sink
Sinks of this type are installed below the table through a seal. On one side, the fastening element grips the countertop, and on the other, the edge of the sink itself.
The structure is securely fixed thanks to screws that are attached to the inside of the sink. For a table made of wood it should be a screw, for stone it should be a screw and a dowel.
Under-table sink mounting diagram
3 more important tips
Do you want to connect the sink yourself correctly? Don't forget 3 more points:
- It is better to replace rubber seals with silicone sealant. Rubber will not provide a tight fit and does not have a sufficient service life, while the sealant will fill all the gaps and cracks;
- It is better to connect sinks made of natural or artificial stone together to prevent falls and damage;
- Fastening the sink to the countertop or module with self-tapping screws is carried out exclusively by hand. Using a tool may create too much tension, which may damage the structure.
Features of installation of structures of various configurations
Since the shapes of sinks differ from each other, it is necessary to take into account some features when installing them:
- When fixing an oval sink, experts recommend first making several openings along the entire section with an interval of 70-100 millimeters. When the set does not include a template for a cutout, it is recommended to make it yourself.
- In the case of corner structures, there will be an atypical rotary cut angle, therefore, in order to prevent the formation of obstacles, when cutting, indentations should be made along the cut line (at the resulting corner of the lines and 0.3 centimeters from it).
- The main feature of a stone sink is that it does not include holes for the drain and tap, so you will have to make them yourself using an electric drill with a special tip. However, such actions should be performed with extreme caution, because the stone is easily damaged.
Get the job done better with high-quality professional tools