How to make a wooden hanger with your own hands? It's very simple, we'll tell you how. It would seem, what is a hanger in the house? Almost no one notices it, even though it is quite a significant and functional item. You will be surprised how you can improve it, and even do it yourself. There are no special skills required, so anyone can do it.
Materials for work: what kind of wood to make a hanger from
Depending on the type of hanger, we may need different materials for work. There is a general handy list that will be quite useful for any of the jobs in this category. The arsenal of tools looks something like this:
- The material from which the hanger is made.
- Self-tapping screws.
- Screwdriver.
- A grinder saw that can be used to cut the required parts of a hanger.
- Dowels, if the structure is wall-mounted.
- Screwdriver or drill (preferably electric).
- Level, tape measure, pencil.
- Sandpaper for cleaning the surface.
- Hooks.
From copper pipe
This hanger is especially suitable for hat lovers. It is difficult to find a place for them where they can be stored and not wrinkled; it takes up too much space in the closet. This is an excellent option for direct use – for clothing and for decorating a room. Of course, in addition to hats, a clothes hanger will also fit here.
Necessary materials:
- Copper pipe
- Scissors
- Clothespins
- Rope
Step-by-step instruction:
Step 1: Prepare the base
Cut the rope to a size large enough to hang the hanger. Pass the rope through the copper pipe.
Step 2: Attach Hat Hanging Strings
Cut a few more pieces of rope and tie them onto the pipe, leaving enough space between them so that the hats do not interfere with each other later.
Step 3: Hang the hanger
Attach the ends of the rope with the copper pipe to the wall or ceiling (there should be hooks or pipe for this). Attach clothespins to the ropes hanging from the pipe; now you can hang hats on them. You can also hang a clothes hanger on the pipe.
TIP: Choose the length of the pipe depending on the amount of free space on the wall, hats and clothing.
As you can see, it is done very quickly, even in half an hour you can do it, and it looks very original.
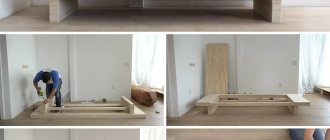
DIY floor wooden hanger
Wooden things have always been of high quality and durable, as well as useful in everyday life. This also applies to hangers, so we will now try to build a wooden floor hanger with our own hands. This work will not take us much time. You will need approximately 20 free minutes, as well as all the necessary materials.
To create a wooden floor hanger we will need:
- Six tribes (copper).
- Four tees (copper).
- Four plugs (must be the same inlet diameter).
- A wooden round stick of the same diameter. The total length should be 5.3 meters, cut into parts: 2 pieces of 125 cm, two more of 70 cm, 4 pieces of 20 cm, and the last 6 of 10 centimeters each.
The process is very simple. Following the drawing plan, we must assemble all the structural elements. To make the task easier, they are marked with letters in the figure.
- "A" - 125cm.
- "B" - 70cm.
- "C" - 20cm.
- "D" - 10 cm.
To further secure our floor hanger, use wood glue. Copper inserts will look interesting; on the one hand, they will attract attention, and on the other, they will be quite durable in use.
Article on the topic: How and what wallpaper to paste in the living room
Features of a floor hanger that you need to consider before purchasing it
When choosing a floor structure, you need to take into account its dimensions. This parameter is influenced by the number and type of things that will be stored on the hanger, as well as the area of the room. A wooden model must be treated with a special impregnation that protects it from moisture. In costume designs, it is important that the crossbars are made of:
- vinyl;
- foam rubber;
- rubber.
These materials will prevent clothes from slipping. Hooks for skirts should also be provided on such a hanger.
The dimensions of the structure must correspond to the parameters of the room
Stability is the second important criterion when choosing a floor model. If the design is unreliable, things will:
- get dirty;
- crumple;
- be damaged.
When choosing a model, you need to inspect its base. The stable design has a weighty disc-shaped base made of metal or stone.
You need to properly distribute the load on the floor hanger, otherwise it will fall to the floor
It is better to choose one-piece models, since the abundance of removable, threaded parts quickly becomes unusable. All parts will become loose and untwisted over time, so you need to regularly inspect the hanger for loose connections. However, solid models are less mobile, because they are more difficult to transport.
If the hanger has hooks with decorative edges, check how well they are attached. They have to:
- be tightly fixed;
- do not fall off at the slightest movement.
You need to check the reliability of these parts directly in the store so as not to encounter a problem at home.
All parts of the hanger must be securely fastened
You also need to take into account that large decorative ends (especially in the shape of a ball) will be impractical. Despite its luxurious appearance, hanging clothes on such a hook is extremely problematic.
Hooks in the middle tier of the hanger would be appropriate for a family with children. This way, the child can easily hang his clothes, since he does not have to reach to the very top. In addition, it is easy to hang any accessories on such parts, for example, scarves, handbags.
If the room where you need to place the hanger has uneven floors, it is better to use a structure with a support in the form of a tripod. The four legs will sway regularly, which puts her at risk of frequent falls.
A tripod support is considered the most relevant option for rooms with uneven floors
It is also important to consider that the surface of the hanger is treated with a moisture protection agent. Often the wood comes into contact with wet clothing, which can lead to the formation of rot.
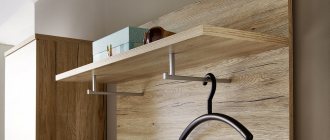
DIY wooden wall hanger
An integral part of any corridor, as well as an item that is simply necessary in every apartment.
You can build a wall hanger yourself using all the necessary tools. The material options can be different, the best of course is wood. For the “cheaper” option, you can use chipboard.
The tools that we will definitely need are:
- Screwdriver or screwdriver.
- Drill.
- The set was drilled.
- Roulette with a pencil.
- Hooks.
It is very simple to do - just measure the required distance and drill hooks to the board, and then hang the finished hanger on the wall. But there are more interesting options for such crafts.
The lineup
Thanks to the variety of models of floor hangers, everyone can choose the most suitable option for themselves. Such furniture can be installed in any room.
Table 2. Popular models from manufacturers
| Model | Description |
| In the form of a chair | Equipped with a back, bar and shelf. You can not only store things on it, but also sit while putting on shoes. |
| Tripod | A tall, stable structure with a flat base (sometimes with a tripod). Equipped with hooks for storing various things. |
| Basket | The base has the shape of a basket, which is ideal for storing:
|
| Rack | It is a U-shaped model, which is equipped with hooks and a bar. Sometimes it is supplemented with various shelves for storing accessories. Ideal for a dressing room. |
| On wheels | This is the most mobile hanger. An ideal model for a large wardrobe. |
| Costume | This design is intended for storing trouser suits. It is equipped with hangers for jackets. Can be used not only for men's, but also for women's clothing. |
| With hangers | The simplest and most affordable option. |
| With a mirror | Allows you not only to evaluate your appearance before leaving, but also to significantly increase the space of the room by improving lighting. |
Example of a custom hanger in the shape of a tree
The hanger with the cabinet fits perfectly into the hallway. It doesn’t eat up extra meters, zones well and makes it possible to store outerwear without staining the walls. The design has a wide variety of shapes. If you have the necessary materials and tools, you can make it yourself. We will tell you how to do this in a special article.
Hammer wall hanger
In this craft, we will need everything the same as in the previous version, only instead of hooks we will use old hammers, from which we will need to cut off the handle, leaving a short end, which we will attach to the board.
Progress:
- We are preparing a board that will serve as a wall hanger. Depending on its condition, we bring it into ideal shape. If necessary, we sand and varnish.
- Then we lay out the hooks and mark with a pencil on the board exactly where they will be attached. They don't have to be in a row. You can arrange them in a zigzag or checkerboard pattern.
- After this, we need to mark with a pencil the points where there will be places for self-tapping screws.
Therefore, we put the hooks on the side and directly drill the required holes. It is important to note that the drill should be approximately 1-2 millimeters smaller than the diameter of the self-tapping screw. Of course, you don’t have to make preliminary holes, but this threatens us with cracking the surface when screwing in, and then the work would take much longer and more difficult - We attach our hammer hooks in place.
- Additionally, there is an option to make a shelf so that you can place a scarf, hat, and other small things there. This is done as follows:
- Measure the same distance on both sides, attach the bracket and mark the required holes for fastening.
- Drill and install the bracket.
- The final part will be attaching the structure to the wall. Here the technique will be similar - mark the place and drill a hole. The drill must be the same size as the dowel.
The approximate time it takes to actually make a wall hanger is about 2-3 hours (this includes the shelf).
The process of making a hanger
A classic hanger made by yourself for the hallway does not require significant effort. Manufacturing takes minimal time. Initially, you need to think through the design in detail; it is recommended to make a drawing on graph paper and calculate the consumption of materials.
You need to transfer the drawing using a pencil or marker.
Then you should take out a wooden sheet (or board) and place it on stable supports so that there are a few centimeters between it and the surface of the floor or table. Armed with a jigsaw, cut out the blanks of the required shape, following the contour. If you want to make the edges embossed, you need to go over them with the same tool.
It is necessary to handle roughness, sand the cut areas and sand them.
The next step is to achieve the desired appearance. To burn boards, you will need a blowtorch, which can be successfully replaced with a gas burner. At this stage, you need to be careful not to injure your fingers or spoil the material. Then you need to get paint or varnish and cover all the sawn parts.
After drying, the product is assembled using screws.
The hinged method involves mounting small round metal strips called “ears”. Holes are drilled in them for fastening into dowels with screws. Moreover, reliability is determined by their length.
A DIY wall hanger can be attached in several ways.
Another, no less popular method is making through holes. After they are created and processed, screws or nails with a long stem are passed through and the hanger is attached to the wall.
For fastening, as a rule, screws or small nails are used.
To complete the work you need to attach metal hangers. They can be arranged randomly, in one or several rows.
Fixation is possible with the following devices:
- "Suckers";
- Adhesive strip;
- Magnets.
Such methods do not cause difficulties and take little time. In this case, the fastening is not very reliable and is only suitable for hats.
Any bold design options will favorably emphasize the relevance and originality of the interior.
Extraordinary ideas for a wooden hanger
Floor and wall hangers are considered classics, but when you want something unusual or creative, you can consider the following design options.
- A collection of things that is similar to an exhibition from the world famous TV series with Carrie Bradshaw. The idea is that when you get into the corridor, you don’t spend a long time rummaging about which hat or scarf to wear today, but simply choose from the things hanging out.
In order to turn your idea into reality, you will need a free wall in the corridor and ordinary hooks. This will become not only a kind of interior design for the corridor, but also an extraordinary approach to solving the issue of hangers.
- With the help of different types of hooks, you can emphasize a particular interior style, be it classic or modern.
- Believe it or not, the most seemingly inappropriate items can be hangers. A very unusual approach would be to use old pitchforks or rakes in this matter, playing with them to suit the desired theme. You just need to cover the sharp ends with it first, so that neither you nor your guests get hurt.
- Fans of hiking and traveling can use old skis or oars as hangers.
- Old chess pieces will serve as an original substitute for ordinary hooks.
- In a vintage style, you can use old doors to create a coat rack, perhaps even with nails instead of hooks.
Of course, you will first need to treat the surface, but imagine the idea itself already in execution. Quite shocking, especially if you work on the small details. In this idea, you can also use an old fence instead of doors. - The motif of a tree on which hooks for things are located has become popular today. It can be cut out of a piece of wood, or simply painted on the wall, placing hooks on the branches.
Where to start looking for the “ideal” hanger for the hallway?
There are several factors that you should rely on first.
- Size of the room (it should complement, but not overwhelm the room).
- Room design. If the hallway is designed in a minimalist style, and you like a bright hanger with remarkable patterns, you should think about this option several times before making a decision.
- Having children. This factor is relevant when choosing any furniture. If the hanger is of original shape with sharp corners and can fall at the slightest push, you should abandon this idea. After all, children are very curious and want to touch everything in the house.
Choosing a wooden hanger will require the designer to have a good sense of style and experience.
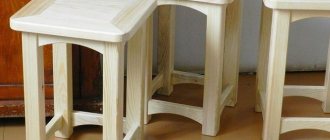
Master class “Hanger made of real wood”
The word “wood” does not mean just wooden material (board), but pieces of real natural wood. Oak chocks are best suited for this work, perhaps even with knots, which will serve perfectly instead of banal hooks.
Progress:
- The first step is to get the decks and cut them in half to the required sizes. It is best to do this outside the apartment, because sweeping out all the garbage will be quite difficult.
- To find out the optimal sizes of the required logs, make blanks approximately 15*15 centimeters, the diameter of the branches no more than 3-4 cm.
- One side of the chip will need to be leveled with an electric plane.
- The next stage of the process will be preparing the surface for use. It would be a good idea to treat the tree with special agents against fungi and insects. It is best to coat the top with a clear varnish to preserve the natural color. Of course, you can also apply paint, which will look much more interesting.
- Self-tapping screws will help you mount our hanger to the wall. First you need to drill a chamfer, then prepare a hole. The diameter should match the screw. This precaution will help prevent damage to our product.
The hanger will undoubtedly attract attention and also brighten up the boring atmosphere of the room. Most often, this option is placed in a country house or in a country house, less often in apartments or mansions.
Unusual hook hanger for scarves
Master class by Vera Voloshina, hobbyndom.ru
The design of this scarf hanger is extremely simple - a wire bent in the shape of an S sign, studded with beautiful beads.
To work you will need:
— Wire with a cross-section of one and a half millimeters, 1 m long.
— Plastic beads – 36 pcs. Two of them should have a larger diameter than all the others.
— Nail polish of the same shade as the beads.
— Aerosol paint for metal, neutral color.
— Metal scissors.
- Nail scissors.
Work plan
:
1. Clean the wire from rust, dirt, moisture, grease if it is old. Wipe the wire dry. Pre-protect the space from spray paint. Apply paint. Let the paint dry - this will take approximately 15 minutes.
2. Bend the wire in half to give the hanger additional rigidity. Thread the first bead so that a small wire loop remains.
3. String the remaining beads
4. If some beads are difficult to pass through, their hole can be made larger using nail scissors: a few rotational movements will remove excess plastic. Just be careful - the bead may burst.
5. When stringing beads onto the wire, do not forget to give our hanger a shape. The upper semicircle should be smaller than the lower one.
6. When all the beads are strung, one end of the wire must be cut so that it remains inside the bead. Cut the other end of the wire so that approximately 1.5 cm of wire remains.
7. From the remaining wire we form a loop, like the one at the other end of the hanger. We carefully hide the end of the loop into a bead.
8. We finally form the hanger for scarves.
9. The final touch: carefully paint the eyelets with nail polish 
Photo of wooden hangers in the interior
As you can see, you can make a wooden wall or floor hanger - for clothes or jewelry, for children and adults, for a dressing room or for a hallway. This could be either a classic or some unusual hanger made of wood - from skis, hammers, old things, a fence or doors, from pallets and so on. The main thing is to use your imagination, and for inspiration I suggest looking at photos of various wooden hangers that you can make with your own hands.
We can conclude that there are quite a lot of options for hangers, as well as ideas for their implementation, and each of them is unique in its own way. Therefore, choose which of the ideas will best suit your home and start making your own masterpiece. Drawings and available materials will help you with this. The main thing is to have an original idea and the mood to implement it.
Related article: Do-it-yourself airplane chandelier for a children's room
Interesting ideas and photos
Tree hangers
This can be a neatly sanded tree trunk or branch, or a folded wooden structure. The main thing is that there is one support and branches from it - the handles of the hanger. An original and useful addition to the hallway.
Designer hangers
The number of elements and design may vary, but what all these floor hangers have in common is that they can be quickly folded and disassembled just as quickly (if you didn’t use glue). Sometimes more expensive and noble materials are used, such as copper, sometimes wood or PVC, in any case the result is beautiful and extraordinary.
From leather belts
A belt can serve not only as a stylish accessory, but also as an interior item. To make a hanger from an old leather belt, you need to cut off its fasteners, giving the ends an oval shape. Then combine the 2 ends of the belt and use an awl to make a hole at a distance of approximately 3-5 cm from the edge. Make a wooden peg with a diameter less than the width of the belt. Fold the belt in half to form a loop and secure it to the wall with a self-tapping screw or a regular nail. Using reliable glue, glue the peg to the base of the loop (where the nail is located).
You can also make 2 such loops at a symmetrical distance from each other and thread the crossbar through the loops. Clothes can be hung either on the loops themselves or on pegs or a crossbar. This hanger looks very stylish and can be improved in many ways by adding bright appliqués, decorations, additional elements, etc.
Hanger made of leather belts.
Purpose and types of hangers
The main task of a hanger is to place and store clothes, hats, as well as some other things - umbrellas, for example.
Hangers can be different: from nails driven into the wall or hooks purchased in a store, to decorative displays that can decorate not only a home interior, but also a museum hall.
In addition to the hallway, hangers may be needed in any room of the house - from the bathroom and loggia, to the bedroom or office.
The hangers themselves come in several types. An approximate classification will be useful when choosing the product that is most suitable for you.
Wall mounted
Products are:
- horizontal or vertical location;
- corner or front;
- equipped with a mirror, a shelf for hats and a hanger bar.
Ideal for small hallways.
Floor-standing
Can be:
- stationary or mobile;
- open or closed - the most important thing is that the structure is stable.
Most often found in the corridors of institutions and offices. In everyday life, it can be placed in the bedroom and in the hallway.
Hanging
The option is rare and non-standard. It looks like a pipe fixed to the ceiling or between the walls. The thing is very simple to make, and ideal for hallways with a wall.
From branches and cuts
Branches and cuttings are excellent material for wall hangers. First of all, it’s very affordable! And secondly, wood will never go out of style and will perfectly complement the style of any apartment!
You can make a lot of crafts for the home from branches - about this in the article “40 ideas for crafts for the house from branches.”
How to make such a hanger from branches in 30 minutes - in this Master Class!
Decoration
Unusual design solutions can transform any, even unsightly, hallway. To maintain a classic style, the hanger can be covered with leather (leather substitute) or preserve the natural beauty of wood, if that is what was used. Paint the hooks with bronze or gold paint. Upholster the hangers with velvet and satin fabric. For country music, use additional accessories in the form of horns; they can be cut from wood. For a retro style, the color can be artificially aged; the decoupage technique is used for Provence. Glue or draw flowers, images of birds, landscapes as prints. In a modern interior, experiments, unusual shapes, original accessories, silhouettes, and complex intricate patterns are acceptable. You can decorate and add originality with rhinestones, sequins, handmade decor, drawings, bows. Apply images of your favorite cartoon characters, TV series, books.