With a huge number of options for personal creativity, developmental complexes for children (which are also suitable for adults), ideas and materials, paper applique remains relevant, although it is developing along with the direction of paper fine art.
Abstract paper panel
Paper butterfly panel
White paper panel
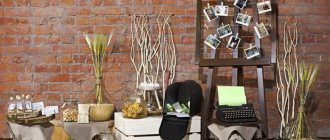
We use available means given by nature
Eco-friendly material is very popular and is used in the implementation of various design ideas:
- wood cutting;
- landscapes with branches and dried leaves;
- photo frames.
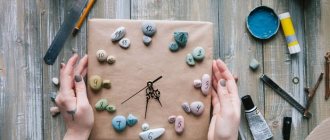
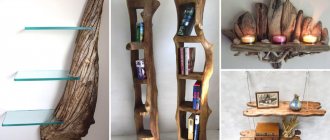
Abstractions made of bars and inlaid with stones look beautiful and original. Wood products will look elegant in any setting. To preserve wooden structures, they are treated with special means and varnished.
Select flexible branches so that they take a position in the composition and do not break. They are secured with staples and self-tapping screws (the caps are rubbed down). Thin ones are tied together with wire. For the background choose cardboard, fiberboard, burlap. Suitable for interiors in the bedroom, hallway, living room. You can always diversify and add new elements. They go well with dried leaves and flowers.
- Wall mirrors in the bedroom: rules for ideal placement according to Feng Shui
- How to make a shelf with your own hands - diagrams, drawings, design and features of use in the interior (105 photos)
- Roller blinds for plastic windows: examples of ideal design and combination
Birds using quilling technique
You can make almost any bird and place it on a cardboard or wood base. The technique is based on rolling rolls. Step by step process:
- Take quilling paper or a strip of colored paper 0.2 cm wide to the required length.
- Clamp one edge into a special awl or a split toothpick.
- Holding the other end of the strip with your hand, roll it into a tight roll.
- Glue is applied to the end of the strip and secured to the roll.
- The finished part is removed from the toothpick.
The roll is shaped in accordance with the intended design. The bird's feather is made from rolled paper, flattened at one end. The result is an elongated element in the form of a feather. Rolls can be made flat on both sides.
In contour quilling, you can do without complex twisted elements, but the picture will still look great.
Handmade weaving
For ancient weaving you will need threads and cords. For beginners, cotton, linen or wool are suitable. When choosing, you should focus on the twist, so the pattern will be more clearly visible. A panel knitted with knotted weaving can be made in a square, circle, rectangle, large or small. The palette of shades depends only on desire. Macrame can be immediately woven from colored ones, or from white ones, then painted. Add decor.
Complex and painstaking work that requires patience and attention. You will need: scrap, glue, fishing line, beads in a palette and sizes. There are three ways to create a bead masterpiece:
- glue them to the base;
- embroider on fabric;
- classic - weave according to the pattern.
First, the decoration itself is made using the chosen method. In the latter, it is secured with wire or glue. The finished product is fixed in a frame and hung.
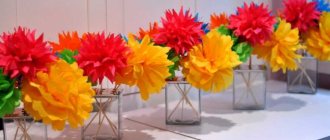
Flowers - lightness and beauty made from paper
A floral theme will add romance to any interior. You can use different types of paper to make it. Crepe or corrugated paper is decorative in itself; it produces expressive three-dimensional flowers. The petals are cut out randomly or according to a template, and connected to each other using PVA glue. The middle is formed from strips. It is easy to assemble a panel from several created elements. The basis for it can be a sheet of cardboard. The finished product must be inserted into the frame.
You can make a panel of paper flowers on the wall with your own hands using the 3D applique technique. The easiest way is to choose a poster with a picture of buds. Then the craft will be done on a ready-made background.
If there is no poster, it’s easy to design the picture yourself. To do this, you need to take a sheet of Whatman paper, paints, a brush, white and yellow paper. The background is painted blue in the upper part; clouds can be depicted. The bottom needs a green tint. This is how you get grass and sky. On white paper, using a stencil or by hand, draw daisy petals and cut them out. The yellow sheet is needed for the centers.
The details are fixed against the background, forming daisies. Glue the middle. Place the composition in a suitable wooden frame.
Butterflies are added for beauty; they can be bought ready-made.
Laconic voluminous flowers are easy to create from craft paper. They will make a monochrome version of the picture. You can attach it directly to the wall or place it on a base made of plywood or other solid material.
By sewing
Technique for sewing images from scraps. Contours are drawn on cardboard, the pieces are laid out on top and sewn together by hand or on a sewing machine. For fabric or hard canvas, patterns are used. Not only fabric is used for the work, but also paints and brushes.
Needlewomen sew New Year's toys from it, for children, and make canvases. You can buy it at any store. Patterns, scissors, thread and needle will come in handy. This craft will decorate a room and is perfect as a souvenir.
DIY arch - step-by-step instructions on how to make a stylish and beautiful arch (115 photos)- Bottle decor: master class on making a stylish and original decorative element (85 photos)
- Cake decor - master class on original design and decoration methods (75 photos and videos)
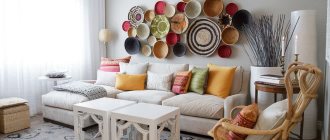
They use it under the base, tighten the frames, and sew brownies. Herbariums, flour collections, things with the addition of buttons, stones, beads, ropes look very good against its background. Burlap paintings are placed in bright colorful frames for greater impact.
Master class on making
Guests from the shores will fit perfectly into a nautical-style room. Before starting to make a masterpiece, the shells are washed, cleaned and sorted by color and size. To work you should prepare:
- sorted shells;
- stain;
- watercolor;
- flap;
- glue.
The main contestants are coated with clear nail polish to make them last longer. Prepare a piece of plywood. It is covered with mesh, burlap or sprinkled with sand. Shells are piled randomly on top. If a needlewoman has planned a whole sea adventure, she first draws it and then lays it out according to the markings applied.
The easiest way to brighten up a boring design is to make paper crafts. It can be:
- photos;
- wallpaper paintings;
- figures made of colored parchment.
They do not require special skills, abilities or costs
Paper butterflies - traditional romance
A picture of butterflies can be made using the quilling technique or cut out of crepe paper. In any case, the result will be a spectacular craft.
To make panels using the kirigami technique, you will need any thick paper - white or colored. First, they think over the design and decide on the size of the painting. Then cut out the required number of butterflies using a stencil. Volumetric elements are mounted on a base or simply on a wall. Only the body of the insect is glued; the wings should be positioned freely.
Monochrome decor looks beautiful. It creates an atmosphere of tenderness and gives airiness to the space.
A paper tree is a symbol of life
Paper decor for a partition in the shape of a tree can be easily made using the contour quilling technique. The peculiarity is that the outline of the picture is first indicated, then the internal space is filled.
To create an image you will need the following tools and materials:
- PVA glue;
- special paper for quilling in several colors: pink, purple, brown, green;
- an awl or a regular toothpick. On one side, a slot is made for clamping a paper strip;
- scissors and tweezers.
The work is performed in the following order:
- On a cardboard or wooden base, mark the outline of the future tree with a pencil.
- The elements of the trunk and branches are laid out along the contour, gluing them to the base.
- Improvised roses are made from the strips; a ribbon of paper is wound onto a special awl or toothpick. The colors used are purple and pink.
- Fill the inner space of the tree with twisted roses.
The result is a stylish paper panel.
Decoupage
A panel made using the decoupage technique can decorate any wall: be it a kitchen or a corridor. This technique consists of gluing cut-out pictures and decorative elements onto the selected surface, and then covering it all with several layers of varnish. The general idea of the work can be anything.
Geometry - paper rigor
An unusual panel of geometric elements is made using the origami technique. Figures are made from strips of paper according to a diagram that can be found on the Internet.
A composition is assembled from the resulting pyramids, arranged by color or in a chaotic order. This type of assembly is also called modular origami, since the design is created from individual modules.
Geometric patterns look good on a plain wall. Elements can be cut out of colored paper, but it is much more interesting to paint it yourself. For such a panel you will need acrylic paint. Chaotic colored stripes are drawn on a sheet of whatman paper as your imagination dictates. The finished canvas is cut into identical triangles. If you want, you can draw squares and rectangles instead.
Glue the figures onto a prepared base made of white painted plywood. The drawing should look like a mosaic. The finished panel is mounted on the wall.
On wallpaper with a pattern, a geometric panel made of monochromatic elements will look better. The main thing is that it stands out on the wall.
We are preparing for the new year
Creating New Year's decor requires creativity. To make it, you take pasta, pine cones, cotton pads and other household items.
The noodles easily stack with each other and take the required format, like Tetris figures. You can simply paint them the color you want. The round ones are used to make snowflakes, and the long ones are used for the Snow Maiden’s hair.
If the cones are washed white, they will be much more interesting in the overall landscape. They make complex, voluminous works.
Snowdrifts are made from cotton wool. All these items are attached with glue.
The simplest ones are made from disposable tableware. For this:
- take a circle (cut it out of thick parchment or use a thick disposable plate);
- Disposable forks or spoons are laid out around the entire circumference with the handle towards the center and glued with hot glue;
- the resulting structure is decorated with tinsel.
This decoration can be hung or presented as a souvenir or craft to a kindergarten.
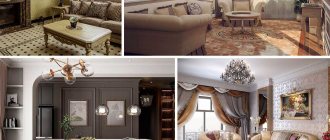
Wall canvases are a simple design solution for updating a room, making changes to the familiar environment.
Expert advice:
- a large panel is placed in a hall where there is a lot of space;
- For safety, things are covered with paint and varnish;
- the paint base for the painting should be identical to that with which the walls are covered;
- in the absence of artistic skills, stencils and aerosol dyes come to the rescue.
Involve children in the process. They will enthusiastically collect twigs, leaves, flowers and come up with new ideas, among which they can find excellent solutions for creating an unusual image.
Original collage on the wall
Creating a collage is a fun activity for the whole family. It is necessary to think in advance how it will be designed and where it will be placed. Select suitable frames and print out pictures. The drawing of a branched tree with leaves and photo frames on the branches will be original. They dilute the photographs with views of nature, mountains, and unusual images.
Using a Scarf
A shawl or scarf with a beautiful ornament will serve as an excellent decoration. Based on the general style of the room, a pattern is selected. It can be a monochrome color or a bright print. Textiles can be nailed to a wooden plank, or fixed directly to the wall.
Essential elements
Now let's look at what parts quilling creations consist of. Any work begins with a tight spiral. This is the first element in quilling when preparing a product.
Above, when we made the roll, we essentially used this element. But then we did not yet know its true name. Now we know this.
Let's repeat the process of creating a tight spiral once again. A rod is taken and a strip of narrow paper is wound onto it. And the tip of the latter is carefully glued to the spiral.
beautiful heart
FYI
- If you are right-handed, you should hold the strip with your left hand and the rod with your right.
- If the strip is double-sided, then the back of it should face the direction of the rod.
- The rod must be rotated clockwise.
The next element is the “free spiral”. It is manufactured in the same way as a “tight spiral”. But after we have finished winding it, we need to remove the spiral from the rod and let it unwind a little.
Now we have learned how to create various kinds of spirals. The same technology is used to create the “curl” figure. But at the end of the work, the tip of the paper tape does not stick and hangs freely in the air.
Any name can be done in this technique
In order to make a drop, you need to squeeze one part of the “free spiral” shape with your fingers and hold for a few seconds. This is done so that the figure takes the shape of a drop. You can also bend the tip of the “drop” shape, getting a slightly different “curved drop” element.
Tip: If you are just starting to learn quilling, never rush!
Well, we looked at simple quilling forms. Now it's time to move on to more complex ones. Such shapes are obtained from two or more folded together.
DIY decorative pillows - The highlight of your interior. Master classes, diagrams, patterns (145+ Photos)
Determining the scope of work
The first stage in creating a wall panel is to decide on the design of the future product. If you already know where it will be located, then this complicates the task. You need to weigh the color scheme, dimensions, what it will have, whether the material from which it is planned to be made fits into the overall picture of the interior.
So, we decide: size, color scheme and what materials will be used. This is the first step. If this is possible, then it is worth drawing a sketch of the planned product. This will help take into account all the nuances in completing the task.
If a piece of cardboard, canvas or any other hard surface is taken as a basis, then markings are made on it: where and how the decorative elements will be located. If the base is fabric, then it is stretched onto the base (for example, onto a piece of plywood, board or plastic), and the rest of the fabric is secured on the back side. After the craft is completed, it is placed in a frame and hung on the wall.
There is another option for making panels on a fabric basis. You will need to take a solid base, for example, a plasterboard sheet of the required size and glue foam rubber to it. The fabric is stretched onto the resulting soft base. In this case, you can do without a frame.
After all the preparations, you can begin the main part of production: decorating.
How to place it correctly
To place it correctly, you should consider some points:
- integrity and volume - do not cut off or hide part of the work, then the meaning will be lost and it will look ugly;
- purpose of the premises - for what purposes it is intended;
- harmony in combination with decoration - selection of things and palette.
The kitchen will be decorated with thematic items: fruits, vegetables, still lifes, grain products, cereals, spices, including cutlery and dishes.
The bedroom creates an atmosphere of lightness, peace, and tranquility. Here people relax not only with their bodies, but also with their souls. Heavy objects will be out of place.
Light bright colors, the child’s favorite characters, animals, collages of children’s photographs and other interesting objects are chosen for the child’s room.
In the hall, the design is complemented with wood products, macrame or abstractions.
Stages of creation
A wooden board is wrapped in parchment paper. The sheet depicts the future ornament or inscription.
A mixture of 250 ml is prepared in a bowl. glue, 150 gr. water and 3 tbsp. with a heap of starch. All ingredients are mixed well until smooth. For convenience, gloves are put on, and the rope is thoroughly impregnated with the finished composition.
An inscription or pattern is formed on a wooden surface covered with film. The rope should be pressed down slightly with a weight so that it does not move. It is important to wait until the product is completely dry.
The dried rope should hold its shape well; it is carefully removed from the plywood.
The board is painted in the chosen shade using paints and brushes.
When the paint has dried, a rope pattern is nailed to the finished base using nails.
The theme for a children's room can be anything, including a New Year's theme.
Experienced craftswomen create paintings that combine several techniques. The combination of quilling and kanzashi looks amazing. The latter was originally conceived as making flowers from fabric and ribbons. But you can do something similar from paper. The main thing is that it must be dense to form volume. The panel, decorated in soothing colors, looks very advantageous. Suitable for a classic interior.
The variation of tropical leaves in 3D looks bold and beautiful. To make it, take two sheets of paper: green and black. The design is transferred to dark and carefully cut along the edges. The two sheets are folded and fastened with glue, with the exception of the cut out fragments. The slits are folded back so that the green color underneath is visible. To enhance the effect, you can apply glow-in-the-dark paint along the edges of the cuts. In the evening the panel will look very unusual. For weighting and fastening you will need a contour of wooden slats.
Paper has many uses in home interior decoration. With its help you can create a design on any theme.
Designer paper panels: options for inspiration
A three-dimensional panel made of colored paper looks beautiful in a nursery. To make it, you can connect a child, together choose a design, cut out elements and design a round or square composition.
Decorative fans: elegance and simplicity of execution
You can learn how to make a fan with your children. The process is simple and consists of the following steps:
- Take a sheet of thick paper and shape it into a rectangle. The longer the workpiece, the wider and more beautiful the fan will be.
- Roll the sheet into an accordion.
- Smooth out the folds well so that they are even.
- Unfold the resulting workpiece and give it a fan shape.
- The base of the fan is secured with tape and pasted over with contrasting paper or wrapped in fabric to give it an aesthetic appearance.
- Finished products are placed on the wall in the form of classic fans or circles made from them. The middle is cut out of cardboard.
Such compositions can serve as decoration for a living room or bedroom.