Vadim
2003 0 0
Vadim April 27, 2018
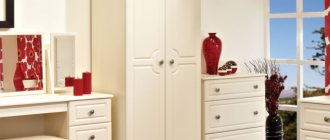
A tall and at the same time narrow wardrobe is found both in spacious houses and in small apartments. The variety of models is impressive, and further we will analyze in detail what types of pencil cases there are, what sizes and how such cabinets are stylized. And home craftsmen will receive step-by-step instructions for DIY assembly.
With a reasonable approach, a single-door cabinet shelving unit can easily adapt to the style of any room.
Making a pencil case with your own hands
If the kitchen is of modest size, it is best to install furniture that is not bulky but also functional.
Nowadays, furniture is often made independently, this allows you to avoid unnecessary costs and make elements of the desired size. What you need for a homemade cabinet:
- It is necessary to prepare materials. You can assemble a cabinet with several shelves that can be adjusted, while one can be fixed. Shelves must rest on specially made holders, which are made of metal. You can also make them yourself or buy them at a hardware store.
- You need to decide on the height - will it be up to the ceiling, or do you need a lower size? However, its height should not be allowed to differ from the top points of other furniture. Otherwise, it will immediately catch your eye.
- The materials you will need are side walls, a bottom, a lid, a shelf that will be fixed, as well as canvas for other shelves. You will also need a piece of plywood for the back wall, wooden strips for fasteners and a door.
- You should purchase accessories in advance, namely nails, screws, metal holders, shelf supports, door handles, door hinges.
It is necessary to remember about drawings and diagrams, which must also be developed in advance. They must be strictly adhered to, and the cabinet must be assembled extremely carefully.
Careful attention must also be paid to the processing and cutting of parts; everything must be done with high quality
Let's start production
To begin with, the parts you cut yourself for the pencil case need to be processed:
- Inspect them for chips and splinters.
- Sand any questionable areas.
- If necessary, stain it (although this is not required when working with laminated chipboard).
Assembling the frame
There are not many parts in a homemade pencil case. You need to start with the body, but where exactly? Oddly enough, from the markings of the side panels:
- Mark the locations for the hinges.
- Using a hand router, make grooves to fit the hinges.
- Attach the roof and bottom - this is done with wood glue and finishing nails (available at a furniture store). If a fixed shelf is provided, add that too.
Important! Don't forget to check the corners - a metal carpenter's square is used for this.
Nailing the back wall
After the frame is assembled, the time comes to attach the back panel of the bathroom cabinet - made of plywood, chipboard, and sometimes even fiberboard (although this option is not very good for a kitchen or bathroom). To work you need:
- PVA or wood glue;
- galvanized nails;
- ruler;
- pencil.
Important! In order for the back wall of the pencil case to hold better with your own hands, it must be placed on glue. Then you need to secure it with nails, having previously marked the places where you will drive them (if this is not the first time you are taking on cabinet furniture, you don’t have to do this). The nails are driven in approximately 7-10 mm from the edge (so that they hit the end of the sidewall), at a distance of approximately 5 cm from each other.
Putting up a closet
The main element of the pencil case is ready. The following work can be done while the cabinet is in place. But before you put it in a vertical position, decide on what your product will stand on:
- on legs;
- on special panels.
The legs for the pencil case cabinet with your own hands need to be screwed on and adjusted in height so that the structure does not wobble:
- Raise the cabinet
- Place it in the desired corner.
- Check stability.
- Check the angles between elements.
- Mark the locations of the shelves.
Important! When marking the shelves of the bathroom cabinet, distortions must not be allowed - all distances must be carefully checked.
We install the fastenings
For shelf brackets, prepare a holder - a metal profile. You need to start sawing from the top end. After all the elements are ready, they are inserted into the grooves that you have already cut out on the sides. The holders are secured with nails. Then supports for the shelves are installed to make the design of the homemade pencil case more reliable and convenient.
Face frame and shelves
After the elements of the holder and support have taken their place, you can begin making the front frame of the bathroom pencil case with your own hands:
- Cut out the frame posts according to your drawing.
- Attach them to the body using finishing nails (optional with glue).
- Cut the crossbars - their length is equal to the distance between the posts.
- Nail them flush against the posts.
- Secure the structure with finishing nails.
Important! The shelves should be shorter in length than the opening, by about 3 mm; do not forget to take into account the thickness of the edge tape.
Finishing
The last element in creating a pencil case with your own hands is the doors and fittings. But before you install them, you need to put in order what is already ready. Sand all surfaces with sandpaper:
- Cut out solid panels for the doors - they should be 1 cm longer than the opening on each side.
- Mark the locations for the hinges on the doors and sides.
- Check all angles and distances.
- Secure the hinges with self-tapping screws, first on the doors, then on the racks.
What to finish with?
In any hardware store you will find several types of self-adhesive film. Choose one that matches the rest of the furniture to give your new DIY wardrobe a makeover. This is the easiest and most reliable way to finish your product:
- After all surfaces are covered, screw on the handles.
- Check how smoothly the doors open and close.
- Check for sagging and distortions, as well as the reliability of the fasteners.
Important! If the cabinet is tall, it is better to attach it to the wall, and make one of the shelves supporting the ceiling structure.
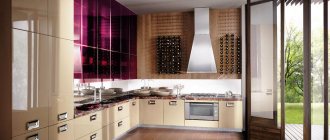
What is a kitchen floor-standing pencil case made of?
The materials for making a floor cabinet can be very different, their choice depends on the financial capabilities of the customer, the overall interior of the apartment and the purpose of the pencil case
When choosing materials, special attention should be paid to pencil cases for the kitchen and bathroom, these places have high humidity and the temperature often changes in them
Basic materials:
- Wood - this material is distinguished by its high cost, but despite this, a wooden set is very popular. One of the disadvantages is the impossibility of using it in places with high humidity, since the wood may lose its appearance and properties.
- MDF is a material that costs much less than natural wood, has an impressive appearance, but also needs proper care.
- Chipboard is the cheapest option, but is sensitive to water and does not tolerate moisture.
- Plastic - this material is not the most environmentally friendly, but it is not afraid of water and wear-resistant, is inexpensive and is the best option for decorating bathrooms and kitchens.
- Metal - furniture made from this material is very durable, but does not fit into many interior styles. Metal is often used for the frame.
For final finishing, surfaces can be painted and polished; glass doors are used as decoration, which makes the product light and also simplifies the process of finding dishes in the cabinet. Such cabinets - speakers in the kitchen are very convenient, many items fit into them, and you can put built-in appliances there. Even if the size of the kitchen is small, they will not be bulky.
You can make a furniture set yourself by drawing up drawings and diagrams.
When choosing furniture, you need to carefully monitor the quality of the goods offered and make purchases only in well-known stores.
Design features
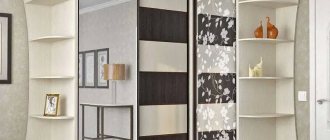
Column cabinets or pencil cases in the kitchen are available in several designs.
Each of them can fit favorably into the interior of a kitchen in a classic, high-tech, Scandinavian style and even a loft. Surprisingly, modern pencil cases fit equally well with kitchen furniture made from solid wood and from more affordable and bright materials, such as chipboard, glass, plastic, and chrome surfaces.
According to their design features, pencil cases can be divided into the following categories:
Now choose for yourself. You can take a pencil case with two closed shelves or a pull-out system, and several open shelves.
Much depends on the purposes for which you plan to use such furniture.
Bathroom cabinet with mirror
The shapes and sizes of the bathroom can be very different, which determines the size of the cabinet. The latter also depend on the availability of free space on the wall above the washbasin. It is better to design a small cabinet with one door and without a lower open shelf (Fig. 1). The cabinet can have one or two doors, and to keep it clean, it’s a good idea to provide it with removable shelves.
To place tall items in the cabinet, we suggest limiting yourself to one horizontal shelf. At the bottom there is an open shelf for soap dishes, toothpaste and other small items.
You can provide an open shelf on both the left and right sides of the cabinet. Fastening the cabinet to the wall will be provided by steel overhead hinges or hidden brackets
It is important that the mirror is located strictly above the sink. Shelves can be made from regular or acrylic glass in a glass workshop
The shelves are relatively small, so we recommend ordering them from tempered glass - it’s safer. For a home first aid kit, it makes sense to organize your own small compartment, and if you do not exclude children from accessing it, then a door with a lock will be useful.
Related link: DIY storage system - drawings and photos
The cabinet has a compartment without a door, a mirror is attached to the back wall, and a lamp is mounted above the latter. Some lamp models are additionally equipped with a socket. It can be useful for electrical appliances - a hair dryer, electric razor or rechargeable toothbrush. In the open compartment you can mount a stand for toothbrushes, made, for example, of tinted plexiglass. It is recommended to use laminated 15 mm chipboard for the cabinet body, and waterproof plywood 6 mm thick is suitable for the back wall. Connections of chipboard parts are made with dowels and glue. Waterproof paint should be used for the surface of the cabinet. You can attach the cabinet to the wall using pendants.
Assembling the pencil case
The ends of the finished chipboard parts must be covered with edge tape. It comes with or without a pre-applied adhesive layer. Pasting the edges of the first group is done with a simple iron, ironing them several times. The second type of edges requires preliminary application of PVA glue to the edged chipboard and further heating with the same household appliance. The remaining part of the edge along the planes of the parts is cut off with a sharp knife.
Having prepared all the parts, you need to mark the places for drilling holes for installing fasteners and accessories. The most common type of screws for chipboards are self-tapping screws of a special shape - confirmats. They have a special hexagonal slot in the head and are screwed in with a key of the appropriate size. The diameter of the hole for them is 7 mm.
We assemble the finished parts manually or with a screwdriver, controlling their relative position. We hang a door of the appropriate size on the finished box and install a handle and a magnetic latch. So, at the lowest cost, you can make a pencil case with your own hands. It will last as long as factory-made furniture.
Homemade pencil case made from jeans
If you have no options or ideas for work, you can always watch excellent videos from channels on a well-known hosting.
For example, the popular channel Trum Trum produces videos that show how easy it is to make a pencil case from available materials - bottles, electrodes, fabric and other materials.
One of the popular types of raw materials is fabric.
Note! From jeans you can sew a soft pencil case filled with padding polyester, which will securely store brushes, pencils and pens. You can use old jeans, then the cost of the product will be minimal
You can use old jeans, then the cost of the product will be minimal.
The process is described in detail step by step:
| Stage | Description |
| Preparing parts | Square size 26x26 centimeters, pocket on the base, face of the pencil case, pockets for small accessories, zipper |
| Assembly | The main parts must be folded, bending the sides inward. To prevent the fabric from bristling, it is better to iron it |
| Lightning | You need to sew a zipper along the top edge of the pencil case - this is done by machine or manually |
| Pockets | Pin all future pockets and sew them in the right place |
| Decor | Using hot glue, you can apply various rhinestones, stones and buttons to the surface of the product |
Steps
Part 1 of 2:
Collect a school pencil case
- 1
Start with the essentials.
The student must carry the same writing utensils with him every day. However, in some classes you may need some special pencils or pens, but first, put in your pencil case what you need every day and in each lesson. Here are some examples of what should be in your pencil case first: X Source of information
- Two simple pencils
Red, blue and black pens
- Sharpener
- Protractor
- Scissors
- Eraser
- Compass
- Glue stick
- Highlighter marker
- Calculator
- 2
Start arranging your items from largest to smallest.
If you have a pencil case with a zipper, place it so that the zipper points to the right or left. This way, it will be easier for you to pack your things and you will be able to make the most of your free space.
First, put in your pencil case the items that take up the most space: calculator, scissors, protractor. This way you will save space for smaller items: pencils, pens, sharpeners. This arrangement will make it easier to find each item.
- 3
If necessary, you can add or remove some writing utensils.
If you have already put the most necessary things in your pencil case, you can add other items that may be useful to you in different classes. If you want to put small items in your pencil case, first put them in a separate package.
- Typically, elementary schools ask you to carry colored pencils, colored markers, and highlighters. To save space, choose only pencils in the colors you use most often. Take these pencils out of the packaging, secure them together with an elastic band, and place them in your pencil case.
If you are a high school student or going to middle school, chances are you may need stickers. Place the stickers in a small ziplock bag. This way, none of the stickers will come off or become wrinkled in the pencil case.
- 4
Periodically clean your pencil case and reassemble it.
To keep your pencil case in order throughout the year, clean it every month. The school year is underway, and a lot of pencil shavings or pieces of paper have probably accumulated in your pencil case. Don’t forget to periodically clean it up and throw away trash.
- Throw away broken pencils and markers.
Replace used markers
- Buy new glue and eraser
Part 2 of 2:
How to choose a pencil case
1
Choose a pencil case with multiple compartments. This way you can organize pencils and other supplies in a convenient order. Try to find a pencil case with pockets and different compartments to organize all your things. X Source of information
Place writing utensils of appropriate size in each compartment of your pencil case.
2
Choose a pencil case made from durable fabric. You will use it in every lesson, take it out of your bag at home, so the pencil case can quickly wear out
It's important that the fabric is durable so that your pencil case doesn't tear in the middle of class and your pencils and pens don't fall into your backpack or onto the floor.
Try to choose a pencil case made of nylon fabric. Not only is nylon fabric easier to clean, it's also durable enough that it won't tear even if you fill your pencil case with as much stuff as possible. X Source of information
You can buy a hard plastic pencil case - these cases are quite durable, but make sure that it will fit all your things, because the plastic pencil case has a lid instead of a zipper, so it is much more difficult to fit additional items into it.
3
Think about the size of your pencil case. If after a few months of studying you find that you are not using some of your writing utensils, remove them from your pencil case and buy a smaller pencil case
A small pencil case will fit into any backpack or bag, and besides, you can always leave it on your desk because it doesn’t take up much space. A medium-sized pencil case is best suited for school classes. Perhaps you have classes where you need a pencil case with a compartment for a ruler or notepad, in which case, take a larger pencil case.
Adviсe
- Write your name on the pencil case so that it can be returned to you if you lose it.
- Buy a special transparent pencil case for exams and tests. Due to the transparent material of the pencil case, you can safely place it on the table during the test.
- Keep your supplies in a ziplock bag or bag to prevent them from sticking together, getting your pencil case, calculator dirty, etc.
- Girls can use a cosmetic bag instead of a regular pencil case.
- Pencil case
- Two simple pencils
- Red, blue and black pens
- Sharpener
- Protractor
- Scissors
- Eraser
- Compass
- Glue stick
- Highlighter marker
- Calculator
- Zip bag
- Elastic bands for fastening
- Ruler
How to make a rotating bathroom cabinet
This type of furniture will probably require more effort. You will have to make several boxes of any height from MDF or chipboard materials. Next, use a screwdriver to make a hole in the center from the bottom, except for the bottom drawer, and from the top, except for the top one.
Pass them in order through the bolts, which are then tightened with a nut and spacer. At the corners of the lowest shelf, holes are cut for the wheels at a distance of two centimeters from the edge of the corner on each side. Then the wheels are screwed tightly and the cabinet is placed in its normal position.
Thus, creating any type of cabinet will be possible for you if you have patience and the process goes through in a good mood.
Subscribe to our Social networks
Mark and drill
First of all, they start by marking the sidewalls:
The drilling process goes something like this
- If the product will stand on the floor, then the bottom shelf is marked with an indentation of 50-60 mm. From the edges, a step of 50 mm is usually used.
- The top shelf is marked with an indentation of 8 mm. It depends on the density of the material, if it is 16 mm, then the middle is 8 mm, but if it is more, then, accordingly, the center shifts.
- The remaining shelves are laid out in a chaotic order, that is, as you need. With the exception of the center shelf, it is necessary for rigidity.
Please note that the central shelf is rigid, the rest are removable for ease of use
For your information! For reliability, it is best to order a few more stiffening ribs that are attached along the rear wall. Through them you can pull the pencil case to the wall.
- All marks for hard shelves are drilled with an 8 mm drill. On the side where the Euroscrews will be screwed in, you need to go through it with a countersink.
- For removable shelves, use a 5mm drill bit. The depth should be no more than 10 mm, since the shelf holder itself is recessed into the material by 6 mm.
Various types of shelf supports
We drill rigid shelves and stiffening ribs with an indentation of 8 mm and 50 mm with a 6 mm drill.
Interesting! If you do not want to drill a lot of holes, then it is better to use plastic or metal corners and attach them to self-tapping screws. This is another way to do without power tools, however, it is not as aesthetically pleasing.
Types of products
The need to always save space, as well as satisfy the requirements of different styles, has allowed furniture designers to develop a lot of different models. For any room, even if its area is 2 m2, and the equipment consists of a shower and washbasin, you can find the necessary furniture.
Installation methods
- Floor-standing – rests on a base or legs. The latter are considered a better solution, since it is easier to clean under them. In addition, there is no danger of deformation of the lower part of the furniture when the floor is flooded.
- Wall mounted – classic cabinets and console models. They are mounted on the wall and do not take up space on the floor.
- Corner - can be either floor-mounted or wall-mounted. They differ in the installation location - the corner, and the design feature - the rear wall consists of two elements that meet at right angles.
- Built-in is a niche, a space between a partition and a wall, a blocked door or window opening, equipped with shelves, and sometimes even drawers. The big plus is that such models use the already existing “non-standard” space. The appearance of the product is determined by the design of the sash. The latter, by the way, can be either a hinged or a compartment.
Photo of a bathroom with cabinets
Shape of models
The attractiveness of the product is determined not only by the color of the facade, but also by its shape. Designers offer the following options.
- A straight facade is an ordinary flat surface, which in a bathroom is more justified than anywhere else: condensation does not accumulate on it. The outline of the facade can be more original, for example, a leaf-shaped door with smoothly rounded corners, etc.
- Convex - this shape is typical for furniture in the Baroque or Rocaille style, but is also found in the classics. Sold in floor cabinets, especially in models under the washbasin. Mounted models of this kind are very rare - they look too massive.
There are also modern versions of this technique. However, in high-tech or techno models, the relief is formed not vertically, but horizontally.
Radial - the surface of the facade is smoothly curved, forming a sector of a circle. Option for modern styles - hi-tech, techno or modern. Wall cabinets also rarely have this shape - with the exception of corner ones, but pencil cases - floor and console - are often found.
The following video contains even more stylish and elegant models of cabinets and cabinets for the bathroom:
Sash decoration
The decor of the cabinet is determined by the door - one or two, as well as the design of the fronts of the drawers. The color palette or finishing features depend on the style of the interior, but general design techniques allow us to distinguish several groups.
- Furniture with blind doors - vertical and horizontal cabinets with a small width almost always have blind doors. From a design perspective, models are structural elements.
- A cabinet with glass doors is a rarity today, as it has a classic design and considerable size. But if the bathroom satisfies these conditions, then such a model will undoubtedly decorate the room.
Instead of glass, acrylic transparent plastic is more often used. This material is suitable for decorating a modern narrow pencil case or horizontal cabinet.
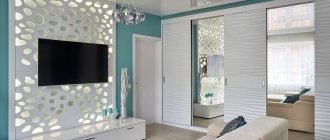
- The mirror version is much more common. Usually it means a wall cabinet above the washbasin, in which one or two doors act as a mirror. This is a truly practical and convenient solution. However, mirror inserts can be found on both console and floor products, especially corner ones. The mirror reflects light, visually reducing the size of the furniture and “adding” space to the room.
- Furniture with lighting - in most cases, we are again talking about a model installed above the washbasin. The small size of the bathroom often becomes the reason for economical lighting - one ceiling lamp. But this is not enough for makeup or a good shave. A backlit pencil case solves this problem. Note that mirrored cabinets with lighting for the bathroom are now very popular.
- Less commonly, you can find floor and console cabinets, where the lighting plays a decorative role, emphasizing the contours of the facade or only the lower part of the product. This technique makes the furniture literally “airy” and is very effective in techno, futurism and hi-tech interiors.
- A cabinet with shelves is usually a wall-mounted version of quite large sizes, where there is also a side section with open shelves. Due to their size, such models are only possible in spacious rooms.
Photo of a bathroom cabinet “under wood”
Convenience of design
Today, furniture companies offer a fairly large selection of models of cabinets, which to some extent make people's lives easier. For example, a pencil case with shelves can accommodate a sufficient number of things, clothes, household items, while saving room space due to its small size. Such cabinets are especially appropriate and necessary in small apartments, where every occupied meter counts.
The main feature of the pencil case is that it can be installed in any room, regardless of its purpose. A small model of a cabinet made of moisture-resistant materials will fit perfectly into the interior of a bathroom; a protocol cabinet in dark colors is suitable for a hallway.
For children's rooms, you can use light-colored products, but in the bedroom or living room, a stylish bright accent in the form of a pencil case with drawers would not hurt.
Some design features of the products under study will help you correctly evaluate all the advantages of the pencil case:
All these design features have not gone unnoticed by consumers today, which is why cabinets are so in demand and loved by many.
A corner cabinet fills a corner. Suitable for any size room, as long as it is square or similar in shape.
Having chosen a suitable design, you can begin to create a project for the future cabinet. Since this piece of furniture lasts for many years, it is worth considering what functionality may be required from it. It is better to build a drawing on whatman paper, recording all measurements there.
Decide on the location and dimensions of the cabinet. If there is a niche in the room - ideal, but if it is not possible to build it in, choose a place where nothing will interfere with it.
Consider the internal content: the location and number of shelves and drawers, their sizes, additional elements such as mezzanines or interior lighting.
We suggest you read: Which bath to choose for a small bathroom
Do not forget about the choice of external decoration and decorations. The colors “oak”, “alder”, “beech” are the most popular today. Or you can choose wood with an interesting pattern and leave the original pattern. Get creative and decorate the doors with a carved pattern.
Basic bathroom furniture
Before starting work, you need to make a list of items that should be installed in the bathroom. By default it includes the following elements:
- Washbasin cabinet. It is especially needed for bathrooms, because... allows you to embed a sink and organize a useful niche for storing detergents and cosmetics.
- Hanging cabinets. Such an element is fixed in the upper part of the walls using brackets. Externally, the products are compact, but their internal space contains many useful little things.
- Linen closet. Such an item is installed on the floor covering if there is an unused empty corner in the room. It is better to make a structure with 2 sections - large and small. In the first you can keep clothes that need to be washed, and in the second - cosmetics.
What is a kitchen floor-standing pencil case made of?
The materials for making a floor cabinet can be very different, their choice depends on the financial capabilities of the customer, the overall interior of the apartment and the purpose of the pencil case
When choosing materials, special attention should be paid to pencil cases for the kitchen and bathroom, these places have high humidity and the temperature often changes in them
Basic materials:
- Wood - this material is distinguished by its high cost, but despite this, a wooden set is very popular. One of the disadvantages is the impossibility of using it in places with high humidity, since the wood may lose its appearance and properties.
- MDF is a material that costs much less than natural wood, has an impressive appearance, but also needs proper care.
- Chipboard is the cheapest option, but is sensitive to water and does not tolerate moisture.
- Plastic - this material is not the most environmentally friendly, but it is not afraid of water and wear-resistant, is inexpensive and is the best option for decorating bathrooms and kitchens.
- Metal - furniture made from this material is very durable, but does not fit into many interior styles. Metal is often used for the frame.
For final finishing, surfaces can be painted and polished; glass doors are used as decoration, which makes the product light and also simplifies the process of finding dishes in the cabinet. Such cabinets - speakers in the kitchen are very convenient, many items fit into them, and you can put built-in appliances there. Even if the size of the kitchen is small, they will not be bulky.
You can make a furniture set yourself by drawing up drawings and diagrams.
When choosing furniture, you need to carefully monitor the quality of the goods offered and make purchases only in well-known stores.
How to make a wall cabinet for a bathroom
Need more space in your bathroom?
Try this simple project, making a bathroom cabinet is not at all difficult, spend just a couple of hours, but you will have a neat cabinet with a mirror where you can put your toiletries and cosmetics. You will need 1x2, 1x6 and 1x8 boards with a length of 185 cm.
The photo below shows the cutting of parts, dimensions in inches. Converting to centimeters is very simple, multiply the values by 2.54 and that’s it. For example, 23-1/2 inches, this multiplied by 2.54 is 59.95 cm, for a total of 60 cm.
How to make a bathroom cabinet with your own hands, see the step-by-step photos below.
Photo source: www.diynetwork.com/how-to/rooms-and-spaces/bathroom/how-to-build-a-bathroom-medicine-cabinet
Wooden vanity cabinet for bathroom
A bathroom vanity cabinet should not only be functional, but also aesthetically pleasing to match the interior design of the room. You will need to find a style that can accommodate the number of sinks you want. Of course, many would prefer double sinks. Unfortunately, there are often space limitations. A size of less than 150 cm usually allows you to install only one sink; it can be located in the center, to the right or to the left. The sink cabinet may also have drawers or standard doors. Here's an example custom made by Marko Studio. If you prefer to make furniture with your own hands, 30 photos of the master class are at your disposal.
Stylish bathroom cabinet
A great example of how to make an English-style sink cabinet in a bathroom. This design requires careful planning and attention to detail. There are many decisions to make, from layout and style to types of sinks and countertops. This project was also developed in Marko Studio and made by professional craftsmen, but if you have the necessary tools and a great desire to make a cabinet with your own hands, a detailed master class is shown below with 100 step-by-step photos.
Hanging cabinet under the bathroom sink
This is part of a bathroom project, a minimalist vanity cabinet.
See the manufacturing master class below in the step-by-step photos.
Photo source: www.instructables.com/id/Walnut-Bathroom-Cabinet/
Bathroom cabinet with sink Ikea
An interesting project for a small bathroom. First you need to make shelves, in this case the upper part of the cabinet is 96 cm x 30 cm. The author used three boards from oak parquet. To make a bowl for a bathroom cabinet sink, you need a hole that fits a standard drain. To prepare the wood pieces, drill two holes in the top of the cabinet in the middle near the edge so that the bowl extends over the edge. Aluminum doors will slide on F-profiles. But aluminum does not slide very well on aluminum, so you can use a 4x4mm brass rod in the bottom F-profile. All doors should be slightly wider than the cabinet. In this case, the frame is 96 cm. Thus, 96/3 – 32. In general, there are many different nuances, you can read all this in the detailed instructions on the website of the author of this project, and below see the master class with step-by-step photos.
Photo source: www.instructables.com/id/Bathroom-cabinet-with-Ikea-bowl/
Round cabinet under the sink
A good solution if, due to the layout of the bathroom where the washbasin is located, you need a round cabinet under the sink. You are unlikely to find such a design in a store. An option is to make a bathroom cabinet with your own hands. The instructions provided here do not include complete assembly information, just the rounded door part as this is the most difficult part. To make curved doors, start by making two identical molds from 18mm MDF. True, this stage is not in the step-by-step photos, but the process is quite simple, read the instructions on the website, there are only 7 points. Note: The molds can be reused later for the top and bottom (or inner shelf). So the time required to make these two identical molds is not only to create a disposable mold, but also to make other cabinet parts.
Photo source: www.instructables.com/id/Bathroom-cabinet-with-curved-doors/
Oven cabinet designs
There are two main types of oven modules. Moreover, each of them has its own additional variation. The most common type is an oven under the hob. And the second, in my opinion more convenient, is an oven in a pencil case.
The design of the cabinet under the hob has two options - with a drawer at the bottom of the oven and with a drawer at the top of the oven. I will tell you about the pros and cons of each design in the following paragraphs.
The design of a cabinet in a pencil case, at eye level, has an option with a work surface above the cabinet and in a pencil case at eye level without a tabletop. I will tell you about the pros and cons of each design in the following paragraphs.
Installing doors on a pencil case
Quite a difficult process for beginners. Incorrect installation of doors is common among them. Moreover, technology violations can be so significant that they are difficult to correct. In order to avoid annoying mistakes at the final stage of furniture assembly, we recommend that you carefully read the procedure. To install the hinges, you will need a Forstner drill of the appropriate diameter for the hinge.
Forstner drills
For furniture of such dimensions as a pencil case, it is recommended to buy hinges with a mounting diameter of 32 or 35 mm; accordingly, the drill should have the same diameter.
Set of tools
Step 1. Place the pencil case on its side and the door next to it. Carefully align their position at the ends; the junction of the elements with each other should be tight without gaps. The standard distance of the hinge from the edge of the door for chipboards is 10 cm. It is allowed to slightly adjust it only if there are shelves or drawers at this level.
The photo shows how to position the door
Step 2. Draw a line for the placement of hinges on the surface of the door and body; it should be strictly perpendicular to the edges.
Performing markup
Step 3. The standard distance from the edge of the loop to the edge is 6 mm, to this parameter you need to add half the radius of the drill. Make a mark at this distance. It is better to mark with an awl; a small hole will serve as a marker for the tip of the drill.
The master puts a mark
Step 4. On the frame, step back from the edge 37 mm, at this distance the second part of the loop will be fixed. The parameters we indicate are standard for loops of the specified sizes; there is no need to change anything.
Step 5. On the side panel, draw a line parallel to the edges, and make marks on it on both sides at a distance of approximately 16 mm. The distance between the oblong holes of the hinge is approximately 34 mm, but the holes for the screws must be made in the middle. Due to this, it will be possible, if necessary, to precisely adjust the position of the valves. We will explain how this is done in this article below. The markings are ready, you can start drilling holes.
The photo shows what the markings for the loop should be
Step 6: Place the Forstner bit in the drill and drill while rocking the tool slightly. Carefully control the depth; it should be several millimeters greater than the thickness of the seat. For safety, it is recommended to insert the loop into the recess several times and check its position.
Drill installation
Hole
Step 7. Using the adjusting screws, move the hinges to the middle position. Clean the hole from sawdust, insert the loop, and use a pencil to mark the places to fix it.
Inserted loop
Loop after adjustment
Pay attention to the compatibility of the markings and hinge holes. Step 8
Remove the special drill from the drill and install an ordinary one. To make screwing in the screws easier, it is recommended to make holes in the plates. The diameter of the holes should be 1–2 mm smaller than the diameter of the screw thread
Step 8. Remove the special drill from the drill and install an ordinary one. To make screwing in the screws easier, it is recommended to make holes in the plates. The diameter of the holes should be 1–2 mm smaller than the diameter of the screw thread.
Drilling holes with a simple drill
Step 9. Fix the loop with self-tapping screws. In order to facilitate the fixation process, first you just need to tighten all the screws, and then tighten them one by one until they stop. Do not use too much force; chipboard does not have sufficient strength; the screws may turn in the thread. If such a problem occurs, then you need to remove the self-tapping screw, insert a match into the hole as tightly as possible and screw it back. This repair holds the doors quite securely, but it will no longer be as strong as before.
Fixing the hinge with self-tapping screws
Screwing screws into holes
The hinges are installed, you can start adjusting the position of the doors.
When the hinges are secured, you need to adjust them
Deciding on materials and sizes
Initially, where you need to start the entire work process is to prepare all the tools that will be required. If difficulties arise, you can rent power tools from a hardware store; most large organizations offer this service. If not, then you will have to ask your neighbors or friends.
Tools
- Drill. It will require various drills, in particular: 6 mm, 8 mm and 5 mm.
- Screwdriver. Also purchase attachments: Phillips, hex (for Euro screws) and countersink. To ensure that the screws are flush with the surface of the material.
- Roulette.
- Construction square.
- Level.
- Hammer.
Note! You can get by with a set of screwdrivers, but this will make the work process too slow. When you assemble it yourself, you want to speed up the work, it’s better not to waste a couple of thousand and use a professional tool.
Materials
Now let's select the materials we need.
- First of all, we order a frame from a furniture company. Most often it is made from laminated chipboard, so it is practical and reliable. Most likely, your kitchen is made of chipboard. Choose a similar color and the size you need. We clarify that you can also order drilling with framing from the organization, but to save money, agree only to stick the edge. You can drill it yourself.
For your information! It is better if the kitchen cabinet has a single top point with the top of the wall cabinets. This way the composition will look like “native”.
- Now we decide on the kitchen facades. If your kitchen is old, it's unlikely you'll be able to find something suitable, so look at what you like. If the kitchen is modern and was installed 3-5 years ago, then, most likely, the material for the facades for the kitchen will be chosen in a single color. It will be either MDF, plastic, or natural wood.
- The back wall is DVPO, it is also worth ordering from a furniture organization.
Important! If you have not ordered accessories, that is, all the components for your pencil case, then you will have to look for a hardware store that sells it all. You will need: hinges for swing doors, Euroscrews, nails, 4x16 mm self-tapping screws, handles and shelf supports.
As you can see, nothing complicated. You can buy everything and assemble it yourself. Moreover, the price for such a service will be significantly lower than if you order both production and assembly in the organization.
Performance characteristics
The height of the pencil cases ranges from 150–200 cm, width 30–50 cm, these dimensions make it possible to have quite roomy furniture with relatively small dimensions. Inside there are shelves for storing bathrobes, towels, household chemicals and personal hygiene products.
Floor cabinet
The pencil case has compartments of various sizes, adjustable shelves, drawers, metal baskets for temporary storage of dirty linen, etc. Depending on the layout of the bathroom, the doors can open in any direction, a mirror can be mounted on the facade, and lighting can be installed inside. Modern industry produces pencil cases in various styles, from the familiar and ever-in-demand classic to the most modern avant-garde or high-tech styles.
Bathroom cabinet
To make the right choice, you should briefly familiarize yourself with the existing designs, their strengths and weaknesses.
| Type of pencil case | Short description |
| Angular | It has a triangular shape, is installed on legs or hung in free corners. Advantages: high stability, minimal dimensions. The disadvantage is small capacity. |
Suspension | Suspended above the floor, they have a small height. In terms of capacity they are inferior to other models. Advantages - you can select the mounting location depending on the plumbing equipment available in the bathroom. Disadvantage - they can only be hung on solid walls; plasterboard partitions cannot support the weight of furniture. |
| Floor | The optimal option for a bathroom cabinet from all points of view. The furniture is mobile, which makes it possible to change its location if the situation changes. The most spacious furniture option for small spaces, for universal use. It can be installed not only in bathrooms, but also in the hallway, kitchen, balcony or loggia. |
floor-standing bathroom pencil case
It is the last version of the pencil case (floor-mounted) that we will dwell in more detail.
Edge processing
For gluing you will need a clamping clamp, an iron, trim tape, a grout block and a sharp mounting knife. It is very difficult to work alone, call an assistant or use a clamp. The fact is that when pasting you will have to do several jobs at the same time, and you only have two hands.
Trimming furniture tape
Iron
Clamp
Grout block
If you do not have an assistant, then operations are performed according to this algorithm.
Step 1. Prepare any object to which the part to be finished will be secured with a clamp. This could be a drawer from a nightstand, an overturned stool, a small table, etc.
The box we will use to secure the shelf
Step 2. Using a clamp, secure the part to the object being held.
Place the shelf close to the drawer
Tighten the clamp
Step 3. Cut the edge tape, leaving approximately one centimeter on each side.
An adhesive base is applied to the edge
Cutting the tape
Step 4. Turn on the iron and set the heat control to medium heat.
We put two gloves on the left hand
Step 5. Use a brush or brush to remove dust from the end of the part. Place the trimming tape on the part with a margin of length, press it with a heated iron and heat it along the entire length. Hold the iron with your right hand, and constantly adjust the position of the tape with your left. It should lie strictly in the middle of the end of the pencil case part.
Glue the tape with a hot iron
Step 6. After the band has been heated once, return the iron back and use a gloved hand to press the hot band firmly against the edge. The fact is that it is very difficult to achieve a perfectly even cut, and the flat sole of the iron cannot heat up and press the tape in the recesses. This is done with a gloved hand.
Step 7. Release the part, turn it over and stick the tape on the other side in the same way.
Glue the tape to the opposite end
Glue the next tape
Step 8. Using a sharp knife, carefully cut off the protruding parts of the tape, do not allow burrs, do not rush.
Trim off the excess
Step 9. Cover the two remaining ends of the part, cut off the excess tape.
Cut off the protruding tape along the long side
Step 10. Use fine sandpaper to clean the sharp edges of the cut of the trim strip; the edge should have a semicircular shape. This will reduce the likelihood of scuffing during use of the bathroom case.
All that remains is to clean up the edge
Before assembly, you need to paste over all the ends of the furniture.
Check the quality, pay special attention to the front surfaces
Tape glued to the ends
The ends of all parts are processed
How and from what to build a bathroom cabinet?
First of all, you should determine the place where the homemade piece of furniture will be located. The possibilities here are quite limited; it can be placed on the floor or hung on the wall. As a last resort, if there is a window opening in the bathroom, and for some reason you do not need it, it is quite possible to make shelves in it, if, of course, this window does not go out onto the street, but into the next room.
Homemade bathroom furniture item
And, as an original option, combining an interior door with a closet, and, if the bathroom space allows, you can make such a design with your own hands in the form of a sliding door. Floor-standing cabinets can be conventional, with a 4-point support, or with fastening directly to the wall, when only two legs located in the front part of the case rest on the floor. Special mention must be made of cabinets installed under sinks (preferably counter-mounted or, in extreme cases, wall-mounted). In this case, the water supply pipes are either hidden behind the wall cladding or are routed inside the cabinet along the back wall. Another interesting solution is to use the space along the bathroom, where you can place a number of low modules from the floor to the side of the bowl.
The simplest option is hanging, and if the side walls are narrow, you can make them yourself even from ordinary edged planed boards. MDF and fiberboard are also suitable for this purpose; these materials are quite dense; there are also special moisture-resistant panels. However, it is a good idea to purchase wood impregnation in advance, which will fill the pores and become an additional factor to ensure that the cabinet is reliable.
How it's made, how it works, how it works
The most educational LiveJournal community
I decided to put a cupboard with a niche for a microwave in the kitchen. I looked around on the sites and got a little crazy. Made from MDF they cost around 15 thousand rubles. The toad, as they say, strangled him and decided to make it himself from furniture panels. I don’t have garages/workshops/dachas, so I cut it right at home.
Photo of what happened. Further on in stages.
Stage 1. Sawing.
The dimensions of the cabinet are 600x400x2100. I chose the most optimal one for the sizes of panels that are sold in construction stores
I fastened the walls, top and bottom shelf together. I left 100mm to the floor so that my toes would not suffer.
DIY pencil case for the kitchen Pencil case, Wood, Furniture panels, Your own hands, Long post Stage 2. Assembled with shelves. At first I thought I would just put the shelves on shelf holders (metal pins or L-shaped holders). I looked and realized that in this case, the flight of the shelves with dishes and everything that would be on them was inevitable. Additionally, I put furniture ties into each shelf (4 pieces per shelf). It became MUCH stronger and safer.
Stage 3. Painting.
Realizing that first assembling and then varnishing is a shitty idea. I disassembled and painted all the elements separately. Water-based varnish with tinting straight from the store. Almost odorless and quick-drying (painted twice in 3 hours).
To be honest, I’m tired of hanging doors. Align them too) I took the hinges with a closer so that the doors close smoothly.
The back wall is made of fiberboard. I then sawed out the hole for the microwave power cord. Didn't make it into the frame.
For those interested in the price, such a cabinet came out at a cost of about 7-8 thousand.
If you have a production or service that you want to tell our readers about, write to Aslan ( [email protected]
) and we will make the best report, which will be seen not only by readers of the community, but also by the site.
How it was done
Let me remind you once again that posts can now be read on the Telegram channel
and as usual on Instagram
. Click on the links, subscribe and comment, if you have questions about the matter, I always answer.
All original videos are uploaded to my channel, support it by subscribing by clicking on this link - How it’s done
or according to this picture. Thanks to everyone who signed up!
Installing doors on a pencil case
Quite a difficult process for beginners. Incorrect installation of doors is common among them. Moreover, technology violations can be so significant that they are difficult to correct. In order to avoid annoying mistakes at the final stage of furniture assembly, we recommend that you carefully read the procedure. To install the hinges, you will need a Forstner drill of the appropriate diameter for the hinge.
Forstner drills
For furniture of such dimensions as a pencil case, it is recommended to buy hinges with a mounting diameter of 32 or 35 mm; accordingly, the drill should have the same diameter.
Set of tools
Step 1. Place the pencil case on its side and the door next to it. Carefully align their position at the ends; the junction of the elements with each other should be tight without gaps. The standard distance of the hinge from the edge of the door for chipboards is 10 cm. It is allowed to slightly adjust it only if there are shelves or drawers at this level.
The photo shows how to position the door
Step 2. Draw a line for the placement of hinges on the surface of the door and body; it should be strictly perpendicular to the edges.
Performing markup
Step 3. The standard distance from the edge of the loop to the edge is 6 mm, to this parameter you need to add half the radius of the drill. Make a mark at this distance. It is better to mark with an awl; a small hole will serve as a marker for the tip of the drill.
The master puts a mark
Step 4. On the frame, step back from the edge 37 mm, at this distance the second part of the loop will be fixed. The parameters we indicate are standard for loops of the specified sizes; there is no need to change anything.
Step 5. On the side panel, draw a line parallel to the edges, and make marks on it on both sides at a distance of approximately 16 mm. The distance between the oblong holes of the hinge is approximately 34 mm, but the holes for the screws must be made in the middle. Due to this, it will be possible, if necessary, to precisely adjust the position of the valves. We will explain how this is done in this article below. The markings are ready, you can start drilling holes.
The photo shows what the markings for the loop should be
Step 6: Place the Forstner bit in the drill and drill while rocking the tool slightly. Carefully control the depth; it should be several millimeters greater than the thickness of the seat. For safety, it is recommended to insert the loop into the recess several times and check its position.
Drill installation
Hole
Step 7. Using the adjusting screws, move the hinges to the middle position. Clean the hole from sawdust, insert the loop, and use a pencil to mark the places to fix it.
Inserted loop
Loop after adjustment
Pay attention to the compatibility of the markings and hinge holes. Step 8
Remove the special drill from the drill and install an ordinary one. To make screwing in the screws easier, it is recommended to make holes in the plates. The diameter of the holes should be 1–2 mm smaller than the diameter of the screw thread
Step 8. Remove the special drill from the drill and install an ordinary one. To make screwing in the screws easier, it is recommended to make holes in the plates. The diameter of the holes should be 1–2 mm smaller than the diameter of the screw thread.
Drilling holes with a simple drill
Step 9. Fix the loop with self-tapping screws. In order to facilitate the fixation process, first you just need to tighten all the screws, and then tighten them one by one until they stop. Do not use too much force; chipboard does not have sufficient strength; the screws may turn in the thread. If such a problem occurs, then you need to remove the self-tapping screw, insert a match into the hole as tightly as possible and screw it back. This repair holds the doors quite securely, but it will no longer be as strong as before.
Fixing the hinge with self-tapping screws
Screwing screws into holes
The hinges are installed, you can start adjusting the position of the doors.
When the hinges are secured, you need to adjust them
Rules for choosing a narrow pencil case for the kitchen
Before you make a purchase of a kitchen set, you need to decide what it will be used for. Will it be a cupboard or will large and heavy equipment be built in? Depending on this, the model and the material from which it will be made will be selected.
Basic rules to follow when choosing:
- The height of the cabinet should be equal to the height of the rest of the set;
- The depth should match the rest of the furniture;
- The material must be of high quality, and the company must be a well-known manufacturer that guarantees quality.
Almost all manufacturers offer interesting models of different sizes and colors, and everyone can choose what they need.
In conclusion, we note that designing a kitchen cabinet is relevant if after a major renovation there is an unused narrow opening, then you can insert this cabinet into it and use the entire kitchen space functionally.
Classic module
This is still the same tall and narrow closet or pencil case from which it all began. Only now it has several additional varieties. On sale you can find models with a different number of doors, with drawers and even glazed facades, turning a massive piece of furniture into an elegant china cabinet.
There are also designs with open shelves on which everything you need is placed. But since the main purpose of a tall cabinet is to accommodate a maximum of utensils and small equipment in a small space, you still shouldn’t completely abandon the doors. Behind blank facades or at least tinted glass you can hide what you don’t want to show off.