Any apartment begins with a corridor or hallway, and these rooms leave the first impression of the entire housing, and it is this that is often the most objective. If the owner managed to make the corridor cozy, then in the remaining rooms you can count on very comfortable conditions.
The hallway, by and large, is needed for only one thing - residents must have a special place for undressing and changing shoes. It should always have a clothes hanger and a locker for storing shoes. Other furniture is very rarely installed in these rooms. The specific interior depends on the size of the corridor and the capabilities of the apartment owners.
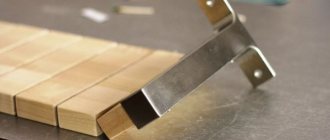
DIY clothes hanger in the corridor
Purpose of the hanger
The main functions that this multifunctional interior item performs:
- Clothes storage. Thanks to her, it does not wrinkle, looks neat and hangs neatly in its place;
- Save time. You can immediately visually assess where and what is located, which allows you to save time and not waste it searching for this or that wardrobe item;
- Proper organization of space in the hallway or corridor, if they do not have a large area, and compact distribution of things in closets.
If there are built-in shelves, you can store items in them; there are also options with shelves for shoes and hats.
In addition, there are models that are used as a decorative element, to decorate and give a certain charm to the interior. They are not used for their intended purpose and are made from fragile, impractical materials.
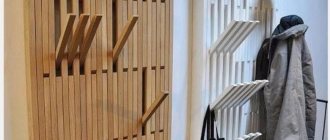
Convenient coat rack with shelves on wheels
If you need not just additional storage space for clothes and shoes, but a functional piece of furniture, then a homemade coat rack with shelves on wheels is a great option.
Essentially, this is an improved “version” of a mobile hanger made from water pipes.
The only difference is that the modified design has an additional vertical module with shelves, which is attached to the base, and an upper shelf for flower pots.
First of all, we make a module with shelves.
We saw off two wide boards of the required length, make markings and screw wooden blocks onto them on which the shelves will rest.
Next you will need to prepare 5 shelves. We lay them on the support bars, and screw them on the sides with self-tapping screws to the side walls of the module.
At the next stage we make the base of the hanger.
This can be either a single piece of plywood, chipboard or MDF, or two boards glued together or fastened together using wooden slats.
We screw furniture wheels to the bottom of the base. Then we install a vertical module with shelves. You can “plant” it on wooden dowels or screw it onto wood self-tapping screws (but it is better to use Euro screws - confirmed ones).
The stand and crossbar are made from steel water pipes. We connect them together using fittings. We screw the lower part of the rack to the base, and the end of the crossbar to the side wall of the vertical module.
At the last stage, all that remains is to install the top shelf. Metal pipes can be painted, and wood can be coated with mineral oil or wood stain. Or you can leave it as is.
Master class on creating
a functional
floor-mounted clothes hanger with your own hands
in the author’s video below.
Video source: YouTube channel Laini Ozark. HOW TO BUILD A CLOTHING RACK |
as seen in my bedroom makeover If you realistically evaluate labor costs, then among all the design options described, this is perhaps the most complex.
But still, even a novice woodworker can cope with this work. In order not to waste time gluing boards, you can use a purchased furniture board.
Materials and tools
The choice of material depends on your imagination and desire. It can be:
- Wood, which is highly environmentally friendly, since it is a natural raw material;
- Plastic is the most common and versatile option;
- The metal, the most durable of all possible options, should be small in mass;
- Plywood, which can be covered with padding polyester and soft fabric.
- You can also use glass, chipboard or cardboard. Each modification has its own advantages and features. A combination of metal with wood and silicone coating are allowed to avoid slipping.
Since there are different types of fabrics, it is advisable to make them yourself or purchase hangers from different materials to maintain their neat appearance. It is important to take into account the sizes (for children they have smaller parameters).
Tools sufficient for manufacturing: tape measure, hooks (from various raw materials), blowtorch (heating device), jigsaw, needle with handle, sandpaper, hand saw, screws, screwdriver, pencil, fitting, screwdriver, measuring instruments, drill, drill bits , stain, screws. In some designs, it is not at all necessary to use all of the listed tools.
Tools for work
Since the structures are attached to the wall and are made of different building materials, it is impossible to do without special devices and tools.
For work you may need:
- Hammer;
- Screwdriver;
- Saw or hacksaw for wood;
- Jigsaw with attachments for metal and wood;
- Hammer;
- Self-tapping screws, screws, dowels;
- Pencil and tape measure for marking;
- Building level;
- Paint for wood and metal;
- Brushes;
- Sandpaper (grit No. 60) or grinder attachment.
Before work, it is necessary to prepare the material: clean the dirt and sand the wood, wash the metal from contamination, paint the frame made of boards or punched sheets, etc. And also clear the place chosen for the hanger in the hallway.
Types of design and construction
There are 2 types of structures: designed for storing wardrobe items inside the closet and outside it. The first type is the so-called “standard model,” that is, hangers with a hook. They fit in the closet, the hook is placed on the crossbar, and things hang on hangers. In this model, a crossbar is made between the sides so that trousers (skirts) can be hung over it, which makes it more multifunctional. Some are made with notches so that you can hook clothes with eyelets and straps onto them.
The second type includes those on which coats, jackets, raincoats, and fur coats are usually left:
- Floor-standing – they are a rack with hooks located at different levels. They can be on several legs, with wheels, special places for hangers;
- Built-in - represent a single unit with the rack. Differ in functionality;
- Wall-mounted – this model is usually supplemented with mirrors, shelves, and various accessories. All structures located outside the closet must be able to support the weight of heavy clothing.
Making a hanger from perforated sheet
Materials used
To make this hanger you will need:
- Perforated panel made of plastic or metal.
- Threads of different colors (floss or knitting yarn).
- 4 hooks ending in a ball.
- Scissors.
Perforated panels can be purchased at specialized construction or furniture stores.
Manufacturing stages:
- The size is determined and the panel of necessary parameters is purchased.
- Select your favorite theme or word for embroidery.
- Embroidery is created on a perforated sheet using existing threads. Once the embroidery is completed, hooks are attached to the panel and it is hung on the wall using the existing holes.
DIY wooden wall hanger
An integral part of any corridor, as well as an item that is simply necessary in every apartment.
You can build a wall hanger yourself using all the necessary tools. The material options can be different, the best of course is wood. For the “cheaper” option, you can use chipboard.
The tools that we will definitely need are:
- Screwdriver or screwdriver.
- Drill.
- The set was drilled.
- Roulette with a pencil.
- Hooks.
It is very simple to do - just measure the required distance and drill hooks to the board, and then hang the finished hanger on the wall. But there are more interesting options for such crafts.
Corner hangers
Many users choose corner hangers. Due to their great popularity, it is worth considering separately all the positive and negative features of these designs. The corner hanger takes up very little space. In addition, it is usually installed in a corner, which allows it to be placed even in the smallest hallways.
Typically, corner hangers have a huge number of hooks and can accommodate a variety of clothes and hats, and you can also hang bags on them. If such a hanger is made for a large family, then it will be quite easy to assign a pair of hooks to everyone and everyone will be able to place their things very conveniently, without mess and fuss.
Corner hangers often turn out to be very functional. You can add an additional shelf or another row of hooks to the top of the structure for storing hats. This entire structure can be made independently from different materials.
As a bonus - a miniature paperclip hanger 
Follow us on Pinterest for more interesting articles.
Useful short videos from Make-Self.net
Metal clothes hanger
A type of hanger-rack is a “U”-shaped hanger. This detail would be right in the dressing room, in a minimalist Scandinavian interior or loft style. To create a floor hanger with your own hands, you will need copper pipes: this environmentally friendly and durable material has long been used in the interior and does not lose its relevance.
Tools and consumables
To create a floor hanger you will need:
- Epoxy glue.
- Pipes 150 cm (2 pcs).
- Pipes 60 cm (4 pcs).
- Pipe 90 cm.
- Copper tees (2 pcs).
- Copper corners (2 pcs).
Step-by-step instruction
How to make a hanger with your own hands:
- We fasten the two bases on which the product will stand. We take two 60 cm pipes and fix them with glue and a tee. Using the same method, we create a second support.
- Let's make a crossbar. We connect two corner elements with a pipe 90 cm long.
- Before assembling the structure, you need to make sure that the glue has completely dried and held the parts together. We connect one and a half meter pipes by inserting them into tees.
- Attach the top crossbar to the vertical supports.
- The floor hanger is ready. It is so thin and light that, if necessary, it can fit into a closet or dressing room.
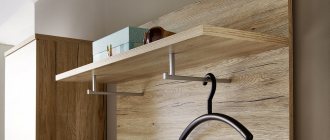
Types of hangers and materials for their manufacture
Photo: DIY hanger option
When making a hanger, you need to take into account the convenience of the design, functionality, spaciousness, and the height of the hooks.
By design features, the most common models are the following types:
- A design that combines the top and the cabinet.
- Wall hanger with mirror, combined with a cabinet, wardrobe and slatted area.
- The wardrobe is a hanger without doors. The hook panel is in the middle. There are small cabinets with doors at the top and bottom. It has good capacity.
The peculiarity of wall-mounted models is that they are attached to the wall. Main options for mounting methods:
- using self-tapping screws or self-tapping screws (basic method);
- by gluing;
- suction cup mount;
- magnetic mount.
The most durable and reliable fastening is with screws (self-tapping screws). This method is designed for heavy loads (for outerwear). Well suited for regular use. Sometimes it can be strengthened with the help of furniture corners.
Fastening with suction cups and adhesive tape is used for smooth surfaces (for example, tiles). In terms of reliability, it is significantly inferior to the previous method, but the advantage is that there is no need to drill the wall.
We recommend How to make an original key holder for your home
The magnetic fastening method is used very rarely, since it requires the presence of a metal surface in the hallway.
A chic hanger that you can make yourself
The most popular materials for making such furniture are wood and metal.
Distinctive features of the products:
- Products made from wood look elegant and noble. They combine well with parquet or laminate flooring surfaces. Well suited to furniture made of natural wood.
- Metal models are durable and versatile. Metals used for their manufacture are iron, aluminum, steel, copper and others. When choosing this option, you should know that aluminum is not the most successful, it is quite fragile.
- Forged hangers amaze with their beauty and unusual shapes. They look unusual and luxurious. A wrought iron hanger will be the highlight of any corridor. Giving metal an aged look will make it more modern and picturesque. The main advantages of such a hanger are that it is durable, stable, and compact.
- Vintage hangers are very popular. The combination of antiquity and modernity adds sophistication and emphasizes history.
An interesting solution is a combination of materials: wood with fabric and metal. The materials complement each other. Wood gives solidity to the furniture, and the metal part makes it lighter and gives grace.
Wall hanger made of branches in the hallway
A very beautiful and unusual hanger is made from branches and pine boards. This craft will not only surprise guests, but will also serve as an original gift for lovers of eco-style or handmade items.
Tools and materials
To work you will need:
- The board is 2.5 cm thick and 220 cm long.
- Saw.
- Branches (the number depends on their thickness).
- Pencil.
- Roulette or ruler.
- Drill and drill bits.
- Screws.
- Glue for joining boards.
- Putty.
- Sandpaper.
- Paint and brush.
- Wall mount.
Step-by-step instruction
Let's start making a wall hanger for the hallway with our own hands:
- We make markings using a pencil and a ruler, and cut the board. You should get 4 segments: two 70 cm and two 40 cm.
- We assemble the frame and make holes in the boards with a drill. We connect the elements with glue.
- We fix the parts with screws.
- We lay out the branches and determine their size using the finished frame.
- We secure the branches and cut them to the required length.
- Carefully make a hole in the frame and branch. We fix them with a screw. We repeat the steps for other branches.
- We apply putty to eliminate defects and get rid of indentations on the frame.
- Let the putty dry. We process the wooden surface with medium and fine-grain sandpaper.
- We paint the frame and branches in the same tone.
- We fix the fastenings using a drill to the back side of the structure. A hanger made from scrap materials is ready.
Step-by-step instructions for making a wall hanger
Let's consider a simple option for making hangers from a laminated board; the only electric tools you need are an ordinary drill.
Practical advice. Experienced craftsmen strongly discourage beginners from cutting workpieces at home using jigsaws, saws and other small and low-power hand-held machines. It is much more profitable to contact specialized companies; they will not only do the cutting, but also help you draw the optimal map, do the edging, etc.
How to saw laminated chipboard without chipping
You need to know that with non-professional hand tools and minimal practical experience you will never be able to obtain high quality edges of the workpieces. And this has an extremely negative impact on the product. For example, you will not be able to firmly and beautifully glue a decorative strip to the curved edge of a slab. There will always be noticeable gaps at the joints of such parts, the appearance is far from expected, etc. In addition, so much noise is created during sawing that problems with neighbors are inevitable.
Cutting laminated boards requires not only appropriate equipment, but also skill
Step 1. Draw a sketch of the hanger or take a ready-made drawing indicating the dimensions and quantities of all parts. Prepare elements according to size. If there are many identical ones, then first you need to make one part, and then use it as a template for the rest, due to this the spread in tolerances will be reduced. The fact is that each time measuring parts under trimming is much more difficult than doing the same under a template.
The dimensions of our hanger are 1400x800 mm. For it you need to prepare the following details:
- one strip 800×250 mm for a shelf for hats;
- two strips 800×100 mm for the rear crossbars;
- four strips 1400×150 mm for the hanger wall (fence).
First you need to draw a sketch of the hanger and decide on the number of elements.
Step 2. Glue decorative edges to the open sections. This is done in several stages.
- Prepare an old heavy iron, an edge with glue applied to one side, a utility knife and a clean cloth. To glue the edge you will need an iron, a rag and a knife.
- Attach a basic device to the workbench to hold parts in a vertical position. To do this, just nail a board or panel to the edge at a distance corresponding to the thickness of the slab. For ease of working with workpieces, you can nail a board or shield to the table, leaving a gap equal to the thickness of the slab
- Cut off the required piece of edge, leave a small margin in length, the excess will then be carefully cut off. Place the tape evenly on the edge of the part, hold it with one hand, and heat it with the other with an iron. The iron should constantly move; press the hot band firmly with a cloth.
Iron the edge - Use a utility knife to carefully cut off any excess pieces. You need to cut away from yourself, otherwise there is a risk of the decor coming off.
The edges of the edge are cut with a knife - Lay the piece flat and use the back of the blade to align the width of the tape. Please note, not with the blade, but with the reverse side. With a blade you will definitely damage the front surface of the slab, cut or scratch it. And with the blunt side the tape can be easily removed and the slab remains intact. Remove excess material along the edge length
Using this algorithm, edge all hanger blanks.
Finished part
Step 3. Lay out the long pieces (fence) on the table, with the front side of the slabs facing down. Align their position along the perimeter, make the same distance. Place two 800x100 mm strips on top; they are used to fix the back wall of the hanger (fence). Take your time, check the position carefully, all distances must be exactly the same. Keep in mind that deviations of a few millimeters will be noticeable and will detract from the appearance of the hanger. It is better to level the ends with a shelf for hats; it is not needed yet.
Lay vertical slats on a flat surface and place crossbars on top
Step 4. Mark with a pencil the places to drill holes in the planks, remove them and make through holes. Place the parts on the fence again, install them in their original position and tighten the elements with self-tapping screws. The length is selected depending on the thickness of the parts. The main condition is that the end of the self-tapping screw should not reach the upper front plane of the part by about 3–5 mm. Otherwise, there is a chance that it will damage the top veneer; it will not be possible to make the problem completely invisible. And such a marriage indicates the low professionalism of the master or his inattention.
Tighten the parts with self-tapping screws
Step 5. Attach a shelf for hats. First, decide on its location; in our case, it will be fixed to all four slats. The shelves are fixed with euroscrews, the body diameter is 8 mm, and the thread diameter is 7 mm. Such sizes of hardware require the preparation of two different holes, Ø 6 mm in the shelf, and Ø 8 mm in the long fence strips.
Mark the location of the shelf
Step 6. Insert Euroscrews into the prepared holes and screw the shelf. First, you need to make two extreme connections, then insert hardware into the remaining holes and only then tighten the elements tightly.
Screw the shelf with furniture screws
Important. The simplified method allows connecting only very precisely cut parts. If the angle of the edges differs slightly from straight, the plane is not rectilinear, then Euroscrews will not be able to provide the necessary strength of the connection.
Step 7. Screw coat hooks to each plank. The distance from the shelf for hats is approximately 12 cm. Never buy cheap hooks; over time, under the weight of clothes, they become severely deformed or break off. If one hook is crooked, then everything will have to be changed. It is almost impossible to find exactly the same ones, and other models have different sizes, the new mounting holes may not coincide with the old ones. It is much easier to immediately fix reliable elements rather than engage in periodic repairs.
Complete the assembly by attaching coat hooks
The hanger is completely ready, you can fix it to the wall and enjoy the results of your work.
Video - DIY clothes hanger in the corridor
We looked at various models of clothes hangers in the corridor. A special place in this series is occupied by original products that are as close to nature as possible. Such hangers are almost not treated with paints and varnishes; only natural wooden elements are used for their manufacture. Additional decorative elements made in the same style will help make the interior of the hallway completely natural and natural. Read how to make crafts from branches with your own hands on the pages of our website.
Leather belts as hanger material
This hanger is similar to the one described in the previous section, but is more versatile. The labor costs for its production are insignificant, and with its originality it can make the interior of the house more attractive.
Required tools, materials and accessories:
- 2 soft leather straps.
- 2 pieces of hard leather.
- Wooden rod.
- S-shaped hooks.
- Needle and thread.
- Scissors.
Stages of work:
- The straps should be cut to the correct size, allowing for the length to wrap around the rod.
- Wrap the straps around the rod and sew them to secure them to the crossbar.
- To disguise the seams, cover the seams with a narrow strap, wrapping it around the main belt, and then sew it.
- Mount the hanger mount in the form of hooks on the wall or ceiling. Use a punch to make holes in the belts and hang the structure on hooks previously driven into the wall or ceiling.
- Place the required number of S-shaped hooks on the horizontal crossbar of the workpiece on which you can hang clothes.
From branches and cuts
The simplest and most financially profitable model is made from wood branches and trunks. Such a hanger will bring an element of living nature into the design, giving it the atmosphere of a cozy country house; the work will not take much time and effort. Materials can be found in a park or forest. Using pruning shears, it is enough to trim off the excess branches; the remaining ones will act as hooks. A solid piece of wood is suitable as a support for a floor hanger. The bark can be peeled, painted any color, or left unchanged. A trunk with branches can be cut into sections. Next, you should hang them on the wall on a board or frame. The result is a multifunctional, convenient interior element. The trunk can also be hung near a window or under the ceiling as a support and a kind of crossbar for hangers.
Hanger made of tree branches.
Copper pipe hanger
This craft will be useful for women who have hats in their wardrobe. In addition to hats, it can be used for drying, storing clothes and decorating the hallway.
The following materials and accessories will be required:
- Copper pipe.
- Clothespins.
- Cord.
- Scissors.
Manufacturing instructions:
- Cut and pass the cord inside the pipe.
- Attach several additional pieces of cord to the pipe, taking into account the minimum required distance between them. When hanging, hats should not wrinkle or become deformed.
- Secure the ends of the cord with the pipe to the ceiling or wall. If necessary, you should first install the fastening elements. Clothespins are attached to pieces of cord hanging from the pipe, with the help of which hats are hung. You can also hang a clothes hanger on the pipe.
Advantages of a wall hanger
A hanger is a simple and useful design. It fits well into any design, creates conditions for convenient placement of clothes and keeps usable space free.
This is especially important for small rooms. In addition, such furniture has many different variations.
Manufacturers offer a wide range of different models. But homemade is the most successful way to emphasize the unique style of the hallway.
We recommend: Several interesting interior design ideas for a small hallway.
Its main advantages:
- achieving the most successful combination with the interior;
- low cost;
- giving individuality and uniqueness;
- handmade is always exclusive and fashionable.
Despite all the apparent advantages, there is still one drawback - lack of mobility. If you want to change the design, you will have to remove traces of fastenings using cosmetic repairs.
From pallets
The main item for this idea is a wooden pallet. Before you start manufacturing, you need to remove all unnecessary elements (bottom, side wall) using a saw. You will need a part consisting of 4 long planks, fastened on the sides. The pallet must be thoroughly cleaned of odors, and all irregularities must be removed with sandpaper. After the surface is smooth, the product must be painted with wood paint and varnished on top. Use a marker to mark the places where the hooks will be attached. The pallet hanger is quite massive, and you need to choose a reliable fastening. Attach the hooks to the pallet, then use self-tapping screws and a drill to hang the pallet on the wall. Additionally, you can nail the shelves and holders.
Hanger with shelf
You can take the idea as a basis and use any other “hooks” and stops. This DIY wall hanger is made from two 25mm planed boards, two carpenter's squares and five hammers.
This is what happened
The wood needs to be dry, otherwise cracks may occur. Instead of squares, you can even use triangular pieces of a similar board. An important condition is the presence of a right angle. And instead of hammers, you can even fasten knots or, for example, cut wooden hangers, or any hooks. This option is just a gift.
Two dry planed boards Spare parts - hammers and squares
The two boards must be the same length. An exact match is important. Having adjusted the length, we sand the edges. There is a drill - we take the attachment, attach the emery and sand first with coarse grain, then with medium grain. Then we start marking. First, we mark where the stops will be attached. We divide the remaining distance by six, put marks - there are five of them. Just according to the number of “hooks”.
Marking the installation of stops and hooks
We mercilessly cut off the handles on the hammers. We cut it slightly diagonally to create a slight slope.
We saw off the handles of the hammers
Using a drill, make holes in the center. The diameter of the drill is 1-2 mm smaller than the fastener used, the depth of the hole is no less than the length of the self-tapping screw.
Drilling holes for self-tapping screws
The two boards must be connected at right angles. The installation step of the screws is 10-15 cm. We mark the places on the sidewall and transfer them to the end. High accuracy is required. We apply one to the other and transfer the marks with a finely sharpened pencil. We make holes according to the markings.
Drilling holes
We fold the boards at an angle of 90° and connect them with self-tapping screws. First we twist the two outermost ones, then the one in the middle, and then all the rest. The length of the screws is at least 75 mm (triple the thickness of the board).
Bonded boards
Using the markings, we drill holes for the hooks.
Drilling holes for hooks
We install angle stops. Since carpenter's squares were used, there were no holes in them. They were drilled - two at the top and bottom on each plank. There are 8 screws on one stop. We take them small - more than 20 mm, so as not to puncture the wood. Therefore, a large number of them are required.
Installing stops
The wooden wall hanger is ready. All that's left to do is paint it and hang it on the wall.
Ready option
Based on this homemade hanger, other versions were made.
Narrower boards with more voluminous shelves
From longitudinal and transverse boards
This roomy model will fit shoes, hats, and jackets. To begin, fix 2 longitudinal planks on the wall: bottom and top. The length is determined depending on how wide the shelves you plan to make. Using self-tapping screws, attach transverse bars to the longitudinal boards. The interval should be sufficient to store clothes, the quantity can be any - choose at your discretion. In order to make even fastening of the elements, use a level. To construct the support, use bars (in the future this will be a shelf for shoes). Use metal corners to secure the connections. Also, with their help, secure a shelf on top (for hats, hats, gloves) perpendicular to the longitudinal boards. The final stage will be attaching the hooks and decorating.
Decoration
Unusual design solutions can transform any, even unsightly, hallway. To maintain a classic style, the hanger can be covered with leather (leather substitute) or preserve the natural beauty of wood, if that is what was used. Paint the hooks with bronze or gold paint. Upholster the hangers with velvet and satin fabric. For country music, use additional accessories in the form of horns; they can be cut from wood. For a retro style, the color can be artificially aged; the decoupage technique is used for Provence. Glue or draw flowers, images of birds, landscapes as prints. In a modern interior, experiments, unusual shapes, original accessories, silhouettes, and complex intricate patterns are acceptable. You can decorate and add originality with rhinestones, sequins, handmade decor, drawings, bows. Apply images of your favorite cartoon characters, TV series, books.
Original types of hangers
Any design is interesting for its originality and lack of stereotypes. When making furniture for the hallway, you have the opportunity to show your imagination, experiment, and find a non-standard solution for making planks and hooks using available materials. For example:
Original hanger
- done in a nautical style . The blue color of the base and anchor-shaped hooks will look colorful and elegant;
- artificially aged wood with images of animals and birds will delight nature lovers and give the corridor an interesting look;
- to decorate a loft-style room, hooks made from wrenches will look good;
- a very stylish, environmentally friendly option - connecting slats in the shape of rhombuses . Hooks can be placed at different heights, which will increase capacity;
- affordable and modern - pallet hanger . Strong and environmentally friendly material will allow you to complement the model with various shelves. To give it a finished look, it can be coated with stain or varnish, thereby preserving the beauty of the wood;
- an interesting idea for making hooks from cutlery (spoons, forks), which can be easily bent in half and attached;
- You can decorate the product in an original way with aluminum leaves . The material is pliable to work with, cuts well and looks unusual.
We recommend DIY hallway
Modern interior style makes it possible to boldly show imagination and combine various materials when modeling a simple wall hanger with your own hands.
Any individual, non-standard solutions will help preserve space and emphasize the individuality and creativity of the room.
Please yourself and surprise those around you with bold manifestations of invention and imagination.
Adviсe
- To avoid cracks in the wood, it is recommended to drill holes with a drill before screwing in the screws.
- The diameter of the screw must be larger than that of the drill. Fill the holes with glue in advance, and then screw in the self-tapping screw - this way the product will be able to carry a lot of clothing weight and will be more wear-resistant and strong.
- For metal hangers, use paints and coatings that resist corrosion.
- At the planning stage, it is definitely important to take into account the dimensions of the wall, think about exactly how you will secure the workpieces, taking into account the material from which the wall is made (concrete, wood, plastic).
- All wood blanks must be processed with a grinding machine or sandpaper, at least 2 times: first with a coarse grain, and then with a fine grain.
From forks
If you want to somehow decorate the hallway and do something creative and unusual with your own hands, feel free to embody your ideas. The idea is very interesting, especially if you want to make a hanger out of forks. At first glance it may seem that this is not entirely possible, but you are wrong.
To create an unusual hanger we will need:
- table forks;
- board;
- self-tapping screws;
- screwdriver;
- spray paint;
- drill;
- pliers;
- varnish;
- brush.
First of all, we will need to bend the forks in a certain way. We do not touch the two outer teeth of the fork, we only bend them slightly for the convenience of further work. And we bend the two teeth in the middle using pliers into two parallel arcs. If you don’t get an equal arc, it’s okay, it will only give your hanger originality. You will also need to slightly bend the fork handle. The bend should be made approximately in the middle of the handle. This can be easily done by hand.
We carry out such actions on each of the forks. By the way, you can choose absolutely any number of forks on your hanger. Just remember to choose a board that is the right length.
To secure the forks to the board, you need to drill small holes in them for screws. The hole should be located slightly below the bottom edge of the fork's bent tines.
Next we prepare our board. If it's a little uneven, we'll have to cut off the ugly edges and sand them down to even out the surface a little. To give the board some shape, grind the corners a little. After this, we coat the board with varnish. It is advisable to do this on the balcony or on the street. Apply the varnish with a brush in one direction and leave until completely dry. If desired, the board can be painted in a color that matches the interior of your hallway. After the varnish on the board has dried, we can attach the forks. The forks are screwed on with self-tapping screws using a screwdriver or screwdriver. After securing the fork legs, bend them slightly upward.
Our fork hanger is ready. All that remains is to drill two holes with which the hanger will be attached to the wall.
Master class “Hanger made of real wood”
The word “wood” does not mean just wooden material (board), but pieces of real natural wood. Oak chocks are best suited for this work, perhaps even with knots, which will serve perfectly instead of banal hooks.
Progress:
- The first step is to get the decks and cut them in half to the required sizes. It is best to do this outside the apartment, because sweeping out all the garbage will be quite difficult.
- To find out the optimal sizes of the required logs, make blanks approximately 15*15 centimeters, the diameter of the branches no more than 3-4 cm.
- One side of the chip will need to be leveled with an electric plane.
- The next stage of the process will be preparing the surface for use. It would be a good idea to treat the tree with special agents against fungi and insects. It is best to coat the top with a clear varnish to preserve the natural color. Of course, you can also apply paint, which will look much more interesting.
- Self-tapping screws will help you mount our hanger to the wall. First you need to drill a chamfer, then prepare a hole. The diameter should match the screw. This precaution will help prevent damage to our product.
The hanger will undoubtedly attract attention and also brighten up the boring atmosphere of the room. Most often, this option is placed in a country house or in a country house, less often in apartments or mansions.
A selection of interesting ideas
To make a luxurious hanger for a corridor or hallway, just find a slab of the appropriate size and coat it with varnish. The more textured the cut edges are, the more beautiful and rich the final result looks. To create a wall hanger, you will also need hooks: they are attached in one row at the same distance from each other.
A hanger made from rebar looks even more unusual. To weld the structure, you will need special tools and skills. The brutal design of the product will organically fit into a loft-style interior.
An even more crude, but original version of a hanger for a “man’s den” is a structure made of a metal pipe, mounted on the wall. Large construction hooks serve as clothing holders. Such a designer item costs several thousand rubles, but you can make it yourself.
Adherents of eco-style will appreciate this floor hanger made from real branched wood. To turn waste material into a useful and beautiful piece of furniture, you need to select a dry tree trunk of a suitable size and trim off excess branches. Small knots are useful for hanging light items. The bark can be peeled or left, depending on the artist. You can secure the trunk using self-tapping screws, branches, a round piece of wood or a regular board. If the bark is removed, it is best to cover the product with stain, varnish or paint.
A hanger made from a pallet will fit perfectly into a bright modern interior.
For its manufacture, it is recommended to choose a pallet that meets EUR or EPAL standards. First, you need to clean the workpiece from dirt and treat it with a grinder: there should be no dangerous defects on the surface. Then you should saw off the excess parts of the pallet, leaving only the frame. The structure can be painted or varnished. Lastly, you need to fix the hooks for caps, scarves and other things, after which the product can be hung on the wall.
Even the remains of pallets can serve as an original decoration for the hallway: just use your imagination.
A lightweight and inexpensive clothes rack can be assembled from ordinary plastic pipes. If you adhere to a certain manufacturing technology, the design will be strong and durable. For manufacturing you will need pipes with a diameter of 20-25 mm, right angle bends, T-shaped connectors, plugs, caps and glue. If desired, the product can be painted with spray paint with a metallic effect. This stand will look great in a country house or garden.
General characteristics of hanger designs
The traditional and almost the only option forty years ago for a hanger in the corridor was a wooden board with screwed aluminum hooks. In those days, the industry was solving problems with fulfilling production volume plans; minimal attention was paid to design and quality.
Over time, the designs became more complex, with separate sections for different types of clothing, shelves for hats and shoes. There were options with small cabinets and bedside tables, wall-mounted and built-in, free-standing and combined, portable and stationary. Currently, the range of hangers has expanded to several hundred models; most large and small manufacturing companies produce their own original products.
Modern hangers are very diverse
Craftsmen make even more options on their own. Moreover, now various hand-held and stationary woodworking tools and equipment are available to them, and restrictions on the complexity of the technology for manufacturing hanger structures have been completely removed. From a technical point of view, the capabilities of individual craftsmen are almost no different from industrial companies, the only difference is in productivity.
Floor hangers
A separate category of special furniture for hallways has special hooks for storing not only clothes, but also hats, umbrellas, handbags and other personal items. Such hangers can be made of wood or metal; there are no restrictions on the shape. Floor models are made in styles from retro to high-tech, designed for several guests or a large company.
This hanger can hold a lot of things.
The advantages of floor hangers for the hallway include the following qualities.
- Mobility. It can be moved to another place at any time, and not only in the hallway. There are types of interiors in which simple floor hangers are used instead of conventional cabinets. They store both outerwear and for constant wear.
- Most modern models have adjustable parameters. The height and width of the racks can be changed at will, making it possible to store items of different lengths.
- Wide selection of design solutions. Each owner selects furniture for himself, taking into account the existing situation in the living rooms.
An example of a designer floor hanger
The cost of products varies widely; such hangers are found both in prestigious buildings and in half-empty apartments of young people just starting their adult life. Unfortunately, for self-production you need to choose only the simplest models, since many hangers have rather complex engineering solutions. Only experienced professionals can perform them at home.
Wall hangers
Wall-mounted models are the most popular and are even more diverse than floor-mounted designs.
A stylish wall hanger will decorate the hallway
They are most often made of wood and metal; there are many combined models; factory-made hangers can also be made of plastic (the most budget option). Wall hangers take up less space, which is very important for small spaces; they are much easier to make with your own hands.
One of the simplest options for a homemade hanger
Examples of homemade hangers
Let's give a brief overview of the most common hangers, both traditional and made in a modern style, with a very non-standard design.
Table. Popular options for clothes hangers.
| Material of manufacture | Brief description of performance characteristics |
| Only steel cutlery is suitable; aluminum cutlery does not have sufficient mechanical strength. Forks and spoons are aligned, geometry can be changed. The handle bends and serves as a hook; the elements are fixed to boards or furniture boards. Such hangers are often installed by creative people who prefer everything unusual. The main thing here is not the functionality of the hanger, but the opportunity to surprise your friends. |
| Pallets | Quite a fashionable material for making furniture today. Pallets are used not only for simple hangers, but also for quite complex sofas and beds, dining tables and work tables, etc. In this way, designers are trying to create unusual interiors, pay attention to the recycling of production waste, and environmental protection. |
| Tree branch cuttings | Branches and trunks of small diameter are selected, from which pieces up to 30 cm long are cut, the protruding parts serve as hooks. Clothes are hung on thin ones, hats are hung on large ones. Such a hanger looks great not only in a country house or in a country house - in city apartments it can be used to create unique hallway interiors. You just need to think through everything and supplement it with the same crafts from natural untreated wood. |
| Combinations of very different and widely used individual materials make it possible to end up with beautiful, cheap and durable hangers. As for design and decor, most models have a traditional look, implying a familiar classic shape and a minimum of decorative elements. The simplest versions of hangers also have their connoisseurs and are quite often found in hallways. |
| The structure is entirely wooden, even the hooks are cut from boards. Surfaces can be scorched with a blowtorch to age and highlight the beauty of the texture. If you don’t have a blowtorch, soak it in stain; if you have time and money, buy and work with several types of special paints. Such hangers have many design solutions, from the simplest to the very complex. |
| Such designs provide the opportunity to show maximum imagination. Various plants and figures are cut out of the sheet, and clothes hooks are attached to them. The hanger is quite simple to make and at the same time looks very prestigious. |
| Plywood | With the help of such products, it is much easier to teach children to dress/undress independently. Children's hangers should be beautiful and cheerful, reminiscent of fairy tale or cartoon characters, and attract attention with bright multi-colored colors. They are usually small in size and are attached at a child-friendly distance from the floor. |
It is impossible to list all the models, because each craftsman may have his own version of the hanger.
Forged clothes hangers
One of the advantages of making hangers yourself is the ability to create a completely unique design. We have given only examples of design ideas, and you can further develop them taking into account your own concepts of beauty, attractiveness and efficiency. At the same time, you must constantly keep in mind the features of the hallway.
The design and color scheme of the hanger must match the interior of the room
Photo gallery
If there is little space in the hallway, this disadvantage can easily be turned into an advantage by creating an open hanger or stand with your own hands. The finished product can become the highlight of the interior. Several more unusual options and original ideas are presented in our gallery.