A hanger rack, hooks on the wall, hangers in closets are convenient and very optimal attributes in the house. To save space in the hallway, it is advisable to install these interior items instead of shelving. There are many original ideas with which you can create them yourself. Using personal preferences in colors, from any material, on any topic (which is close to you and like, for example, wildlife) and, accordingly, of any shape. The quality and characteristic properties will not be inferior to the version purchased in the store, if you approach manual work wisely. The undoubted advantage will be that a hanger in the hallway with your own hands will be individual, unique, and will cost minimal material costs. It is also important that it will be possible to make options that are most suitable for the design of the entire room, which will be in harmony with it. Creating comfort in your home with your own hands is a truly exciting activity.
Hanger in the hallway.
Purpose of the hanger
The main functions that this multifunctional interior item performs:
- Clothes storage. Thanks to her, it does not wrinkle, looks neat and hangs neatly in its place;
- Save time. You can immediately visually assess where and what is located, which allows you to save time and not waste it searching for this or that wardrobe item;
- Proper organization of space in the hallway or corridor, if they do not have a large area, and compact distribution of things in closets.
Save space and time with a hanger in the hallway.
If there are built-in shelves, you can store items in them; there are also options with shelves for shoes and hats.
In addition, there are models that are used as a decorative element, to decorate and give a certain charm to the interior. They are not used for their intended purpose and are made from fragile, impractical materials.
Destination options
The convenience of hangers lies in the fact that you can place on them almost any items that should always be at hand:
- outerwear in the hallway;
- everyday wardrobe items;
- accessories;
- kitchen utensils;
- towels in the bathroom and much more.
At the same time, a wide selection of materials and designs makes it possible to create a unique original model.
A self-made hanger will be inexpensive, fit perfectly with the interior, and be an exclusive handmade item.
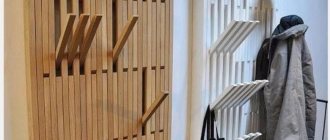
Wooden hangers
Wall design
A wooden structure will fit well into almost any interior. In order to get started, you need to decide what size and height of the hanger you need. Based on this, saw off a suitable fragment of the board. Using a jigsaw, cut out the rounded edges with smooth lines, after which they need to be sanded with sandpaper, first coarse, and finally fine-grained. The board must be treated with a blowtorch or over a gas burner. Attach the resulting blank to the wall; there are 2 methods for this:
We process the board with a burner.
- Attach metal ears to the back side. To fix it with long screws, drill holes in the fastener;
- Fasten the workpiece directly to the wall by drilling through holes.
The final step is to secure the hooks with screws.
If you want to make your wall hanger more spacious and fit more things, then you should choose triple hooks. Antique-made ones will look unusual and beautiful.
Floor design
- Make a cross.
Cut the beams (60-70 cm in length) into 2 equal parts, sand them with sandpaper and connect them at an angle of 90 degrees. In sections of the cross, select recesses along the entire perimeter to make the connection more tight. We make a cross. - Using a fitting, cut out 4 supports for the trunk. Screw it to the legs and trunk with self-tapping screws.
- Attach a small rectangle with hooks placed on it to the top of the trunk.
- Cover the product with varnish and stain. Go over it again with sanding paper and stain it.
Thanks to the stain, the natural pattern present on the wood will acquire clearer contours. Glue rubber to the bottom part, made by yourself, so that it does not slip and scratch the parquet.
DIY floor hanger.
Get into the details
- Using a hand router, make 10 mm wide and 13 mm deep folds on the back of the frame for each of the openings. Then trim the corners with a chisel.
Back view
Advice. To prevent chips from forming during milling, you need to change the direction of movement of the machine counterclockwise. But at the same time, you need to get used to the behavior of the router. The cutter must be sharp. Hold the router firmly with both hands.
- Then we will prepare places for the glass holders under which the photographs will be placed. To do this, use a Forstner drill with a diameter of 38 mm to drill 8 mm recesses. Next, in the center of the recesses, make mounting holes for the screws that will secure the holders. The depth of the holes is no more than 10 mm.
- According to the drawing below, behind the side posts, mark the centers of the holes with a diameter of 16 mm and with the indicated depths. They are needed to install the lugs.
Recess for hanging eye
- Level the walls of the recesses - use a chisel. Place the lugs in the groove, make marks for its fastening and drill mounting holes up to 16 mm deep.
Note. The size and type of lugs may vary. Act according to the situation. Here we offer one of many options.
- In our case, we used wooden pegs as a hanger for clothes and bags. To do this, it was necessary to drill holes on the front side of the structure with a diameter of 13 and a depth of 16 mm. Then glue in the pegs.
You can make holders for bags or a hanger for children below the clothes hanger so that they can reach them and learn to undress themselves.
Bag hanger
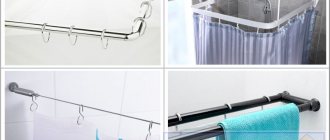
From copper pipe
Copper products are always relevant and have a decent appearance. To do the work yourself you will need: copper pipes: 60 cm - 4 pcs.; 150 cm – 2 pcs.; 90 cm – 1 piece; copper tees – 2 pcs.; epoxy adhesive; copper corners – 2 pcs.
Copper tubes for hangers.
To make the base, you need to connect 2 copper pipes (60 cm) with epoxy glue using a tee. Do the same for 2 other pipes of the same size.
Attach 2 corners to the pipe (90 cm) (later it will serve as a crossbar on which you need to hang clothes). The next step is to insert 2 pipes (150 cm) into the tees and connect the upper part of the pipes with the corners.
After the glue has dried, the product can be used for its intended purpose. It is also possible to add a wooden stand, attach the legs to it and use it to store shoes.
DIY copper hangers.
Materials and tools
Almost anything can be used as a material to create hangers. Wood - in the form of planks, slats, branches; also plywood and chipboard. Fittings, rope, horns (any), pipes (even plastic) will do - it all depends on your imagination.
Self-tapping screws, bolts and screws are used as fasteners. The set of tools is the simplest:
- jigsaw;
- electric drill;
- screwdriver;
- screwdriver;
- hammer;
- roulette;
- level;
- hacksaw for metal.
Naturally, if you work with wood, then a hacksaw for metal will not be needed, and if only metal is present, then a jigsaw is of no use.
From leather belts
A belt can serve not only as a stylish accessory, but also as an interior item. To make a hanger from an old leather belt, you need to cut off its fasteners, giving the ends an oval shape. Then combine the 2 ends of the belt and use an awl to make a hole at a distance of approximately 3-5 cm from the edge. Make a wooden peg with a diameter less than the width of the belt. Fold the belt in half to form a loop and secure it to the wall with a self-tapping screw or a regular nail. Using reliable glue, glue the peg to the base of the loop (where the nail is located).
You can also make 2 such loops at a symmetrical distance from each other and thread the crossbar through the loops. Clothes can be hung either on the loops themselves or on pegs or a crossbar. This hanger looks very stylish and can be improved in many ways by adding bright appliqués, decorations, additional elements, etc.
Hanger made of leather belts.
A selection of interesting ideas
To make a luxurious hanger for a corridor or hallway, just find a slab of the appropriate size and coat it with varnish. The more textured the cut edges are, the more beautiful and rich the final result looks. To create a wall hanger, you will also need hooks: they are attached in one row at the same distance from each other.
A hanger made from rebar looks even more unusual. To weld the structure, you will need special tools and skills. The brutal design of the product will organically fit into a loft-style interior.
The photo shows a hanger made by yourself, the service life of which is close to eternity.
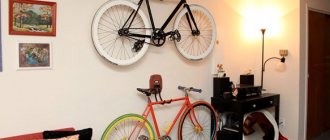
An even more crude, but original version of a hanger for a “man’s den” is a structure made of a metal pipe, mounted on the wall. Large construction hooks serve as clothing holders. Such a designer item costs several thousand rubles, but you can make it yourself.
Adherents of eco-style will appreciate this floor hanger made from real branched wood. To turn waste material into a useful and beautiful piece of furniture, you need to select a dry tree trunk of a suitable size and trim off excess branches. Small knots are useful for hanging light items. The bark can be peeled or left, depending on the artist. You can secure the trunk using self-tapping screws, branches, a round piece of wood or a regular board. If the bark is removed, it is best to cover the product with stain, varnish or paint.
A hanger made from a pallet will fit perfectly into a bright modern interior. For its manufacture, it is recommended to choose a pallet that meets EUR or EPAL standards. First, you need to clean the workpiece from dirt and treat it with a grinder: there should be no dangerous defects on the surface. Then you should saw off the excess parts of the pallet, leaving only the frame. The structure can be painted or varnished. Lastly, you need to fix the hooks for caps, scarves and other things, after which the product can be hung on the wall.
Even the remains of pallets can serve as an original decoration for the hallway: just use your imagination.
The photo shows sanded pieces of wood, painted in different colors and fastened together on a wooden base.
A lightweight and inexpensive clothes rack can be assembled from ordinary plastic pipes. If you adhere to a certain manufacturing technology, the design will be strong and durable. For manufacturing you will need pipes with a diameter of 20-25 mm, right angle bends, T-shaped connectors, plugs, caps and glue. If desired, the product can be painted with spray paint with a metallic effect. This stand will look great in a country house or garden.
The photo shows an easy-to-assemble stand made of white PVC pipes.
From branches and cuts
The simplest and most financially profitable model is made from wood branches and trunks. Such a hanger will bring an element of living nature into the design, giving it the atmosphere of a cozy country house; the work will not take much time and effort. Materials can be found in a park or forest. Using pruning shears, it is enough to trim off the excess branches; the remaining ones will act as hooks. A solid piece of wood is suitable as a support for a floor hanger. The bark can be peeled, painted any color, or left unchanged. A trunk with branches can be cut into sections. Next, you should hang them on the wall on a board or frame. The result is a multifunctional, convenient interior element. The trunk can also be hung near a window or under the ceiling as a support and a kind of crossbar for hangers.
Hanger made of tree branches.
From perforated sheet
This hanger will display the phrase “I can also cross-stitch” in every sense, show your creativity and become a good home decoration.
Materials
In order to create it, you will need the following materials:
- plastic or metal panel with perforation,
- multi-colored floss threads (in principle, knitting threads are also suitable),
- scissors,
- hooks (in this case 4 pieces with a ball at the end).
TIP: where can I get such a perforated sheet? At any hardware or furniture store, ask for perforated sheet. And they will cut you the size you need.
Work order:
- We buy a perforated sheet of the required size.
- You do regular cross stitch with threads, only the fabric is larger.
- You can choose any word you like, or a simple picture (a heart, for example), the main thing is to make sure that everything fits and the spaces between the letters are the same.
- When the inscription is ready, attach the hooks through the holes in the panel and hang the hanger on the wall (you don’t even need to drill holes for the fasteners, they are already there).
Here you will also find furniture ideas for a small and narrow corridor!
From pallets
The main item for this idea is a wooden pallet. Before you start manufacturing, you need to remove all unnecessary elements (bottom, side wall) using a saw. You will need a part consisting of 4 long planks, fastened on the sides. The pallet must be thoroughly cleaned of odors, and all irregularities must be removed with sandpaper. After the surface is smooth, the product must be painted with wood paint and varnished on top. Use a marker to mark the places where the hooks will be attached. The pallet hanger is quite massive, and you need to choose a reliable fastening. Attach the hooks to the pallet, then use self-tapping screws and a drill to hang the pallet on the wall. Additionally, you can nail the shelves and holders.
DIY pallet hanger.
Photo gallery
If there is little space in the hallway, this disadvantage can easily be turned into an advantage by creating an open hanger or stand with your own hands. The finished product can become the highlight of the interior. Several more unusual options and original ideas are presented in our gallery.
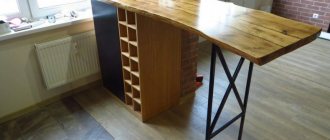
From longitudinal and transverse boards
This roomy model will fit shoes, hats, and jackets. To begin, fix 2 longitudinal planks on the wall: bottom and top. The length is determined depending on how wide the shelves you plan to make. Using self-tapping screws, attach transverse bars to the longitudinal boards. The interval should be sufficient to store clothes, the quantity can be any - choose at your discretion. In order to make even fastening of the elements, use a level. To construct the support, use bars (in the future this will be a shelf for shoes). Use metal corners to secure the connections. Also, with their help, secure a shelf on top (for hats, hats, gloves) perpendicular to the longitudinal boards. The final stage will be attaching the hooks and decorating.
Hanger made of longitudinal and transverse boards.
Hanging
This type is non-standard, but the ease of assembly of the hanger allows you to make it yourself. The basis of the structure is a horizontal pipe for hangers, suspended on ropes, cables or chains.
Such models are non-standard. For stability, the crossbar pipe is often mounted in a frame supported by furniture or a wall.
The process of making a hanger
Cut out a template from a sheet of plywood and transfer it to the timber with a marker. Drill 2 holes in the inner part and use a jigsaw to cut out the outlined template. Mark the hole for the hook and then drill it (diameter 5 mm). Cut a notch in the inner part of the drilled hole (using a file with a large notch), place the nut in it. The notch is needed in the future to prevent the formation of snags during operation. Saw off 20 centimeters of wire with a narrow handsaw, round off one end with a file, chamfer the other and cut the thread with a metal-cutting die (length about 5 mm). Drill a hole for the hook, which needs to be bent, then insert and secure firmly with a nut.
Types of design and construction
There are 2 types of structures: designed for storing wardrobe items inside the closet and outside it. The first type is the so-called “standard model,” that is, hangers with a hook. They fit in the closet, the hook is placed on the crossbar, and things hang on hangers. In this model, a crossbar is made between the sides so that trousers (skirts) can be hung over it, which makes it more multifunctional. Some are made with notches so that you can hook clothes with eyelets and straps onto them.
The second type includes those on which coats, jackets, raincoats, and fur coats are usually left:
- Floor-standing – they are a rack with hooks located at different levels. They can be on several legs, with wheels, special places for hangers;
- Built-in - represent a single unit with the rack. Differ in functionality;
- Wall-mounted – this model is usually supplemented with mirrors, shelves, and various accessories. All structures located outside the closet must be able to support the weight of heavy clothing.
Decoration
Unusual design solutions can transform any, even unsightly, hallway. To maintain a classic style, the hanger can be covered with leather (leather substitute) or preserve the natural beauty of wood, if that is what was used. Paint the hooks with bronze or gold paint. Upholster the hangers with velvet and satin fabric. For country music, use additional accessories in the form of horns; they can be cut from wood. For a retro style, the color can be artificially aged; the decoupage technique is used for Provence. Glue or draw flowers, images of birds, landscapes as prints. In a modern interior, experiments, unusual shapes, original accessories, silhouettes, and complex intricate patterns are acceptable. You can decorate and add originality with rhinestones, sequins, handmade decor, drawings, bows. Apply images of your favorite cartoon characters, TV series, books.
Stylish and original ideas for wall hangers for the hallway
For rooms in a classic style, a wooden or metal product with a laconic decor is suitable. Modern models offer the opportunity to experiment with the shape of the bar and the type of hooks. Designer products favorably emphasize the originality and relevance of the interior. Funny figures, original designs, original shapes - the more unusual the furniture looks, the more interesting the overall design of the hallway will be.
In the loft style, you can use furniture with hooks like wrenches. Metal structures are well suited for high-tech hallways.
For a room in the Scandinavian style and minimalism, you can choose any model, the main thing is that it has compact dimensions and does not have excessive decor.
Wooden hanger
Solid wood hanger with mirror for the hallway
Adviсe
- To avoid cracks in the wood, it is recommended to drill holes with a drill before screwing in the screws.
- The diameter of the screw must be larger than that of the drill. Fill the holes with glue in advance, and then screw in the self-tapping screw - this way the product will be able to carry a lot of clothing weight and will be more wear-resistant and strong.
- For metal hangers, use paints and coatings that resist corrosion.
- At the planning stage, it is definitely important to take into account the dimensions of the wall, think about exactly how you will secure the workpieces, taking into account the material from which the wall is made (concrete, wood, plastic).
- All wood blanks must be processed with a grinding machine or sandpaper, at least 2 times: first with a coarse grain, and then with a fine grain.
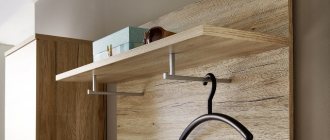
Add a shelf, brackets and backdrops
- Cut out shelf E - 18x102x914 - 1 pc. We made a groove for crayons along the front edge of the shelf - 13 mm wide, 3 mm deep. If there are no windows for writing with chalk, then you don’t have to do it.
- Then install part E in place - center and align the rear edge with the back side, clamp with clamps.
- Next, we will make brackets from 18x76x114 boards - 2 pcs.
- Make two copies of the bracket template and glue them onto the boards.
- Cut out the brackets with a band saw or jigsaw. Sand the edges and ribs.
- Glue the brackets to the frame posts and shelf using wood glue. Secure with clamps.
- Make back platforms G for photography, for painting - 6x130x181 - 5 pcs. For photographs you also need glass 3 mm thick.
Wall hanger for jewelry and scarves
Photo gallery: DIY hallway hanger
White hanger in the hallway.
Drawings and ideas for DIY
Drawing of a wall hanger with dimensions
Assembly procedure A simple version of a hanger for making it yourself Dimensions of a hanger with a shelf