Chairs with a metal frame have gained particular popularity in recent years and compete with wooden models, because the metal base is designed for heavy loads, which means it will definitely last for many years. There are a large number of options for manufacturing such products, and in order to make a choice it is necessary to study them in more detail.
Chairs with metal frame
Advantages and disadvantages of chairs with a metal frame
Chairs with a metal frame have many positive qualities:
- Strength and durability. Such products can even last for several decades. In addition, due to their ability to withstand heavy loads, they are suitable for people with curvy figures or large body weight, and that is why they are most often installed in public places.
- Resistance to various external influences. Metal chairs withstand mechanical damage, high temperature, and excessive humidity. They rarely corrode, so the structures can be safely installed even in the garden.
- The structure can be easily repaired even at home. At any time it will be possible to replace a boring seat or even a backrest, while you can leave the same metal frame, painting it if necessary.
- Plastic. Metal can be given any shape, which does not affect its strength in any way. Therefore, there are dozens of design options for such furniture.
Chairs with a metal frame can have the most unusual shapes - Possibility of decoration in any way. Of course, the metal structure can be left in its original form, but you can easily cover it with a special coating of any color.
- Lack of maintenance requirements. In this regard (compared to the same wood), any metal structures are unpretentious.
- The products look stylish and will suit a variety of room decors. They are used both at home and for bars, restaurants, and country houses.
You can read about how to make a bar stool with your own hands in our special article.
Chairs with a metal frame are not difficult to clean.
The only disadvantage we can note is the large weight of the structure, which can make it difficult to move it around the room. However, for most people this feature is not a minus, so if you do not plan on frequent rearrangements, you can safely choose this option.
Important point! Not all structures are heavy - some frames are hollow inside, which means they are lightweight.
A frame made of hollow pipes will be lightweight.
Another disadvantage of certain types of metal is the likelihood of corrosion - a protective coating will help prevent such a problem. In addition, it is better if there are special attachments on the chair legs. Otherwise, the structure will damage the flooring.
What types of chairs are there with a metal frame?
Table No. 1. The most popular models of metal chairs.
| View, illustration | Description |
| Classic | In appearance, such models are not very different from wooden chairs. There are still four legs, a seat and a backrest. However, the structure will be more durable due to a reliable frame. |
| Viennese | Since the metal has good ductility, various designs can be made from it. These can be any bent parts, rings, etc. |
| Armchair chair | These are more massive products that are more comfortable. Such chairs have a soft seat (sometimes also a back), as well as armrests. Thanks to these features, the furniture looks more respectable, but it is worth considering that such chairs will take up more free space than standard options. |
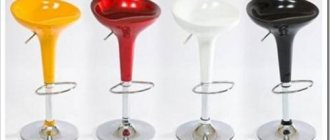
| Bar | Bar stools can also have different appearances: · the simplest and most laconic product is a stool. It will not be very comfortable to sit on it for several hours in a row, because there is no backrest. · A chair with a backrest is already comfortable. Its height may vary. · The most comfortable option is a bar chair with a high back. Typically, such chairs also have an additional footrest at the bottom. |
| Designer | Designers create all kinds of sketches for chairs, which are then made of metal, resulting in rather extravagant products. Due to the complexity of the structure and original design, the cost of such furniture is high, but the likelihood of encountering such furniture in someone else tends to zero. |
Video - Making Viennese chairs
Frame: manufacturing features
Chair frames are made from various metals; if properly processed, they can withstand any negative impact. The most commonly used types are:
- Aluminum. This material is lightweight, so it is mainly used to create small parts. The main advantage of aluminum is that it has excellent resistance to high humidity and corrosion. However, aluminum is not the strongest metal and will definitely not support too much weight.
- Steel. From such metal it is already possible to make large products that should be as durable as possible. Without treatment, steel will corrode, so the material must either be coated with appropriate finishing paints or varnishes, or be stainless.
- Cast iron. This is a very durable metal, the main disadvantage of which is considered to be too much weight. Therefore, it is mainly used to make garden furniture that does not have to be moved regularly. If left untreated, products will also corrode. In addition, cast iron is not the best material option for making a chair yourself.
A chair with an aluminum frame does not require additional processing
There are the following methods for connecting parts of a structure:
- Welding. This is a very reliable method of fastening parts, which will require the craftsman to mask the welded joints. In addition, for work you must have special equipment and skills to work with it.
- Bent elements. You can make the frame of a metal chair from just one plastic pipe. In this case, you will not need any fasteners at all, but you will need a special machine - a pipe bender.
- Bolts. It is in this way that parts of a metal frame are often connected (in this case, all fasteners must remain on the inside). In addition, the bolts will have to be tightened periodically, because the nuts often loosen while using the chair.
By bending pipes you can make a frame of any complexity
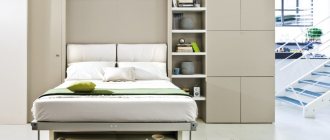
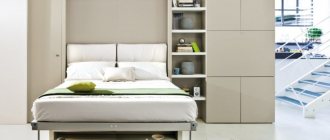
The frame can be solid or folding. The first option is the most common. These are standard chair designs that need to be allocated a separate place. The second option is compact chairs that, if desired, can be easily folded, making them convenient to store. In addition, folding products are best suited for small apartments.
An example of a comfortable folding chair
To ensure that the metal does not lose its normal appearance for a long time, it is necessary to use a special coating. The most popular ways to preserve a metal frame can be seen below.
Table No. 2. Common methods of coating metal a.
| Way | Description |
| Coloring | On sale you can find a large number of enamels intended for metal structures. This coating has good resistance to many negative factors, including high temperature and humidity, so the structure can be safely installed in the kitchen and even in the bathroom. The smooth surface has an excellent appearance after drying, and not only gives the furniture aesthetics, but also helps protect the material from corrosion. |
| Sputtering | In the production of metal furniture, chromium and titanium coatings are often used. Such coatings protect the metal from corrosion, have an attractive appearance and good resistance to damage. |
| Etching | The processing principle is based on the fact that the structure is impregnated with special chemicals. This allows the metal to change its properties and stop “reacting” to humidity. |
| Varnishing | The advantage of the coating is that there is a wide variety of finishing varnishes of various colors. Varnishing will also protect the metal frame of the chair from rust, but only if the layer is renewed from time to time. |
Products after painting
Required Tools
To work, you need to prepare a basic set of carpentry tools. It is simply impossible to make any wooden furniture without carpentry tools. Professional furniture manufacturers have fully equipped workshops with expensive, specialized equipment. But in order to prove yourself as a carpenter, of course, you shouldn’t immediately buy professional equipment, but you still need to prepare some tools.
Seat and back: manufacturing features
Fully metal chairs are not comfortable; they are usually used at train stations, airports, hospitals and other places where there is a large flow of people every day. Household products should be more comfortable, so a back and seat made of a different material are placed on a metal frame.
Depending on the purpose of the chairs, different materials are also used to make the seat and back; they differ in strength, wear resistance and cost.
Table No. 3. Materials for making the seat and backrest.
| Material, illustration | Description |
| Plastic | Plastic is often used to make the seat and back of a metal chair. This material does not require maintenance; it is not afraid of high temperatures and humidity. The main advantage is considered to be a wide variety of colors of plastic, thanks to which it will be possible to create a product that is suitable for both an apartment and a summer house. In the case of making structures with your own hands, use polycarbonate panels - this is a very durable material compared to ordinary plastic and is quite easy to work with. Such chairs can withstand a weight of about two hundred kilograms. |
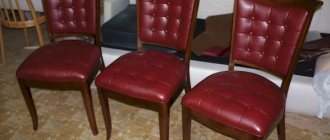
| Wood | The combination of such material with a metal frame is very common, because wood is also strong, durable, and easy to work with even at home. The result is attractive furniture that can be complemented with soft cushions to make sitting more comfortable. |
| Rattan | This is a natural, environmentally friendly material that does not require special care - you just need to periodically wipe it with a dust cloth. The main advantage is that rattan best withstands severe frosts, so the structures can be safely installed in outdoor gazebos. In addition, the material does not deform under the influence of humidity, so this furniture is suitable for the kitchen, bath or sauna area. In total, this seat can last about ten years with daily use. |
| Plexiglas | Of course, ordinary glass is not used to make furniture, and chairs in particular. In this case, you will need a thick and very durable material - organic glass. This glass is scratch resistant and will be very difficult to break. |
Natural, artificial leather or textiles are often used to upholster seats and backrests. Each option has its obvious advantages.
For example, leather upholstery is more resistant to stains, so this chair can be safely placed in the kitchen or nursery. Textile surfaces will need to be cleaned periodically, in which case it is recommended to use a steam generator.
Metal chairs with seats upholstered in leatherette
Preparing for work
In order to make a wooden chair with your own hands, you will need the following devices and tools:
- Miter saw;
- jointer;
- thicknesser;
- a circular saw;
- band-saw;
- pattern for marking legs;
- ruler;
- square;
- slotting machine;
- tenon cutting machine;
- hand eccentric sander;
- hacksaw;
- wooden hammer;
- spray bottle for applying varnish.
Necessary materials:
- wood;
- glue;
- putty;
- varnish
Chairs with a metal frame for various styles
It is important to consider that any product must be combined with the overall interior of the room, so it is recommended to first study the features of styles, and only then choose one or another model for independent production.
Table No. 4. The most popular styles and their features.
| Style | Description |
| Country | Since metal is used extremely rarely in such interiors, it is recommended to combine structures with wood. The best solution would be to coat the frame, seat, and back with a translucent varnish to give the finished chair a neutral appearance. Square-shaped recliners with armrests fit well into the country style. |
| High tech | Chrome plated products in combination with a plastic seat and back are ideal for this interior design (if desired, plastic can be replaced with plexiglass). In this case, you can use various bright colors and unusual shapes. |
| Provence | Products with a soft back and seat and rounded shapes are ideal for this style. The legs of such chairs can be either high or low, and they often have armrests. All lines should be smooth, and it is better to paint the metal white or beige. |
| Modern | In this case, various openwork, forged frames are perfect. This style allows you to create or purchase the most imaginative models of chairs, and you can create an ensemble from several pieces of furniture of different shapes or colors. |
| Vanguard | It is in such an interior that all kinds of design designs can be used. Standard forms are not acceptable here; it is recommended to use abstraction. Using the same principle, you need to choose a design for the seat and backrest. |
Forged chairs on a metal frame for a classic interior
Where to begin
First of all, you should decide on the material and design of the chair. There are many types of chairs with a back - a high bar stool, a high chair for feeding a child, a transformer that turns from a chair into a stepladder. In the past, it was common practice to divide chairs into living and dining chairs. The latter were distinguished by a higher back height and low position of the legs. Today, dining chairs have practically gone out of use, but if you wish, you can make such a model yourself.
Having thought through the design of the chair, you need to draw a sketch and draw drawings; you can take as a basis one of the diagrams available in books, magazines, and the Internet. Based on the drawings with dimensions, details are drawn up, the required amount of material is calculated (it must be purchased with a reserve). Then the parts are prepared, the chair is assembled and finished.
If a complex design with shaped elements is chosen, it is advisable to make drawings not only of the chair as a whole in different projections, but also of individual parts. It’s even better to draw life-size patterns, according to which parts of the required configuration will be cut out of timber, boards, plywood, and furniture panels. When drawing up drawings, they often do not indicate the names of the parts, but simply number them, and these numbers are then used in the assembly instructions. The detailing indicates the dimensions of each element and the number of identical or symmetrical parts.
But for the convenience of describing the work process, it is better to study the names of the main parts:
- drawers are the parts that form the supporting frame for the seat;
- the seat can be soft or hard;
- legs - vertical supports of the chair, the back and front usually differ in configuration, the front ones are strictly perpendicular to the ground, the rear ones slightly deviate from the vertical axis;
- in chairs with a back, the back legs, as a rule, form a single unit with its side supports. The abutments are the part that is located above the seat; the backrest is attached to them.
- the backrest connects the side supports and serves as a support for the back of a sitting person. It can be solid, made of plywood, wide boards, or inlaid, made of several slats, beams, flat or curved. Sometimes the side abutments are connected at the top by a crossbar, and between this crossbar and the rear drawer, several vertical slats are attached to form the backrest. Also the back can be soft;
- legs - parts that connect the legs of a chair and give rigidity to the structure. All legs can be located at the same height; it is also possible to have side and transverse or rear and front legs at different levels;
- crackers, jibs - these are additional elements that are installed in the corners of the drawer, give it rigidity, and also serve as support for a soft seat if it is recessed into the frame. Instead of jibs, stop strips can be used; they are attached to the side frames from the inside;
- armrests are more typical for armchairs, but they are also sometimes found in chairs.
When making an upholstered chair, it is better to place the seat not on top of the frame, but insert it into it. This reduces the load on the frame. The jibs are attached to the side frames with an indentation from their upper edge equal to the thickness of the seat frame (without taking into account the thickness of the soft cushion). It is recommended to lower the front drawer to the same height; the front jibs will be positioned flush with its upper edge. The seat is made in such a size that it slightly protrudes beyond the edge of the front drawer.
Making a chair on a metal frame with your own hands
You can make a structure on a metal frame with your own hands; for this we will need to prepare the following:
- profile pipes with a cross section of 20×20 millimeters;
- metal scissors;
- eye protection glasses;
- jigsaw;
- square;
- furniture stapler;
- unnecessary plywood sheet for making patterns;
- wooden blocks;
- chipboard sheet (for seat and back);
- furniture foam rubber;
- leatherette;
- thick cardboard for stencil;
- simple pencil, ruler;
- fastenings
Step-by-step instruction
Step 1. First of all, on a sheet of plywood you need to mark the location of the structural parts - this will avoid additional measurements. Next, you need to secure the wooden blocks on the plywood according to the markings, between which the parts of our chair will be inserted - this will allow you to get the most even structure. Since some parts will be located at an angle, you should make a cut in the pipe and bend it slightly to the side.
To ensure uniformity of the structure, the pipes are clamped with bars
Step 2. Now you need to weld these parts together using a welding machine. Using the same principle, you should fix it with bars, and then weld the other side part of the chair together.
Important – the welding machine can only be used outdoors
Step 3. At this stage, we only have the sidewalls ready, now we need to weld the crossbars to them. To do this, you need to fix them on both sides with clamps and attach crossbars. At this stage, you should achieve the most even angles, otherwise the design will turn out crooked.
We weld the sidewalls
Important point! When working with a welding machine, it is also important to monitor the location of the pipes, because they may rise or fall slightly.
Using the same principle, we should connect all the remaining parts, as a result of which we will get blanks like this.
Step 4. Next, you only need to use a grinding machine to process all welding joints so that they look more aesthetically pleasing. Now we have to move on to the stage of creating the seat and backrest. First, we need to take thick cardboard and display the seat and back on it.
You can use parts of a cardboard box as a stencil.
Step 5. The resulting stencils will need to be cut out and attached to the frame. Here you will be able to adjust their size in order to ultimately get the most suitable option. In order to make rounded edges, you can use a compass or any round object. As a result, we ended up with a seat that will widen slightly on the front side. In addition, square cutouts should be provided for the profile pipe. Now you need to transfer these stencils to a sheet of chipboard and cut along the contour using a jigsaw.
You should work carefully at this stage, especially when cutting round corners
Seat fitting
Step 6. The resulting seat must be tried on the chair. To prevent sharp corners from tearing the soft part of the future upholstery, they must be thoroughly sanded using sandpaper. Now you need to cut out the foam part, attaching the seat and back from chipboard.
Cut out the soft part from the foam rubber
Step 7. The workpiece must be trimmed with scissors. In this case, the edges of the sharp part should also be cut off to obtain a beautiful shape of the seat when tensioned. Now you need to cut out the leatherette, leaving an extra few centimeters, which we will bend down. At this stage, you should also cut out the soft part to the size of the backrest blank.
Important point! In your work, it is better to use chipboard without lamination, but if you still have an old sheet of chipboard, then it will also work in our case, you just have to remove (sand) the coating on the side where the staples will be attached.
Stretching the leatherette
Step 8. It is necessary to stretch the material and fasten the staples one by one. It is important to fix them in such a way that the material fits as tightly as possible to the surface; special attention will have to be paid to the corners. Now you need to cover the back with foam rubber and leatherette. Only here you should sew the cover so that the back has a normal appearance on both sides. Before attaching the seat and back, you will need to paint the metal frame.
Spray painting
Before starting painting, it is recommended to clean the surface again with a sander to remove all burrs and rust. Then you can start painting.
Tips for choosing a sander
Step 9. In this case, special moisture-resistant enamel was used. The main advantage of this coating is that it can be applied to a metal surface without prior priming (even if there is already rust on the surface). Upon completion of the process, the structure should be left for a day so that it dries thoroughly. In some cases, a second coat of coating is required. When the frame has thoroughly dried, you need to secure the seat and back using self-tapping screws.
Ready-made chairs
The finished product will look like this. We made the back from leatherette of a different color. The patina technique was used as decoration here. To do this, we spray-painted gold onto the surface of the black frame.
Chair with curved back
Let's look in detail at how to make a chair, using the example of a model with a hard plywood seat and a stacked back made of boards, without legs and with side supports. It consists of the following parts:
- front legs made of timber 50*25, 2 pcs. 425 mm each;
- rear legs, also known as side supports, made of boards 25*115 mm, 2 x 929 mm;
- drawers made of narrow boards 18*75 mm - 2 longitudinal 371 mm each, 2 transverse 396 mm each;
- 2 stops of 385 mm each from a 25*15 rail;
- seat 430*440 made of plywood 15-20 mm;
- backrest crossbars made of board 40*100, 2 pieces 369 mm long.
The configuration of the rear and front legs, side drawers, stops, and backrest parts is shown in the drawing. Transverse drawers are made by analogy with the side drawers, differing from them only in length.
Manufacturing of parts
The rear legs have the most complex shape; in them you need to select grooves for the rear drawer and for the backrest crossbars. The front legs smoothly taper downwards to form a support of 25*30 mm; in their upper part, 2 grooves open at the top are selected for the longitudinal and front drawers.
Tenons 73*18*9 are cut out on both edges of the drawer. To do this, you need to make marks at a distance of 18 mm from the ends, 4.5 m from the wide sides of the board, 2 mm from the narrow bottom edge and select the wood. The spikes should fit smoothly, but tightly enough into the grooves on the legs. At the ends of the stop strips, cuts are made 3.5 mm deep with a distance of 28 mm from the front end and 22 mm from the rear. In the stops you need to drill 3 vertical through holes for fastening the seat, in the center and closer to the ends.
The easiest part to make is the seat; take a rectangular piece of plywood, cut out at the back corners with an indentation of 44 mm from the rear edge and 35 mm from the sides. The front corners are rounded. The back parts are more difficult to cut out; they are made curly, with 66*18*9.5 tenons on the edges. The tenons on the sides need to be rounded from the bottom, on the back - on both sides.
It’s easier to make the back flat, but a curved one is more comfortable and more ergonomic. To make it, a recess is selected in the front part of the crossbars. First, cuts are made to the required depth (the closer to the center, the deeper), then the wood is selected using a chisel and sanded. Making a neat, symmetrical curved back using hand tools is a difficult task.
Assembly
The parts made must be carefully polished. They are assembled using glue, but first it is better to connect all the parts dry, make sure that they fit together without distortions, disassemble and reassemble, coating the tenons and grooves with glue. After final assembly, each structural element is fixed in clamps until the glue dries completely. Assembly sequence:
- The back drawer and backrest crossbars are inserted into the grooves of the support legs.
- The front legs are connected to each other by a transverse drawer.
- The back and front parts are connected to each other by side drawers.
- When the assembled frame dries, stops are attached with glue to the inside of the side drawers, flush with the top edge.
- The seat is glued to the top of the frame.
- When the glue sets, turning the chair over, screw 35 mm screws into the seat through the holes in the stops.
The finished chair can be varnished or painted.