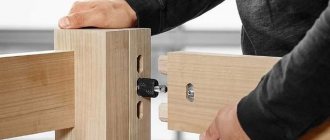
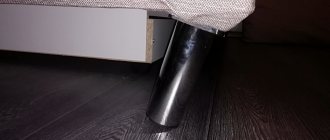
Chair disassembly diagram
We don't need any special tools to do this job. The back and elbows are loosened and removed, trying not to destroy the spikes made of wood. This requires very little effort. If the tenons are sitting in the grooves, then you must try to remove them in such a way as to prevent breakage. Otherwise, the remains of thorns will get stuck in the nests, which will be very difficult to remove. It is easier to be careful when disassembling the chair, separating one part from another. To make the process go faster, you can use a hammer wrapped in advance with a piece of soft material. Things will go even better if you have a special rubber mallet.
If the connections are over-strength, then they should be disassembled with extreme caution, because the possibility of destroying the fastenings is very high. Individual joints are fixed with screws. They should be removed using a screwdriver. If obstacles arise during the process of removing the screws, then you need to slow down and stop unscrewing the fastener; otherwise, there is a risk of tearing off the edges, thereby complicating your work. In this case, experts recommend taking a screwdriver, pressing on the back of its handle, and trying to unscrew the screw, making movements left and right. Most often this helps to cope with the fastening. It is also recommended to drip technical oils onto problematic screws. If there is a torn thread, the screw is removed with pliers, applying all the effort. In order not to confuse the fasteners in the future, they must be marked immediately.
The basis of a soft chair
Those connections that were fixed with glue are separated with the introduction of hot water. It is necessary to moisten an unnecessary piece of tissue (The structure of tissues of living organisms is studied by the science of histology)
, apply it to the joint space, repeating the steps until the adhesive composition is wet and the parts are separated from each other. If desired, the process can be speeded up by widening the gap with an oblong tool, for example, a knife. Hot steam is excellent for removing glue from inaccessible places. It only takes a couple of minutes to separate the two parts of the chair.
Preparation
First you need to determine what material will be used. The chair can be upholstered with fabric or leather. Working with one and another material has its own characteristics.
There are several requirements for the skin:
- It should be elastic and thin. It will be better if its thickness is no more than 3 mm. Thicker material is very difficult to work with. This is especially true when you have to connect several separate pieces together.
- Also, the material must be dry. Wet skin first stretches, and then dries out and becomes smaller. You can wet this material if there is a need to tighten it more.
With fabric the situation is a little simpler. It is not necessary to buy special upholstery fabric. You can take the simplest tapestry. It has several advantages:
- Low price compared to upholstery fabrics.
- Almost complete lack of opportunity to take a puff. If it does appear, you can simply cut off the loop. In this case, the integrity of the fabric and the pattern will not be damaged.
After the material has been selected, you need to inspect the chair-bed. It is important to determine in advance which parts need to be replaced or updated. These can be foam pads, staples, tie straps and, in fact, the upholstery itself.
How to disassemble a chair-bed
From time to time, our apartments come across a layout that makes moving furniture difficult. Most often these are quite narrow doors. The only way out in such a situation is to disassemble and move it. As a rule, there are no problems with sofas and beds: there are many articles on the Internet with step-by-step instructions regulating the entire process of disassembling into components. But with a rocking chair everything is a little more difficult. Due to the low prevalence of this comfortable furniture, there is not enough information. If you decide to move a chair from one room to another or to disassemble it and retighten it, you have to develop the method of action without the help of others.
Loading and transportation of furniture
The priority task is to properly organize the process of removing items. Pre-measure the doorways of the apartment, entrance, office. Analyze whether the object can navigate the turns in the stairwell without damage. Check the elevator's lifting capacity and the opening width of the doors. If it is not possible to carry the load, remove all elements. Don't skimp on professional movers. A specialist will be able to foresee all the nuances and move heavy objects without risks.
Important loading steps:
- a layout of elements in the body is preliminarily developed;
- with the help of rigging tools, objects are moved into the machine - platforms, elevators, manipulators, rails;
- placement - different types of furniture are placed separately so that they do not touch on the road;
- loaders provide reliable fixation. Not all vehicles are equipped with mounting systems. This is provided in the transport of an experienced logistician. Ignoring the requirement will lead to numerous damages along the way, falling objects, and severe shaking.
For safe transportation, choose a specialized vehicle.
- Belts and harnesses for tight fixation.
- Soft rollers.
- Covered awnings protecting from precipitation and wind.
- Soft walls.
- Wooden fenders around the perimeter of the side.
You need to know how to use the devices in order to securely fix objects.
Fundamental points when disassembling a chair-bed
Before all this, you need to inspect the chair and find the type of fastening. There are two main options, less often their composition. 1st - the fastening is hidden under the upholstery, 2nd - simply accessible. As a last resort, we immediately move on to examining the fasteners.
In the most difficult part, we are trying to assess where the tension mechanics are located in the chair. There you will have to remove the outer layer of tissue (The structure of tissues of living organisms is studied by the science of histology)
to gain access to it. Some manufacturers anticipate the need for the owner to disassemble furniture and make the outer layer in such places easily removable. For example, with a zipper or Velcro.
Finishing
After making a piece of furniture, it needs to be given a decorative appearance.
If the product was made from natural solid wood and beams, all elements are cleaned, covered with stain and paints and varnishes
. If you used laminated chipboard, the product does not need finishing.
But any chair-bed can be decorated to give it an original appearance. Prints and appliques are suitable for this. It is better to apply appliques to fabric before the furniture assembly process. To do this, you should prepare a stencil and the necessary pieces of fabric of different colors, matched to the main tone.
To prevent the product from collecting dust, you can sew a separate cover for it.
or cover with a cape. A piece of faux fur draped over a chair also looks beautiful.
What is not allowed to be done during disassembly?
It is unacceptable to make rough and powerful movements - such an approach to business is fraught with breaking parts of the furniture, tearing its coverings or breaking fasteners.
If disassembly is done for the purpose of repairing the frame or replacing the upholstery, it is not permissible to leave part of the fittings unremoved. By the way, it doesn’t hurt to take a photo of the places where it is attached, so that later, when assembling, you don’t get confused.
In the case of dismantling a chair to move it to another room, it is strictly not recommended to do this in part, leaving parts of the furniture articulated, only loosening the fastenings and bending the parts to create a narrower system. This is often done. This often ends in failure.
Removing the upholstery
The next step is removing the old upholstery. In most cases it is glued, so removing it will not be difficult. If you still have difficulties, you can use a stationery knife.
If the old material is in good condition, it will have a use. It can be used to secure a new foam gasket. The upholstery must be secured with tension. It should not sag or form wrinkles. Counter folds should only be at the corners. The staples are attached on both sides of them.
Disassembling the chair-bed depending on the model
There are certain aspects depending on the type of chair:
- It is better to not completely disassemble compact models for moving; depending on ability, it is enough to divide the system into two parts.
- Double models are more reminiscent of a sofa or sofa and the principles of their disassembly are not sufficiently different.
- Corner models must be disassembled from the back, which is found in the vast majority of chairs of this design.
Fundamentally! There are individualities that also depend on the transformation mechanism.
Folding parts of the “accordion”, “tick-tock”, “telescope”, “puma” and “eurobook” types are usually not very different from disassembling ordinary furniture. Due to similar components.
But those built on the “dolphin”, “sedaflex” and “recliner” principle almost always consist of an iron frame. And they demand that this particular structural element be dismantled first.
Manufacturing process: step-by-step instructions
Before starting work, it is imperative to complete a drawing of the product, where the exact dimensions will be indicated and parts of the model will be drawn in detail.
Product drawing.
To make a frame-type folding chair you will need a lot of space. Choose a spacious room.
First we make the body:
- Measure out sheets of chipboard, fiberboard and plywood.
The first ones will go to the sides, back and bottom. Plywood – for the folding part. Saw off the excess along the marked lines. - Connect the side parts (aka support parts) to the bottom and back using self-tapping screws.
We connect all the parts with self-tapping screws and glue them well.
Then we start creating the folding part. Make 2 frames from beams the width and length of the seat. Attach sheets of plywood to them.
Connect the frames using long loops.
To ensure that the chair reclines evenly, use a metal transformation mechanism - attach steel contours with through hinges to the sides.
The main thing is how to make a chair bed yourself, so that the parts folded together form a beautiful and even square.
This cute chair bed that we made with our own hands can be painted, varnished, or upholstered with foam rubber and stylish, beautiful fabric.
The next step will be plating:
- Glue pieces of foam rubber cut to size, 2-3 cm high, to the top of the frame.
- Lay the fabric evenly and use a stapler to attach it to the beams at the bottom.
- The sides can also be upholstered using a thin layer of foam rubber.
For a folding structure you will need legs.
They are made in the middle and front part of the frame, level with the bottom point of the bottom or slightly higher. For armrests, use wide bars sanded with sandpaper.
The seat easily unfolds without clinging to the sides, and just as quickly turns into a chair.
The frameless model is much easier to manufacture. It requires foam rubber, which can be used in 2-3 layers, and dense fabric like a “raincoat” (or less slippery). The cut material is sewn on several sides. the remaining opening is intended to be placed inside the foam.
In order to prepare the chair-bed for sleeping, you should unfasten the straps, then pull the top pillow towards you.
Equip the unsewn section with a zipper. For more practical use of the frameless sample, make an outer case.
Since it does not have a rigid base, the backrest should be placed against the wall
Chair disassembly diagram
We don't need any special tools to do this job. The back and elbows are loosened and removed, trying not to destroy the spikes made of wood. This requires very little effort. If the tenons are sitting in the grooves, then you must try to remove them in such a way as to prevent breakage. Otherwise, the remains of thorns will get stuck in the nests, which will be very difficult to remove. It is easier to be careful when disassembling the chair, separating one part from another. To make the process go faster, you can use a hammer wrapped in advance with a piece of soft material. Things will go even better if you have a special rubber mallet.
Roll-out mechanism
When unfolding, the seat base is pulled towards itself, and additional sections are pulled out. The seat is turned over, resulting in a fairly flat sleeping area.
The main disadvantage is the presence of gaps between the individual parts of the mattress. Another feature is the low height of the bed, usually it does not exceed 25-30 cm, which can be inconvenient for tall people and the elderly.
The right tool
Let's move from words to action. In order to create a restoration of an old chair, we will need the following tool:
- Hammer, pliers, screwdriver (flat),
- Manual stapler, staples from 4 to 6 mm, scissors,
- Wide sling (textile),
- Foam rubber, batting, synthetic winterizer,
- Tissue (medical system of cells and intercellular substance, united by a common origin, structure and functions)
(1.5 – 2 m), - PVA glue, gauze.
Accordion sofa design
The design of the accordion is cumbersome in itself. This means that it will be difficult to take it out right away (and there is also a risk of damaging the unassembled product during transportation).
What does it consist of
This sofa consists of a frame with three sections connected together. The frame is usually made of metal, with wood slats used inside. By extending the seat, the back of the sofa lowers - this creates a straight base.
Front and mattress
The front part contains 4 wheel supports, the folded backrest rests on a fixed headboard. The mattress has three sections, which, when the structure is laid out in “sleeping mode,” form a single space.
We are talking about disassembly as a mandatory stage of the transportation process, for which movers are usually searched. In the future, you will have to wrap the disassembled elements of the sofa separately in film. The moving elements of the frame are secured with tape, and everything on the outside should be wrapped in corrugated cardboard.
Disassembling the chair
Before you start working, you need to disassemble the old chair and see what’s inside it.
As a rule, this is a wood base, foam rubber on the back and seat. It is held in place by rubber or textile slings.
Also included in the devices we see legs, elbows (polished or fabric-like (a medical system of cells and intercellular substance, united by a common origin, structure and functions)
). The back wall of the chair is secured with a board. That's probably all.
- We determine what needs to be replaced. We carefully knock out all the tenon parts with a rubber hammer so as not to destroy the edges and preserve the polish.
- Using a scalpel or a knife with a narrow tip, we clean the grooves so that there are no glue residues inside.
- We coat the tenon parts with PVA glue, then wrap the bandage directly onto the tenon.
- We carefully hammer everything into the space and wait a day for it to dry completely.
Manufacturing stages
When starting directly to manufacture the product, it won’t hurt to get an assistant. He will help by holding the parts during their fastening and assembly of the structure. The entire creation process includes cutting out parts, assembling, upholstering and decorating the finished chair. How to assemble a chair-bed yourself, without skipping important steps and without making mistakes, is described below.
The procedure depends on the type of model selected.
Cutting out the parts
All details of the future chair are marked in strict accordance with the diagram drawn independently. Dimensions are used according to the drawing. The plywood is cut into 4 squares at the rate of 3 for the bed and 1 for the backrest. Next, the bars are prepared (6 - longitudinal for the berth, 7 - transverse, 4 - legs). The armrests are cut. The places of attachment to each other are marked on the workpieces.
An important condition is that all parts of the chair are cut without deviations from the specified dimensions, with an accuracy of 1 mm
Housing assembly
The assembly of the body occurs in stages. It is better to adhere to the following sequence:
- assemble the sidewalls, securing them with screws;
- check their similarity to each other in all respects (mirrority);
- if a closed type is provided, then cover their sides with plywood;
- attach the backrest to the rear pillars (it must match the size of the seat);
- assemble guides for rollers;
- cover the bottom of the chair with plywood;
- a lid with hinges is screwed to its upper part;
- check the dimensions for compliance with the drawing;
- strengthen the structure with transverse beams.
Next, you can begin making the covers and the sheathing itself.
Sheathing
This stage of work consists of marking and cutting out patterns from the prepared fabric, sewing the parts into a cover.
The sides are covered with prepared sheets of foam rubber. It is attached to the base of the chair with staples using a furniture stapler, starting from the middle and moving towards the edges. After the glue has dried, the covers are pulled on.
Installation of the transformation mechanism
Chairs with ready-made folding mechanisms are very easy to use. The installation proceeds as follows:
- the base and seat are fixed in the desired position;
- parts of the mechanism are attached and drilling locations are marked;
- holes are made according to the marks;
- parts are bolted and lubricated to prevent unnecessary friction.
If everything is done correctly, assembling and disassembling the chair will be easy and simple.
To assemble a chair-bed, any ready-made transformation mechanism can be used.
Do-it-yourself chair reupholstery
Let's take a step-by-step look at the process of reupholstering a chair.
Replacing foam rubber
The next step in restoring the chair with your own hands will be replacing the foam rubber. List of brands used in furniture production:
| Album | Brands of foam rubber-1 |
| Album | Brands of foam rubber-1 |
| Album | Brands of foam rubber-1 |
| Album | Brands of foam rubber-2 |
| Album | Brands of foam rubber-2 |
- ST – regular type,
- EL – differs in medium degree of hardness,
- HS – soft type,
- HL – super hard,
- HR – low degree of rigidity, most often used in the manufacture of upholstered furniture.
In our case, HR is the best option.
It is best to cut foam rubber with a knife with a long blade sharpened on an abrasive stone. We cut in several stages.
Material
When choosing materials for making furniture, you should pay attention to them:
For the frame you can use
:
- Chipboard or
. These materials are distinguished by a variety of textures and colors. They do not emit toxins, are easy to process, are wear-resistant and durable; - . This material is easy to cut and saw with various tools, has an attractive appearance, and has high technical characteristics;
- . It is safe, has an interesting texture and structure. To work with, you need to have certain skills. It is better for beginners to start making furniture items from laminated chipboard.
An important role should also be given to the choice of upholstery. For these purposes the following are most often used:
- chenille;
- jacquard;
- velours;
- velvet;
- tapestry;
- genuine leather.
Advice
: A tapestry would look good as upholstery. If you want to make a product that is soft and pleasant to the touch, give preference to artificial velvet.
Restoration of frame parts
The concept of “restoration” includes not only reupholstery, but also the restoration of the wooden parts of the chair. Over time, decorative parts (elbows, turned elements, curly chair legs) become unusable, in other words, they become dull, the varnish surface wears off, and small cracks appear on the furniture frame.
What can be created in this case?
To solve this problem we will need:
- Sandpaper,
- Scraper,
- Blade from a stationery knife.
- Varnish, stain.
Every detail needs to be sanded. It is necessary to start with a large grain, gradually moving to the finest grain.
- After the parts have been sanded, carefully remove the dust with a dampened rag or foam sponge.
- Apply nitro varnish with a soft brush until completely dry.
- After the varnish has dried, you can run your hand over the surface and feel how the pile has risen. Using the smallest sandpaper, we carefully “knock down” the raised fibers, in other words, we make the surface smooth.
- Then you can apply a stain (alcohol, aqua, or white spirit based) and only later cover it with any commercially available varnish.
Conclusion
By spending a little time, effort and a minimum of money, you can build a comfortable chair-bed yourself. It will not only increase the space in the room, but will also become a full-fledged chest of drawers for bed linen. We should also not forget about the decorative component of this design. After all, the choice of upholstery depends on your preferences and imagination. One such product will replace as many as three. It's not only cheap, practical and attractive. This way you can diversify your everyday life and get creative.
Cosmetic repair of chairs at home
Chair repair is one of the simplest types of home furniture repairs. Even a person who does not have the skills to make upholstered or cabinet furniture can learn this business. At home, you have to repair old “Soviet-style” chairs with wooden or soft armrests, as well as office chairs.
For work you will need cotton and upholstery fabrics, foam rubber or other filler. If you need to replace or update fasteners and wooden elements, you will have to buy wood glue, stain, varnish of a suitable shade, putty, boards, screws, nails, sandpaper (if you don’t have a sanding machine).
You can't do without a minimum set of tools. The craftsman will need a pencil, tape measure, screwdriver, scissors, hammer, brushes, furniture stapler, and grinder.
Principles of repair
How to reupholster a chair and what are the stages of this process?
First you need to disassemble the chair and get rid of the old upholstery. When carrying out repairs, we perform a number of simple steps:
- Remove the back of the chair by turning the screw at the back and disconnect the armrests. Remove the back panel.
When choosing fabric, it is important to purchase as much of it as you need for upholstery - to do this, measure the chair and add to the resulting figures another 5-7 centimeters necessary for upholstery.
Final assembly of the product
When the upholstery is done, you need to find the places where the holes for the screws are located in the wooden frame. These points are marked on the fabric with chalk and specified. After this, small holes are made in appropriate places using scissors. The edges of the resulting holes are treated with colorless nail polish or fire. The fabric around the holes is additionally secured with staples.
Now the master’s task is to connect all the parts of the chair with each other. The structural elements are fastened using self-tapping screws, which are installed in the same places in which they were previously located. To increase the strength of the fasteners, you can fix the fasteners with wood glue.
As work progresses, it is necessary to check the evenness and strength of all joints, and, if necessary, knock out the joints of the parts with a hammer. When everything is ready, all that remains is to check whether individual parts of the product are wobbly. After this, the chair can be used for its intended purpose.