Who said crochet is outdated? Why not give the furniture some coziness, make it softer and more pleasant? In this case, you don’t even need any investments other than a set of hooks and threads! You can read how to make accessories for furniture in this article.
To make a beautiful crocheted chair rug, you need to study the diagrams and descriptions. Below are patterns for knitting accessories for chairs yourself, which can be repeated without problems.
Sizing
In order to take the correct measurements, you should choose the style of the cape. It could be:
- a cover that follows all the contours of the furniture, covering or not covering the legs;
- product in the form of a cross covering the back, seat, armrests;
- a rectangular cape covering only the back and seat;
- covers for the seat and back, knitted separately;
- a cover for chairs that covers part of the back only in the place where the head of the seated person is located.
The most difficult thing to take measurements for is a one-piece cover. You will need to measure all the parts of the chair and repeat their outlines. Start knitting from the bottom, measuring the girth of the place to which the cover will hang. Knit the fabric up to the level of the seat, then form the back. Lastly, the armrests and the inside of the furniture are taken care of.
If the chair is at hand, it is easier to adjust the size of the product directly to it. You should take into account the properties of the threads from which the cape is made. If they can shrink, then you need to add a few centimeters to all parameters.
For the cross cape you will need the dimensions of the back, seat and armrests. We must not forget that the product should hang down at all ends. Exactly how much depends on the desire of the craftswoman. The hanging part along the back should be of such length that the cape does not slip off, the same applies to the armrests. If desired, you can attach it with buttons or Velcro to further secure the product.
The length of the overhang is equal to the thickness of the seat, approximately 10 cm, but this parameter may vary depending on the knitter’s idea.
The cover for just the seat or just the back is made exactly according to measurements, taking into account the shrinkage of the fabric. The product must tightly cover part of the furniture and be fixed on the back side with an elastic band, Velcro, or other means. A knitted cape for the headrest of a chair can be of any shape and size. It rather serves a decorative function and is made using the same technique as other products, for example, a pillow lying on a furniture seat.
Correct size determination A cover that completely covers the furniture
Product in the form of a cross
Rectangle cape
Cape for the head of the chair
Caring for a crochet blanket
Hand-knitted items require special care and careful use. At the same time, the handmade product will serve for a long time and will retain its original size, shape and texture.
- It is better to wash such an item by hand, in warm water, without strong spinning, using special detergents.
- The bedspread must be thoroughly rinsed several times.
- Textiles should not be dried on a line to avoid stretching.
- Sometimes you need to hang a bedspread with a hook for ventilation on a balcony or terrace.
Materials and tools
The result of knitting depends on the hook and thread. The yarn must match the purpose of the cape. Typically, the product is knitted from thick, dense threads to provide furniture with wear protection for long service. Their composition can be different: wool, cotton, synthetics or mixed options. The fabric made of polyester cord 3 mm thick has good qualities.
It is better to take threads that do not shrink, are easy to wash, and dry quickly. As a rule, they contain synthetics. To knit a warm blanket that makes your favorite furniture cozier, you can use wool or combine it with acrylic. It is better to make covers for children's chairs from cotton or viscose. Thin threads are suitable for decorative items; the pattern from them will be openwork and delicate. Most often, craftswomen use leftovers that lie idle to knit such things. This option is especially suitable for capes made of square motifs.
At its thinnest part, the hook should be half the size of the thread. Usually this recommendation is indicated on the yarn package. When knitting, unless there are separate instructions, the thickness of the thread should match the thickness of the product.
Crochet bedspread video - tutorials
There are many different techniques for knitting bedspreads, but not all are presented on our website. Therefore, we have several video master classes, we hope you like them.
Bavarian knitting, crochet pattern for bedspread
An original knitting technique that allows you to get an interesting “waffle” texture of the fabric.
The video should load here, please wait or refresh the page.
Crochet bedspread made from motifs
In this video, the author will tell you in detail how to knit a motif for a blanket, how to combine the motifs into a single fabric.
To knit a blanket we will need:
- simple and cheap yarn of different colors;
- hook number 3;
- desire to knit!
Also from the motifs you can knit a light blanket, seats for stools and much more!!!
The video should load here, please wait or refresh the page.
How to crochet a blanket using the granny square pattern
With this pattern you can crochet a large blanket or a children's blanket, as well as pillowcases, bedspreads, shawls and blouses.
For knitting you will need threads of two colors (100g/250m) and hook number 3.
The video should load here, please wait or refresh the page.
Master class on crocheting a square bedspread for a sofa
I knitted a swatch using yarn I found at home. But she's a little rude. For the bedspread, I advise you to take thinner yarn, which contains acrylic. For example, Turkish Alize, then yarn consumption will be more economical. According to my calculations, you may need about 2.5 kg of yarn approximately, maybe a little less or a little more.
The video should load here, please wait or refresh the page.
Crochet bedspread “Sunflowers”
How to crochet a motif with sunflowers in a beautiful blanket. For a blanket, I recommend using good yarn that contains acrylic, for example, Turkish Alize. The source magazine indicates yarn 100 g/370 m. Yarn consumption in the same source is indicated as follows: 6 skeins of brown, 4 - green, 3 - yellow, 2 - light yellow (I have white) and 3 more skeins of harvust color, With the last one, I didn’t really understand what color it was. In total it comes out to 1800 grams.
The video should load here, please wait or refresh the page.
Design and decor
You can decorate furniture with unusual knitted covers in various colors, shapes, and patterns. Depending on the technique of making the canvas there are:
- solid smooth;
- openwork with varying degrees of density;
- solid with a three-dimensional pattern;
- with various motives.
When choosing, you need to take into account that solid fabric is suitable for a classic style; it better protects the surface of the furniture, but washing can be labor-intensive. It will be even more difficult to clean a cape with a voluminous pattern. For beginner craftswomen using the technique, openwork solid fabrics or motifs are suitable. Such products are quickly knitted, do not require much thread consumption, and are easy to wash and dry. Capes with voluminous and openwork patterns are ideal for interior styles such as country and Scandinavian.
It is better to start knitting with a test sample measuring approximately 10 x 10 cm. This will allow you to understand what size of fabric is needed and evaluate the effectiveness of the appearance.
By color, knitted furniture covers can be:
- plain;
- nuanced (using similar colors);
- contrasting.
Various types of fringe, cord, pompoms, buttons, and knitted elements are used to decorate the finished item. It is better to use bulk beads on the back side of the back.
Making an overhead stand for the armrest of upholstered furniture as a bookmark
An overhead stand for the armrest of upholstered furniture, a sofa or an armchair, a convenient thing. It takes up practically no space, but you can put a mug of coffee, a glass of wine, and, for football fans, even a bottle of beer with a plate of chips on it. To make a stand, the following Tools and materials are required: - Board: - Circular machine; -Roulette; -Pencil; -Jointing machine; -Epoxy resin; -Dye; -Sandpaper; - Fasteners; -Screwdriver; -MDF; -Scotch; -Glue gun; -Putty knife; -Burner; -Plane; -Pliers; -Hacksaw; -Insulating tape; -Carpentry glue; -Varnish; Step one: preparing parts To make the stand, the master used a red cedar board. Sawed into two parts.
Then he passes the halves through a jointer and evens them out in thickness. Cuts to size.
Step two: preparation for pouring A box is made from MDF.
The bottom of the box is sealed with tape. Places the workpiece inside. Now you need the distance on both sides of the workpiece to be the same. Levels workpieces. Use a glue gun to fix the workpieces and close the cracks of the drawer.
Step Three: Pouring Mix the epoxy resin according to the instructions. Pours into two glasses.
Adds a different dye to each glass. Add pearlescent flakes (decorative) to one of the glasses. Stirs the contents.
Levels the box.
Pouring epoxy resin between the workpieces.
To remove air bubbles, heat the epoxy with a torch.
Step four: processing The resin has hardened, and the craftsman removes the workpiece from the box, planes it and grinds it.
Step five: making a stand Measure the width of the sofa armrest.
Sawing the workpiece into three parts. The angle was 45 degrees.
All three parts of the stand are connected using flat dowels and glue.
Step six: processing, finishing Wet the stand and let it dry. This technique raises the fiber and then you just need to sand it. To add shine, rub the surface with shavings.
Now you need to wipe the surface and apply four layers of varnish.
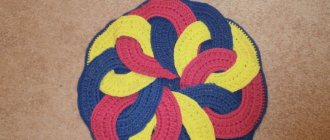
Chair cover with square motifs
This is a great way to use up leftover thread. There are motives:
- round;
- square;
- triangular;
- hexagonal and octagonal.
The square shape is considered the most favorite among knitters. Such motifs are simple to make, easy to stitch and help create a dense, continuous fabric without large holes. They are made in any color, often combined. An undoubted advantage of knitting with motifs is that the craftswoman does not have to hold the entire fabric in her hands (which becomes heavier over time). To knit a chair cover from squares, it is better to choose yarn of two or more colors. You can use leftovers, but the threads for tying fragments should be of the same type and shade.
Knitting is done according to a simple pattern:
- Close the chain of 12 VPs into a ring.
- Knit 1 ch for lifting, then 23 sc in the ring. Close the row SSt.
- Make 3 ch for lifting, 2 dc from the same loop, 1 ch, then 3 dc in the third sc in the second row, 5 ch, 3 dc in the third sc in the second row. Knit this sequence until the row is completed. Finish with an arch of 5 VPs and close the row of SS.
- Perform 3 VP for lifting, 2 Dc, 1 VP, 3 Dc in 3 Dc of the third row, 4 VP, 1 Dc in the middle of the arch from 5 VP of the third row, 4 VP, 3 Dc in 3 Dc of the third row. Knit this sequence until the row is completed. Finish with an arch of 4 VPs, close the row of SS.
- Make 3 VP for lifting, 2 Dc, 5 VP, 3 Dc in 3 Dc of the fourth row, 4 Ch, 3 RLS so that the middle one matches the RLS of the 4th row, 4 VP, 3 Dc in 3 Dc of the 4th row. Knit the sequence until the row is completed. Finish with an arch of 4 VPs, close the row of SS.
- Knit 3 VP for lifting, 2 DC, 1 VP, 3 DC in the arch, 3 VP, 3 DC in the same arch, 1 VP, 3 DC in 3 DC in the fifth row, 5 VP, 1 DC in the middle SC in the 5th row, 5 VP, 3 dc in 3 dc in row 5. Knit the sequence until the row is completed. Finish with an arch of 5 VPs, close the row of SS.
To calculate how many such squares need to be knitted, the length and width of the intended product are divided by the length of the side of the resulting motif. After a sufficient number of elements have been made, they are steamed and covered with a damp cloth, through which they are treated with steam using an iron. All squares must be the same so that the product does not bubble.
Related motifs are sewn together with a needle or hook, which should be smaller in diameter than the main one. You can connect the squares while creating the last row. The edges are tied around the perimeter to visually combine the motifs into one composition. A beautiful crocheted chair cover is ready. It can decorate an armchair, a chair, or a stool.
Scheme
We collect a chain of air loops and close it into a ring
We knit single crochets and close the row with connecting stitches
For the second row, tie a thread of a different color and knit according to the pattern
Add a thread of a different color to the next row and knit with double crochets
Add air loops to the last row and close with a connecting loop
Ready-made square motif
Using the same pattern, we make many square motifs.
Sew the squares together
The chair cover with square motifs is ready
Crochet bedspreads
You can create a wide variety of ornaments and openwork with crochet. Crocheting such a huge product as a bedspread will take a lot of time, so you need to be patient. Usually this does not cause problems for needlewomen, since the process of crocheting itself is a great pleasure.
There are several ways to crochet a bedspread:
- whole canvas;
- from the middle;
- from squares or triangles;
- stripes.
Crochet blanket made of squares
The most common method is crocheting a bedspread from squares. If you choose a simple pattern for knitting fragments, then any craftswoman who has only recently learned to hold a hook in her hands can handle it.
It is not difficult to knit such a blanket from “granny squares”. By choosing the right combination of colors, it can look very original.
Using bright yarn of various colors you can create an interesting crocheted blanket in the form of a patchwork. The multi-colored product will suit boho, Provence and country styles. This bedspread will look great in a country house or country house.
A classic crocheted bedspread made of openwork squares is ideal for an urban interior. Intricate patterns of squares will make the bedspread a source of pride for the hostess and the center of the room’s interior.
Knitting a blanket in a single fabric
Crocheting a single fabric is a more complex method. If this is a bedspread for an adult bed, and the threads are used from different balls, then with each row it will be more and more difficult to move the knitting. That is why only children's bedspreads are knitted this way.
How to tie?
Particular attention is paid to the edges of the bedspread. They should reach almost to the floor, hang elegantly, and maybe be decorated with various decorative elements. It depends on the imagination of the craftswoman. The edges might look like this:
- tied with an openwork border;
- with brushes;
- with pompoms;
- trimmed with satin ribbons.
Openwork cover for a computer chair
A computer chair on wheels that is comfortable for working, usually has a separately attached back and seat. You will need two covers for it. You can take as an example a motif called “granny square” and knit an item based on it.
The sequence of knitting an openwork cape-cover based on a “granny square”:
- Close 5 VP into a ring SS.
- 3 VP for lifting, 2 treble dc in the ring, 2 ch, 3 treble dc in the ring, thus knit 4 groups of loops of 3 treble dc. Finish row 1 VP and close St.BN to form an arch.
- 3 VP for lifting, 2 St. CH in the arch. Work into the next arch 3 dc, ch 2, 3 dc. Then 3 dc, 2 ch, 3 dc in the next arch and so on. Close row 1 VP and St.BN.
- 3 VP for lifting, 2 treble dc in the arch, 3 treble dc in the gap between groups of 3 treble dc 3 rows, then tie 3 treble dc, 2 treble dc, 3 treble dc into the arch. Then continue in the same way until the row is completed. Close row 1 VP, 1 St.BN.
- Knit in this way to the desired fabric size.
It is necessary to knit two openwork square fabrics according to the size of the back and seat, with an allowance on the reverse side of approximately 15 cm. Using a pin, you need to insert a linen elastic band of a suitable color into the holes formed along the edge of the motifs. Place the knitted covers on the computer chair and tighten the elastic band. The main thing is that the product tightly covers the surface of the chair. Cut the elastic and sew the ends together.
Steaming can be done directly on the chair so that the shape of the cape exactly matches the design of the back and seat. Even a novice craftswoman can easily make such a case. For more experienced people, you can take a pattern of an openwork napkin or tablecloth.
We collect air loops and close them into a ring
We knit double crochets and form an arch
By analogy, we knit groups of loops until the desired size is obtained.
Add a thread of a different color
We knit two fabrics: for the seat and back
We put a pin on the elastic band
Along the edge of the fabric we thread the elastic through the openwork holes
Openwork cover for a computer chair is ready
Crochet bedspreads from the Internet
Blanket made of circles
Crochet bedspread made of openwork motifs
Crochet floral bedspread
The blanket is crocheted using the continuous method
3D crochet bedspread
This blanket for the dacha is knitted from Soviet era yarn. Weight 1.660, hook 2.0, size 135 x 170.
Diamonds: White, 8 pcs. — 6 times, 7 pcs. and 2 halves - 6 times. Black: 1 piece, 2 pieces, 3, 4, 5, 6, 7, 8, 9, 10, and 11 pieces - 3 times. Beige: like black. Total: 266 diamonds and 14 halves.
Scheme:
Royal crocheted plaid
They ordered a bedspread for me.
We spent a long time choosing and settled on this. I knitted it for a whole year, although I was distracted all the time, because... It was difficult to knit the same thing all the time. Each square turned out to be 50x50 cm. I knitted 25 of them, but when the customer took them and put them on the bed, she wanted 5 more squares so that it would reach the floor on all sides of the bed.
I had to unravel the border and tie on 5 more squares.
The size was 2.5 by 3 meters, weight almost 5 kg. She didn’t want a large border; we made do with shells.
The first photo is an untied blanket.
And this is the diagram:
Unlike the diagram, I made a sliding loop and immediately knitted a DC. The yarn here is Baby cotton, hook number 2.
Author of the work.
Decoding the circuit for beginners
In order to easily read patterns for chair covers, you should know how different types of loops are indicated on them. You can find them on specialized resources for needlewomen. Graphic images usually use the symbols presented in the table.
| Designation | Decoding |
| Dot or small circle | Air loop |
| Vertical stripe | Single crochet |
| Vertical stripe with crossbar | Double crochet |
| Vertical stripe with two (three) transverse lines | Double crochet stitch |
| Small bracket with ends down | Connecting post |
| Arch with a number in the middle | A chain of air loops (the number of loops corresponds to the number under the arch) |
| Circle with a number inside | A closed ring of air loops (the number of loops corresponds to the number in the circle) |
| Check mark | Two single crochets knitted from one loop |
| A checkmark with one (two, three) crossbars on each side | Two double crochets (two, three), knitted from one loop |
| Dot or small circle | Connecting post |
| Vertical stripe | A chain of air loops (the number of loops corresponds to the number under the arch) |
| Vertical stripe with crossbar | A closed ring of air loops (the number of loops corresponds to the number in the circle) |
| Vertical stripe with two (three) transverse lines | Two single crochets knitted from one loop |
| Small bracket with ends down | Two double crochets (two, three), knitted from one loop |
| Arch with a number in the middle | Connecting post |
| Circle with a number inside | A chain of air loops (the number of loops corresponds to the number under the arch) |
| Check mark | A closed ring of air loops (the number of loops corresponds to the number in the circle) |
| A checkmark with one (two, three) crossbars on each side | Two single crochets knitted from one loop |
| Dot or small circle | Two double crochets (two, three), knitted from one loop |
When it comes to deciphering circuits, you should know the most important rules. If the patterns are knitted from the center to the edges, in straight and reverse rows, they need to be read from bottom to top. Odd rows should be deciphered from left to right, even rows – vice versa.
A handmade cape will definitely give your home comfort and a special atmosphere. It will protect furniture from dirt, animal claws, and help update the interior. Knitting is not particularly difficult even for a woman who has never picked up a crochet hook or knitting needles before.
Conventions for crochet patterns
We sew the simplest blanket
For those who prefer sewing to knitting, there are also many ways and tips on how to sew an interesting and original cape.
Take any fabric you like and, having decided on the size of the future blanket, simply trim the edges. Fringe or ruffles will be a wonderful decoration. And from many multi-colored scraps you will get a luxurious patchwork-style bedspread. Sew them together to create a unique pattern, or create a whole picture - in any case, such work will bring a lot of pleasure.
Decoration options
If a cover for a stool is knitted to insulate the furniture or increase the level of comfort, you need to decorate the finished product. Original decor will refresh the interior and help you place the right accents. The following design options are popular:
- Drawing of the canvas. Unusual ornaments, patterns, and weaving patterns look attractive without additional elements.
- Lace edge, tassels, strong border. Optimal for square models.
- Pompoms. They create a playful atmosphere and look great in the interior of a children's room.
- Embroidery. Cases with such decor will become bright and expressive. Experts do not recommend using voluminous patterns or beads.
- Fabric bows. It is important that the details match the color of the cape; decorations are usually placed on the backs of chairs.
- Rhinestones, beads, beads. Used on one-piece capes and backrest products. A prerequisite is that the decor should not interfere with the full use of the furniture.
Knitted leg warmers are trending and are worn on the legs of stools. Accessories are easy to create with your own hands and serve as a harmonious addition to the cases.
Covers crocheted on a stool should organically fit into the interior of the room in color and texture. Stylish handmade models allow you to realize interesting creative ideas. Thanks to the wide variety of patterns, unusual patterns, and decorative methods, any craftswoman will be able to choose an option that is ideal for her skill level.
What will you need at work?
The pads on the stool need to be hard and able to hold their shape. Twisted, thick yarn is best suited for knitting them.
True, you can also use many other threads. If the choice is given to thin options, the yarn should simply be folded several times. It will also be possible to create incredibly beautiful openwork covers for a stool. When choosing yarn, keep in mind that it may shrink. As a rule, such changes are observed when choosing materials with a natural composition. For example, cotton or wool threads. Before you start working with them, it is necessary to carry out a number of preparatory manipulations. The yarn is wetted and then dried. True, you can also simply make a small increase during the knitting process, taking into account shrinkage.
Info! When choosing synthetic threads, the product may stretch during use. Naturally, there is no need to make a reserve in such a situation. On the contrary, it is worth considering the possibility of reducing the size of the product.
You can knit furniture covers/capes from knitted threads. Such models look incredibly attractive and do not require additional decor. Just as in the case of synthetic materials, in this case it is additionally recommended to provide a fabric base.
Often, needlewomen prefer polyester round cord. Capes made from it are practical and keep their shape well. In addition, threads made from plastic bags are often used. Such products are capable of providing complete surface protection, but are not very convenient to use.
Products made from merino wool yarn look incredibly impressive, but are considered not entirely practical. Pills often form on such capes.
Experienced needlewomen manage to create similar products even from leftover threads. When combined correctly, you can get incredibly beautiful and bright capes. The main thing is that all materials have the same thickness. Otherwise, the product will not have the proper appearance and will take on an unattractive appearance.
The hook is selected taking into account the diameter of the yarn. As a rule, an instrument of at least number three is used. It is recommended to give preference to steel products. Hooks made of wood and plastic break quickly, and those made of aluminum bend.
Cotton
Polyester Cord Wool Merino Wool Knitwear Hooks