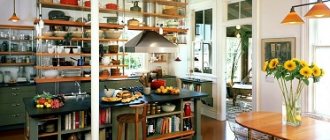
Production technologies are constantly being improved - new inexpensive polymers and durable composites are being created, but it is still impossible to do without natural materials. Wood is one of the most popular and important materials in construction. And if you want a wooden table to decorate your kitchen, it’s time to start developing a project.
For an impressive and durable product, it is not necessary to use elite and expensive types of wood. With the help of imagination and careful elaboration of the plan, you can make a tabletop from boards, scraps, saw cuts and timber. Modern designers have learned to turn disadvantages into advantages: this wonderful experience is definitely worth taking advantage of.
What is the best way to glue wood to wood?
For carpentry needs, a fairly wide range of adhesive materials is used: various types of PVA adhesives, polyurethane compounds, epoxy resin, contact adhesive, etc. The choice of the most suitable adhesive option is made with a focus on the following features of the project:
- characteristics of the tree itself (oily content, level of adhesion, etc.);
- characteristics of the loads that will fall on the seam (including shocks and vibrations);
- conditions in which the product will be used (humidity, temperature changes, exposure to moisture).
You can read about the working properties and areas of application of the main types of wood glues here.
Furniture assembly
The table top fits well on the legs. We secured it with self-tapping screws - and our table is ready! It is stable and durable. This means that everything was calculated correctly and done well.
We secured the legs to the seat of the bench. Despite good screws and PVA glue, the fastening did not turn out to be rigid, and we decided to modify the design. It was possible to make cross-shaped slats or additional corners, but we decided to make a shelf similar to a seat that would connect the legs together. Using a well-established method, we quickly made a furniture panel for the shelf. Its perimeter dimensions were 8 cm smaller than the perimeter of the seat (the width of the leg was 4 cm and 4 cm - the leg was spaced from the edge). We secured the shelf with PVA glue and self-tapping screws, and got the expected result - a strong, rigid and, at the same time, beautiful structure.
We make stools using the technology of our shop: seat, legs and shelf. We glue boards from the remains of floorboards. For beauty and convenience, we decided to make stools with a soft top. We still have linen fabric from covering the fronts of the kitchen table. We covered the stools for her. We used discarded and ugly boards for the stool seats. The legs of the stools were made the same as the legs of the bench. To assemble the stools, we used self-tapping screws and PVA glue. Half a day - and we already had four stools ready. Before covering the wooden structures, we tint them in a soft brown “peach” tone and cover them with one layer of yacht varnish. At the same time we paint the dining table and bench.
How to glue wood correctly?
Carpentry adhesives are applied in a thin, even layer to both surfaces to be joined. The only exception is the technology of gluing wood with polyurethane glue: in this case, the material is applied to one of the surfaces, and the second is moistened (slightly moistened with water). Applying the compound in excess does not improve the quality of gluing in any way, but only leads to wasted material consumption and smearing of surfaces with squeezed out excess (by the way, this adds headaches at the finishing stage).
When gluing a tenon-groove joint, only the cheeks of the tenon and the walls of the groove are lubricated with glue. This gluing method provides the most reliable connection: the joint is glued “tightly”, not inferior in strength to the surrounding wood. Applying the compound to hangers does not improve the quality of gluing; all you get in this case is just excess bleed through and a waste of time, which is especially valuable in complex multi-component assembly.
Tools
To make a wooden tabletop, a novice user will need the following tools :
electric or manual plane;- electric jigsaw or wood saw;
- drill;
- Bulgarian;
- thicknesser;
- tape measure and square;
- sandpaper.
In addition, for subsequent assembly and finishing of the product, the craftsman may need stain, various antiseptics against pests, wood glue, paint or varnish and, of course, an application tool such as a paint brush.
What is the most effective way to apply glue?
It is important to distribute the glue over the surface of the wood in an even layer, so you should not limit yourself to simply squeezing strips out of a bottle or tube. For smearing, a small brush with stiff bristles is usually used. But the simplest toothbrush will be a more effective assistant: bristles of optimal stiffness will carefully and evenly distribute the composition over the surface, providing an optimal adhesive layer.
Coating technique
The protective coating is intended both to create additional decor and to protect the wood from external influences. Wood itself absorbs liquids well, so applying any coating is not a problem, but before applying a protective layer, the surface of the countertop must be prepared. Sanding is best for this. If you don’t have a sanding machine, it is recommended to nail the sandpaper onto a piece of wood – this will be much more convenient.
Having achieved the desired result, the surface should be wiped off dust and treated with antiseptic impregnation. Impregnation treatment has several purposes. The first is protection from fungal diseases, the second is the uneven absorption of wood, especially coniferous species, is eliminated. Antiseptic impregnations are available in a wide range of colors. If painting the countertop is not intended, then a colorless composition can be used.
The next stage is applying varnish. The simplest way is to cover it in one layer; of course, this is also the least qualitative. To create a reliable coating, several layers are required. Their number can reach up to 10. The first two layers should be sanded with coarse sandpaper to the base of the wood. Due to this, the depth of impregnation increases, which means the quality improves. The following layers, after drying, are periodically polished. Thus, the resulting surface has a good appearance and is able to withstand mechanical stress.
Treating countertops with natural oil bases creates a velvety surface that is more characteristic of natural wood. Water-repellent properties and resistance to high temperatures meet the requirements, in addition, they are environmentally friendly.
Is it necessary to degrease surfaces and what is the best way to do this?
When gluing wood to wood, there is no need to degrease the surfaces. Although in some cases, for example, when working with oily rocks, this will not be superfluous. In this case, it is advisable to degrease the wood before gluing with white spirit.
When gluing dissimilar elements: wood with plastic, glass and other materials with low adhesive properties, the degreasing process is more important. Degrease only one of the surfaces, wiping it with white spirit.
Let the furniture be soft
First, we covered the seats with 30mm thick foam rubber and carefully secured it with staples using a stapler. The remaining foam rubber was removed to make the seat neat. Next, we cover it with linen fabric, shooting it with staples. The first stool is ready, the next one is upholstered faster. It turned out beautiful, but something was missing. We decided to make a leather rim around the edges of the seats. To do this, strips 20 mm wide were cut from a piece of leather. Then they were carefully nailed to the edge of the seat with decorative bronze furniture nails. Even before we finished working on the first stool, we realized that our little design idea with leather and bronze simply transformed the furniture and gave it a finished look.
And then we made another dining table for the outdoors. Now we have two sets of furniture: one took its place in the kitchen, and the other outside.
Alexander Isakovsky, Grigory IsakovskyPhoto by Grigory Isakovsky
“Garden Affairs” No. 7 (32), August 2009
How tight should I tighten the clamps?
It is important to understand that the strength of the gluing does not depend on the amount of pressing force, but on the quality of surface treatment and their accuracy of fit. There is no need to tighten the clamps too much. A small amount of glue showing through is a sure sign that sufficient clamping pressure has been created.
The use of clamps is not always advisable. If we are talking about gluing small crafts, for example, wooden boxes and boxes for tightening, you can use adhesive tape or masking tape, but, again, provided that the joints are well fitted.
What legs!
The legs of a table, chair or bench are a critical moment in terms of design and aesthetics. The stability of the furniture depends on the correctness of their manufacture, and the beauty and comfort depend on the design. Before making the legs, it is important to think through the design of the attachment point for the legs to the tabletop and seat. For the table we took blanks of bars 60×60 mm, and for the bench 80×30 mm. We got creative with the routing and tapered the lower ends of the legs for elegance and stability.
According to our plan, the legs for the table should not be perpendicular to the tabletop, but should go at a slight angle - the lower ends are slightly exposed outward. To attach the legs to each other and then to the tabletop, we used a classic “skirt” type tabletop design made from boards 20 mm thick and 12.5 mm wide. The ends of the boards were left wide and the middles narrowed. So, later, it will be more convenient for us to sit at the table. At the upper ends of the legs, we used an electric router to select grooves for a “skirt” with a depth of 15 mm. And here we made a small mistake - we chose the grooves not on the two inner sides, but only on the outer ones. What to do? To remake the leg - there is no suitable workpiece. We decided to make grooves in the legs on four sides, and then make small triangular inserts that would fit into the outer grooves. This will make it more convenient to attach the tabletop, and the overall structure will be more rigid and durable. In general, “every cloud has a silver lining.”
The legs for the bench were made of a simpler shape with protruding “flags” at the top. “Flags” serve to more firmly attach the legs to the bench seat, but they also look good. Leg blanks were cut out from 30 mm planks according to the sketch using a jigsaw, milled with a round cutter and finally sanded. Now the legs of our headset are ready! Now we return to the blanks for the tabletop and bench.
How to clean a surface from dried glue?
It makes sense to remove excess glue from the surface of the wood either while it is completely fresh or when it has completely hardened. If you rush to sand a damp area of wood, you will most likely end up with an even greater aesthetic defect when the fibers deformed by sanding dry. The hardened glue is cleaned by hand sanding (along the fibers) or cut with a chisel.
Before applying decorative finishing, check to see if there are any stained areas on the product. Otherwise, traces of dried glue will appear under the finishing compound. To more effectively detect defects, wipe the surface of the wood with a cloth soaked in white spirit.
How to make a tabletop from boards
An original tabletop made from boards with your own hands will decorate the interior of a kitchen, living room or terrace. How to make a tabletop from boards so that it lasts a long time? What type of wood should I choose and what size? Consultants will tell you about this.
ADVANTAGES OF WOODEN BOARD TABLETOPS
For a wooden tabletop you can use the following materials:
Surfaces made from MDF boards, chipboard and veneer have an aesthetic appearance, but are inferior to wooden boards in practicality and durability.
Wooden boards are the most popular material for countertops, as it has a number of undeniable advantages:
- environmental friendliness and safety;
- presentable appearance;
- resistance to mechanical damage;
- resistance to moisture, sunlight, temperature changes;
- ease of processing, creation of various shapes and designs;
- possibility of surgical restoration.
To make a tabletop, you should take boards from durable and flexible wood, such as larch, teak, oak, walnut or cherry. It is not easy to qualitatively process harder types of wood at home, which can lead to rapid deformation (drying out, swelling) under the influence of temperature and humidity changes.
TYPES OF TABLETOPS
The dimensions and design of countertops may vary depending on the installation location, operating conditions and functional purpose of the products. Among the main types of countertops are:
- prefabricated structures;
- glued products;
- made of solid wood;
- carved from furniture board.
Thick boards for countertops are more often used in luxury interior design, since the cost of the material is high. To create a tabletop yourself, the best option would be a prefabricated or glued structure made from boards (lamellas).
HOW TO ASSEMBLE A TABLETOP FROM BOARDS
Assembling a tabletop yourself will not be difficult if you are familiar with woodworking technology. Before making a tabletop from boards, prepare the necessary materials, equipment and read the step-by-step instructions for assembling the product.
You can make a tabletop from boards, which you can buy at:
- planken (20×90, 20×140) – a larch board that has a smooth surface and its edges are beveled or rounded;
- deck board (28×110, 28×140, 45×145) is a universal material of increased strength that can withstand aggressive environmental influences and mechanical damage.
Work progress
1. Selecting a kitchen furniture project. After scouring the Internet to find a kitchen suitable for my size, I chose several options. In my case, a right-hand kitchen in the shape of the letter “L” was required. Projects are a dime a dozen. The project I had chosen and finalized was drawn, and further work was carried out on this paper.
Dimensions of the kitchen: 3.5 x 3.6 m. Ceiling height minus the floor and suspended ceilings - 2.5 m. The kitchen apron is finished with “coffee with milk” mosaic. The table top is finished with porcelain stoneware in ivory color, the ends are finished with a textured end insert of the same color. The dimensions of the kitchen furniture turned out to be 2.95 x 1.85 m. The height of the table (lower tier) is 85 cm, the distance between the lower and upper tier is 80 cm. The height of the upper tier is 72 cm.
2. Calculation of the amount of material required. Well, this is pure mathematics: using the previously determined dimensions of the kitchen cabinets, we calculate the total square footage of the material required for purchase. We add up the areas of all frame elements and facades and get the total area in m2. Don't forget about the back wall: I have it made of laminated fiberboard to match the color of the facades. We also count handles and other fittings by the number of cabinet doors. First you need to decide where and how the doors will open - after that, purchase the necessary hinges.
3. Selection of the required frame material for kitchen cabinets. In general, there are not so many options: glued furniture panels made of real wood (pine, for example) or pressed furniture laminated or covered with chipboard film (as in this corner homemade kitchen). My choice fell on a furniture panel made of pine . It smells absolutely wonderful. While I was processing them I was simply enjoying the smell of pine. True, there is a lot of resin in it. You can choose what you like, which is more pleasant to the touch or texture. I wanted the texture of real wood and its very presence to be in my kitchen. Again, I thought that real wood would be preferable to something compressed with glue and polymers. Surely there are furniture panels made of solid wood - but I can’t afford it, so this option was not even considered.4. Purchase of materials and tools. Just buy it at a store where it's cheaper. If you take glued furniture panels from pine, then take grade E - “Extra”. It has no knots and very few flaws; it costs 1.5 times more than the variety with knots. But after processing it looks like real pine - beautiful.
5. Sawing the panels according to the calculated dimensions. To cut the purchased panels, I used a hand-held circular saw with a disk with a larger number of teeth 36-48 to ensure a clean cut. For rough sawing, a blade with 24 teeth is suitable, but it will “tear” the pine. Since I decided to save money in the kitchen by doing it myself, my sawing also had to be economical. After preliminary cutting, you need to mark each received frame part, otherwise you can later get lost in them - there will be a lot of parts!
I marked them with masking tape and marked which cabinet the piece belonged to. I would like to note one more important detail that I paid little attention to at first: the precision of cutting parts down to the millimeter . After assembling the frame of the first cabinet, I realized that I had made an inaccuracy of only 2 millimeters and the cabinet turned out a little skewed. I had to correct the flaws by sanding. And grinding, in turn, further reduces the size of the final frame of the entire cabinet as a whole.
When cutting, it is very important to leave a grinding gap of 2-3 mm as a reserve. I repeat - this is important!
6. Pre-assembly of kitchen cabinets, fitting. After cutting and rough sanding, we begin the first assembly and fitting of cabinet parts. We assemble the frames, sand them, eliminate mistakes and flaws; if there are chips, we fix them with wood putty to match the desired color. All cabinets must be screwed together securely, as for installation, all defects must be corrected, the back walls must be cut out, all their ends must be adjusted and sanded. I assembled all the cabinets on dowels and euro screws (confirmed) using a Phillips screwdriver using a screwdriver.
7. Disassembling cabinets and sanding them. After preliminary preparation and sanding, we disassemble all the furniture and polish/sand “clean”. We do not touch the ends and places where the parts meet - we, in theory, have already prepared them in the previous paragraph.
8. Varnishing of all parts. Varnishing takes almost a third of the total working time due to long drying and layer-by-layer sanding, which also takes a lot of time and effort. I did this:
- covered the entire surface of the frames and facades with stain using a roller - this is much faster;
- I sanded with a hand sanding sponge number 100 and 120 - just a little bit so that the texture of the wood showed up;
- covered with the first layer of varnish - dried it - then sanded the first layer of varnish with a zero polish, wiped it with a damp cloth;
- covered with a second layer of varnish - dried and sanded again, wiped again;
- the third layer of varnish is drying and final sanding and polishing of all front surfaces.
9. Drying, assembling and installing cabinets in their place in the kitchen. At this stage, the final version of the kitchen was already visible. Varnish, stain and sanding did their job - they are beautiful. Installation in place in the room was carried out in 3 hours, I really wanted to quickly install everything in its place. First, I hung the upper cabinets using pre-installed rails. After which I assembled and installed the main and lower cabinets without installing the fronts.
10. Making a countertop. The tabletop is a separate “song”. I also wanted my own making. After searching the Internet, I found several options and settled on a tabletop with a base made of plywood and faced with caramogranite tiles . You need to choose really good and strong legs for cabinets so that they can support the entire structure along with the contents of the cabinets.
11. Installation of closing/opening elements and mechanisms on cabinet doors and shelves. Responsible point. It is important to choose the right hinges and rollers so that they meet all the needs of your kitchen, so that the rotation and exit/exit/sliding angles of kitchen doors and shelves are ensured. Each product, be it a loop or rollers, indicates the dimensions that must be observed and maintained when installing it. If you follow these instructions, it won’t be difficult to install them in place. Of course, installing them will require special tools, such as a Forstner drill. The thing is inexpensive so you can buy it.
It is important to maintain symmetry when installing hinges and rollers so that the door or shelf does not warp when closing/opening.
12. Production of kitchen facades with milling of the ends and design on the front side. I also made the facades by hand. At first I wanted to order, but after learning the price and looking at the samples, I decided that I could do it myself, at least as well. Again I had to buy a hand router. I didn’t take the cheapest one, but the second to last one in price. The work will be one-time and there is no point in taking an expensive router, I don’t need it. The work procedure for the manufacture of facades is similar to those specified in paragraphs 3-8. The coating with stain and varnish is similar to the frame. The only difference is that the cutter applies the pattern to the front surfaces of the facades.
Well, I bought a router, I also have hands. I practiced on the scraps and started doing the main work. I started with small doors. For them, a template was made according to which a pattern was transferred using a milling cutter, repeating the arch in the passage of the kitchen and room. Then came the turn of the large doors of the facades. A larger template of the same configuration was made for them. At the ends I processed the facades with an edge cutter, and transferred the design with a groove cutter. The cutters are expensive, I charged 500 rubles apiece and bought two of them: one edge cutter and one groove cutter. I will add that milling work must be done outside, in the open air: there is a lot of dust and shavings. This is also possible in an apartment, but the vacuum cleaner will have to be cleaned frequently. 
13. Installation of glass parts, shelves and trays for drying dishes in cabinets and sinks. After assembling and installing all parts of the kitchen in their places, you can install the filling. I screwed the glass parts using special fasteners for glass. I bought pallets and dryers ready-made to fit my size - installation was the simplest, with screws.
Upper tier cabinet pre-assembly process
All kitchen cabinets are assembled and ready for final sanding and stain and varnish.
The future general appearance and size of the kitchen is emerging... the critical stage lies ahead - staining and varnishing.
Using the installed guides, the corner cabinet was hung first, followed by the right side of the upper tier, the installation of the guide was designed to place the cabinet at the beginning of the mosaic.
The manufacture of the countertop took place in a residential apartment, so I had to experience some inconveniences: there is no sink, you can’t use the table, in short it’s dark, but the tiles are laid and everything is ready for grouting.
The grouting is done, now the sink and baseboards are waiting their turn, the area under the hob and sink was carefully treated with bioprotective impregnation to prevent fungi and mold from growing.
Trying out panels for future facades. In this form, they temporarily hung for a week until there was free time to process them; at the same time, they just dried thoroughly.
Here are the facades after covering with stain and the first layer of varnish, without polishing or sanding yet.
Second coat of varnish and second polishing with sanding.
The facades are in place, the glass inserts are not yet ready.
Under the top tier there is an LED strip for additional illumination of the desktop, a very good and practical thing, as it turned out: it shines decently and gives additional beauty, especially at night, it illuminates beautifully when the main, overhead light is turned off, the illumination is soft, does not hurt the eye, illuminates evenly.
This is the final look we got with glass inserts, LED lighting, additional cabinet overhangs and an installed hob.
This is the kitchen I ended up with.