An oven mitt is one of the necessary things in every kitchen. There are few requirements for this simple accessory - it must be a good heat insulator and have a beautiful appearance. Of course, a neat housewife’s potholders should always be clean. But how difficult it is to wash kitchen towels and oven mitts! That is why it would be more rational to simply replace the dirty potholder with a new one. Moreover, it is not difficult to sew potholders with your own hands from scraps using simple patterns. It will take little time to sew; you only need small scraps of fabric. It is better to use a material with a natural composition; synthetics can melt from high temperatures.
Patchwork potholders
A simple option for beginners
To tack patchwork you need:
- textiles in two colors;
- padding polyester or batting;
- bias binding for ribbon;
- threads, sewing tools.
How to sew
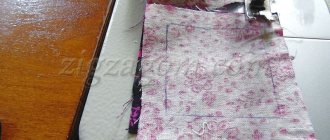
To implement the idea, we will need to make a template from cardboard. It should be a square with a side of 7 cm. Cut out a window in it, leaving a wall 1 cm thick.
Using the template, cut out 9 squares. These blanks already take into account a perimeter allowance of 1 cm. In the finished form, the squares will have a side length of 5 cm. When cutting, keep in mind that in the finished product we need to ensure alternation of different squares by color.
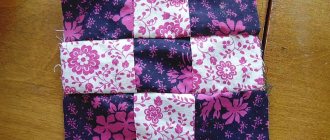
Sew the squares together, placing them right sides together.
Pairs of blanks can be stitched together without cutting the thread.
We prepare three stripes.
Press the seams and press the allowances to one side.
We sew the second side of the potholder in the same way.
Place the finished parts with right sides facing each other. We sew on three sides. We cut out the corners.
Having turned the product inside out, we tuck two layers of padding polyester or batting inside.
We make a loop from bias tape. We insert it into the corner of the potholder and sew the remaining side.
All we have to do is quilt the tack. This can be done manually or by machine.
DIY ideas for interesting potholders for March 8th, photo
Potholders are made not only for their own use. They can be given to mothers, girlfriends, sisters, colleagues, mothers-in-law, etc. There can also be an unlimited number of reasons: New Year, Easter or just a good mood. But such gifts will be most appropriate on March 8th.
We sew potholders without a sewing machine
To sew potholders from scraps with your own hands using a pattern, you need:
- remnants of fabric of different colors, 100% cotton;
- thermal insulating gasket, you can use synthetic winterizer;
- thread, needle, scissors and other tools.
Description
Draw the pattern of the future potholder according to the required dimensions. We have hexagons with a side length of 27 mm. We need to prepare 19 of them. For ease of cutting, it is advisable to cut out the hexagon template immediately with allowances. The allowance is about 1 cm around the perimeter.
We prepare 19 hexagonal blanks.
Now let's take a step-by-step look at how this original item is sewn.
We place the workpiece with the wrong side up, and place the template on it. Secure with a pin.
We wrap the seam allowance over the template and sew it with a basting stitch. We do the same with the rest of the blanks.
Place two hexagons with right sides facing each other and sew them together with stitches over the edge.
The front side of the seam is shown in the following photo.
We continue to sew hexagons.
The product will turn out more interesting if you combine printed and plain fabrics.
The assembled mosaic needs to be ironed, the basting threads removed and the paper templates removed. Now we cut out square pieces of fabric for the back and front sides of the product. We also cut out an equal-sized piece from padding polyester.
We assemble sequentially: lower part, padding polyester, upper part, mosaic patchwork. We chop off the “sandwich” with pins.
We quilt all the hexagons around the perimeter with a “forward needle” seam.
We cut out the facing to process the outer edges of the tack. Its width should be 5.5 cm, and its length should exceed the length of the perimeter by 10-15 cm. We make two counter turns on the facing and iron it.
We sew the facing with a “needle forward” seam, first along one side of the potholder, then along the reverse. You need to start the seam from the middle of the potholder side.
Pay attention to get beautiful corners when turning.
Finally, we make a loop and carefully hem the ends of the facing.
Types of products and its fillers
Regardless of shapes, sizes, colors and application features, only two types of potholders are known:
- Textile;
- Silicone.
Flat, round
Textile
For fabric potholders, it is best to use material made from natural fibers: cotton, linen or chintz fabric. They are more durable, wear-resistant and tolerate high temperatures well.
Note! When heated, synthetic fabrics can lose their shape and become unusable very quickly. Plus, synthetics have the ability to ignite quickly, so you should be very careful when using a grip made from this material near an open fire.
The standard textile potholders are:
- Ordinary flat;
- Having the shape of a geometric figure: square, round or rectangular;
- In the form of a glove.
Filler. This is the key factor in protecting your hands from burns. When choosing filling, it is best to choose batting or drape; felt and flannel are also sometimes used - taking a hot kettle or pan with such filling will not be scary.
Pattern "Kitty"
Important! Pot holders with padding polyester instead of filler increase the risk of burns by 3 times than with drapery or batting. If it so happens that this was not discovered upon purchase, then it is best to use it as a decorative accessory.
Silicone
Silicone potholders are a modern approach to creating kitchen utensils. It has a wide functional range and is varied in design types. It also has a wide range of different shapes: clip, mitten, glove. Or in the form of animals: cats, pigs, dogs, mice, frogs, butterflies. The technical characteristics of this type of grips have many positive aspects, which allows them to increasingly gain popularity among housewives.
You might be interested in this: The procedure for sewing a tulle skirt with your own hands
Potholder Owl
For creativity we need to prepare:
- fabric of three types of colors (we recommend using a special fabric for patchwork);
- seal;
- bias tape;
- threads, sewing accessories.
How to sew oven mitts for the kitchen with your own hands
We will cut the details of the product according to the pattern presented below. You need to print it to life-size scale.
We take all the details separately and cut out the patterns.
Mark the contours of the parts on the fabric.
We cut out according to the markings.
All you need to find is:
- wings - 4 parts made of fabric and 2 parts made of sealant;
- dark details of the eye - 2 reinforced details;
- light details of the eye - 2 reinforced parts;
- body - 2 parts made of fabric and 1 part made of sealant;
- beak - 1 piece made of fabric.
We fold the blanks for the body with their right sides facing each other, placing a seal between them.
We place the beak part on top, making sure the cuts match. We pin all layers together with pins.
We sew the two sides of the beak with a zigzag seam. The third side of the part remains open for now. At the same time, we stitch together all layers of material.
Place the light details of the eyes in the right places and secure them with pins.
Sew a zigzag stitch around the circumference.
Let's attach the dark details of the eyes, having previously secured them with pins.
We fold the fabric blanks for the wings with the wrong sides facing each other, placing a seal between them.
We lay a decorative seam in the center, grinding down three layers of material.
We process the sections of one side of the wings with bias tape. To do this, unfold it and attach it to the wrong side of the part.
Then we turn the binding to the front side and sew it along the edge.
We assemble the potholder by attaching and fixing the wings.
We apply the unfolded binding with the front side to the wrong side of the product. We attach, leaving the upper portion of the tack untreated.
We turn the binding to the front side and sew along the edge.
Cut off 0.3 m of tape, find and mark the middle. Aligning this point with the middle of the upper open area, we attach the facing. We turn it to the front side.
We make a machine seam, grinding down the edges of the binding and at the same time processing the open upper section of the potholder.
We fold the free ends of the binding into eyelets and sew them on using a hand or machine stitch.
The potholder bird is ready!
DIY dog grip, photo
Another interesting type of potholders is made in the shape of a dog's face. In order to sew such a potholder, more time and skill is required. But how cute these kitchen accessories can turn out!
Calyxes
For production we will need:
- two types of fabric;
- batting;
- bias tape;
- threads, sewing accessories.
How to sew oven mitts for the kitchen with your own hands using a pattern
We cut out four rectangular blanks from the main fabric. Dimensions 16.5 x 21.5 cm. Cut off two corners on the short side, creating a smooth line.
From the finishing fabric we will prepare 4 strips measuring 5.5 x 16.5 cm and 2 strips for future handles measuring 5.5 x 20 cm.
We cut out two blanks 3 x 5 cm from the binding. We cut off the corners on the blanks.
We cut out two pieces of 15.5 x 22 cm from the batting. On the short side of the pieces, we cut the corners, following the contours of the pieces made from the main fabric.
To seal the handles, we prepare two strips of batting or fabric coated with padding polyester. The dimensions of the strips are 1.5 x 20 cm.
We adjust finishing strips 5.5 x 16.5 cm to the main parts.
We fold the blanks for the handles in half with the wrong side out and sew along the long side.
Turn inside out using a wooden stick.
We thread the seal into the handles, using a pin for convenience.
We quilt one piece from the main fabric and the batting so that the latter does not get confused during use.
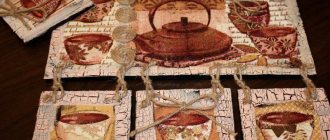
On the second piece of the main fabric we sew a rectangle of tape, imitating a tea bag. We hand embroider a thread from it. If you wish, you can do this on a typewriter.
We begin to assemble the potholder completely. We place a handle on the main fabric piece quilted together with the batting - see photo below. Please note that the main piece is face up.
Place the second piece of main fabric on top, face down. We machine stitch on three sides.
Turn the potholder inside out. We process the upper sections with bias tape.
We embroider “Thea”.
The potholder is ready! The product is viewed from both sides in the photo below.
Options for using oven mitts for the kitchen
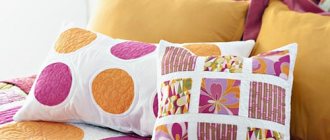
The main and main purpose is to protect your hands while cooking. But its possibilities are wider: home decor, implementation of creative ideas, teaching sewing skills to small children, gifts.
Potholders made using the patchwork technique are an excellent souvenir that you won’t be ashamed to give to colleagues, friends and relatives for any occasion. A New Year's potholder can be sewn from fabric with a themed print or in the shape of a Christmas tree, snowman, or symbol of the year.
Making potholders with your own hands is a creative process that brings pleasure, and, importantly, can distract us and our children from endless sitting in front of gadgets. Perhaps the first potholder you made yourself will be a step towards diversifying or completely changing the interior of your kitchen.
Butterfly
For production we will need:
- fabric of several colors that can be combined with each other;
- bias tape - 1 m;
- padding polyester;
- buttons;
- decorative braid;
- threads, sewing accessories.
How to sew a potholder
This cute butterfly pot holder is made using the pattern below.
We cut out from the main fabric - 2 body parts, 4 wing parts.
We cut out 2 large and 2 small parts from padding polyester. We provide 5 mm allowances on the inside of the wings.
We strengthen the outer part of the wings with padding polyester. Having folded the blanks for the wings with the right sides inward, we grind them along the inner edge. We make cuts according to the allowances and turn the wings inside out. Sew along the edge at a distance of 3-5 mm from the fold.
We strengthen one main part with adhesive synthetic padding. Having folded it with the second part with the right sides facing each other, we fix it with pins. We cut out antennae from two pieces of braid and pin them. We attach two lines. In the photo these lines are highlighted with red lines. We cut the padding polyester at the base of the wings in two places and turn the body inside out.
We quilt the body.
Since decorative seams are practically invisible due to the pattern on the fabric, they are shown for clarity in the photo below, on a product made from a different fabric. If you sew the layers of the product according to your stitching pattern, deviating from the diagram, then this is quite acceptable. The main thing for potholders is that the pattern is symmetrical.
For the appliqué on the wings, cut out the part in the form of a drop with an allowance of 5 mm. We sew it on with a hand stitch. For the second decoration, we cut out a round blank using a template. Its diameter should be twice the diameter of the finished decoration. We place the blank and the template on the wing and sew it around the circumference.
We sew around the circumference using hand stitches.
We pull it towards the center, fix it, and close the sections with a button.
We sew on a couple more buttons for decoration and perform decorative hand stitches. You can use felt or drape for decoration.
Fold the wings and the main part. On the binding we make two counter turns of the cuts and iron them. We apply tape along the edge and pin it.
We turn the binding over to the other side of the potholder and baste it. Please note that the width of the binding on the wrong side of the potholder should be 1-2 mm greater than the width on the front side. We sew a line along the front side, passing along the stitching seam. If you wish, you can sew the other side of the binding by hand using blind stitches.
When doing the edging, we need to remember to make a loop.
DIY butterfly pot holder, photo
Butterflies are called potholders that are put on only the fingers, where for the thumb the indentation is made on one side, and for the rest - on the opposite side. If you bring your fingers to the center several times and then spread them apart, you get something like the flapping of a butterfly’s wings, which is how the potholder got its name and is often made in the shape of this insect.
Such oven mitts are very convenient in everyday life; it is impossible to burn your fingers or palms with them. Many housewives, having tried to use such an accessory once, do not want to use other types of potholders anymore.
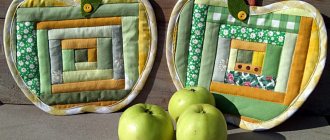
But a butterfly potholder in this form is not the only option. It can be done in the shape of an apple:
Another interesting option in the form of laying hens, only the fingers are placed on top of the body from the side of the head. Such potholders will add coziness to the interior and can be an excellent gift.
Heart-shaped “butterflies” made from scraps of different colors look unusual and cute:
The simplest version of a butterfly potholder can be sewn in the shape of an egg. Unlike previous options, it is easy to perform, but this does not make it any less interesting.
Kitchen oven mitts "Bell"
Such original caps are very useful for a teapot.
They can be made stylized as a Christmas tree, eggplant, or pear.
Let's sew a bell - a strawberry.
We will need:
- green and red fabric;
- fabric for lining;
- heat-resistant gasket;
- finished narrow binding;
- threads, sewing equipment.
How to sew unusual potholders
We cut out the pattern according to the proposed drawing. Please note the required allowance of 5 mm.
We cut out the blanks.
Sew on the sepals using an appliqué stitch. You can simply sew a zigzag seam.
Then we collect all the layers of the bell and quilt it.
We outline the top of the bell.
Using a compass we draw a circle from it (see pattern).
Trim the excess fabric around the circumference.
We process the cuts with binding. If you do not have a suitable ready-made trim in color, you can cut out the desired strip of fabric. Just keep in mind that cutting must be done on a bias.
We trim the edge of the product by cutting off the excess trim.
Fold the piece in half, after inserting a loop of braid into the corner. We sew a machine seam.
We sew the cuts.
Turn the finished bell inside out.
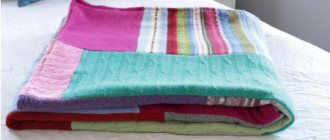
DIY potholder towel, photo
An oven mitt can perform more than one function, especially if it is combined with a towel. Agree that you should always have both at hand in the kitchen. We have prepared for you a selection of photographs demonstrating what this might look like.
In the kitchen you can have not one, but several potholders and towels at once.
The towel and potholder can be combined or contrast with each other in color.
An experienced needlewoman can make a set of kitchen accessories made in the same style, including a potholder and towel.
In order to diversify the atmosphere in the kitchen, you don’t need much - sew elegant and beautiful accessories. Take things you haven't worn for a long time, come up with a design and go for it! The reward for your efforts will be an updated look for the kitchen.
Cake
For sewing you need to take:
- fabric of two types of colors;
- tape;
- button;
- padding polyester;
- threads, sewing accessories.
Description
Let's draw a cupcake pattern. Sizes and shape are arbitrary. The main thing is that the product is symmetrical.
Fold the fabric in half, mark and cut out the piece - see photo below. We repeat the process for the padding polyester.
We sew the unfolded parts in the center with two lines. Fold in half. Sew around the perimeter, leaving a small open area.
Turn it inside out and stitch along the edge, retreating 2 mm. At the same time, we will stitch up the remaining open area.
We cut out two blanks for the hat. We fold them right sides together, after inserting the loop. We stitch together, leaving an open area. Turn it inside out and stitch around the perimeter at a distance of 1-2 mm from the edge.
Fold the main part and the cap, aligning the edge. Sew along the edge.
Sew on a bow and button.
DIY round pot holder, photo
Even the round potholders we are used to can be made stylish and original if desired. If you add a little imagination, a simple potholder will turn into a ladybug with wing-shaped finger pockets.
A pot holder can also become a sunflower mitten.
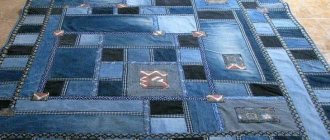
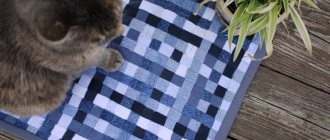
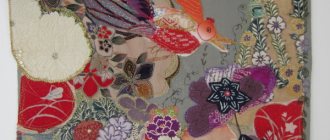
patchwork product
With the onset of the warm season, the kitchen also requires bright colors. A rustic kitchen pot holder patchwork will be the best summer kitchen interior decor idea. In addition, the remnants of scraps of fabric that zealous housewives would be sorry to throw away will be used.
Patchwork potholders made in the applique style look extraordinary.
Recently, it has become fashionable to purchase sets of oven mitts: one large oven mitten and two smaller square models. Made in a beautiful colorful combination, they will become a real decoration of the kitchen.
Of course, this technique requires incredible perseverance and patience, because you need to sew the scraps together, after selecting the combinations, cut out the shape, sew, and decorate. But the result is worth it: your kitchen will receive a worthy element of decor.
The kitchen is decorated with various products and things, trying to give the room coziness and comfort. Sometimes things are completely useless. Kitchen oven mitts are not only beautiful, but also functional. They are used to remove hot dishes from the heat and to remove molds and baking sheets from the oven. They can also be used as a stand for hot pots and pans.
Buy these useful accessories for your kitchen, or better yet, sew them yourself, and your hands will be protected from burns and injuries.
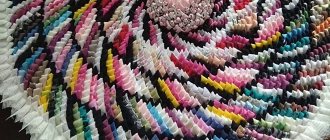
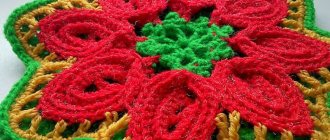
Crocheted and knitted potholders
Such a bright juicy berry will certainly find its place in the kitchen and will be a worthy decoration. How to crochet a potholder pattern is clearly demonstrated. This diagram contains a detailed description of the work. For the strawberry itself you will need red and pink-red thread. The diagram shows which is used where. Knit the top of the berry with green thread.
The diagram will also show you how to knit potholders. These charming things will soon settle in your kitchen. Pay attention to the diagram on the left. This product has a round shape.
Start knitting from the bottom, casting on 11 stitches with green thread, as shown in the photo. The second row will be purl. To complete it, cast on 3 additional loops at the beginning and end of this row. Each cell in the diagram corresponds to a specific loop. Based on the visual hint, you will be able to complete this work. Small details such as:
- flowers;
- leaves;
- grass;
- seagulls;
- feather marks on the wings are made at the end of the work.
They are made with threads of the appropriate color, threaded into a needle with a thick eye. Don’t forget to sew a loop at the end of the work and then it will be easy to hang the new potholders in their place.
Original kitchen design
A tack of modest colors will not attract attention, but a bright model will become an object of admiration, a “highlight” of the design. Crafts in the form of watermelon or orange slices, pink-cheeked apples, bright strawberries or cherries will match the kitchen theme and whet the appetite of the household.
The design of the kitchen will look stylish and elegant if all interior items match in color. The fabric for the accessory can be chosen to match the dishes or curtains, you can sew an apron from the same material, or line boxes for various kitchen items.
From the same fabric as potholders, make hot mats and napkins.
"Mouse"
The original potholder is in the shape of a funny mouse.
For work they take:
- Two cuts of wound fabric (calico, chintz, textile towels can be used);
- Cutting scissors;
- Threads of a suitable color;
- Sewing machine.
The creative process looks like this:
- The template is traced over the fabric.
- Having cut out the necessary parts from textiles and insulation, we proceed to the mouse’s face. Cut a triangle and two double circles.
- Before sewing, the muzzle is attached to the body using safety pins.
- Both ears are stitched from the inside out (can be done by hand), turned inside out and smoothed with an iron. Then, forming the ears, they make tucks and tuck them behind the muzzle, baiting them onto the thread by hand.
- Next, all the parts are sewn on a machine.
- After this, the excess insulation is cut off and bias tape made of the same fabric as the body of the mouse is sewn on.
Finally, a tail loop is attached to the round side of the textile rodent.