An oven mitt is one of the necessary things in every kitchen. There are few requirements for this simple accessory - it must be a good heat insulator and have a beautiful appearance. Of course, a neat housewife’s potholders should always be clean. But how difficult it is to wash kitchen towels and oven mitts! That is why it would be more rational to simply replace the dirty potholder with a new one. Moreover, it is not difficult to sew potholders with your own hands from scraps using simple patterns. It will take little time to sew; you only need small scraps of fabric. It is better to use a material with a natural composition; synthetics can melt from high temperatures.
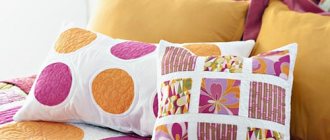
Patchwork potholders
A simple option for beginners
To tack patchwork you need:
- textiles in two colors;
- padding polyester or batting;
- bias binding for ribbon;
- threads, sewing tools.
How to sew
To implement the idea, we will need to make a template from cardboard. It should be a square with a side of 7 cm. Cut out a window in it, leaving a wall 1 cm thick.
Using the template, cut out 9 squares. These blanks already take into account a perimeter allowance of 1 cm. In the finished form, the squares will have a side length of 5 cm. When cutting, keep in mind that in the finished product we need to ensure alternation of different squares by color.
Sew the squares together, placing them right sides together.
Pairs of blanks can be stitched together without cutting the thread.
We prepare three stripes.
Press the seams and press the allowances to one side.
We sew the second side of the potholder in the same way.
Place the finished parts with right sides facing each other. We sew on three sides. We cut out the corners.
Having turned the product inside out, we tuck two layers of padding polyester or batting inside.
We make a loop from bias tape. We insert it into the corner of the potholder and sew the remaining side.
All we have to do is quilt the tack. This can be done manually or by machine.
Internal filling
You need to immediately decide what the kitchen accessory is made for. If you need a thin pot holder used to remove the lid or rearrange a frying pan or pan, then sometimes two layers of material are enough. For dense items that are used to remove baking sheets from the oven, you will need filler. Usually this is a thin padding polyester, although it does not have any positive properties, it does not hold temperature well. Batting, drape, or another layer or two of fabric will do.
To start sewing potholders, you first need to assess your strengths and, based on your skills, choose or come up with a model for the future product.
By the way, felt is very popular now. The material is easy to work with, does not require an overlocker, is dense, holds high temperatures well and is excellent for tacks. It can also be used as a filler.
We sew potholders without a sewing machine
To sew potholders from scraps with your own hands using a pattern, you need:
- remnants of fabric of different colors, 100% cotton;
- thermal insulating gasket, you can use synthetic winterizer;
- thread, needle, scissors and other tools.
Description
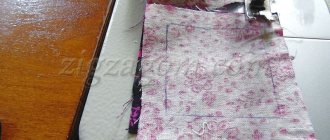
Draw the pattern of the future potholder according to the required dimensions. We have hexagons with a side length of 27 mm. We need to prepare 19 of them. For ease of cutting, it is advisable to cut out the hexagon template immediately with allowances. The allowance is about 1 cm around the perimeter.
We prepare 19 hexagonal blanks.
Now let's take a step-by-step look at how this original item is sewn.
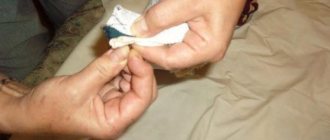
We place the workpiece with the wrong side up, and place the template on it. Secure with a pin.
We wrap the seam allowance over the template and sew it with a basting stitch. We do the same with the rest of the blanks.
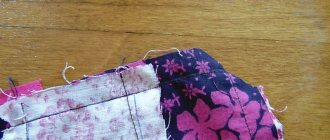
Place two hexagons with right sides facing each other and sew them together with stitches over the edge.
The front side of the seam is shown in the following photo.
We continue to sew hexagons.
The product will turn out more interesting if you combine printed and plain fabrics.
The assembled mosaic needs to be ironed, the basting threads removed and the paper templates removed. Now we cut out square pieces of fabric for the back and front sides of the product. We also cut out an equal-sized piece from padding polyester.
We assemble sequentially: lower part, padding polyester, upper part, mosaic patchwork. We chop off the “sandwich” with pins.
We quilt all the hexagons around the perimeter with a “forward needle” seam.
We cut out the facing to process the outer edges of the tack. Its width should be 5.5 cm, and its length should exceed the length of the perimeter by 10-15 cm. We make two counter turns on the facing and iron it.
We sew the facing with a “needle forward” seam, first along one side of the potholder, then along the reverse. You need to start the seam from the middle of the potholder side.
Pay attention to get beautiful corners when turning.
Finally, we make a loop and carefully hem the ends of the facing.
Main features of cutting and sewing
Potholders can be made of any size and type, but you don’t always get easy-to-use accessories. Therefore, patterns of simple shapes are often used. You need to be more careful with the decor. Beads, buttons, applique made of satin or other flammable materials are not the best solution. When choosing a model, you need to take this into account.
It is much more pleasant to use potholders made by yourself.
Basic moments.
- If the fabric frays, treatment will be required. In the classic version, an overlocker is used for this purpose. You can pass the needle by hand using a blanket stitch. It’s even easier to tape the seams or hide them inside.
- Regardless of the pattern, be sure to leave an allowance of about one centimeter for stitching and security.
- Potholders are usually hung on a hook, so you should immediately take care of the loop and the attachment point.
- You should not use felt-tip pens or markers for patterns; they do not always wash off and often appear on the other side.
To sew potholders, you will only need the skills acquired in labor lessons at school.
The last point is the most important: you need to determine the size. If the hand is large, for example, a man often works in the kitchen, then the pattern will have to be slightly enlarged. To do this, add 1-2 cm on all sides.
Potholder Owl
For creativity we need to prepare:
- fabric of three types of colors (we recommend using a special fabric for patchwork);
- seal;
- bias tape;
- threads, sewing accessories.
How to sew oven mitts for the kitchen with your own hands
We will cut the details of the product according to the pattern presented below. You need to print it to life-size scale.
We take all the details separately and cut out the patterns.
Mark the contours of the parts on the fabric.
We cut out according to the markings.
All you need to find is:
- wings - 4 parts made of fabric and 2 parts made of sealant;
- dark details of the eye - 2 reinforced details;
- light details of the eye - 2 reinforced parts;
- body - 2 parts made of fabric and 1 part made of sealant;
- beak - 1 piece made of fabric.
We fold the blanks for the body with their right sides facing each other, placing a seal between them.
We place the beak part on top, making sure the cuts match. We pin all layers together with pins.
We sew the two sides of the beak with a zigzag seam. The third side of the part remains open for now. At the same time, we stitch together all layers of material.
Place the light details of the eyes in the right places and secure them with pins.
Sew a zigzag stitch around the circumference.
Let's attach the dark details of the eyes, having previously secured them with pins.
We fold the fabric blanks for the wings with the wrong sides facing each other, placing a seal between them.
We lay a decorative seam in the center, grinding down three layers of material.
We process the sections of one side of the wings with bias tape. To do this, unfold it and attach it to the wrong side of the part.
Then we turn the binding to the front side and sew it along the edge.
We assemble the potholder by attaching and fixing the wings.
We apply the unfolded binding with the front side to the wrong side of the product. We attach, leaving the upper portion of the tack untreated.
We turn the binding to the front side and sew along the edge.
Cut off 0.3 m of tape, find and mark the middle. Aligning this point with the middle of the upper open area, we attach the facing. We turn it to the front side.
We make a machine seam, grinding down the edges of the binding and at the same time processing the open upper section of the potholder.
We fold the free ends of the binding into eyelets and sew them on using a hand or machine stitch.
The potholder bird is ready!
Advantages of use
An oven mitt is a convenient kitchen accessory used when preparing hot food to protect your hands from burns. You can use it to hold a hot pan in the oven to check if the dish is ready, remove the pan or saucepan from the stove, press the lid on, and drain the water into the sink so that the potatoes or pasta remain inside. This device is also used as a stand for hot dishes, protecting the work surface from damage.
For interior
A homemade mitten or rug can be a wonderful decorative accessory that complements the interior of the kitchen. Due to the variety of shapes and colors, this attribute is also presented as a gift to housewives.
Calyxes
For production we will need:
- two types of fabric;
- batting;
- bias tape;
- threads, sewing accessories.
How to sew oven mitts for the kitchen with your own hands using a pattern
We cut out four rectangular blanks from the main fabric. Dimensions 16.5 x 21.5 cm. Cut off two corners on the short side, creating a smooth line.
From the finishing fabric we will prepare 4 strips measuring 5.5 x 16.5 cm and 2 strips for future handles measuring 5.5 x 20 cm.
We cut out two blanks 3 x 5 cm from the binding. We cut off the corners on the blanks.
We cut out two pieces of 15.5 x 22 cm from the batting. On the short side of the pieces, we cut the corners, following the contours of the pieces made from the main fabric.
To seal the handles, we prepare two strips of batting or fabric coated with padding polyester. The dimensions of the strips are 1.5 x 20 cm.
We adjust finishing strips 5.5 x 16.5 cm to the main parts.
We fold the blanks for the handles in half with the wrong side out and sew along the long side.
Turn inside out using a wooden stick.
We thread the seal into the handles, using a pin for convenience.
We quilt one piece from the main fabric and the batting so that the latter does not get confused during use.
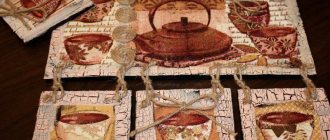
On the second piece of the main fabric we sew a rectangle of tape, imitating a tea bag. We hand embroider a thread from it. If you wish, you can do this on a typewriter.
We begin to assemble the potholder completely. We place a handle on the main fabric piece quilted together with the batting - see photo below. Please note that the main piece is face up.
Place the second piece of main fabric on top, face down. We machine stitch on three sides.
Turn the potholder inside out. We process the upper sections with bias tape.
We embroider “Thea”.
The potholder is ready! The product is viewed from both sides in the photo below.
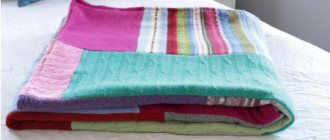
Material selection and preparation
To sew potholders, you can use any thick fabric. It’s good if they consist of natural or at least semi-synthetic fibers. Linen and cotton can withstand high temperatures well and protect your hands. New materials need to be washed, as they can shrink and fade. It is recommended to do this directly in the washing machine. The accessory will be used mercilessly, will get dirty, and it is unlikely that any housewife will care for it manually.
The exception is interior decorative potholders.
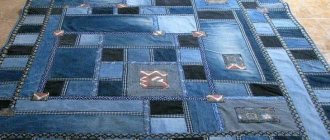
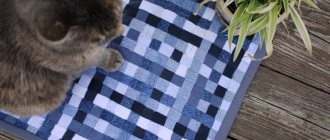
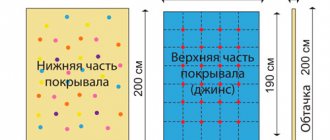
By the way, an excellent material for potholders is jeans (denim, denim). You don't have to run to the store to get it. Old pants and skirts are perfect for making a new item.
What else will you need:
- sewing needle;
- threads;
- ruler or measuring tape;
- scissors;
- pencil or piece of soap;
- pins.
As for color schemes, here you can show all your fantasies, come up with cool combinations or sew potholders to match the interior.
It’s good if they are combined with towels, curtains or other kitchen textiles.
Butterfly
For production we will need:
- fabric of several colors that can be combined with each other;
- bias tape - 1 m;
- padding polyester;
- buttons;
- decorative braid;
- threads, sewing accessories.
How to sew a potholder
This cute butterfly pot holder is made using the pattern below.
We cut out from the main fabric - 2 body parts, 4 wing parts.
We cut out 2 large and 2 small parts from padding polyester. We provide 5 mm allowances on the inside of the wings.
We strengthen the outer part of the wings with padding polyester. Having folded the blanks for the wings with the right sides inward, we grind them along the inner edge. We make cuts according to the allowances and turn the wings inside out. Sew along the edge at a distance of 3-5 mm from the fold.
We strengthen one main part with adhesive synthetic padding. Having folded it with the second part with the right sides facing each other, we fix it with pins. We cut out antennae from two pieces of braid and pin them. We attach two lines. In the photo these lines are highlighted with red lines. We cut the padding polyester at the base of the wings in two places and turn the body inside out.
We quilt the body.
Since decorative seams are practically invisible due to the pattern on the fabric, they are shown for clarity in the photo below, on a product made from a different fabric. If you sew the layers of the product according to your stitching pattern, deviating from the diagram, then this is quite acceptable. The main thing for potholders is that the pattern is symmetrical.
For the appliqué on the wings, cut out the part in the form of a drop with an allowance of 5 mm. We sew it on with a hand stitch. For the second decoration, we cut out a round blank using a template. Its diameter should be twice the diameter of the finished decoration. We place the blank and the template on the wing and sew it around the circumference.
We sew around the circumference using hand stitches.
We pull it towards the center, fix it, and close the sections with a button.
We sew on a couple more buttons for decoration and perform decorative hand stitches. You can use felt or drape for decoration.
Fold the wings and the main part. On the binding we make two counter turns of the cuts and iron them. We apply tape along the edge and pin it.
We turn the binding over to the other side of the potholder and baste it. Please note that the width of the binding on the wrong side of the potholder should be 1-2 mm greater than the width on the front side. We sew a line along the front side, passing along the stitching seam. If you wish, you can sew the other side of the binding by hand using blind stitches.
When doing the edging, we need to remember to make a loop.
How to sew
In order to create a beautiful and neat potholder, you need to act slowly. Each stage of work is very important.
Necessary materials
To effectively protect your hands from burns, the potholder must be tight. To make it, you should take insulating materials - felt, batting, padding polyester or fabric from an old coat.
- The insulation is surrounded on top with a beautiful cotton fabric. It is safe when heated and ignited, melting is excluded. This means that the risk of burns is minimized. In addition, natural materials (cotton, calico or linen) are much more comfortable for the skin than synthetics.
- An excellent solution for edging a potholder would be bias tape. You can choose any of the dozens of shades that are available in the handicraft departments.
- The product should be comfortable. To do this, you need to correctly calculate the dimensions of the potholder so that your hand fits completely inside. Ideally, not only the hand, but also the wrist should be protected.
- The choice of colors must be taken seriously. The potholder should be made with soul and decorate the interior of the kitchen and be combined with.
- To create kitchen accessories, you can use both new materials and old scraps of expressive fabrics. These can be used to sew the outer part or the lining. In every closet there are many well-preserved things that are a pity to throw away. The pattern will give them a second life.
How to make a pattern (diagram)
Let's look at creating a pattern using the example of the most popular three-layer oven mitt.
Measurements to be taken:
- thumb length;
- index finger length;
- wrist volume;
- palm length (10 cm is usually added to this number);
- palm width.
The pattern is made on special paper. The next step is to cut out the pattern and place it on a piece of textile. We turn the material over with the outer part inward, lean the pattern against it, and lay a snare along the edge of the pattern.
Cut carefully
Next, the edges of the pattern are folded back. The threads are stretched, thus the snares become bastings. We cut the basting in the middle. As a result, we have two patterns for one of the sides of the potholder. Everything is repeated again to make the second side.
After making the patterns for the outer side, we proceed to two patterns of insulation. Repeat all manipulations again. Make the same allowances.
Fabric making process
Insulating fabric is applied to the inside of the cotton fabric pattern. The edges of the basting are aligned. A running stitch will help temporarily connect the elements. One side is finished. The tack parts are usually sewn together in some way. The same manipulations will allow you to build the second half of the potholder. It also consists of two patterns of outer parts and insulation - a total of three layers.
Next, you can connect the two halves of the potholder together to get the finished product. First, you can sew them with a basting stitch, then stitch them on a machine or by hand. Now it's time to decorate the edges with piping.
The final step is to make a neat and small loop.
Design and decor of potholders
When making oven mitts, it is important to remember that they are not just a piece of fabric. This is an important interior detail, an interesting element
A double-sided potholder performs remarkably well in everyday life.
Its owners have no questions about which side to hang it to make it look beautiful.
Selecting a pattern for a tack is not an easy task. A large drawing must be positioned correctly and beautifully. If you are sewing a set of identical mittens, you need to place the design symmetrically on both mittens.
Beads, lace, braid and similar details can be used as decorative elements. The matter is limited only by your imagination. The main thing is not to overdo it. However, the main function of a potholder is to provide protection against burns.
It is also important to firmly sew the decorative elements to the potholder. No one likes catching buttons or beads in their soup. Read about other DIY kitchen design ideas in our
How to sew a bright and good potholder in a few minutes, master class:
Interesting ideas for original DIY potholders (mittens)
Several options for tying a potholder:
It is easy and quick to sew a potholder according to the pattern from drape.
There is no need to add an inner layer, since the drape itself is a fairly dense material. You need to cut out two identical drape pieces and connect them with an overcast stitch made of colored thread. At the end, sew on the button eyes. Such potholders can be made together with the child, or they can be made using knitting or patchwork.
Whatever your potholders are, make them with soul, fantasize, experiment! Then they will give homeliness, warmth and comfort to your kitchen.
You can find out how to choose curtains for the kitchen here.
Kitchen oven mitts "Bell"
Such original caps are very useful for a teapot.
They can be made stylized as a Christmas tree, eggplant, or pear.
Let's sew a bell - a strawberry.
We will need:
- green and red fabric;
- fabric for lining;
- heat-resistant gasket;
- finished narrow binding;
- threads, sewing equipment.
How to sew unusual potholders
We cut out the pattern according to the proposed drawing. Please note the required allowance of 5 mm.
We cut out the blanks.
Sew on the sepals using an appliqué stitch. You can simply sew a zigzag seam.
Then we collect all the layers of the bell and quilt it.
We outline the top of the bell.
Using a compass we draw a circle from it (see pattern).
Trim the excess fabric around the circumference.
We process the cuts with binding. If you do not have a suitable ready-made trim in color, you can cut out the desired strip of fabric. Just keep in mind that cutting must be done on a bias.
We trim the edge of the product by cutting off the excess trim.
Fold the piece in half, after inserting a loop of braid into the corner. We sew a machine seam.
We sew the cuts.
Turn the finished bell inside out.
Round crochet
Crocheted potholders look beautiful. Knitting them is easy and quick.
- Collect air loops and close them into a ring.
- Next, knit a row in a ring with a single crochet.
- Next row: two stitches are knitted into each stitch, starting from the instep loop.
- Then, in each subsequent row, add one loop through one column, the second row through two, the third through three, etc.
- The edging is knitted with another thread and a loop is made from the braid (it can also be tied).
Crochet without patterns or descriptions simply crochets products in the shape of a watermelon slice, apple, pear, etc.
Cake
For sewing you need to take:
- fabric of two types of colors;
- tape;
- button;
- padding polyester;
- threads, sewing accessories.
Description
Let's draw a cupcake pattern. Sizes and shape are arbitrary. The main thing is that the product is symmetrical.
Fold the fabric in half, mark and cut out the piece - see photo below. We repeat the process for the padding polyester.
We sew the unfolded parts in the center with two lines. Fold in half. Sew around the perimeter, leaving a small open area.
Turn it inside out and stitch along the edge, retreating 2 mm. At the same time, we will stitch up the remaining open area.
We cut out two blanks for the hat. We fold them right sides together, after inserting the loop. We stitch together, leaving an open area. Turn it inside out and stitch around the perimeter at a distance of 1-2 mm from the edge.
Fold the main part and the cap, aligning the edge. Sew along the edge.
Sew on a bow and button.
Curtain decoration
After leafing through a lot of magazines with beautiful interiors, there is a desire to do something original and always with your own hands.
All you need to make your dream come true are the remains of beautiful fabric, they can remain after sewing curtains and tulles, openwork or satin ribbons, ribbons, threads and much more.
You can make a varied collection of potholders for the same curtains and curtains. In this case, you can safely use accessories, beads, seed beads and other small accessories.
Variety of shapes
The mitten is the most popular and versatile option. The pattern is created by tracing the hand on paper.
Note!
- Ideas for LD (a girl’s personal diary): step-by-step instructions for making it yourself, photo reviews of the best options
- Educational soft books made of felt: materials for making, detailed instructions + reviews of plots for books (100 photos)
Original do-it-yourself valentines - design options, necessary materials, master class for DIY work
The two outer and two inner cut-out parts are first sewn separately, and then joined, stitched, and quilted. Then a piping and a loop are sewn on. The mitten is very maneuverable, comfortable and practical.