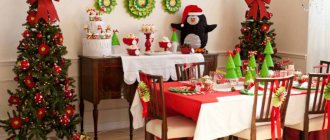
- Pineapple decor
Very wintery: knitted clothes
With the onset of cold weather, we often wrap ourselves in warm sweaters and blankets. Why not knit a suitable “suit” for a bottle of wine? Both decor and packaging at the same time.
If you don’t want to knit anything special, look in the closet for an old sweater. Those who don’t like to knit can simply look for old jumpers in the closet of a suitable color. Well, craftswomen who enjoy spending an evening with a ball and knitting needles come up with exclusive outfits for gift bottles.
Knitted clothes for champagne You can limit yourself to just funny hats and scarves. It will take much less time than knitting a full outfit, and the effect is no worse:
Scarves and hats for bottles The main thing is the winter, New Year's mood. And it can be conveyed literally with one or two expressive details.
A small detail with a New Year's mood
A bottle of champagne in a dress made of ribbons
You will need: 11 meters of pink ribbon, 2 meters of silver ribbon, pink bow fabric, thread, needle, scissors and glue.
Master Class
- Glue 2 circles of silver tape diagonally overlapping.
- Apply pink tape diagonally to half of the bottle.
- Apply pink tape in even circles from the middle to the end of the bottle.
- Gather ribbon onto a string for a bow, making a skirt.
- Glue the skirt to the bottle.
- Decorate the side with a silver ribbon bow.
A bottle of champagne in a dress made of ribbons is ready!
Kanzashi
Kanzashi is more common when decorating champagne for a wedding, but no one forbids using this method to decorate bottles on March 8th.
The set of tools and materials required for work is almost standard:
- ribbons;
- champagne;
- scissors;
- sewing centimeter;
- Super glue;
- pencil for marking;
- additional decorations (if necessary).
Some designs may require an open flame (when finishing edges) - a regular candle will work for these purposes.
There are several ways to decorate a bottle beautifully using colored ribbons. The most popular option is a variety of outfits.
Dresses made using the kanzashi technique look more impressive than suits made of corrugated paper. They are more elegant and neat, but not everyone succeeds in creating such an outfit on the first try.
Most often, difficulties are caused by two points:
- edge processing. Ribbons tend to unravel quickly from the ends. Such edges look very untidy. They can be hidden by carefully tucking them, but this method is not suitable for every scheme. If it is not possible to hide the edges, they are treated with open fire. Thin threads are soldered and the ends are sealed. The method is quite effective, but requires some skill. Without the proper skills, you can burn too much or end up with an edge that is too thick and uneven;
- smooth surface. The tape slides both when forming elements of the composition and when in contact with the glass surface. It is not always possible to securely fix the edges in the desired position on the first try. You can get rid of excessive smoothness of the bottle by opening it with acrylic primer or a thin layer of PVA. It’s not so easy to deal with the slippery surface of the tape; only gained experience will help here.
Before decorating the bottle with various decorations, it needs to be “hidden” under a layer of ribbons.
This is quite simple to do - the main thing is to strictly follow all the steps.
First of all, you need to cut the tapes into the required lengths. For a flat part, a piece of tape should be equal to the circumference of the container plus an allowance of 0.5–1 cm.
The cone-shaped part is decorated at an angle, so the ribbons should be longer. In this part, each segment must be measured directly against the bottle, taking into account the allowance.
You need to start decorating the neck from the very top row (from the foil), connecting the edges at an angle (as in the photo) in the front part of the bottle. The joints are glued together with an overlap and glued to the glass surface.
Each subsequent layer should cover the previous one by half the width of the tape. This way the entire narrowed part of the bottle is closed. Depending on the brand of champagne, a different number of rows may be required. All layers can be the same color, or tones can be alternated.
Decoration of the flat part of the bottle begins from the very bottom row (from the bottom). The tape is glued so that the edges are either on the back of the container or on the front (not on the side).
The joints are glued together overlapping, but it is better not to attach them to the bottle or to grab them just a little bit, so that later they can be peeled off from the glass (this will be needed for the final decoration of the edges).
The next rows are attached in the same way, overlapping the bottom layer by half the width of the tape.
After the entire glass part of the container is hidden under a layer of tapes, you need to hide the edges of the horizontal layers. This will require an additional piece of ribbon or lace. It is placed vertically, covering untidy joints.
The edges of the vertical tape are folded up and hidden under the horizontal layers (for this they did not need to be firmly glued to the bottle).
After the blank has acquired a beautiful and neat appearance, you can proceed to decorating the champagne bottle.
For decoration, you can choose spring motifs (flowers, butterflies, etc.), make a dress for the bottle, or implement any other design.
It is not at all necessary to use only ribbons for decoration. Lace, beads, buttons or ready-made decorative elements - all this is suitable for decorating champagne.
All decorations are attached to the base using glue (you can sew them on, but there will be more hassle).
Experienced craftswomen can try to make the entire decor of a champagne bottle in the kanzashi style. Delicate flowers made from ribbons look very elegant and sophisticated. Such a gift for March 8 will definitely be appreciated.
How to decorate with glitter?
An original and elegant bottle for the New Year can be decorated not only with pieces of fabric or themed napkins, but also with shining sparkles. This simple component can give the base a very bright and festive look, which will elegantly emphasize the holiday atmosphere.
Along with glitter, you can use other decorative components. In a single combination, they will make wonderful bottle decorations. Let's consider what positions should be used to decorate such an interesting New Year's homemade product:
- spray can with golden paint;
- glitter;
- adhesive composition (ordinary PVA glue will be sufficient).
Let's consider the correct sequence of decorative design of a bottle using the listed components.
- At the first stage, it is advisable to carefully prepare the workplace for all creative manipulations. The table on which the bottle will be decorated must be covered with newspapers. You should do the same with the nearby area so that it is not stained with golden paint.
- Next, take a bottle. You can remove paper labels and stickers from it, or you can leave it. Different masters act differently. If you decide to remove the labels, it is important to remove all remaining adhesive on the glass walls, otherwise they will be visible on the gold paint.
- The bottle will need to be covered with a continuous layer of beautiful golden paint. After this, you should wait until it is completely dry. Until this moment, you cannot begin further manipulations, otherwise the craft can be ruined.
- As soon as the golden layer on the bottle has completely set and becomes completely dry, the surface of the workpiece will need to be completely coated with a layer of PVA adhesive solution. To make applying this component as convenient as possible, it is recommended to use a brush.
- After this, the prepared bottle, coated with glue, is sprinkled with glitter. They should be beautifully distributed over the surface of the bottle to make it more aesthetically pleasing.
Using a similar scheme, you can decorate the bottle with rhinestones. The only difference in the decoration technique will be in the features of fixing the decorations. For each shiny pebble you will need to select a specific place on the prepared vessel. As a result, you can form a very beautiful pattern, designed in a New Year's theme.
Women will appreciate it
Fur clothes will add a touch of warmth and comfort to the design; in cold weather, one look at such a craft will have a warming effect. You need to pay attention to ensure that the structure does not move from the container; to do this, it is better to secure everything well at the base.
You can use glue or silicone, using a small cord when choosing it, you must remember the main color of the entire product, you should choose the most suitable tone. Small mistakes should not be made; they can attract very strong attention.
Removable felt cover
The original decoration is reusable felt covers in the shape of Father Frost and the Snow Maiden.
Felt covers for champagne bottles
Take:
- a bottle of champagne;
- paper;
- bias tape in red and blue colors (sold at any sewing store);
- silver ribbon;
- glue;
- sushi stick;
- a little padding polyester or cotton wool;
- needle, thread;
- wide red satin ribbon;
- decor (white beads, lace, sparkles).
Making a cover
Draw 2 rectangles on a sheet of paper, one with sides 14 and 30 cm, the second - 8 and 30 cm. Cut them out. Attach the wider one to the bottle, glue the ends of the part so that the resulting pipe can be easily removed. Now glue the second rectangle at an angle, cutting off the excess parts. You need to act carefully. Try to make the part even: all small folds and irregularities will be visible on the finished product.
Felt case in the shape of Santa Claus
When the glue dries, start decorating the case. Apply silver tape to the top of the paper piece and cut enough to make a full turn. Place the tape on the paper. If it is wide, then one strip is enough; a narrow one will have to be glued in 2-3 rows.
Christmas bottle covers
Take bias tape and cover the entire cover with it, all the way to the bottom. Proceed in the same way as when gluing tape.
Christmas bottle covers
Take the lace, attach it at the junction of the trim and the ribbon - you will get a collar. Do not rush to cut off the lace by wrapping it around the bottle: use it to disguise the junction of the trim. You can also trim the bottom of the cover with lace.
Satin champagne case
Try removing and putting the cover on the bottle again - is it easy? If no difficulties arise, then everything was done correctly.
Staff
Start making the staff: take a stick, coat it with glue, and then wrap it with red bias tape. Decorate with silver ribbon, securing the ends with hot glue gun.
A bag with presents
Take a wide satin ribbon and cut a small strip. Fold it in half and sew it together using a sewing machine or needle and thread. You need to leave 2-3 cm unstitched on each side. Turn the finished bag right side out and put a piece of cotton wool or padding polyester in it.
New Year felt and wool decoration for bottles
Cut a small strip of narrow silver ribbon and tie a bag. If desired, you can decorate the bow with a bead.
A cap
Cut a strip of paper slightly longer than the circumference of a champagne cork. Glue the ends of the part. Attach it to the paper and draw a circle. Cut it out and glue it to the cylinder.
Knitted bottle covers
When the glue dries, decorate the workpiece by covering it with a wide red ribbon or bias tape. Secure the tape with hot glue.
“Clothes” for New Year’s bottles
Decorate the bottom of the hat with lace or sew sequins in the shape of snowflakes onto the hat.
New Year's apron for a bottle of champagne
Assembly
Christmas bottle decor
Attach the bag to the staff, and then glue the entire structure to the case.
A bottle of champagne decorated with Christmas tree decorations
Make a cover in the shape of the Snow Maiden, just use blue bias tape rather than red.
Champagne bottles decorated for the New Year
Knitted New Year's outfits
If you have basic knitting skills, use them to create a unique outfit for New Year's champagne. You can knit a cover in the shape of an elegant Christmas tree - with balls and a bright star on the top.
You can use knitting needles to knit a “sweater” in the shape of a snowman or Santa Claus. Knit the main part in stockinette stitch, and decorate the top in the form of a stand-up collar, tying it with an elastic band. A pom-pom nose, beady eyes, a little jewelry and imagination - here we have a charming guest at the feast.
Decorating with tissue paper
Why not use this wonderful material to decorate a bottle of champagne for the New Year 2022! Simple, fast and beautiful. Let's study and do!
To work you will need:
- Cigarette paper;
- Paper glue;
- Thermal gun;
- Palm paper leaves;
- Candies.
Progress
- Then, using glue, glue one candy to each square, strictly in the center.
- We wrap the ends of the paper square from the base to the top. We do this with all the squares with candies.
- Moving from bottom to top, apply glue to the square from the back side and glue it to the champagne bottle. Thus, in a circle, in a checkerboard pattern, we cover the entire surface of the container.
- Now we take paper leaves, roll them into a circle (the diameter should be equal to the neck of the bottle), and glue them together.
- Attach the resulting bundle to the neck of the bottle. The product is ready!
Decorating bottles for kitchen interiors
The kitchen is the soul of the home. The atmosphere that reigns in the kitchen reflects the inner world of the family. Decorative dishes and bottles are often used to decorate it.
You can use bottles of various shapes, materials and sizes in your kitchen interior. You need to select them depending on the style of the kitchen. The external shape and design of the glass decoration should support and complement it.
Decorating bottles for kitchen interiors
For the Provence style, bright bottles of unusual shapes filled with various seeds, cereals, grains, flowers and leaves are suitable. In this option, natural materials are most often used: peas, beans, corn, peppers, lentils, colored curly pasta. Small fruits and vegetables placed inside jars can remind you of summer in winter. Orange circles of orange, yellow lemon slices, unripe carrots, red peppers will create a bright mood in the kitchen and will lift the culinary mood all year round.
Decor made from colored salt or spices will also look impressive. They are poured inside transparent bottles in layers.
Bottle decor with silver paint for kitchen decoration
For a classic style, clear shapes are suitable. Glass or plastic rectangular bottles filled with cereals, grains and seeds will look beautiful here. Decorating bottles with coffee beans or nut shells is a DIY bottle decoration that even a child can do.
Bottles painted on the outside with silver or gold paints will look organic in a high-tech style.
We should also not forget about the decor of the top of the bottles. There are many options: fill the lid with wax or paraffin, cover it with burlap and tie it with twine, rope or ribbons, use a wooden cork.
Bottle decor with twine
New Year's decor of bottles for a feast
Decorating bottles to update your interior
In a holiday bag
In order to festively decorate a bottle of champagne for the New Year, you don’t have to fuss with its design. You can make an excellent decoration with your own hands using fabric in the form of a colorful magic bag, into which your sparkling wine can then easily be hidden. This option is also perfect as a gift for anyone. So, let's start our design business.
To make it you will need:
- fleece in red, beige and white;
- white and red threads of dense quality;
- needle;
- black acrylic paints;
- thin brush;
- scissors;
- satin ribbon or decorative rope;
- a simple pencil;
- white sheet of paper.
Progress:
- To get started, we need to create a pattern for our future bag. To do this, first of all, we take measurements from our bottle of champagne in order to subsequently transfer them to a white sheet of paper.
- We transfer our paper patterns onto red fleece fabric and cut them out using scissors. Let's put aside the details of the bag for a while and start making a pattern for Santa Claus's face in order to subsequently decorate our New Year's product. To do this, we take a beige fleece fabric for the face, and a white one for the beard, mustache and the edge of the supposed hat. Looking at the photo, we create patterns and sew them using a sewing machine to one part of the bag. From a small red piece of fleece we will make a nose for our fairy-tale hero, and using acrylic black paints and a thin brush we will add eyes.
- We sew the decorated part of the bag with its second half. So our beautiful elegant decoration for the New Year 2022 is ready, which should be in sight of all members of your family. And since this work is done with your own hands, it is worth appreciating and extolling.
Our selection of colorful photo ideas will inspire you to new fruitful thoughts and you will create the same beauty.
If you know how to crochet, then you have a great chance to make wonderful New Year decorations not only for the Christmas tree, home, but also for the table.
Homemade wreaths
Do you have a sprig of spruce or rowan on hand? If yes, then you can play it up beautifully and make an attractive decoration for champagne. Fold the branch in a circle to make a wreath. Try to give the craft the correct shape, but do not overdo it: the branches can be broken. Secure the wreath with glue so that it does not break. Wrap the bottle in the most ordinary craft paper of a single color. You can put the wreath on the neck or attach it to the front side of the craft. Complete the composition with small white and red ribbons. Everything is ready to serve.
A bottle of champagne as a Christmas tree
So, the costumes are ready, Father Frost and the Snow Maiden are there, what else do we need for the holiday? Christmas trees! And a bottle of champagne (with our help, of course) will cope brilliantly with this role:
A bottle of champagne will successfully cope with the role of a New Year's tree. A Christmas tree decoration for a bottle can be sewn, knitted, made from natural or artificial fir branches, scraps, candies - the possibilities are inexhaustible.
A bottle in a Christmas tree costume is almost unrecognizable. More ideas for “Christmas tree” decor:
- Christmas tree bottle
- Christmas tree that has no needles
- DIY Christmas trees: ideas for every taste
All of the above options have only one drawback: they are quite labor-intensive. It will not be possible to make such packaging or decoration for a bottle five minutes before the holiday. What ideas are there for those who are very busy, don’t like to do handicrafts, or have received an invitation to visit on the eve of a holiday?
Textile
Even an old sweater or a Christmas toy can become a decoration for a bottle. If you have an unwanted white or off-white knitted sweater in your wardrobe, cut off the sleeve and put it on the bottle. If the sleeve is too long, shorten it so that the neck is barely visible. Tie the sweater into a bow using a satin ribbon. You can complement the composition by attaching small Christmas tree balls of different colors to the ribbon.
If you know how to sew and you have a sewing machine at home, then make a bottle costume. You can choose Santa Claus and sew a coat with a hat. Make patterns according to the size of the bottle, and you can secure the costume with tape. The sewn suit will be reusable and will last you more than one New Year's Eve.
What you need for work
As a material, you can use almost any decor that can be found in every home on the eve of the holiday:
- New Year's tinsel and serpentine;
- costume jewelry;
- corrugated and colored paper;
- New Year themed paper napkins;
- sweets in beautiful wrappers;
- special covers for bottles that you can sew with your own hands;
- satin ribbons;
- sparkles and other decor.
You also need to prepare tools and supplies:
- glue;
- scissors;
- threads;
- acrylic paints and primer;
- tassels;
- glitter;
- foam sponge;
- colored, shiny and corrugated paper;
- pieces of fabric;
- ribbons.
Decoupage of a champagne bottle for the New Year 2022 “Santa Claus’s House”
We offer another interesting option on how to decorate a bottle of champagne with your own hands for the New Year 2022 using the decoupage technique. For decoration you will need ordinary napkins, but with the image of Santa Claus. If you wish, you can come up with your own plot.
Materials:
- priming;
- acrylic paints;
- napkins;
- acrylic lacquer;
- Styrofoam;
- hot glue, PVA.
Master Class:
- We remove all labels from the bottle and be sure to degrease the surface before decorating.
- Now prime the bottle with white acrylic paint using a small piece of foam rubber or sponge.
- Cut out the desired fragment from the napkin and separate the bottom layer; for work you will only need the top layer of paint.
- The place on the bottle where we will apply the image is lightly rubbed with sandpaper, then we apply PVA glue.
- Place the cut out fragment with the pattern down on the bag or file, sprinkle it with water, and straighten the resulting wrinkles.
- We attach the file with a napkin to the bottle, carefully iron it, then remove the file, let the picture dry and cover it with acrylic varnish.
- We cut the foam into small pieces and glue it around the picture, that is, we make a window.
- Mix the putty with PVA glue and make a chimney on the neck of the bottle. We simply apply the composition to the neck and squeeze out the brickwork with thread.
- We make a mixture of PVA glue and plain water. We dip napkins into it and randomly apply it to the bottle, and in the end we get snow walls.
- Using hot glue we make an ice roof for the house.
- Now we paint the pipe and window brown, and the walls and ice roof white. Finally, for shine, we cover everything with acrylic varnish.
For better adhesion of the primer to the glass surface, make the first layer thin, dry it well and apply the second layer. The pipe can be made from salt dough.
How to surprise guests
Antique decoration will look unusual; a background of combined golden and brown colors will remind everyone of the magic and mystery of the festive night. Aerosol cans are quite convenient to use, paint is used sparingly, and nearby things do not get stained. Before starting, it is better to cover with oilcloth material the place where the application will take place if the surface is new and expensive.
Painting
On the eve of the holiday, buy a special paint that can be applied to glass. The paint is not destroyed by water because it has a stable base. Take a bright paint color, then the bottle will look festive, but tasteful. Place the bottle, cleared of the label, on a piece of unnecessary paper, it could be an old newspaper, for example. Apply paint with a brush or from a can onto the glass. Wait for it to dry completely and after about 1-2 hours, coat the glass with a second coat of paint. Next, rhinestones, snowflakes cut from napkins and other small details are suitable for decoration. Distribute the elements over the entire surface of the bottle, secure with double-sided tape or superglue.
Important! When you paint a bottle, open the vents and windows in the house, and don’t forget to wear gloves so as not to get dirty.
Decoupage
In stores or creative departments you can find special kits designed for decoration. If you come across one, then take it without hesitation, your drink will be so attractive in appearance that it’s even a pity to open it.
You will need:
- napkin for decoupage;
- scissors;
- PVA glue;
- varnish;
- primer.
How to do:
First, remove the manufacturer's label from the bottle. Apply a thin layer of primer to clean, dry glass over the entire surface. The primer is needed for strong adhesion of the glass to the future pattern. When the primer dries, coat the glass with PVA glue. Without letting the glue dry, take a napkin, moisten it with water and place it on the bottle surface. Straighten out any irregularities and folds so that the drawing is clear. Coat the top of the bottle with varnish. The neck can be decorated with multi-colored ribbons or pieces of tinsel.
New Year bottle design options
Snowmen, Christmas trees, cheerful children on skis - there are many motifs of napkins for New Year's decoupage, choose according to your taste
Since preparations are underway for the New Year, Christmas motifs should be present in the equipment. The most popular material for work is three-layer paper napkins, with New Year's drawings or photos. In addition to these you will also need:
- PVA glue, if there is no special one for decoupage;
- acrylic paint (in this case white);
- acrylic varnish, preferably transparent;
- nail polish remover (always on hand);
- cotton pads;
- red and green ribbons, each 1 m long and 0.5 m wide;
- dry sea salt (the grind should be fine);
- brush for varnish and glue;
- sponge or paint brush;
- paper and scissors;
- rubber spatula;
- container with water.
Prepare everything you need to decoupage a bottle and get to work
When all the auxiliary materials and tools are prepared, you should pick up a wine bottle, and it will be even more interesting if it comes with contents. An alternative would be to decoupage a bottle of vodka for the New Year.
Decoupage of champagne for the New Year with romantic notes
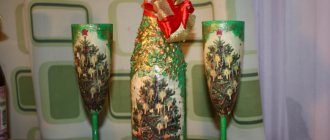
Champagne decor in vintage style
Bottle painting
You can draw on champagne containers. The drawing can be anything, the main thing is that you like it. New Year's characters and attributes would look appropriate: Santa Claus, snowman, snowflakes, Christmas trees.
You can also decorate empty bottles this way. By the way, it is better to remove the labels before painting so that the surface is even and smooth.
Original bottle decor made from thuja branches
If you need the best ideas on how you can decorate a bottle of champagne with your own hands for the New Year 2022, then we offer original decor from thuja branches. Such a bottle can serve as a New Year's gift, New Year's table decoration, or as a night light if you place a garland in an already empty bottle.
Materials:
- thuja branches;
- acrylic paints;
- acrylic lacquer;
- beads;
- salt, glitter.
Master Class:
- We degrease a bottle without labels and cover it with acrylic varnish, but apply the varnish only to the area where we will apply the twig.
- Now we apply a thuja sprig and also apply acrylic varnish on top with a brush. Leave until completely dry, and then glue all the other branches in a circle.
- Then we glue small ones between the large branches.
- Using hot glue we make a snowfall, which we then cover with white acrylic paint. We also apply paint to the thuja branches.
- Then cover the bottle decor with acrylic varnish and leave for 5 minutes.
- Mix salt with silver glitter, sprinkle and leave until the varnish is completely dry.
- Now we glue small beads or rhinestones to the thuja branches and secure everything with hairspray.
For decoration we use only fresh thuja branches; dry branches will simply break.
Paper decor
Make a reusable case for the bottle, it looks aesthetically pleasing on the table, and you can use it every year. Thick paper that resembles cardboard will do. Take a piece of paper measuring 40x60 cm and roll it into a tube. The diameter of the tube should be a couple of cm larger than the diameter of the bottle itself. Unfold the tube back into a sheet and divide it vertically into two equal parts with a ruler. In one part, use a pencil to make identical strips 1-2 cm thick. Cut the paper into strips. Then roll the cardboard into a tube and fold the strips in half. Secure the strips with ribbons at the bottom.
Using double-sided tape, stick pine cones and cinnamon sticks onto the cardboard. You can decorate the paper with small snowflakes or rhinestones. Place the bottle in the case, the festive drink is ready.
The spectacular presentation of a sparkling drink will remain in the memory of your household for a long time, because attention is paid to such little things most often. Show a little patience and strength, bring creativity and give free rein to your hands, and everything will definitely work out. Happy upcoming winter holidays!
Decorating champagne with candies
Pineapple decor
The traditional combination of chocolates and sparkling wine can be arranged as one whole composition. We invite you to make New Year's champagne-pineapple.
To make a pineapple from sweets and champagne for the New Year with your own hands you will need:
- sparkling wine of your choice;
- wide paper tape;
- scissors;
- round chocolates in yellow packaging;
- hot glue gun;
- decorative bow or ribbon;
- green corrugated paper;
- paper for packaging.
How to decorate a bottle of champagne for the New Year in this style:
1. The wide part must first be covered with paper tape. This simple action will increase the adhesion force of the candies to the surface.
2. We attach each candy to the walls using adhesive. The first row starts from the bottom. The rows are formed in the same way until the neck begins.
3. Thin strips are cut from corrugated paper, symbolizing the top of the pineapple. The ends of the paper can be twisted by pressing them against the sharp part of the scissors and pulling them through.
- All that remains is to decorate and pack a beautiful gift of sweets and champagne. Wrap everything in wrapping paper and tie a nice bow on top.
Decor in the form of a Christmas tree
Another easy-to-execute way to decorate a gift from a bottle of champagne and sweets.
For the Christmas tree you will need:
- glue gun;
- a sparkling wine;
- green tinsel;
- round shaped candy;
- decorative bow;
- beads
The sequence of actions on how to make a Christmas tree from champagne and sweets:
1. First of all, you need to wrap the tinsel around the champagne. The edges of the tinsel are fixed with glue.
2. How to decorate a bottle of champagne with sweets? By slightly moving the strips of tinsel apart, you can use glue to fix each one separately.
- In this option there are no clear layouts of the candies; the most important thing is the organic appearance of the finished composition.
3. The finished champagne bottle Christmas tree is decorated with a decorative bow at the neck and beads wrapped around it.
Decorate the bottle with tinsel with candies
For this method of decoration you will need about a meter of thin tinsel. Do not take very thick tinsel, it is inconvenient to wrap. Also take small candies. Immediately attach the candies to the tinsel using double-sided tape. Attach sweets at approximately the same increments to make them look more beautiful. Attach one end of the tinsel to the bottom of the bottle and wrap it all the way to the neck. Secure the other end of the tinsel with adhesive tape. Tie a piece of gold or a festive bow to the fastening site to close the fastening.
For decoration, instead of sweets, you can take beads. Wrap them with tinsel and then secure them to the bottle as above.
Decoration with corrugated paper
Corrugated paper, especially festive green, will perfectly decorate your bottle of champagne for the New Year 2022. It’s not at all difficult to do it yourself, especially for beginners, you just need to purchase this material at an office supply store and stock up on some details for further New Year’s decor. As you can see in the photo, these can be golden ribbons that play the role of securing paper, bells, flowers, gift ribbons in all their variety, beads and much more, collected in a specific festive composition. So let's get started.
To work you need:
- corrugated paper (any color);
- a bottle of champagne;
- gold thin ribbon;
- gift ribbon (different colors);
- floral paper;
- ready-made gift bows;
- scotch;
- all kinds of decorations on hand.
Progress:
- Grab a bottle of champagne and get to work. First you need to design the neck and stopper. To do this, carefully wrap them with a small piece of corrugated paper. To prevent the paper from opening, we secure it with tape.
- We do similar work with the rest of our product, wrapping it with the same material, and for fixation we use a piece of gold gift ribbon.
- The final stage. To do this, you need to decorate the sparkling wine with a New Year's decorative composition, which you can make from anything. Let's say, as in our case, these are bells, ready-made gift bows, beads, rain, artificial flowers (you can replace them with small Christmas balls), transparent colored floral paper.
Such beauty, made with your own hands, can be placed not only under the tree for the New Year 2022, but also presented as a gift to loved ones. They will certainly appreciate it. In order to make several souvenir copies, you should check out our video tutorial, which will provide you with another great idea.
Making an ice bucket for champagne
Surprise your family and serve them a holiday drink in a homemade ice bucket. You need to prepare in advance: take 2 buckets of different diameters. Try inserting the bottle into a smaller bucket, if it fits in without any problems, then you can safely get down to business.
Take any New Year's attributes: rowan branches, needles, cranberries, plastic snowflakes. You can add tinsel and even small New Year's toys. Insert the bucket into the bucket. Place a weight in a small bucket to prevent it from floating. Fill the space between the buckets with water, and put all the previously selected decorative elements into the water.
Freeze the bucket on the balcony or in the freezer for at least 8 hours. Just before serving, place the bucket on a large plate and place the sparkling wine in it. Bring your creation to your guests, they will be impressed by such beauty.
To make the ice beautiful, fill it with clean, twice-boiled water.
Decorate in the shape of a pineapple
Turn a New Year's bottle of champagne into a pineapple, like in the photo! This is not at all difficult, and the finished souvenir will look festive and original.
You will need:
- green and orange tissue paper for pineapple leaves,
- round candies in gold foil (such as “Ferero Rocher” or “Evening Kyiv”),
- glue,
- glue gun,
- twine.
Process of creation:
- So let's get started. Cut orange tissue paper into squares measuring six by six centimeters.
- Drip glue onto the flat side of the candy and place the candy in the center of the paper square. After the candy is securely attached to the paper, fold the edges of the paper so that they “envelop” the candy.
- Start by using a glue gun to cover the bottle of champagne with candies in a circle. Since we are not gluing foil, but tissue paper, there should be no problems. When gluing, follow these two principles: place the candies as closely as possible to each other so that there are no gaps between them. The second secret to successfully making a souvenir is to glue the sweets from bottom to top in concentric circles. Of course, you can attach candies in different colors, but then the “pineapple” will look sloppy.
- Using scissors, cut out thin long leaves from tissue paper to decorate the neck of the glass container in a circle. For this we also use glue.
- Wrap it with twine in the place where the candies meet the leaves.
This master class will make you a real specialist in the field of creating an extraordinary souvenir, especially since it will not take much effort and time, and the material you need is the simplest.
Ribbons and balls
Purchase ribbons of different lengths from a fabric store. You can take satin and brocade fabrics; lace works well. Remove the wrapper from the bottle. Using a glue gun, secure one end of the tape to the glass and wrap around the champagne, but not reaching the neck. Secure the other end of the tape with glue. The joints of the ribbon can be decorated with lace inserts, it will look great. Tie a bow around the neck of the bottle. Attach rhinestones with glue to the center of the bow.
It is convenient to remove the sticker from the glass by running a damp sponge soaked in a soap solution over it.
Necessary materials
To understand what materials will be needed in the process of decorating a bottle, you need to decide on the decoration method. This can be a simple design with tinsel, sparkles, serpentine and other New Year's attributes. To fix them, you don’t need additional accessories; you just need to beautifully wrap the garlands around the bottle or tie them with a bow. Champagne decorated in this way will look good on the table during a noisy festive feast or corporate party.
Another way to quickly decorate a bottle will require you to purchase special thermal stickers (custom labels) with thematic designs and wishes.
The original labels are removed from the vessel by dipping in heated water.
Very often, paints and decoupage techniques are used for decoration. Both of these options are considered the most classic. To create the outer “clothes” of champagne using these techniques you will need:
- acrylic paints;
- special contours;
- brush;
- thematic drawings and stencils;
- napkins;
- PVA glue;
- water-based varnish;
- additional decorations: beads, ribbons, wreaths.
If you decide that your bottle will have beautiful New Year's wreaths on it, you should purchase the following materials to create them:
- wire;
- designer paper;
- artificial or natural spruce branches;
- dry flowers;
- walnuts;
- tangerines;
- dried fruits;
- satin ribbons;
- cord;
- lace fabric.
A wreath created from these materials will itself be a highlight in the design of sparkling wine. For greater solemnity, it is recommended to first wrap the bottle with foil or any decorative paper (for example, corrugated) and put a wreath on top of it.
The finishing touch will be decorating the wreath with a transparent pendant or satin bow.
If you love crafts, you can make special pockets for drinks.
To create them you will need:
- fabric of neutral tone (beige, creme brulee); It is recommended to choose natural materials such as linen, cotton, felt, and if they are unavailable, you can use any fabric that is at hand;
- thick threads (decorative, interspersed with lurex);
- needles or sewing machine;
- a pattern made independently based on the parameters of the bottle;
- decorative elements: buttons, beads, ribbons, stickers, lace, rhinestones, sequins.
Pockets can not be sewn, but knitted or crocheted in the form of a pullover, a Snow Maiden dress, or a Santa Claus outfit. You can also complement these outfits with knitted winter accessories: a hat and scarf. Based on your skills and imagination, knitted items can be made in the form of the symbol of the year, a snowman and other characters.
To create knitted decorative patterns you will need:
- knitting needles – No. 1,2,3;
- hooks – No. 1,2;
- acrylic yarn of different colors (green, red, white, brown);
- knitting patterns.
You can also decorate a holiday bottle with a drink in other ways.
Let us give some interesting examples.
- Decorative cord. Additional tools you will need: glue, lace elements, beads, buttons, decorative figures, fur.
- Sparkles. You will need glue. The decoration can cover the entire bottle or be applied in stencils to certain areas of the champagne.
- An aerosol can. For a more festive design, you can apply paint using appliqués and stencils.
- Rice napkins. It is better if they are translucent and with thematic patterns.
- Decorative stones. They must be placed in a fantasy order on a prepared base - ribbons, painted glass, corrugated paper.
- Newspapers. Clippings in foreign languages, made in beautiful fonts, will look original.
- Rain. Suitable for additional decoration and creating a truly New Year's mood.
- Figures made of polymer clay. This material, like no other, provides limitless opportunity for creativity. You can make snowflakes, figures of snowmen, Santa Claus, owls, Christmas trees and many others from clay. Such decor will make a bottle of champagne a real masterpiece.
What to use
Having chosen the right one, it will be clear what materials will be needed; for simple processes they usually use:
- Tinsel of different colors.
- All kinds of sparkles.
- Serpentine.
- Thematic attributes.
The main works do not require fixation and are easy to perform; ready-made garlands are used to wrap a vessel or form a lush bow. Great for corporate parties, the event will not last long, and a large number of colleagues can lead to additional purchases of alcohol. Elements from one will smoothly transition to the other, quite convenient and practical in such cases.
Note!
- DIY wall clocks - the best clock designs for children
- Crafts on a military theme: how to make a tank, a soldier, various patriotic models of military equipment
What is a Candy bar - decorating a sweet table for a girl or boy for a birthday and New Year
Thanks to such features, beautiful decanters from the family sideboard will find their place on the table. A very practical approach, and most importantly, without unnecessary harm to household dishes.