What is special about suspended ceilings?
To make a stretch ceiling, a special PVC film and polyester fabric are used. In terms of their technical characteristics, these materials sometimes outperform plasterboard and suspended ceiling panels because:
- very thin and light material;
- elastic, can stretch almost 2.5 times;
- does not collapse at low temperatures, withstands down to minus 30º;
- a huge selection of fabric textures: matte, glossy, fabric;
- wide color palette: white, colored, metallic, imitation of Venetian plaster and natural stone and much more.
Despite the large number of advantages, there is one small disadvantage: not every chandelier is suitable for a stretch ceiling. To install the lighting device you need:
- use a special mounting platform on the concrete base of the ceiling, because it is impossible to attach anything to the canvas itself due to its softness;
- the use of lamps with lower power, because heating by more than 60º is impossible to avoid deformation of the canvas and fire;
- There is no need to use lamps with special converters, which can overheat in a space without proper ventilation, or use them where there is access to air.
Rules for choosing a chandelier for a stretch ceiling
Based on the features of the tension structure, which we have already considered, we will compile a list of recommendations for choosing the right chandelier.
- The most successful option would be a chandelier model with shades that point down or to the sides, but not at the ceiling. This way you can avoid excessive heating of the canvas. It is better to choose closed lampshades and lampshades.
- For the same reason, i.e. overheating of the canvas, pendant chandeliers are considered more suitable because the distance from the ceiling to the light bulb increases significantly. This does not mean that ceiling fixtures will not work at all. They need to pay attention to the base. It shouldn't get very hot, so a metal base is unlikely to work. But the mirror surface will reflect heat.
- When choosing, take into account the texture of the stretch fabric. Remember that everything is reflected well on a glossy surface, including exposed wiring.
- The lamp in the chandelier is worthy of separate discussion. What is the power, type, intensity of the glow? All parameters must be taken into account. We'll talk about them in more detail a little later.
- A few design tricks:
- a small lamp will get lost in the space of a large room;
- a large lighting fixture will visually reduce the area;
- Light directed to the sides, on the contrary, will expand the room.
Methods for attaching chandeliers
In the case of installing chandeliers under a suspended or regular ceiling, basically similar methods of fastening them are used. The only difference can be that the space between the main and tension surfaces of the ceiling at the place where the lighting fixture is mounted has to be reinforced with additional elements, giving the necessary rigidity to the suspension system. It should be correctly understood that the canvas itself cannot perform any load-bearing function. In addition, the place where the fabric is punctured for the passage of fasteners and the power cable of the lighting device must be framed in a special way.
Wiring for a chandelier: installation
So, the chandelier can be mounted using a ceiling hook, a mounting strip and a cross. All three types of fastening are similar in that the fixation of load-bearing parts to the ceiling is provided even before installing the tension fabric.
Ceiling hook
There are several options for hooks for attaching them to the ceiling - this can be fixed using dowels or anchors. However, the most reliable option is through installation of the bracket, that is, it is fixed in the cavity of the hollow-core floor slab.
Ceiling hook for chandelier.
On the leg of such a bracket there is a so-called “butterfly”, the two wings of which have a spring fastening.
When passing through a drilled hole, the wings move down and, having passed through the ceiling, open up, securely holding the hook in the thickness of the slab.
Installation of a butterfly hook on the ceiling
- The first step is to select the diameter and length of the drill that will be used to drill a hole in the ceiling. The diameter should correspond to the width of the “butterfly” when folded. After this, a point is marked and drilling is performed.
- Next, the hole must be thoroughly cleaned of any dust remaining after drilling - this can be done in different ways - blow it out with a syringe, as shown in the figure, or use a vacuum cleaner for this purpose.
- Then the wings of the “butterfly” are driven along the thread as high as possible. Next, they are pressed down towards the hook pin, and in this position they are inserted into the drilled channel. Having passed through the thickness of the slab, in the hollow cavity the wings will independently move apart under the action of a spring. Next, take a wrench and use it to tighten the lock nut and washer upward from below. As a result, the washer should rest against the ceiling, and on the reverse side of the ceiling, reliable fixation will be ensured by the wings completely spreading and pressed to the slab.
- After this, you can proceed to the installation of the stretch ceiling.
A cut in a stretched ceiling panel of a window for fastening and connecting a lamp.
- Next, you need to open the hook screwed into the ceiling. To do this, a thermal ring is glued to the surface of the stretched fabric in the right place. After the glue has dried, a hole is cut inside the ring using a sharp knife. The ring will help maintain the integrity of the canvas. Both the chandelier suspension and the power wires will pass through this window.
Mounting strip
If the chandelier mounting design involves installing a mounting strip, which is usually included in the product package, then work to prepare the fixation of this part is carried out as follows:
Prices for inexpensive chandeliers
inexpensive chandelier
- In the place where it is planned to place the chandelier, a piece of timber is fixed with the help of anchors so thick that its lower edge, after fastening, falls exactly along the plane of the future stretch ceiling. If necessary, the position of this block is adjusted, for example, by installing small wooden wedges.
Mounting strip for attaching the chandelier to the ceiling.
- If the beam is wide enough, then you can also drill a through hole in it for the electrical cable. However, this is not necessary, since the wires can be connected to the chandelier and from the side, as shown in the illustration below.
- After securing the beam to the ceiling, the stretch ceiling is installed.
- Next, the area where the embedded beam is located is determined on the tension fabric, markings are made and a thermal ring is glued, along the contour of which a window is then cut from the inside. The cable is pulled out through it.
- Now that the location of the beam is visible, the mounting strip is fixed to it using self-tapping screws.
Ceiling strip screwed to the beam with self-tapping screws.
This type of fastening is suitable for many chandeliers that are not overly massive.
But for the installation of large or heavy lighting fixtures, a cross is usually used.
Cross mount
The set with massive chandeliers includes two metal strips, from which a cross-shaped structure is assembled. This allows you to more evenly distribute the load from the suspended lamp and reliably balance large-sized models.
The crosspiece is fixed in the same way as the mounting strip, onto bars pre-fixed to the ceiling, also arranged in a cross. But the difference is that the fastenings of the chandelier crossbar are usually spaced along the crossbars to the edges, that is, the canvas will be cut in several (four or even five) places. Therefore, even before fixing the beam, it is necessary to make precise markings, determine the positions of the crossbars of the wooden crossbar and the exact locations. where the windows will be cut.
Embedded beam under a suspended ceiling for fastening a chandelier equipped with a mounting cross.
The optimal approach would be to fasten not individual bars, but a pre-assembled wooden cross. The length of the embedded beam must correspond to the dimensions of the standard metal cross of the chandelier.
Expert opinion: Afanasyev E.V.
Chief editor of the Stroyday.ru project. Engineer.
A convenient option for fastening the embedded cross is the usual galvanized straight hangers, those that are used when installing suspended ceilings. This allows you to very accurately set the height of the beam - along the planned plane of the stretch ceiling. After fixing the structure, the remaining free ends of the hangers are simply bent upward.
Fastening the crosspiece under a chandelier mounted under a suspended ceiling.
Next, the suspended ceiling is installed. When the canvas is stretched, the location of the crossbars of the embedded cross is determined. Then, taking into account the position of the mounting holes on the standard metal cross, the centers of the cut windows are outlined.
Next, as usual, that is, the thermal rings are glued on, and after the glue has dried, windows are cut. Through one of them the electrical cable for connecting the chandelier is immediately output.
And all that remains is to use screws to first rigidly fasten the metal cross to the wooden mortgage through these windows. Well, then - proceed to the installation of the chandelier itself in accordance with the instructions for its installation.
Embedded panels (platforms)
Another widely used method of hanging massive chandeliers or lamps with a non-standard mounting system on a suspended ceiling is the advance installation of an entire mounting platform of the required dimensions on the ceiling. Such a panel can be cut from thick plywood or a sheet of chipboard.
The convenience of this type of mortgage is that you can carefully hide and route the cable under the panel. To do this, a hole is drilled in its center.
Fastening the embedded chipboard panel.
It is clear that, as in previous cases, the lower plane of the panel must coincide with the plane of the stretch ceiling, so that it remains invisible after the canvas is tensioned (does not appear in relief). Again, a convenient way to attach the panel to the ceiling is to use direct hangers. However, there are also special brackets on sale that allow you to adjust the position of the mounting site down to fractions of a millimeter.
Installation diagram of a chandelier using a mounting platform.
For example, in this case, special brackets were used to secure the panel to the ceiling, and a hook with an anchor fixed in the concrete ceiling was used to hang a heavy chandelier. The brackets are distributed at the corners of the platform. Thanks to the rigid base, the upper edge of the chandelier will fit snugly against the canvas, and the passage of the hook and cable part will become completely invisible.
There is another way to attach a chandelier to a suspended ceiling - when it seems to be recessed into it. How this is done is clearly shown in the video below.
Shape and size of a chandelier for a stretch ceiling
The shape and design will depend on the style in which the lighting fixture is made. What to choose is up to you. Based on the general interior and design of the room. Let’s share our experience of what goes perfectly with what, how the design of the chandelier will affect the overall lighting and atmosphere of the room.
A wide variety of materials are used for the manufacture of ceiling and hanging chandeliers: glass, metal, fabric, crystal, special paper, plastic, wood. Some materials are more expensive than others, they have different characteristics and illuminate the area differently. Traditional classic chandeliers, which always remain at the peak of popularity, are crystal devices. Crystal itself is considered a symbol of prosperity, chic and brilliance. If you install such a model on a glossy ceiling, dressed in clothes made of crystal pendants, balls, beads, then the room will simply sparkle with reflections of the sun, because the gloss will reflect the light passing through the multifaceted details.
Another version of the classic chandelier is with light bulbs in the form of candles, mounted on original candlesticks. But such models are not suitable for glossy ceilings, because the reflection will not give the desired effect, because... Only incomprehensible points of light will be visible.
Light sources on a long, rigid rod look good on a reflective surface. In an apartment with high ceilings, for example 3 meters, a similar model will create an interesting ceiling design.
The matte ceiling allows the use of any type of chandeliers. Light is not reflected in it, but scattered throughout the room.
Glass goes well with suspended ceilings. The main thing is that individual parts do not damage the canvas.
Some styles use chandeliers with wooden lampshades. But, probably, this is not the most correct option for suspended ceilings, because the canvas implies lightness and airiness, and wood can make the entire structure visually heavier. It doesn't always look attractive.
The cheapest option is plastic lamps. But cheaper doesn't mean worse. The lightweight material itself will not add extra weight to the entire suspended or ceiling structure. There is one drawback - the plastic fades and loses its color over time.
Fabric stretch ceilings and chandeliers with fabric lampshades go well together. Due to the materials being similar in texture and texture, the entire ceiling looks very harmonious.
Types of chandeliers by style
A chandelier is one of the main elements of room design; it is the one that puts the finishing touch on the interior. Therefore, we cannot ignore its appearance and style:
- Classic ones are distinguished by grace and rich decor. Often made of crystal, they can decorate any living room. Such a chandelier dominates and requires appropriate surroundings. Your modest apartment turns into a luxury apartment.
- The Japanese style is a restrained decor, regular lines and natural materials - either wood or rice paper. This would be good in the kitchen or in a minimalist interior.
- In the Art Nouveau style it is always a complex composition and non-standard form. Art Nouveau loves strict geometry and curved lines.
- Vintage ones work “antique”. They are characterized by complex patterns, unusual shapes, and colored glass.
- With an abundance of plant motifs - decor from stems and leaves, decorated with floral patterns are called floral. A striking point in a romantic, rustic interior. They are made from wood, textiles, and glass.
- High-tech is clear lines, urban minimalism. Most often they are made of metal.
Of course, when decorating a room, you buy a chandelier last, as the final point in the overall composition. Therefore, let us express a few thoughts about which chandelier will suit your interior style.
- Classic - crystal or glass chandelier of the same design. A classic, it is a classic, there are no options.
- Modern – either a matching chandelier or a floral one. We remember that this style loves non-triviality.
- Minimalism – chandeliers without decoration, with clear geometric lines. Such as in the Japanese style.
- The Scandinavian style allows very small liberties in decor and color, but in general it is the same strictness of lines and nothing superfluous.
- Loft is a very popular style that looks like an unfinished home or an abandoned factory. In this setting, a vintage chandelier will play interestingly. will add zest to the interior. Try hanging it instead of bare light bulbs without shades.
- Lovers of romance, country, Provence, and rustic styles will love floral chandeliers; they fit perfectly into this interior. Vintage ones will also be good here.
Which lamps to choose for a chandelier
We came to one more nuance related to the installation of a chandelier on a suspended ceiling - a lamp. The following light sources are offered on the lighting market:
- incandescent lamps;
- halogen;
- luminescent;
- LED
All have characteristics that allow them to be used correctly.
- An incandescent lamp is the cheapest way to provide yourself with light. But they are not recommended for suspended ceilings. Firstly, they can destroy the ceiling canvas, especially if they are too close to it. Secondly, the canvas turns yellow over time. Thirdly, the service life of such light bulbs is very short, and, in addition, they can hardly be called energy-saving. Their disposal also requires special conditions so as not to harm the environment.
- A halogen lamp is a glass bulb filled with bromine or iodine. When the substance is heated, the brightness of the glow increases. With an external bulb, capsule, with a reflector - any of these types can be used in chandeliers for suspended ceilings. But the light bulb power should not exceed 35 W, otherwise the canvas will suffer.
- A fluorescent lamp is also a normal choice for suspended ceilings. It consists of a flask with electrodes hidden inside. The only thing to consider is that they are not very bright. If you don't need ball lightning at the top, then you can use these bulbs. They belong to energy-saving models.
- The most ideal solution would be LED lamps. They have a lot of advantages:
- economical energy consumption;
- do not heat up, which means they are excellent for lighting stretch ceilings in any type of chandeliers;
- With the help of LEDs, the most interesting models of chandeliers are made: from simulating a huge sun to twinkling stars in the sky.
What kind of light bulbs do they have?
An important characteristic is the light bulb, that is, the light source . And here LEDs are most preferable for such a chandelier, because:
- consume little energy;
- have a long service life;
- do not heat up;
- resistant to damage and temperature changes;
- environmentally friendly, do not contain toxic materials and do not cause disposal problems;
- a wide variety of sizes provides a wide range of applications;
- cyclical, do not fail due to frequent on-off switching.
Unfortunately, there are also disadvantages:
- Requires installation of a special power supply - LED driver.
- The color rendering index does not always meet our needs.
- High price.
If for some reason LED lamps do not suit you, or maybe you simply cannot afford them, there are other light sources - incandescent and halogen lamps. They:
- They emit a soft, eye-pleasing light.
- They have low cost.
True, incandescent lamps consume a lot of energy. Fluorescent models are much more economical, but they emit too bright a cold light and are almost never used in chandeliers. It is better to give preference to energy-saving lamps; they consume little energy, last a long time and can burn with both cold and warm light.
Location
This is an important point, because you need to think about the location of lighting fixtures when installing suspended ceilings in advance, otherwise it will be problematic to install the chandelier itself afterwards. For a square room, one central chandelier is enough, which will be the main lighting. For an elongated room, it is better to provide two identical models. This will illuminate the entire area, leaving no dark corners. In rooms with architectural features, the center of lighting may be shifted depending on the configuration of the room.
Manufacturers also offer the most unusual stretch ceilings, for example, with photo printing. A lighting device in the center of an exotic flower, as if blooming above you, will look very impressive.
Lamps with energy-saving lamps
In most cases, lighting devices with energy-saving light sources are spotlights. Due to the low degree of heating, the lamps can have different powers, and the lamp itself can be located at any distance from the stretch ceiling. In addition, lamps with energy-saving lamps are equipped with a reflector, which serves as a kind of protection from heating for everything that is behind it.
The popularity of luminaires with energy-saving lamps is ensured by their low cost compared to LED lamps.
Ceiling color and chandelier color
There is a wide choice of colors for stretch fabric. If it is also beneficial to choose a chandelier, then the ceiling will sparkle with new colors. We're sharing design secrets again.
- Light or completely white ceilings would be well decorated with a contrasting chandelier. If this is a classic option, then lampshades or bases trimmed with gilding will do a great job.
- On dark canvases, use the same contrast: white or silver shades, crystal elements, or gold again in the lamp design.
- The ceiling in the form of a blue sky with clouds is a ceiling chandelier with a closed white shade.
- Canvas with photo printing? Here you need to choose a chandelier to match the main pattern, then there will be no dissonance and unnecessary diversity.
- Blue and pink shades look great on a black or chocolate background. Depending on this, select the design of the chandelier.
Photos of chandeliers on suspended ceilings in the interior
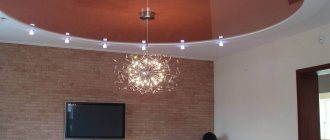
A designer chandelier consisting of many metal rods with LED bulbs at the end of each of them. It resembles a dandelion that is about to fly apart into small parachutes. The composition is complemented by lighting along the entire perimeter of the ceiling.
The following lamp model on a black background of a glossy stretch ceiling will evoke unique emotions. Thanks to the design of the crystal lampshade, an exotic flower literally blooms on the ceiling. Such a chandelier will undoubtedly become an interior decoration.
A classic chandelier made of crystal in the form of numerous pendants that convey unique glare from the light bulbs. All of them are reflected on the glossy chocolate-colored surface and create a very tasty picture.
The unusual design of the lamp creates a fantastic visual effect. Long rods topped with small rectangular shades. The arrangement of the elements is repeated on the ceiling, creating a 3D picture.
Here is a version of a colored stretch ceiling in the form of a sky, and in the center there is a luminous circle from a crystal ceiling chandelier. It represents either the sun or a whirlpool of water.
Chandelier with candles in sconces instead of shades. Contrary to the opinion that candle lamps are inappropriate on a glossy ceiling, we see the opposite option. But the peculiarity lies elsewhere - in the color of the canvas. The heterogeneous sand color scheme does not allow light bulbs to be reflected in the form of boring dots.
Original ceiling chandelier on the matte surface of the ceiling. A fairytale butterfly has taken up residence in the children's room. The main body is made of lightweight plastic. Light breaks through the opaque frosted glass and softly illuminates the room.
Photo examples of interesting options
Here are some successful lighting design solutions for various types of premises. Examples will include both standard schemes and original compositions.
For the corridor and hallway
In such rooms there is no need for bright lighting, therefore, there is no need to install a central chandelier. The sources are installed along the walls or along the entire perimeter; if there are mirrors, it is advisable to additionally illuminate them using wall lamps.
Classic corridor lighting scheme, suitable for almost any interior
Below is a similar option, but with a central chandelier.
Option with central chandelier
If the corridor is narrow, then place spotlights in the middle, creating a light path; if necessary, you can make additional lower lighting on the walls, as shown below.
An example of a light path laid along the center of the ceiling in a narrow room
A similar arrangement is also possible on a multi-level ceiling, as can be seen from the figure; this version is more original.
Multi-level stretch ceiling with light track
If the corridor has a glossy stretch ceiling, then upward-facing soffits look good as additional lighting. Their rays reflected in the ceiling will create an interesting play of light.
The use of flashlights (spotlights) for additional lighting
Lamps on a suspended ceiling do not have to be installed at equal distances from each other; the asymmetrical design looks quite original.
Asymmetrical hallway lighting scheme
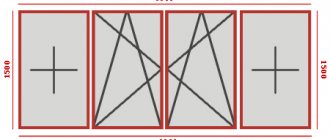
For small square hallways, we can recommend a classic scheme for 5 lamps. It is shown in Figure 1 (A), and the chandelier can be replaced with a ceiling lamp.
For kitchens
This type of room is rightfully considered the brightest; it is problematic to prepare food in the twilight, in particular, cutting vegetables. Therefore, proper kitchen lighting needs to be given special attention. This is greatly facilitated by the division of the room into zones, in one there is cooking, in the other there is a dining table, etc. In such cases, lamps are installed in accordance with the interior, room layout and level of natural light.
Of the typical options in Figure 1, schemes “I” and “K” are best suited for such purposes.
Example of implementation of scheme I for 10 lamps
Option “K” is more suitable for spacious rooms.
Example of scheme "K"
It is not at all necessary to use the above schemes; you can find other solutions, the main thing is that there is enough light in the work area.
The kitchen work area should always be well lit
It is equally important that the lamps are also directed towards the dining table, as shown in the example below.
The dining table is located under the central chandelier
It is not at all necessary to use a hanging chandelier; if the spots are positioned correctly, you can do without it.
Kitchen lighting without a pendant chandelier
Below is another version of a “chandelier-less” scheme for a kitchen with a ceiling panel.
Solution for multi-level stretch ceiling
For the hall
This is the largest room in the house, and since it is considered the main room, it should correspond to this status. For large areas, the classic scheme with the main lamp in the form of a pendant chandelier and additional illumination of areas may not be effective. In such cases, it is better to use a uniform arrangement of lamps on a stretch ceiling.
Uniform lighting of the hall
As an alternative, you can consider schemes with uneven placement of lamps on the ceiling. In such cases, spots can be concentrated in different parts of the room, creating zonality.
Example: Uneven placement of luminaires
This method of placement is perfect for studio apartments, which essentially consist of one large hall. With the correct placement of spots, a large room can easily be divided into several zones.
Example of zoning in a studio apartment
A good option would be to install several lamps on the ceiling in an oval, while the figure can be divided into several segments that can be switched on separately.
Lamps can be arranged in the form of geometric shapes
Solutions with multi-level suspended ceilings on which spots are installed look good.
Illumination of a hall with a multi-level ceiling
When choosing a scheme, be sure to take into account the interior design, since choosing a different solution will require major renovation work.
Light scheme creates zonality
For the bedroom
In fact, this room is a continuous recreation area, therefore, it is necessary to maintain moderate lighting.
Light in the bedroom should be moderate
If there is not enough light, you can always install additional sources in the form of a sconce or floor lamp.
If necessary, you can install a sconce or floor lamp near the bed
If we consider classic schemes (see Fig. 1), we recommend paying attention to two options “E” (8 lamps) and “H” (12 lamps). A small pendant chandelier framed by several LED strip figures also looks good.
Chandelier, LED strips and several spotlights
You can choose an option with imitation of the starry sky; an example of the implementation is presented below.
Grouped small sources for a starry sky effect
Please note that the interior can also influence lighting. Light reflected from the drapery acquires its shade. This is clearly visible in Figure 24, where ordinary “warm” white light lamps are used to illuminate the room. The interior adds red undertones.
An example of the influence of the interior on lighting
There are no restrictions on your imagination; you can create something fabulous and unusual.
Bedroom lighting in a futuristic style
For living rooms
This type of room differs from a hall in its smaller area, so it is better to use schemes with a central powerful source (chandelier) in the middle of the room with additional spots. The latter can be located around the perimeter or highlight the corners of the room. If we consider the classic options (see Fig. 1), then we can choose the following schemes: A, C, D, F, G, J and L. Each of them fully satisfies the conditions of the problem.
An example of classic lighting according to the “C” scheme
Moreover, the perimeter does not have to have the correct shape; the absence of right angles creates a completely different mood.
Interesting lighting solution around the perimeter
There is no need to install lighting above the seating area; it can be successfully replaced by sconces.
Sconce in the recreation area
In the living room, as in the hall, you can completely abandon hanging chandeliers if you use several powerful lamps with an outdoor location.
Oval made from outdoor light sources
An LED strip in a multi-level plasterboard ceiling will cope with lighting the living room no worse than a chandelier.
Lighting scheme using built-in lamps and LED strip
If the living room is small, it is enough to just install spots around the perimeter.
Classic scheme without chandelier
For children's room
As a rule, such rooms are zoned for sleeping, studying and a play area. Accordingly, a group of additional lamps should be installed on the suspended ceiling above the table, and sconces should be placed near the cribs.
It is necessary to install sconces in the sleeping area
Alternatively, a table lamp can be installed on the desk.
Table lamp as an additional light source
Since a children's room is often a playground, a chandelier in the room is not desirable. If children play too much, they can damage it. Uniform placement of powerful spots allows you to do without a bulky chandelier.
It is better not to install a hanging chandelier in the nursery
Proper lighting will help create a bright, fairy-tale atmosphere in the nursery.
The correct scheme will fill suspended ceilings with photo printing with colors. Photo wallpaper will take on a more realistic look. Multi-colored lighting will create the illusion of a fairy tale.
For the bathroom
Since in standard panel houses this room is not large in size, you can opt for option “B” with 6 lamps (see Fig. 1). For such a situation, it is not even necessary to implement the entire scheme; it is enough to choose one of two types of lamps for the ceiling. If necessary, you can install sconces or rotating lamps near the mirrors.
One of the simplest bathroom lighting options
If the bathroom is larger, then the scope for imagination expands significantly. You can use the classic version with evenly spaced spots.
Evenly spaced bathroom fixtures
Light can emphasize zoning.
Zoning using light
Another option for emphasizing zoning
Use a technique to give the light the desired shade.
Due to the color of the tiles and stretch ceiling, the light is given a light green tint
Option with a warm blue tint