The popularity of veneered furniture is constantly growing. They combine the advantages of panel furniture with the elegant appearance of solid wood furniture. Thus, they are light, functional and relatively cheap, and at the same time they captivate with their natural texture and wood grain. Unfortunately, veneer is easy to damage. So it’s worth knowing how to repair, refresh or restore veneer furniture.
Solid wood furniture captivates with its natural color and textured pattern. Veneer allows you to achieve the same effect on furniture made from other materials.
Restoring wooden furniture
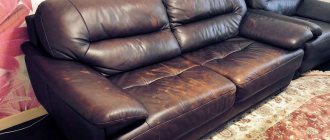
If wooden furniture is scratched, stains or abrasions appear on its surface, the best option is to contact a specialized furniture repair shop.
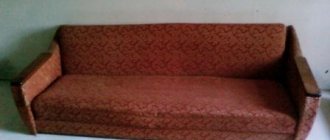
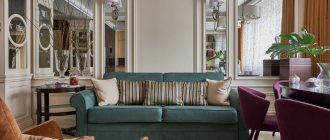
But if this is not possible, or you want to work with your own hands, you can try to restore the furniture yourself. Our advice will help you with this. So, let's begin! Before:
After:
To begin restoring furniture coverings, you need to determine its type. What is your furniture made of - solid wood or veneer? Different types of coating require different approaches. Let's consider them sequentially.
Advantages and disadvantages
Restoring old furniture is a creative process that allows you to restore beauty and functionality to interior items. A finished sofa, table or cabinet can be used independently, left as decoration or sold. Antique furniture is in great demand among collectors and lovers of retro styles, so there is always a demand for it.
Advantages of restoring furniture with your own hands at home:
- Savings on the purchase of a new item and the services of a restoration workshop. Much work can be done independently using available tools.
- After the work carried out, the furniture will last longer.
- You can discover your creative potential and realize complex ideas. You will not be rushed, which allows you to spend a lot of time on restoration.
- You don’t have to get rid of an antique item inherited from your ancestors. Perhaps the chest of drawers is treasured as a memory of your grandmother or evokes nostalgia for childhood. Many people find it difficult to part with old items left over from childhood.
- Old furniture will not spoil the new interior. This applies to items that were purchased to complement the interior, but then the design of the room changed. In this case, you need to create new furniture that will fit perfectly with the overall style.
You will get the wardrobe or sofa you need without tedious searching. At home, you will create an item that meets your requirements. And to do this, you don’t need to look for it in stores, order it on foreign websites, or have it manufactured by specialists.
But there are also disadvantages to restoring furniture yourself:
Without any experience working with furniture, you may encounter difficulties already at the stage of selecting materials
It is important to choose a coating that will protect the surface from insects and minor damage. You need to be able to work carefully with small details so as not to spoil the original drawing. To restore furniture, you need a separate room, preferably not in an apartment. If this is not possible, construction covers are needed to protect the interior. During repairs there will be dust, dirt, noise and unpleasant odors.
This is another reason to look for a separate room where your family members will not be.
Do-it-yourself restoration of solid wood furniture
Removing scratches
Minor scratches on unpainted wooden surfaces can be masked using a nail file or fine sandpaper. Using gentle circular movements, polish the area with scratches or burrs, then wipe with a soft cloth.
Bringing back the shine
Wooden furniture that has lost its luster can be treated with a sponge and any furniture product that contains orange essential oil. The sponge needs to be heated in the microwave, spray the surface, and quickly wipe the entire wood with a hot sponge. Enjoy the aroma of orange and the result. Wipe the surface after sponging with a dry soft cloth to rub the substance with oil into the wood as much as possible. Compare the untreated surface and the already treated one: the difference is obvious!
Removing stains
Stains on the surface of wooden furniture are not a problem. A regular banana peel will help remove them. Using the inside, gently wipe the surface, lightly touching the stains without pressing on the peel. Afterwards, do not forget to thoroughly clean the surface of any remaining peel and rub with a cloth.
If the stains are more serious, you need to proceed as follows: clean the furniture with a damp cloth with a drop of dishwashing detergent, and after drying, treat with a swab dipped in denatured alcohol. Next, treat with a suitable shade with a retouching marker and finish with wax. After this you can enjoy the result.
Removing chips
Chips on the corners of tables and chairs are the main reason for the loss of aesthetics of furniture. To remove them, you will need furniture putty. It is preferable to take a light color and add the main pigment if necessary. Form a flat surface, allow to dry, and after drying, sand the surface with fine-grained paper and, if necessary, varnish.
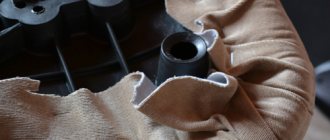
Veneer repair on furniture
How to repair veneer on furniture. Veneering with valuable wood species is used in almost all price segments in the production of furniture. This can be economical furniture, when veneer is glued to a base made of chipboard, as well as expensive furniture, where parts made from MDF and cheaper types of wood are decorated with veneer of valuable species. All types of furniture can be repaired independently.
Cracks, chips, broken pieces of veneer are fairly common cases of damage to veneered furniture. Sometimes this is a consequence of poor quality manufacturing, but most often it is the consequences of long-term use. Veneer is a thin sheet of wood glued to a wooden or other base. If your furniture is not veneered, then you can refresh the varnish, see tabletop repair.
Repair most often consists of re-gluing the loose veneer, or re-gluing the lost fragment. It is very advisable to select veneer for repair of the same type as the main one. At the very least, it should not differ much in texture and color. The rest can be corrected by selecting appropriate primers, stains or varnishes.
Repairing cracks or peeling veneer
Part of the veneer that has come away from the base, but has not lost its integrity, can be re-glued in place. The same applies to cracks in veneer. First of all, you need to very carefully clean the surface of the veneer and base from old glue. This can be done with sandpaper and a thin sharp cutter. Then we lubricate the joints with glue.
Moreover, it is advisable to coat both the veneer itself and the base underneath it. In some cases, you can use quick-drying adhesives, but it is better to use good carpentry adhesives.
The surfaces to be glued must be pressed with a weight or clamps with wooden spacers. In addition, it will be better if you place a sheet of clean paper between the surface of the veneer and the wooden block, then the spacers will not stick to the part when gluing.
After the glue has dried, remove the clamps and carefully cut off the excess glue at the ends. Usually this is enough, although if you poured glue into cracks, under veneer, you will have to cut off the glue and touch up the repair area with a furniture oil marker or wax pencil in a shade that matches your furniture. On the topic of how to paint over scratches on furniture.
Replacing a piece of veneer
As I already said, to replace part of the broken veneer, it is advisable to select a new fragment of the same species and texture. As a home option, you can trim and break off part of the veneer on your furniture (or some old one), in a place where it is not visible, and use it to repair facade parts.
First you need to level the place you are going to repair. Use a cutter to cut straight lines along the edges of the break. Mark and cut a piece of veneer according to the shape of the missing fragment. If part of the veneer is broken in the middle of the part, then you can make a template by attaching a sheet of paper to the damaged area and drawing the outline with a pencil. The more accurately you cut out the missing part, the less noticeable this place will be after repair. I would like to note that the missing fragment does not have to be cut out in a rectangular shape; it can be a triangle, circle or oval.
Before gluing, clean the surface with sandpaper, apply glue and press. On large surfaces, such as doors or sides, it can be difficult to use clamps. In these cases, the gluing site is pressed with a load of several kilograms. Paper and a flat wooden block are placed under the load.
| We’ll help you figure out the choice of routers for your home. Review of power tools for work and home, reviews of the tool on the website: OPilah.Ru |
After gluing, you need to lightly clean the surface with sandpaper and apply a varnish of a suitable color. It will be better if you use water-based varnishes for repairs, so at least you will not damage the rest of the furniture surface. To decorate small areas, use furniture oil markers or wax pencils.
Do-it-yourself restoration of veneered furniture
Masking moisture damage
Veneer often suffers from moisture. The production technology is such that this material suffers noticeably from drops - blisters, swellings, and unaesthetic marks from smudges appear. What should I do? Take PVA glue, a syringe for 10 cubes, make a puncture in the swelling and fill in the required amount of PVA glue. To ensure the result is fixed, place a weight on top. If it is a door, it will need to be removed. If the surface is not quite the correct shape, use a thick fabric bag filled with heated sand. Thanks to its streamlined shape, the bag will help even out bloating.
Veneer that has moved out of place using alcohol glue can be returned to its place by heating it with an iron at medium heat, after first placing a dry cloth on the surface. If this option does not help, wet the cloth and wring it out. Repeat the procedure, using glue for more reliable fixation.
Removing scratches
Veneer that has scratches on the surface needs to be sanded and treated with a restoration marker of a suitable shade. The main task is not to cause harm, since veneer is a delicate material; it can become stained and blistered if handled carelessly or hastily restored.
Restoration of wooden surfaces
No matter how carefully you handle the furniture, abrasions, scratches, and stains still appear. They are easy to eliminate. The main thing is to know how and with what.
- If the wooden surface has simply lost its shine, find a wood care product that contains orange oil. Take a clean sponge, dampen it slightly and microwave for 20-30 seconds. Spray the product from a spray bottle, then wipe with a hot sponge (hands should be wearing rubber gloves with a coating on the inside).
- More serious stains require serious measures. These are retouching markers (available in furniture stores), denatured alcohol and wax. First, clean the surface (dishwashing detergent diluted in water is the best solution). After cleaning, dry the wood with alcohol: use a moistened swab to rub the lightened areas well. In most cases, the color is restored. In deep scratches, alcohol does not restore the color; they are painted over with a marker of a suitable color. To add shine, the top surface is covered with wax and polished with a soft cloth.
- If you need to smooth out small unevenness, you can use a nail file. For meticulous work, it is easier to use than sandpaper.
- If the wood is locally swollen from moisture: place a leaking vessel, you can quickly get rid of the defect and neutralize its consequences by mixing salt and olive oil. The paste is applied to the damage and rubbed in a circular motion. Leave for 20-30 minutes. The salt will draw out the water, and the olive oil will restore elasticity to the fibers.
- If there are chips, you cannot do without putty. Suitable for both wood and automotive applications. The best way is to buy a light one and add color to it as needed. The chip is covered, a little putty is spread on the adjacent surface. After drying, everything is smoothed out well with fine-grain sandpaper.
If there are scuffs or stains on the wood, you can try to get rid of them by rubbing it with a banana skin. It works well for minor injuries.
You might be interested in reading what types of wall shelves there are (with drawings).
General rules for restoring old furniture with your own hands
- Caution and slowness are the basic rules. There is no point in rushing to quickly coat the surface with glue or wax. The more carefully you carry out the processing, the more aesthetically pleasing the result will be. Restoring furniture coverings should not be rushed.
- Set aside a few days for work. You must wait until the surface is completely dry. In this case, the quality of work will be higher. 1-2 days is the minimum period for drying the area treated with glue.
- Do not use furniture immediately after finishing work. We strongly recommend that you let the furniture dry for three days after the final stage of work and only then use it.
Please note that this material is about household restoration. We strongly do not recommend restoring rare, expensive, antique furniture yourself - the consequences of improper repair can be disastrous for the furniture.
Furniture preparation
Restoring an old chest of drawers will be successful if the furniture is properly prepared for work. The chest of drawers is emptied of the things and objects stored in it, and the drawers are taken out. Old handles are unscrewed - if they are antique, the products can be repainted in gold, bronze or silver.
- To decorate an old chest of drawers with your own hands, wipe the furniture from dust and dirt. You can use warm soapy water for cleaning;
- Do not use aggressive chemical components - ordinary laundry soap will do;
- carved elements are cleaned with an old toothbrush, and small decorative holes with an awl or other sharp object;
- use a grinding machine to remove the old paintwork, hard-to-reach areas are treated with sandpaper;
- repair of furniture fastenings - loose legs are disassembled and reassembled, adding PVA glue to the joints;
- the wooden slats on which the boxes “ride” can be replaced with modern guide runners;
- If the product has cracks or chips, they are covered with wood putty. The mixture dries for at least a day;
- the restored areas are carefully rubbed with fine-grained sandpaper so that the surface is even and smooth;
- to increase adhesive properties, furniture is coated with a primer in two layers, allowing each coating to dry;
- the primer dries from 12 to 24 hours - this depends on the type of primer composition chosen.
An antique chest of drawers with a long history may contain a unique mark or mark of the master on the surface - these fragments should be preserved in order to accurately convey the charm of the restored antique item.
Dust removal
The old coating must be carefully removed from all decorative elements
Sanding furniture surfaces
Before upgrading old furniture, it is worth determining whether it is an overly valuable antique. In this case, selling it can be much more profitable than restoring it. You can determine how valuable an ancient piece of furniture is by the presence of the craftsman’s mark on the back of the cabinet or the underside of the seat of a chair.
More complex ones will require reupholstery, restoration of the inlay pattern or carved pattern, and strengthening of loose joints. Each case requires a personal approach and specific tools. But most often you may need:
- drill and drill bits, screwdriver;
- end plane;
- files and emery cloth;
- Screwdriver Set;
- jigsaw;
- sharp knife;
- pliers and round nose pliers;
- furniture stapler with staples;
- furniture fabric;
- sewing accessories and scissors;
- brushes, paints and varnishes, furniture wax, etc.
If updating the furniture involves decorating it with decoupage elements, then you will only need the necessary images (napkins, special sets, etc.), PVA glue and a soft hair brush. For craquelure you need to buy a special varnish, and, if desired, metal powder for gilding or silvering.
In some cases, it is necessary to disassemble the item into parts. This usually happens if furniture repair involves more than just external decor. When reupholstering upholstered seats or restoring lacquered furniture at home, you will need to separate at least the main parts. To avoid mixing up parts when assembling complex units, you should photograph the disassembly process.
How to care for wooden furniture so that it lasts longer?
It is quite possible to extend the service life and maintain the aesthetic appearance of furniture. This can be achieved by following simple rules:
- Clean only with products intended for each specific type of surface. Leather requires special care, and the varnished surfaces of cabinets, for example, require special equipment.
- Compliance with temperature and humidity levels. A minimum of 40% humidity is a necessity, without which furniture made of almost any material other than metal will quickly fail - cracks will appear on its surface, the leather will shrink and dry out in just a few years.
- It is advisable to eliminate minor imperfections without waiting for the surface of the furniture to lose its attractiveness.
How to order tabletop restoration?
To apply for our company’s service, just call and tell us about the problem, after which we will jointly make a decision on the location of the restoration and we can negotiate its preliminary cost. The final price is announced upon a visual assessment of the countertop during a personal meeting or after viewing photos of the damage sent by you via Whatsapp.
+7
Order restoration
+7 (963) 684-33-22 Quick price calculation using photos on WhatsApp
What to do if the coating is swollen?
The first step in restoring veneered doors should be a thorough inspection of them. After all, you need to assess the upcoming amount of work, prepare all the necessary materials and tools, and it is better to eliminate all visible defects at once. It is much easier to work if the sash is removed from its hinges and placed on the floor or chairs.
Blistering of veneered doors appears when the sheets of finishing material were poorly or incorrectly glued. This can also happen if the structure is operated in conditions of high humidity, the door is washed with a too-wet rag, or if the room is flooded.
There are two effective methods for eliminating this defect:
- Ironing. Before restoring a veneered door, you need to moisten a piece of cloth, wring it out well and place it on the swollen area for about 10-15 minutes. Moisture will make the veneer layer softer. Then you should heat the iron, but not too much (minimum or medium temperature). All that remains is to iron the swollen fabric.
- Gluing. If the first method does not help, then you will have to glue a layer of finishing. Before repairing a veneer door in this way, you will need to buy PVA glue and a regular medical syringe, which makes it easier to inject the glue under the coating. After a sufficient amount of glue has been applied under the veneer layer, you need to press the coating well and rub it on top with a dry cloth so that the glue is evenly distributed. The gluing area must be pressed with a weight for at least a few hours, and preferably overnight or a day. After this, the canvas can be hung in place.
The veneer sheets have a small thickness, so PVA sticks quite well. It is suitable for the restoration of artificial and natural coatings.
How to glue veneer using an iron
Veneer most often suffers on the edges of countertops, doors, and drawers. If it is impossible to repair the damage or a fragment of veneer is lost, then the old veneer in the damaged area must be replaced with new one.
Replacing the entire surface with damage, that is, veneering large areas, at home, without experience, will not ensure uniform sticking of the veneer, its pressing and drying.
To repair the surface of furniture, choose veneer of a suitable tone; if this is not possible, use the lightest version of veneer, which you can then tint yourself, but when choosing, pay attention to the texture of the wood. Remove the damaged piece of veneer with a sharp knife. First mark the cut line, and then quickly cut a piece of veneer
If the wood or chipboard under the veneer is damaged, putty it and level the surface
First, mark the cut line, and then quickly cut a piece of veneer. If the wood or chipboard under the veneer is damaged, putty it and level the surface
Remove the damaged piece of veneer with a sharp knife. First, mark the cut line, and then quickly cut a piece of veneer. If the wood or chipboard underneath the veneer is damaged, putty it and level the surface.
Before gluing the veneer, prepare the following tools and materials:
- suitable veneer;
- PVA glue (or “Moment” glue, “Liquid nails”);
- sharp knife;
- iron;
- syringe;
- sandpaper, block;
- cotton fabric or cloth;
- paper;
- flute brush.
When repairing furniture at home, follow these instructions to repair damaged veneer:
Apply a small amount of PVA glue to the prepared underlying surface using a flute brush.
When cutting, try to keep the cut line slightly wavy and the piece cut with a slight allowance. Coat the cut piece of veneer with PVA glue.
Place the veneer in place so that the direction of the grain matches. After this, it is advisable to firmly press the veneer with a wooden block.
To speed up the gluing process, use an iron. To do this, place a cloth or sheet of paper between the veneer and the iron and press the iron against the surface for a couple of minutes.
If the original veneer is not damaged, but swelling has occurred, it can be returned to its place by ironing it with a hot iron through a damp cloth.
If the previous method did not help, it means that the adhesive properties of the glue have been lost. Cut the swollen coating and use a regular syringe to inject PVA glue under it. Press down on top with a weight and leave for a day.
Masking scratches
Veneered doors can be scratched by pets or children playing with their claws. They also suffer when moving furniture, from bicycles and strollers. Scratches are noticeable and spoil the appearance. Wax for veneer doors for minor damage is the best option. To do this, it is worth acquiring a material that matches the color of the finish.
Damage can be repaired in the following ways:
- If the scratch is small, then before restoring a veneered door, you need to cut off a small piece, literally a pinch, from a wax pencil, hold it in your hand for half a minute, so that the material becomes soft and begins to melt. After this, the wax needs to be rubbed into the scratched area, and then the veneer door should be polished. To add shine, it is worth using polishes; they also contain wax.
- If the scratch is significant, it must first be cleaned. This must be done carefully so as not to damage the top protective coating (varnish). Minimum grit sandpaper is suitable. After this, wipe off any dust and lightly degrease the well-protected scratch. Then you need to drip melted wax into the grooves. Immediately, before it hardens completely, its excess should be removed.
What materials are needed to restore
Undoubtedly, tools alone are not enough to fully restore a table. You will also need materials: for processing wood, sealing defective areas, cracks, and final finishing. These are putties, impregnations, stains, glazes, paint and varnish compositions. In critical situations, you will have to resort to replacing individual elements, making them from wood, and then gluing them in.
putty
A special material that is used to seal deep cracks, crevices in countertops, frames and legs. Most often it has an acrylic base and dries quickly. Hardened putty can be easily processed with sandpaper. Certain types allow you to disguise the material as wood types (pine, ash, oak). They make the table repair area unnoticeable.
Special products for wood
This group of materials includes impregnations. Including those that prevent rotting and destroy fungus (if the table has been in a damp room for a long time, in the attic).
Varnish
Varnishing is used when it is necessary to emphasize the noble structure of wood. In all others, it is successfully replaced by coloring. The use of varnish is justified if the table is made of natural wood. Modern paints allow you to achieve an equally impressive appearance for the table (if you choose them correctly).
Dye
The painted surface of the table is not afraid of water and looks good. By using several areas of different colors, bright mosaics achieve a complex range. Just like on expensive and rare tables.
Glue
In case of serious damage to the tabletop or individual elements, gluing in new parts cannot be avoided. For this, two-component mixtures, PVA or polymer, are used. The main thing is that after gluing there are no unsightly stains or marks left on the surface.
Wooden canvas
Wooden inserts are used in particularly difficult situations when it is impossible to do without “prosthetics”. In this case, the grade and color of the material (wood) and its texture must match.
How to varnish or paint a veneer door?
If you need to completely renew veneer interior doors, you can coat the door leaf and frame with varnish or paint. In the first case, both shellac varnish and cellulose polish will be useful. There are few differences between them. Painting is more suitable for doors covered with natural veneer.
It is carried out according to this scheme:
- Remove the canvas from the awnings. Before updating a veneered door, you need to prepare paint, brushes for the frame and the end of the door, as well as a roller for painting the main area. It is better not to use brushes on large surfaces, otherwise streaks will be visible.
- If there are deep scratches on the canvas, they need to be cleaned and puttied. If the canvas is repainted in a completely different color, you need to cover it with a layer of primer. If primer coating is not intended, then the surface must be sanded and degreased.
- After the primer has dried, you can begin painting. Only nitro paints are not suitable for veneer; this composition results in a spotty coating. Water-dispersed, hyphthalic or polyurethane can be safely used.
- Painting can be done in one or two layers, but the paint must be completely dry. Depending on its composition, this may take from several hours to 2 days. If you paint in two layers, then one of them is done in a horizontal direction, and the other in a vertical direction. This approach will ensure an even coating without gaps or sagging.
Only after this can the veneered door be hung and used. The finish can be matte or glossy. Painting is an opportunity to completely renew a very old, shabby product and transform the interior beyond recognition. The cost of restoring veneered interior doors using paint is the most affordable option.
Features of self-restoration
Independent restoration of furniture is a complex, labor-intensive process that requires at least a little theoretical and practical knowledge. When working on outdated interior items, important points to consider:
- Furniture that is constantly in use needs to strengthen the frame. As a rule, the body of a cabinet, sofa or table becomes loose after 5-7 years of use, so restoration work must begin with strengthening the frame.
- You need to select tools and paints taking into account the material from which the base is made.
- If there are drawings on the object, then you need to work with them carefully, either choose the right shade of paint for painting, or use a thin brush to draw details.
- When restoring wooden furniture, the condition of the wood should be assessed. If it is severely rotten, then there is no point in restoring the item.
Before starting work, it is important to assess the general condition of the frame. In some cases, its restoration is impractical. You can replace the fittings and upholstery, repair the mechanism, but if the base is very dry, insects have eaten it, or rot has struck it, then it is better to abandon the restoration.
How to extend the life of the coating?
To ensure that veneer doors last longer and remain like new, they must be properly cared for. Veneer should not be cleaned with abrasive compounds, otherwise micro-scratches will remain on the surface and it will quickly lose its shine. It is not recommended to install veneered doors so that they are constantly exposed to direct sunlight. This will cause the coating to fade; veneer doors will need to be renewed quite often: varnished or painted.
You can wipe the veneer with a damp cloth, but it must be wrung out well. This material cannot be literally washed with water or used in high humidity conditions. You also need to be careful when washing floors, since this can cause damage to the lower part of the sash and frame. Periodically, to add shine, it is good to polish the structure with wax-based products (polishes). They repel dust and mask minimal defects.
Veneered doors, if properly cared for, will last for a decade. But even in this case, minor scratches and damage cannot be avoided. Therefore, you need to know how to update a veneer door with your own hands. This is easy to do with inexpensive materials and simple tools.
What is veneer? What are the advantages of using it in finishing?
Veneer is a thin sheet covering obtained by removing longitudinal chips from solid wood.
Veneer strips are glued to solid wood and fiberboard products to imitate the natural pattern of natural valuable wood. In addition to its decorative function, veneer is a durable and natural protective coating. With the advent of various technologies for producing veneer, they learned to give it different textures and colors, which expanded the range of decorative designs using it. Veneer and veneered plywood have become a common finishing material in the production of furniture and wooden accessories. The material is relatively easily attached to flat surfaces using wood glue on an organic or synthetic basis. However, due to the nature of the gluing, the coating is very sensitive to high humidity and high temperature. The veneer is glued in strips and the seams between individual sections may come apart if they were not sufficiently lubricated with glue or squeezed out during drying. The reason for veneer restoration is most often a swollen and peeling decorative coating.
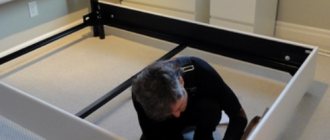
Do-it-yourself restoration of old furniture
This is what FORUMHOUSE users get at home, where instead of a carpentry workshop there is a small kitchen, and the set of tools is the most common one that everyone has.
To make a furniture masterpiece out of an old bedside table, you need:
- clean the old surface;
- prime and putty it;
- paint;
- varnish;
Quick and creative methods for repairing wooden furniture
You can make an unusual piece of furniture out of an old table, a battered wardrobe or a falling apart bed on your own. Modern techniques that can be used even by beginners will help.
Decorating and masking defects using decoupage
The decoupage technique is a common restoration method. Pieces of furniture will find a new life; all work can be done at home yourself. The essence of the technique is that wooden surfaces are decorated with drawings from paper napkins or wallpaper. The paper elements are immersed in an adhesive composition, and then glued to the facades. When the composition hardens, it is coated with varnish.
Tools and materials
You need to prepare:
- primary source - napkins or wallpaper;
- PVA glue;
- sandpaper;
- solvent;
- putty for woodwork;
- pencil;
- tape measure, ruler;
- stationery knife;
- brush or roller;
- varnish
Procedure
Having prepared the materials, you can begin restoration by decoupling. Algorithm:
- Preparation of wooden furniture: cleaning from dust and dirt, leveling with sandpaper. Primer.
- Taking measurements and preparing elements of wallpaper or napkins. It should be cut generously.
- Glue preparation. PVA is dissolved in water (proportion 1:3). The amount of composition depends on the size of the area to be decorated.
- Apply the resulting glue to the back of the napkin or wallpaper. Work with a roller or brush. If the composition is quickly absorbed, apply 2-3 layers.
- The canvas is laid out face up on the surface to be decorated. Roll over it with a roller to get rid of air bubbles. Leveling until a perfectly smooth surface is obtained.
- Dry the coating.
- Trim off excess base along the contour.
- Varnish coating. Apply in multiple layers, thoroughly drying each layer.
Tips and tricks
Surfaces to use this technique must be smooth. Dents, chips and other damage are unacceptable. You need paper wallpaper; vinyl and non-woven wallpaper are not suitable.
For beginners, it is better to start with small fragments; they are much easier to paste.
Decorating and masking defects using craquelure
When repairing furniture, the craquelure technique is used. This is a special coloring of wooden surfaces that gives them the appearance of old products.
The work involves several stages:
- Varnish removal, primer.
- Applying an even layer of acrylic paint. Metallized ones are often chosen.
- After complete drying, coat with craquelure varnish. It will create an unusual “crack” effect.
- When the varnish dries, apply another layer of matte paint, it will help complete the formation of a network of cracks.
For artificial aging, furniture varnishes, PVA glue, egg yolk, gelatin and vinegar are also used.
| Way | Short description |
| PVA | Apply a thick layer, dry, but do not dry. The glue is still wet and painted with water-based acrylic. When the compositions interact, the surface becomes covered with cracks. To dry it thoroughly, use a hair dryer. |
| Furniture varnishes (“PF283”) | Apply for 4 hours. When it forms a sticky film, it is painted with acrylic and dried completely. |
| Egg white | The product is painted with two layers of acrylic paint. Then coated with protein. Drying is carried out in natural conditions, the hair dryer is not turned on. The next step is to paint the surfaces in a contrasting color. |
| Gelatin | Used similarly to protein. The thinner the layer of food additive, the narrower the lines of the craquelure mesh. |
| Vinegar (9%) | The paint layer is dried and covered with vinegar using a sponge. A network of “wrinkles” will appear almost immediately. |
Remember that the described technique is quite difficult to implement, so you should try it for the first time on an inexpensive and non-valuable item.
Decorating and masking defects with painting
Another interesting creative renovation option is painting the facades and countertops of wooden furniture. Even those who haven’t drawn since school can do this at home. The secret is simple - we will use a stencil.
First, the surface needs to be prepared: cleaned, leveled, and coated with primer. Next, paint it in the chosen basic tone. The base is placed in several thin layers. You can use acrylic or water-based paints; they work well, are not afraid of dampness and do not fade. Oil paints, acrylic, even gouache or watercolor are suitable for painting.
There are several application methods:
- They choose the design they like, print it on paper, and then make a template.
- Buy ready-made stencils.
- Use lace or guipure to create an original design.
The template is applied to the facade or tabletop, fixed with tape, and paint is applied with a brush or from a spray can. You can remove the stencil only after it has completely dried.
Cleaning old surface
One of the most difficult processes is removing layers of old paint or varnish from furniture.
If the paint is in good condition (not chipped, not a toxic color), then you can paint the top with fresh paint. But the catch is that the old paint can fall off.
Old paint is washed off with special removers (you can buy them in hardware stores). The manufacturer's instructions indicate for which materials it can be used. Before applying the remover, it is recommended to disturb the structure of the coating - scratch it with a nail or other sharp object. You need to apply the remover with a wide but thin brush. After this, the furniture should be covered with waxed paper and left for half an hour to two hours (if the old furniture was covered with polyester compounds). This work is performed with gloves and a mask, in a well-ventilated area.
After keeping the furniture covered with the remover under the paper for the required amount of time, you can proceed to removing the exfoliated surface with a spatula.
Then the furniture needs to be sanded with a soft disc sander, or just sandpaper. The goal is to get a clean and necessarily slightly rough surface.
What you will need
Materials
- Veneer or wood that matches the texture and species of the original material
- Varnish
- Steel wool
- Sandpaper
- Shellac putty stick
- Beeswax
- Bone or flesh glue
Tools
- Scalpel or knife blade
- Veneer saw
- cycle
- Chisel
- Steel ruler
- Soldering iron
- Iron
- Plane
- Screwdriver
- Varnish brush
Primer and putty
Why you shouldn’t skip this stage - without it, restored furniture will quickly lose its aesthetic qualities, scratches, indentations, and chips will appear on it. Therefore you will have to:
- Degrease the product with any alcohol solution, you can even use vodka.
- Apply the solution to a clean cloth and thoroughly, without skipping, treat the entire surface of the furniture.
- Prime with acrylic primer (it has suitable adhesion and strength properties). You can prime with a thin roller or a bristle brush. FORUMHOUSE restorers usually apply two coats of primer: the second after the first has dried.
- It is recommended to apply the putty with a rubber spatula. The order of work is as follows: apply - wait until it dries - sand it - apply again. And so on until a perfectly smooth surface is formed.
Remaking an old wall: changing the design
That’s not what’s trending today. But plain or patterned ones are what can turn an old wall into new furniture. The steps are simple, but the work requires care. But the result is excellent. See two photos. The first one shows an old Soviet chipboard wall before renovation, the second one shows it after.
Updating an old furniture wall - before and after
Now about how it was updated. Compacted furniture self-adhesive film was used, cream color, matte surface. The open part of the old wall was closed with glass doors; a translucent matte film was used for the glass. The edging is furniture layout (also self-adhesive) chrome color. The order of work is as follows:
- Everything that can be removed, you remove and disassemble. Remove old fittings.
- Surfaces must be clean and free of grease. This is easier to achieve with a soft cloth soaked in dishwashing detergent. Then everything is washed off with warm water and a small amount of vinegar. Wipe with a dry cloth.
- Cut out the details. It is better to cut the film 8-10 mm larger. The remains are then cut off with a paper knife.
- Spray the part to be glued with water from a spray bottle. On a wet surface, the film can be moved if something goes wrong. You can even peel it off without damaging it.
- After removing the protective layer from the film, carefully lay it out. Having leveled it, begin to smooth it with a soft cloth from the middle to the edges. Try not to have any bubbles. To do this, you need to move gradually, without jumping from place to place.
- If there is still a bubble, you can pierce it with a thin needle approximately in the middle. Then expel air from the edges of the bubble to the hole and rub the puncture site.
- Having glued the film, take a clean thin cotton cloth, spread it on top and iron it with a warm iron (medium heat).
- We glue the trim and install new handles.
This is the sequence of work with every detail. It’s the same with glass, you just need to glue it to the inner surface. After assembly you have a renewed wall. This technique can be used for any item: chest of drawers, bedside tables, wardrobe, kitchen set, etc.
With lighting, the updated wall looks magical
For example, after a successful experiment with a wall, we remodeled an old cabinet in the same way and added it to the right. Now the entire wall is occupied. You can update your kitchen set in the same way: apply self-adhesive film and replace the handles.
A simple renovation of an old Soviet-era wall: paste suitable non-woven wallpaper on the doors
What's good about this method: it's easy to change the decor. Tired of the old appearance, they tore off the wallpaper and put on new ones. Despite the fact that the method seems frivolous, the appearance is maintained for several years. Its author even tried it on a kitchen set.
Sometimes wallpaper is varnished. But before you do this, try it on a scrap piece: see how they react to it.
You might be interested in reading how to make a bar counter in the kitchen yourself (several options)
Using the same technology, a banal coffee table can be turned into a modern piece of furniture. In this case, it was covered with wrapping paper. It is dense, adheres well and does not become limp when applying varnish.
Before starting work on decorating the tabletop, the legs of the old table and the edges of the tabletop were painted in a light color: this way it fits better with the new design style. Then the process of its transformation began.
When pasting, the panel is cut out significantly larger than the dimensions of the tabletop. It's necessary. The paper is glued to PVA and rolled with a roller so that there are no lumps or blisters. The surface must be absolutely smooth.
The paper is glued gradually, roll it with a roller so that there are no bubbles
How to make a beautiful edge
Even cutting with a guillotine will not give you a fairly even edge. And with this method, it turns out professionally designed. There is no smell of amateur activity.
This is what the edge looks like when all the excess has been removed
After the glue has dried, the surface is coated twice with a thin layer of varnish. It should be applied with a soft brush in a small amount. Layers are applied in different directions: first along the long side, then across.
What kind of shelves there are and drawings for making them yourself can be found in this article.
Remaking furniture with your own hands is a creative endeavor. Even from a boring shelf you can make a great thing. And it is not at all necessary to repeat exactly what you saw. Many useful ideas come during the implementation of a “project”.
It’s just a pity that some of what was planned turns out to be not as attractive as it seemed. Try it, experiment. Fortunately, modern technologies allow this to be done at minimal cost.
Coloring
Before painting, it is better to apply a thin layer of primer to the furniture again - this way the paint will adhere better and stick well. All you have to do is wait for the primer layer to dry and proceed to painting.
- Apply the first layer of paint with a comfortable, small brush. The most important thing is that the bristles do not come out of it.
- Leave until completely dry, possibly for a day.
- After this, sand with fine-grain sandpaper.
- Apply a second coat.
Restoring polishing
Restoring a layer of varnish is a complicated matter. Any furniture restoration begins with cleaning and degreasing, and repairing the varnish coating too. We use dishwashing detergent diluted in water: safe and reliable. After drying, we proceed to refinishing the polish.
- On dark furniture, a scratch can be painted over with iodine, achieving the desired color in a number of layers or diluting it with water. If you have furniture markers, you can use them.
- Deep scratches that have turned white cannot be painted over like this. There are other methods: Make mastic from 4 parts melted wax and 3 parts turpentine. This paste is applied to the polish and rubbed with a soft cloth.
- If you have shoe polish of a suitable color, you can cover it with it and then polish everything with a cloth.
Scratches are painted over, then the coating is restored
You can simply refresh the faded polish on furniture using mixtures you prepare yourself:
- Two parts each of linseed oil and turpentine and one part vinegar. Mix everything, apply with a swab, wait until it is absorbed and polish.
- Mix oil and beer in equal parts and wipe the furniture with this mixture. After it has been absorbed, rub.
- The surface will be more shiny if you boil beer with a piece of wax, cool it and apply it slightly warm to the furniture. When the composition is absorbed, the surface is rubbed until shiny.
A few more recipes in the video.
How to remove polish from furniture
Quite often you have to remove the polishing: it is not the most fashionable finish. Modern furniture is most often painted with opaque or tinted paints, and the surface is matte. In any case, the polish must be removed. There are several ways. Since varnishes come in different compositions, you have to select them experimentally. But one of the methods should work.
- You can remove old polish from furniture mechanically. If you have a sander, the process will go faster; if not, take coarse-grain sandpaper and remove the varnish layer until wood appears. Then take a fine grit and sand it to a smooth surface. Mechanical removal does not always work. Sometimes even a grinder does not give results: the polish does not come off, but begins to melt and stink. Then they change tactics.
- You will need a piece of old glass. Put on gloves and break it into several fragments. Use the sharp edges that have formed to scrape the coating down to the wood. If there are chamfers and recesses, it is convenient to scrape them out with sharp edges. After the main layer of polishing is removed, everything is brought to a smooth state using fine-grain sandpaper.
Often, restoring furniture with your own hands requires tough measures: some types of polishing can only be scraped off with glass - If working with glass does not appeal to you, chemical methods remain. There are ready-made products for removing polish. You can work with them either in the open air or in a draft: the fumes are harmful. How to remove polish - you need to read on the packaging. The means are different and the duration and order of processing may vary.
How to paint polished furniture
If old furniture was prepared for painting, it must be cleaned of dust, wiped with a damp cloth and allowed to dry. Then level everything with putty, smooth out all the unevenness, wait until it dries. Take sandpaper and sand again, first with medium, then with fine grain. Next, apply a layer of primer and wait for it to dry.
Applying varnish with a brush when restoring furniture polish
You buy a primer for the paint you are going to use, or you can dilute the paint with a compatible solvent and coat it instead of primer. After drying, you can paint.
You can paint with a roller or brush. Usually several layers are needed: do not try to apply a lot of paint at once, as drips may appear. It is better to apply several thin layers. This way the surface will be smooth and uniform. Another trick: for uniform coloring, layers are applied in different directions - along, then across. This also applies to applying varnish.
Some types of varnish are easier to work with when they are warm. They are heated a little and then applied with a spray gun or brush. When heating, you need to be careful: vapors may flare up.
In order of painting: first paint the internal surfaces, edges and joints, then move on to the external ones. With this sequence, there is less chance of getting dirty or touching an already painted surface, ruining it.
If the varnish coating is smooth, without defects, and it needs to be painted over, you can do without removing this layer. There are special primers for complex surfaces. Apply them to the surface and paint after drying. They have components that penetrate even the varnish layer. Therefore, the paint will apply well and last a long time. But such soils have a disadvantage: they are expensive. But they save significant time.
Some secrets of painting wood (including brushing and painting in two colors) are in the article “How to paint lining.” Watch the video for a few secrets to applying acrylic paint evenly.
If the restoration does not bring the expected result, maybe you need to change the appearance? How to remake furniture in a new way is described here.
Applying varnish
If all the preliminary work was done correctly, then there will be nothing difficult in applying the varnish. The main thing is to wait until the paint layer is completely dry.
- The varnish should be applied in two or three layers;
- The layers should be thin;
- Apply the next layer of varnish only after the previous one has completely dried;
- It is better to apply the varnish with a sprayer, roller or special brush.
Stages of complete restoration
If you decide to completely renovate a piece of furniture, then there is a lot of work to do. It takes place in several stages:
- Disassembly. Fittings and upholstery are removed if they require replacement. Keep in mind that antique items have good fastening materials, which can be damaged. If you are remodeling a chair, but the upholstery is intact, then there is a reason to keep it.
- Removing paintwork. The varnish is removed with a grinding machine or sandpaper. Cracked coating can be easily removed with solvents. You can also remove the paint with sandpaper or preheat it with a hair dryer, and then clean off the softened material with a spatula.
- Removing damage. We wrote above about ways to eliminate scratches, stains and cracks; use them to restore the integrity of the surface.
- Preparation for surface painting. Before applying paint, prepare the area. Remove dirt, dust, debris. Then degrease the surfaces to be treated. For better adhesion, apply a primer.
- Applying paint. The paint is applied with a brush or spray gun. To obtain a bright shade, apply 2-3 layers of paint.
- Applying varnish. To get a shiny surface, apply varnish to the dry paint.
- Upholstery. The fabric is attached to the frame with a construction stapler or small nails.
- Assembly. The final stage is the assembly of the structure and installation of fittings.
Restoring furniture completely with your own hands is interesting, but quite troublesome. If you are not ready to spend several days remodeling home furnishings, turn to the professionals.
The Klebor workshop repairs modern, vintage and antique interior items, restoring their functionality and aesthetic appeal. We restore by hand and using professional equipment. Before ordering, please read the price list and examples of work.