Over the years, our kitchen cabinets can accumulate a huge number of different plates, mugs, glasses, pots and salad bowls. But sometimes, when setting the holiday table, we often discover the absence of such a seemingly insignificant, but often simply necessary item as a beautiful cake stand.
But anyone, especially a little one, will be happy to receive a sweet surprise, not served in a simple box, but laid out on a luxurious dish with an elegant stem. In addition, you can place sliced cheese or fruit on it and make it the central decoration of the buffet table.
We want to offer you 20 options for dessert plates that were bought in stores or made at home.
Variety of cake stands
What you need to know about cake stands? Metal, wood or glass, what material should you choose a stand from? Types of cake stands for all occasions: single-tier or two-tier, on a leg, decorative stands. We make the stand with our own hands.
A cake or pastry stand serves as an important element in the design of a festive table or display case.
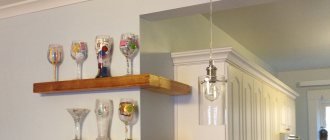
Old picture frame
If you have an old frame in your house that used to hold a mirror or store photographs, you can use it as a beautiful rim for a tray. Cut the bottom out of plywood to the size of the frame, decorate the resulting surface with a piece of fabric. The bottom can also be painted or decoupaged using patterned paper napkins.
If there is glass along with the frame, you can use it as an additional decoration. It is possible that a painting stored in a frame can be used to decorate a tray. You can screw the handles to the frame from the side so as not to disturb the design.
The frame itself can be updated with gold paint. A good solution would be to use varnish or use a burner to highlight the beauty of the design.
Features of cake stands
It’s rare that a celebration is complete without a cake – the main attribute and symbol of the holiday. It is he who takes us back to a serene childhood and brings back pleasant memories.
An amazing culinary dessert needs a beautiful stand, especially if the cake must “travel” to the celebration on its own.
Proper and beautiful presentation of this confectionery product can decorate the table and become the highlight of a tea party. To achieve a similar effect, you can use a practical and original thing - a cake stand.
Typically, a cake stand looks like a round “plate” with or without a leg.
Basic option
The basic option includes a single-tier cake stand. It’s easy to make it yourself; this work will take no more than 15 minutes. To do this, you need to take a piece of polystyrene foam, which you can purchase at a hardware store.
Expanded polystyrene of the desired shape is combined with a special food substrate, which is a thin cardboard with a foil coating on one side. Such a substrate should have a round shape. Its diameter should correspond to the size of the confectionery product that will be created. Connect the substrate to polystyrene foam using double-sided tape.
Types of cake stands
Such designs are very popular among housewives. This is due to the presence of a number of advantages. The main ones among them should be mentioned as follows.
- This design is very practical, takes up little space and allows you to focus all attention on the cake as the main component of the festive table.
Different models are used at almost all banquets, restaurants and cafes.
- Thanks to the availability of various options, it is suitable for baked goods of all sizes and shapes.
Difficulties begin when you need to decide which option suits the tasks of the confectioner or designer.
- The materials from which such structures are made are environmentally friendly and safe.
On sale there are special culinary decorative stands for baked goods, cakes and cupcakes of various types, and from a wide variety of materials.
- They are easy to clean and reusable.
With such products you can immediately assemble the cake and decorate it.
Multi-tiered stand
This model often has a two- or three-tier design. Cakes can be placed one above the other, on a number of holders arranged in a semicircle or in a spiral.
Tiers can be not only the usual round or square shape, but also fantasy - in the form of hearts, stars, triangles.
Note! In order for a multi-tier stand to support the weight of the dessert, it is important to follow the recommendations specified in its description. Otherwise, the entire structure may simply fall apart.
Multi-tiered wedding cakes have been made since the 19th century. Now they act as a spectacular end to the evening and are present even at modest weddings.
There is also an original multi-tiered cake stand that imitates a crystal chandelier. It is suspended from a special bracket and decorated with glass beads and balls hanging down. The cakes are arranged in the reverse order: the largest is at the top, and the smallest at the bottom.
A wedding cake stand often serves as an element of festive table decor.
"Pyramid" design
It is considered traditional and is a subtype of the multi-tier model. A “pyramid” can have different shapes: square, circle, triangle, rhombus, etc. However, its main feature is the arrangement of tiers one above the other, from largest to smallest, which is located at the very top. Their number is unlimited.
If the shelf option is chosen, then the wedding cake (or rather, several cakes of different sizes) can be made with any cream and almost any set of decorations.
These design options allow you to place several cakes at the same time. The dessert itself turns from an ordinary set of cake layers, cream and filling into a work of culinary art.
Stand on a leg (or stand)
This model is distinguished by the presence of a solid leg under the surface of the main part. If it is made of transparent material, then the cake will look like it is floating above the table. This weightless effect looks very unusual and will not go unnoticed.
This type of structure can be swivel and rotate. This is very convenient not only for tea drinking, but also for assembling and decorating the finished dessert.
Interesting “rabbit” cake stand
A special place among cake stands is occupied by models made using figures of animals or plants. They can decorate any holiday. A single-tier “rabbit” cake stand is a structure on a leg, only instead of the latter, a figurine of a rabbit lying on its back is used.
The rabbit supports the dessert tray with its hind legs.
Stand with lid
This option is simply irreplaceable at parties held outdoors. A transparent lid will not interfere with admiring the cake; a matte or opaque lid will add a touch of mystery and mystery.
The cake on a smooth glass stand combined with a glass protective dome looks like it is floating in the air.
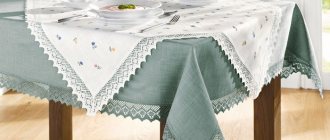
Leafy
This model is the simplest and looks like a regular tray. However, do not underestimate her. It is very practical and convenient.
Thanks to the openwork embossing and patterns, it will also become a table decoration.
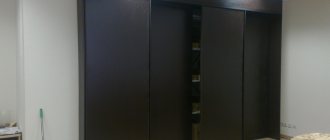
Master class No. 2. Tray from the kitchen door in 2 evenings
You can make a serving tray with your own hands not only from a photo frame, but also from an old kitchen cabinet door, a chest of drawers, a nightstand and other furniture. This tray takes a little longer to make, but it will be much more reliable, practical, durable and will hold more breakfast goodies!
The procedure is as follows:
- Remove all loops.
- Remove the old coating with coarse sandpaper.
- At this point, the outside of the tray can be brushed with a wire brush if desired to remove the soft fibers from the wood.
this technique will make the surface of the door even more “old” and rough, but, on the other hand, the effect of dilapidation in the shabby chic and Provence style can be achieved without it.
- We clean the door and its back side, and fill the holes from the hinges with wood putty or polyester putty. We also sand the patches a little and clean the entire door again. In principle, this step is not necessary if the holes from the fasteners do not bother you.
- Coat a clean, dry door with wood primer in 1-2 layers. Each layer must dry thoroughly.
- Now you need to take the sandpaper again, but with a medium grit and walk it over the entire surface.
- Again we wipe the door clean and dry, and then we begin to paint our future tray. Using a small brush (non-fading!), cover the surface with 1 layer of paint. And here it is necessary to note a couple of nuances:
- if you want to make a tray in Provence or shabby chic style, then the first layer of paint should be dark, and the second and third should be light;
- if you want to paint the bottom of the tray with slate paint as in this master class, then before applying dark green paint, cover the outline of the bottom with masking tape (see photo above);
- If you don't have a brush, a clean cotton rag will do the job.
- When the first coat of paint is completely dry, coat the door with the finishing paint, the lighter one.
To make a “chalk” tray at this stage (or after it), you need to apply the actual chalk paint first in 1 layer, giving it time to dry, and then in the 2nd layer. After the 2nd layer has dried, we again seal the edges of the slate bottom with tape and begin painting the door with the finishing paint (you can do the opposite - first apply the finishing paint, wait until it dries, and only then apply the slate paint).
- And now the surfaces of the tray need to be sanded with fine-grained sandpaper, exposing a layer of dark paint in some places (again, if desired).
- And finally, we attach the handles: we mark the attachment points for them and tighten the screws. Woo-ala, the breakfast-in-bed serving tray is ready!
By the way, if you painted the bottom with slate paint as in this master class, then the resulting tray can be used not only as a serving tray with messages, but also as a board for menus and household notes.
Here are other ideas for making beautiful DIY trays from old wooden doors (scroll through!).
Please also pay attention to our site guide in the section Kitchen design and decor - site guide
- Kitchen wall decor - 12 super ideas
- 12 super ideas for crafts for the home and kitchen
- Kitchen panels - ideas and instructions
- Everything about sewing an apron for the kitchen - instructions, tips and photos for inspiration
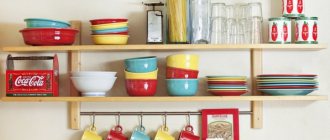
- Homemade shelves for the kitchen - stylish, convenient, easy
What materials are cake stands made from?
Wooden structure
Wood is one of the safest and most natural materials. Thanks to its texture, it looks very colorful. However, the wooden base must be protected from moisture and cleaning agents. Otherwise, it will quickly lose its appearance.
It must be remembered that wood “does not like” frequent washing.
For lovers of all things natural, a stand made from wood cuts is perfect.
Glass
Such a glass structure will not look too bulky and the cake, sitting on it, will appear to be floating above the table surface.
This material always gives the space airiness and lightness.
Metal
The metal base will create an atmosphere of elegance and add a bit of modernity.
This design is one of the most practical and wear-resistant.
Plywood cake stand
Today, plywood products decorated with burnt patterns are becoming very popular. An effective decoration would be the use of a carved leg or patterned edges.
Original plywood construction.
Cardboard cake stand
Cardboard as a material is not particularly durable, but it allows you to make a stand for a cake or pastry of any shape and size with your own hands.
Such a structure can be made from paper and cardboard.
This material is also suitable for the base, which confectioners often use when working with some designs.
You can cover the surface and edges of a not entirely attractive, but thin material using food foil or self-adhesive.
DIY rotating tray from an old stool
An old stool can be turned into a handy turntable. For this we need his round seat. A rotating mechanism in the tray is necessary so that during dinner each family member can turn it to the desired side. You can display spices, sauces on the tray, or simply place a vase of flowers on it. It looks very interesting and stylish. Details of making a rotating tray with your own hands from an old stool in step-by-step instructions.
Materials
For work, prepare:
- the stool itself with a round seat;
- swivel mechanism;
- screws;
- a round piece of cork board;
- furniture handles;
- A4 paper;
- stain;
- black paint;
- drill;
- grinding machine or sandpaper;
- hammer;
- screwdriver;
- brush;
- ruler;
- pencil;
- scotch.
Step 1
. First, you will need to disassemble the stool to separate the seat from it. What kind of tool you need for disassembly will depend on the fastenings in the furniture. In this case, a screwdriver was used.
Step 2
. Remove the old paint layer. Depending on its thickness, you may need special solvents. If the paint layer is thin, use a sanding machine with a coarse-grained attachment.
You will need to process the top and bottom surfaces, as well as the side of the seat.
Step 3
. After completely stripping the seat of paint, you can cover it with stain. Choose a tone that suits your style and idea. Apply the coating material to all surfaces.
Step 4
. Since the tray is stylized in a rustic direction, it needs to be further aged. Dents will be an ideal decorative technique. Apply them with a hammer, but do not make them too deep.
Step 5
. Apply a second coat of stain. Let it dry for 24 hours. After this, decide whether the color of the tray is sufficiently saturated.
Step 6
. On a sheet of paper, print out the inscription prepared for the stencil, which you will transfer to the tray. Using a utility knife, make the stencil itself.
Step 7
. Apply the stencil to the already dry surface of the tray. You can secure it with small strips of tape. Using black paint and a sponge brush, fill in the empty space of the stencil.
Step 8
. After the paint has dried, mark the surface of the tray to attach the handles.
Step 9
. Drill holes at the marked points.
Step 10
. Attach the handles to the tray.
Step 11
. Use a pencil to mark the center of the circle on the underside of the tray.
Step 12
. Attach the rotating mechanism.
Step 13
. Attach a circle of cork board to the bottom of the mechanism.
The tray is ready!
DIY rotating tray from an old stool
3.9/5 — Ratings: 64
How to make your own cake stand
Many people believe that things made with their own hands have a special energy and create harmony in the home. If you're of the same mind, or just like to make things, here are some easy options for cake holders.
From foam plastic
- Glue two circles of foam plastic (square, oval, etc.) together.
- Place them on corrugated paper and trace them. Cut out the circle.
- Glue it to the top of the foam cylinder.
- Cut a strip of corrugated paper. Its width corresponds to the height of the foam cylinder. Fold it like an accordion. Sew in the middle.
- Glue the strip in several layers along the side of the structure. Decorate the middle with decorative ribbon or beads.
Such a holder can be covered not only with corrugated paper, but also with fabric, strings of beads, and sparkles.
From plastic dishes
- Paint the prepared dishes: two glasses, two plates.
- Glue one glass to the bottom of a large plate.
- Glue the top of the second glass to its inside, and the bottom to the bottom of the second smaller plate.
The main thing is to get a harmonious composition with the cake.
Made of wood
- Paint or coat wooden circles of different diameters with a special product.
- Place them on special columns.
- Attach their lower part to the prepared platform in a semicircle or other shape.
Cutting circles for a stand out of wood yourself is feasible, but labor-intensive.
A cake stand is a functional and effective attribute of any celebration or simple tea party. There are many varieties of it, each of which is suitable for a specific occasion. This makes this design even more practical and convenient. And the main thing is that everyone can make it with their own hands and decorate their home in a special way.
The finished stand must be perfectly clean and safe for use, because children are rightfully considered the main lovers of sweets at all celebrations.
Making a tray with your own hands
Marking holes for handles
Mark the locations for the holes on 9x32 cm boards (see photo). The main thing here is to accurately and accurately indicate the shape of future handles.
Mark the middle line of the board (16 cm). From it, step back 5 cm to the right and left and mark 2 points in these places. Mark with vertical lines the places where the centers of the drilled holes will be located. The hole for the handle should be no less than 1.8 cm away from the top edge of the board. For example, if the height of the hole for wooden handles is 2.5 cm (as in our project), this means that the points for drilling the holes will be further away 3.1 cm from the top edge of the tray. Mark these points on the drawn vertical lines.
Drilling holes
Using a 2.5 cm drill, drill the holes as carefully as possible. If you don't have a special drill press (as shown in the photo), follow these recommendations. Before starting drilling, press the drill bit at the marked point. This will help level it out. During the process, keep the drill strictly perpendicular to the board - no drilling at an angle.
Cutting holes
Draw a straight line on the board with a pencil, connecting the top and bottom points of the drilled holes. The resulting lines will serve as guides for the movement of the jigsaw saw. The blade should move from the inside of the line. Do everything extremely carefully. Sand the resulting hole with sandpaper. The edges of the handles should be smooth, without sharp corners.
Assembling the tray
Using the photos as diagrams for making your own tray, start assembling. To a board measuring 32x61 cm, aligned in the center, nail the side walls with 2 cm nails (planks 6.5x56 cm). Before nailing, the lower edges of the boards can be coated with glue to ensure reliable adhesion. Do not nail nails closer than 2.5 cm to the edge of the boards. For convenience, you can use a clamp to fasten the parts of the tray to be connected.
Once placed on the tray, line up the two pieces with the handle holes. Apply glue to the bottom edges of the parts. With or without a clamp, pin the pieces to the bottom of the tray.
To make the sides of the bottom of the breakfast tray look as good as possible, you can glue veneer to them. If the veneer has adhesive sprayed on the back side, it will most likely be glued with a hot iron. If without one, then you will need to glue it with PVA or universal glue.
Using solid scissors or a segment knife, cut the required four strips of veneer (cladding). Leave a small margin, which you will cut off after gluing. Start gluing the veneer to the long sides of the tray bottom. Cut off the protruding ends. Glue on the remaining sides, trim off the excess. Sand the corners (cladding joints) with sandpaper.
DIY painting of a wooden tray
Proceed to this stage after the glue has completely dried. Thoroughly sand the uneven surfaces on the tray and remove various protruding elements. Try holding the tray again by the handles and check whether the sharp edges of the handles are pressing on your hands. If so, then remove a few millimeters of sandpaper from the sharp edges.
Wipe off the dust from the tray with a rag and begin applying the stain. If you do not want to change the color of the wood, proceed directly to varnishing the tray. After the stain has dried, apply another coat if necessary. After all layers have dried, coat the tray with a protective agent. This role is most often played by various types of varnishes, but wax-based impregnations can also be used.
Note: When choosing a protective product, if you do not want a strong, pungent odor to appear in your home, do not buy oil- and polyurethane-based products, but water-based varnishes do not have a strong odor and dry quickly - you can check if the varnish is dry , lightly touching the tray with your hand.
What could be better than breakfast in bed on a Saturday morning on the eve of the New Year holidays? Or hot chocolate, a warm blanket, a favorite book in the evening when the snow is quietly falling through the window? Find time to relax, and we will help you prepare for it. These irreplaceable helpers - beautiful trays - will help make your stay enjoyable and protect you from tipping over and liquids on your blanket or bed, and we will show you how to make such trays with your own hands.
Why do you need a turntable?
A rotating cake table is a great find for those who are interested in baking complex confectionery products.
The device has the following advantages:
- significantly facilitates the final processing of the cake, rotating around its axis;
- the pastry chef can decorate the product without moving, which greatly speeds up the cooking process;
- Often there are special markings on the table surface that allow you to create smooth and neat elements.
The rotating stand will help professional confectioners and ordinary housewives create culinary masterpieces.
https://youtube.com/watch?v=lBVHGjYUhtM
https://youtube.com/watch?v=Mi6lfMHFSdg
Important part of household appliances
The glass microwave turntable serves as the main surface for heating or cooking food. It can simultaneously bring several dishes to the desired temperature, spending a minimum of time, which significantly reduces energy consumption and helps save money on the family budget.
In addition to heating ready meals, the microwave tray is used for defrosting food. The size of its surface allows you to place several ingredients that need to be defrosted in a short time. The product is also used for baking confectionery, roasting meat, fish or vegetables.
The glass microwave tray is easy to clean. Its surface allows you quickly and easily deal with any contamination using regular dishwashing detergent. When installed in the oven, the glass tray is placed on a roller stand with its center aligned with the coupling.
The diameter of the rotating element is selected depending on the volume of household appliances. Its central part can have different configurations, which allows you to buy a tray for a specific model of microwave oven. The durability of the product is ensured by the use of special fire-resistant glass in the production process.