Options and drawings of shelves for pantry
Before choosing any shelving option, it is important to know the dimensions of your pantry. Armed with a tape measure, you can easily measure all the necessary data and build on them in the further selection of the scheme.
Dimensions for each structure must be calculated individually, depending on the available space
Based on the individual dimensions of the pantry, it is important to understand the height and permissible width of the shelves, the distance between them, and the most comfortable depth of the entire product. Thus, making a rack will not be very difficult. Furniture manufacturing, like nothing else, is subject to the principle “Measure twice, cut once.”
The design can be either simple or intricate - it all depends on the imagination of the manufacturer
Leaving aside the classic shelving, you can allow yourself to go a little wild in the design of your storage space. By putting more effort into the drawing and measurements, you can make with your own hands not empty shelves in the pantry, but a work of carpentry art.
What to consider when planning a storage system in the utility room
As we have already said, it is important to think about what exactly you want to keep in the closet and relate it to the area. If it is small, then it is better to equip spacious mezzanines, and put drawers or baskets below for items that you use less often than others. This option is not suitable for building materials.
When calculating the depth of the shelves, do not get carried away. Remember that you need to leave free space between them so that it is convenient for you to enter, take something, turn around, and take out large objects. It is advisable that the passage occupies at least 70 cm. In a room with a high ceiling and an upper tier directly below it, provide space for a stepladder or ladder.
Measure the longest containers that you plan to put away for storage, and make several compartments just for them.
A few more tips for arranging storage shelving in an apartment
- Straight shelves without intermediate supports are only suitable for small closets with a distance of no more than 2 m from wall to wall. Otherwise, the board will sag.
- The width of the ledges increases from top to bottom; the heaviest things need to be removed downwards. This is due to safety and convenience.
- Use the rule: the larger the load, the thicker the material (this applies to wood, plywood), the more fastenings and the smaller the gap between the support posts.
- The optimal mezzanine width for cans with blanks is 30 cm or more.
- It is preferable to fix light equipment against the wall; massive structures are stable due to their weight.
- Take care of separate lighting for the pantry, do it before starting other work.
- Before installing storage systems, the utility room must be prepared: thoroughly cleaned, if possible, level the walls, re-paste them, paint or tile them.
- If necessary, cover the walls with antiseptic impregnations to protect against mold.
- If the room will be open, paint its walls in bright colors that match the surrounding interior.
Taking into account all the tips and features of your room, draw a sketch of the future closet indicating the design parameters and start creating it.
Pantry design
There are few options for creating a shelving unit in a pantry; there are only two of them: make a separate cabinet or attach the shelves directly to the wall. After choosing one of the two options above, first of all you should take measurements of the room and reproduce the detailed design of the future pantry on paper. It is necessary to take into account some nuances to make using the racks convenient. For example, it is important to arrange the shelves in such a way that it is convenient for you to be inside while picking up the thing you need.
Be sure to consider the correct placement of shelves: from wide to narrow. Naturally, the wide ones should be located at the bottom in order to store the heaviest and largest items there, which are difficult to put up and remove from there. You also need to think about the distance between the racks themselves. Beforehand, review the things you will put there and determine the places to place everything at the correct distance.
Next, you should determine the location of the racks; as a rule, either a U-shaped or L-shaped structure is built. These options are the most practical and convenient. For fastening, metal brackets are optimal; they are the most durable and can withstand the maximum load.
Choosing a place for a shelf
When thinking about how to make shelves in your pantry, it is important to decide on the location. The place where the shelves will be attached should be chosen taking into account many factors.
The wall on which it is planned to mount must be load-bearing.
This is the key to the strength and durability of the structure. A thin interior partition may not withstand the load and shelves filled with heavy objects will collapse.
In addition to boards, you can use particle boards, plywood and other suitable materials.
If the fastening is not carried out directly to the wall, then you can use your imagination in accordance with the desired shape of the location.
Consider the dimensions of the items you intend to store.
It is important to prepare the storage room itself, level and tidy up the walls in advance so that the shelves stand up straight and there is no need to adjust them to the topography of the wall.
It is worth taking care of lighting before the installation of the rack occurs.
Sizing
As mentioned earlier, the dimensions of the rack depend directly on the dimensions of the room
To make shelves in a closet in an apartment, it is important for a home craftsman to consider several parameters before drawing up a diagram:
- width, length and height of the pantry - for the basic layout of the drawing;
- convenient access to the shelves and low height of the rack - for comfortable use of the product without the use of stands and ladders;
- the expected number of items that will be stored on the rack, their sizes, from height to width;
- load capacity - the higher it is, the more stiffeners there should be to ensure the strength of the structure;
- The slope of the floor is an important parameter, without taking it into account you can get an unstable product.
Based on the listed parameters, the home craftsman should sketch out the most detailed drawing, or take a ready-made diagram and substitute his own dimensions. Such a thorough and responsible approach will bring successful carpentry results.
Important! If the floor is uneven, then both stands for the shelving supports and additional fastening of the shelves to the wall of the pantry can help. The load capacity of the rack directly depends on the distribution of load on the shelves
The load capacity of the rack directly depends on the distribution of load on the shelves
Load calculation
Before production begins, the load from objects and things to be stored is calculated. This indicator depends on the following factors:
- The thickness of the wooden shelf is from 30 to 55 mm. The greater the load expected, the thicker the board should be;
- fastening method - wooden blocks of several cm, metal brackets. Plastic holders will not cope with the weight of the shelf;
- fastening points – the longer the built-in rack is, the more fastenings are used.
Preparation
Before installing storage systems, the pantry must be repaired: clean the space, carry out dry and wet cleaning, remove old wallpaper and flooring. If necessary, the walls of the storage room or attic are leveled and also put in order: painted or pasted over.
It is recommended to use a primer that contains antifungal impregnations.
Laminate, parquet or linoleum is laid on the floor. It is also worth equipping the pantry with ventilation and lighting, which will greatly facilitate the use of the room.
Tools for work
To understand what tool is needed for the job, you need to clarify what exactly needs to be done. If the material for the shelves is not prepared and needs to be trimmed and sharpened to the required dimensions, then it is imperative to have a jigsaw or a hacksaw for wood and a plane. They will help you make shelves of the right size. You will also need sandpaper to sand the edges of the cuts and give the shelves a finished look.
Tools needed for work.
You need a hammer drill to create holes in the wall for dowel-nails to attach brackets, and a screwdriver to connect parts to each other, if necessary.
This is enough to ensure that the pantry has good and reliable shelves on which you can store anything.
You will definitely need:
- Tape measure, for creating markings and measuring distances;
- Construction level so that the rack with shelves is level;
- Pencil or colored chalk for marking the wall. When you have prepared all the materials, you can begin the process of installing them in place.
What is needed to make a rack
Once you decide on the type of structure to be made, you need to calculate the amount of material that will be needed for the work. For example, to make a regular straight rack you need the following materials:
- wooden supports from 1.5 to 2 m long;
- bars for connecting supports;
- boards for making shelves;
- metal corners;
- a set of nails and screws (you need to take it with a reserve, because some of them may get lost in the process);
- special impregnation for wood;
- varnish or paint (optional).
Wood for making shelving
Prices for construction boards
Construction boards
To work, you also need to prepare some tools, most of which can be found in any garage:
- brushes for painting wood;
- vacuum cleaner or small brush to remove dust;
- electric jigsaw or regular wood saw;
- crosshead screwdriver;
- sandpaper or sanding machine (if you have one);
- hammer.
What tools may be required
Necessary materials
When deciding how to make shelves in a pantry, you need to decide on the material from which the structure will be made. There are several options.
- The budget option allows you to make shelves from the material included in the furniture.
If you have an old wall or an unnecessary chest of drawers, then you can disassemble them and get a fairly durable and, at the same time, free canvas for making boards. This will be enough to ensure that the pantry has good and reliable shelves on which you can store anything. - The second option involves purchasing material for shelves in the pantry. The choice must correspond to the list of intended items for storage, their dimensions, and weight.
It is advisable to make a rack directly in the pantry, since if it is large, then it will be difficult for you to bring it inside.
If it is expected that the racks will be loaded with conservation, then a solid board about 30 mm wide will be the best choice.
Any boards will do - the main thing is that they are of sufficient length and can withstand the expected load.
In addition to wooden materials, you can choose others, the main thing is durability and the possibility of self-assembly. In addition to the shelves, you should stock up on the fasteners on which the shelves will be installed, and the consumables necessary for the work.
In order to make wooden shelving for a pantry, you will not need a lot of materials and serious tools.
Non-standard use
If you don’t want to store construction tools, an ironing board or food supplies in the pantry, then you can pay attention to bold and unusual solutions. Non-standard use will make a small space as efficient as possible
If you often work at home or like to spend your free time at the computer, then a small closet can be equipped as a work office. Place a table with a chair behind the door, and small shelves on the walls. You can also use the door for various hooks and hanging shelves. But this method of arranging a pantry is suitable only for neat people who can give up free useful space for storing things.
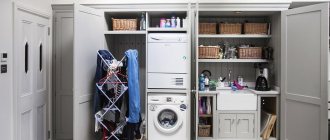
If the pantry is located next to the bathroom or kitchen, then you can even organize a laundry room. There is also room here not only for a washing machine, but also for shelves with powders and conditioners, for a basket with clothes and a small dryer. This method will significantly save space in the kitchen and bathroom. And for greater functionality, you can provide and attach a folding ironing board to the pantry door.
Profile shelves in the pantry
Making a rack using metal profiles is suitable for storage rooms, where the walls are easily subject to self-tapping screws.
Simple shelf design using metal profiles
There are several nuances in the execution of this version of the product. For ease of installation, it is fixed under the ceiling and near the floor; it requires fastening to the walls. If this can be done in a pantry room, then the rack will make the owner happy with its simplicity and conciseness. Step-by-step manufacturing instructions are below:
- Metal profiles three meters long will be placed on the wall as follows. A total of 8 supports for the shelves are required. If necessary, the dimensions of the diagram must be adjusted to the dimensions of the storage room.
- The dimensions shown in the diagram below can also be adjusted. At this stage, it is necessary to attach metal profiles to the wall, floor and ceiling of the storage room. The framework of the structure begins to emerge.
- The dimensions shown in the diagram below can also be adjusted. At this stage, it is necessary to attach metal profiles to the wall, floor and ceiling of the storage room. The framework of the structure begins to emerge.
- Install additional perpendicular profiles on vertically fixed workpieces. They must be parallel to the wall ones. Thus, at this stage of work, the home craftsman needs to have three supports on the wall, two vertical ones from floor to ceiling, one from the beginning of the shelves to the ceiling, as well as three horizontal supports. The 8 profiles stated at the beginning of the instructions are used up - the shelving frame is ready.
- The next stage is creating shelves from plywood. Three blanks with a width of 500 mm are cut from a piece of 3000 mm. The quantity and sizes are selected individually.
- The next stage is creating shelves from plywood. Three blanks with a width of 500 mm are cut from a piece of 3000 mm. The quantity and sizes are selected individually.
- The final stage is the installation of plywood shelves on a structure made of metal profiles. Here you need to secure the bases with self-tapping screws and the rack is completely ready.
Quick and easy production will not ruin the home craftsman, but will provide additional storage space for tools, cans and other household items.
Original options for shelving structures
Anyone who believes that a rack is a rough frame with shelves is deeply mistaken. Indeed, for the basement and garage you don’t have to imagine too much. Strength, durability and functionality are the main slogans for these premises.
For the home interior, on the contrary, I want to do something special and non-trivial. Therefore, home-made masters spare no time and effort to capture our imagination. A couple of oak boards and a few glass bottles are all that is needed to create an original design.
Photo No. 1 Rack made of bottles and boards
Despite its simplicity, the strength of such a rack is quite high. You can store not only books on it, but also use it to display your wine collection.
Anyone who has dealt with high shelf structures knows that without a good ladder it is impossible to reach their upper tier. Why not use shelves as steps - a resourceful person thought and created such an original system.
Photo No. 2 Rack-ladder
The classic frame shelving rests on the floor, and to install the rope shelving you only need two hooks in the wall. Of course, it won’t be possible to store heavy cans of preserved food on it, but it is perfect for books, photographs and souvenirs.
Photo No. 3 Hanging rope rack
You can make a rack with your own hands so that others will appreciate your creative nature using steel water pipes and fittings. This design looks perfect in an industrial-style interior. In addition, it is quite appropriate in an ordinary apartment.
Pay attention to the original way of mounting the shelves. They are mounted on racks according to the principle of a children's “pyramid”, tier by tier
Photo No. 4 Rack made of water pipes
This rack does not have rear support posts. The high rigidity of a steel pipe reinforced with tees makes it possible to eliminate them. This design can be placed anywhere: in an apartment, on the veranda, in the attic or cellar.
If your house has a staircase leading to the second floor, then the free space under it can be adapted for shelving. It will turn out functional and beautiful, as in photo No. 5.
Photo No. 5 Shelving under the stairs
Having studied the original homemade options, we will consider the sequence of design and assembly of wooden and metal shelving.
Hanging shelves in the pantry
Wall shelves always look light and laconic. This option is perfect for lovers of high-tech style and minimalism. The whole secret of such products lies only in installing them on the wall. Read more about how to create this piece of furniture and install it correctly in step-by-step instructions:
- The first stage is making the shelves. In this design, they must be wide enough so that the mount fits securely to the product. Plywood must be cut into equal pieces - the dimensions in this case depend entirely on individual preferences.
- You should get one long and narrow blank - the front side of the shelf, two wide boards for the base itself, two small side ribs where objects will be located, as well as three bars - they will become jumpers.
- You should get one long and narrow blank - the front side of the shelf, two wide boards for the base itself, two small side ribs where objects will be located, as well as three bars - they will become jumpers. Important! The side edges of each workpiece are sharpened at 45 degrees for easy assembly of the parallelepiped shelf.
- Having provided additional convenience with masking tape, you need to fold the shelf around three bars already attached to the base. In this position, they must be glued and secured with weighty objects until they dry.
- The next step is to secure the side panels in place of the shelf ribs. This can also be done using glue. The blanks are cut from the same plywood with a 45-degree edge.
- The next step is to secure the side panels in place of the shelf ribs. This can also be done using glue. The blanks are cut from the same plywood with a 45-degree edge.
- For aesthetics, treat the joints with wood putty - they should become invisible. Sand the shelf. If desired, you can prime, paint and varnish.
- For fastening, you need to take metal bars or profiles. They must go inside the shelf cavity. Weld or fasten the workpieces as shown in the photo. Paint as desired. Place them on the wall.
- For fastening, you need to take metal bars or profiles. They must go inside the shelf cavity. Weld or fasten the workpieces as shown in the photo. Paint as desired. Place them on the wall.
- Place the shelf on the metal fastener.
This design of a wall rack will not take up much space and will be an excellent design solution. Moreover, the load capacity of the structure is several tens of kilograms.
How to make a bookshelf yourself?
A bookshelf is one of the most popular options for homemade wooden shelves. It fits organically into the interior of a small room, is comfortable and practical. Wood is an easy-to-work material, and shelves made from it are practical, comfortable, durable and easily fit into any interior.
Classic wall shelf
One of the classic options will be a shelf with three cells measuring 100 * 40 cm. The design provides a small upper side 10 cm high for additional placement of a number of books.
To work you need to stock up:
- jigsaw,
- sanding machine or sandpaper,
- drill, screwdriver or screwdrivers,
- screws or self-tapping screws,
- square,
- brush,
- varnish for wooden surfaces.
The calculation of the dimensions of the parts was made for a board with a thickness of 2 cm.
Step-by-step instruction
First of all, you need to cut out 2 long pieces:
- 50 cm,
- 96 cm,
- 26 cm.
Then they get to work.
- The wooden parts of the future shelf must be sanded or sanded.
- Assembly begins from the bottom, which is fixed in the side walls at a distance of 1 cm from the edge. This will make the product look more interesting. Fastening is done using self-tapping screws.
- On the inside of the fixed base of the shelf, you need to mark the places for attaching additional supports. With the same cell size, the step will be 32 cm from the side wall on each side.
- The inner walls are attached to the base strictly at right angles.
- I secure the top lintel of the shelf.
- If the design does not provide a back wall, then it is recommended to reinforce the shelf with metal corners.
- The shelf is treated with stain, dried and varnished. Varnishing usually occurs in 3 stages with an interval of 12 to 48 hours for surface drying.
Taking this option as a basis, you can make a bookshelf yourself.
Final decor of the rack
The finished structure must be painted. Of the various options, the simplest are coating with water-based acrylic paint or varnishing the product.
The advantage of acrylic paint is that it dries quickly and has virtually no odor. It can even be used indoors, although the room will still need to be ventilated. Varnishing is preferable if you want to preserve the structure or slightly tint the surface of the wood. Clear or tinted varnish to resemble oak, walnut, ash and other wood species should be applied two to three times. Each new layer is applied after the previous one has dried.
Before painting the rack, it is necessary to prime the surfaces to be painted, unless two-in-one paint is used. Priming the surface will ensure a good result and will ensure that the paint does not peel or crack over time. If you intend to paint with oil paints, it is recommended to do this in advance outside the living space. We bring all painted parts into the house for subsequent assembly only after complete drying.
So, once the shelving unit is assembled and painted, you can stand back and admire your work. However, your furniture will look more presentable when books, figurines, framed photographs and other household items for which it was made appear on the shelves.
Expert advice
Experts give a number of tips to avoid mistakes in manufacturing and installation. A rack for a pantry or dressing room can be made by hand no worse than in production, if the rules are followed:
- the purpose of the structure is determined. The diagram reflects all large items that require shelves with sufficient width and depth;
- treatment of all wooden elements with varnish and stain. On the Internet you can find many photos with examples of such work;
- optimal placement of the structure along three walls or in a U-shape;
- natural materials, solid wood are preferred. The manufacture of partitions allows the use of veneer, plywood, chipboard or MDF.
Kinds
Existing types of shelving for the storage room of an apartment or house can be divided into three groups:
- linear;
- corner;
- U-shaped.
Linear products are ordinary straight shelves. They are the simplest, take up minimal space, and save useful storage space. Corner models are distinguished by the presence of a monolithic corner; U-shaped products occupy most of the space. All models are united by the fact that they are selected based on the specific footage of the pantry.
Along with the classical categories, there are also modular designs. They are convenient because they allow you to select modules exactly to the size of the pantry. The convenience of such designs is the ability to use the usable area with maximum benefit , leaving space for free movement for the necessary thing.
For example, corner structures can be made from such parts and supplemented with separate shelves and drawers.
According to the type of fastening, pantry racks are divided into two types:
- hanging (fixed directly on the wall);
- classic (installed on strong supports).
The difference between these models is the weight load. Options that are installed on the floor can support more weight. They can be used to the maximum based on the type of material.
Wall-mounted varieties are not able to support heavy items. Therefore, they cannot be used, for example, for storing building materials.
Photo ideas for homemade shelving
Sources
- https://FurniLux.ru/dizajn/kak-sdelat-polki-v-kladovke.html
- https://berkem.ru/polki-i-stellazhi/kak-sdelat-polki-v-kladovke-svoimi-rukami/
- https://bezkovrov.com/prihozhaja/stellazhi-v-kladovku.html
- https://vdome.club/materialy/svoimi-rukami/kak-sdelat-stellazhi-v-kladovku-svoimi-rukami-iz-dereva-profilya.html
- https://www.ivd.ru/dizajn-i-dekor/sistemy-hranenia/kak-sdelat-polki-v-kladovke-svoimi-rukami-sovety-foto-i-poshagovyj-plan-35931
- https://ProPodval.ru/stroitelstvo/kladovka/kak-sdelat-stellazhi-v-kladovke-svoimi-rukami.html
- https://wexy.ru/obustrojstvo/dizajn/stellazhi-dlya-kladovki-305
- https://gidrukodeliya.ru/stellazh-svoimi-rukami