Carrying out renovations in a home that will be a refuge for you and your family for many years to come is a natural and useful activity, especially if done in a timely manner, but it also takes a lot of effort.
Sometimes even such a simple task as unsticking a mirror from a cabinet can become overwhelming if you don’t know the special secrets that professional builders have developed over many years.
Mirrors are usually glued tightly to cabinets, or screwed using fastening devices. But their shape can get boring, and over time they become damaged. Let's learn how to remove them by learning several techniques for separating mirrors from the surface of the cabinet.
How to remove a mirror from a closet door?
Separation of mirrors held on its surface by fasteners from the cabinet
So, first of all, we will discuss how to remove mirrors from the cabinet that are mounted on its surface using fastening systems.
When separating the mirror from the surface of the cabinet, it would be wise to remove the door from its hinges and lay it horizontally so that the glass does not fall to the floor haphazardly
Table 1. Mounting systems for mirrors
| Fasteners | Description |
| Suckers | Silicone suction cup holders are not often used as a fastening device for placing a mirror on a vertical cabinet surface, however, they are still found. In this case, you are more likely to worry about the suction cups not accidentally coming off if the door of a given piece of furniture slams too loudly, since silicone suction cups are too often poorly made. Consequently, they are unable to hold the mirror in the place you have determined, and this accessory often falls. How to remove: You can easily remove a mirror fixed to the surface of the cabinet door using suction cups by simply gently pulling its body. If the suction cup does not come off easily, carefully pick up its edge with a ruler or fingernail. |
| Screws | Quite often, mirrors are attached to cabinet doors, walls and other vertical surfaces using screws. Screws can hold this accessory to the surface of the cabinet, while being passed through:
|
| Staples | Bracket holders are another way to secure a mirror to a cabinet door. Each holder is separately screwed into the wall using flat-head screws. Before screwing it in, a bracket is put on each screw - a holder, which will then hold the mirror. The tighter the bracket is tightened, the stronger the mirror “sits” in it. Several such staples are used along the entire perimeter of the mirror to clearly fix our mirror accessory. How to remove: And depending on the quality and thickness of the staples, as well as your desire to use them in the future, the following methods for removing the mirror from the surface of the cabinet can be used:
|
The above methods of attaching a mirror involve the use of special fasteners, which are initially designed in such a way that you can get rid of them as simply as possible by easily removing them from the mounting location, and along with them the mirror itself.
Such fasteners are called reusable. Indeed, if you do not accidentally or deliberately damage them while removing the mirror, they can then be used in tandem with it, while placing the piece of furniture on a different surface. We recommend that you use just such fasteners, since they are the easiest to remove, even without any specialized experience or sophisticated construction tools. To rid your closet of a mirror with each of them, the maximum you will need is:
- assistant;
- screwdriver;
- time.
Reusable fastening systems for mirrors, of course, are much more convenient, since they allow you to quickly remove the reflective surface, and then use both it and the fasteners themselves more than once.
However, preliminary fastening of mirrors to other construction devices can create a serious problem. Let's look at them in the next section.
What will you need for work?
Some tools for gluing mirrors
When performing installation, you cannot do without special materials and tools. You will need:
- mirror;
- degreasing composition;
- devices for implementing the chosen fastening method;
- sandpaper;
- gun for performing installation work;
- pencil, ruler.
If you plan to mount a bronze mirror, you will need to additionally take a drill, a set of drills, and fasteners.
How to peel off a mirror from a cabinet if it is attached to it using construction substances
In this case, construction substances will be understood as disposable fasteners, represented by condensed liquids that have pronounced fastening properties.
So, we are talking, of course, about:
- double-sided tape (tape on which a layer of adhesive is applied);
- liquid nails (special construction adhesive, especially strong when hardened, which is used for mounting various parts, and in particular, installing a mirror);
- construction adhesive specifically used for working with specific surfaces.
Using liquid adhesive substances as a way to secure a mirror to the surface of a cabinet, you must understand that when removing the mirror, you will most likely break it into many pieces.
Removing a mirror from a cabinet door without damaging the mirror, and at the same time without getting hurt, is very not easy unless you know specific tricks that will at least help you protect yourself. The fact is that when the required substances mentioned above are used, subsequently the mirror turns out to be tightly fixed and it is really very difficult to separate it without breaking it.
Variety of options
Before you start attaching the mirror to the cabinet yourself, you need to understand the design features. Standard straight-format devices can be equipped with two, three, or four leaves. Built-in products are installed in wall niches. This arrangement method saves space. Often such models do not have a floor or roof. In this case, the cabinet shelves are fixed directly to the wall.
Rules to consider when removing a mirror glued to a cabinet
There are several important rules that you should follow during the peeling procedure in order to implement the idea as quickly and efficiently as possible. Let's look at them in the list below.
1. Before you begin the process of dismantling the mirror from the place where it was after gluing, you need to remove the element on which it hangs. Of course, if it’s a wall, then most likely you won’t be able to do this (unless you cut out, for example, a piece of drywall, but then it will be easier to restore the wall with fresh material). But if we are talking, as in our article, about removing a mirror from a cabinet, then its door can be temporarily removed from its hinges.
It is better to remove a cabinet door equipped with a mirror and place it separately if you still want to keep your body safe and sound, otherwise pieces of glass will fall directly on you
The fact is that in a horizontal position, removing the mirror is much easier, in addition, in this case it will be possible to carry out the procedure alone, because you will no longer need an assistant to hold the mirror.
2. The second rule concerns safety. Unfortunately, it is rarely possible to remove a glued mirror from its place without damaging it. Most often, the mirror surface crumbles and breaks off in pieces, which can lead to unpleasant consequences, such as:
- damage to the skin;
- deep wounds, etc.
Work must be carried out in special protective equipment: gloves, closed clothing, glasses, etc.
An open wound is most often accompanied by infection, so the more carefully you work, the greater the chance that you will remain safe and sound. In this case, accuracy will consist of the following two points:
- wearing protective equipment;
- preliminary preparation of the mirror for removal.
In the first case, it is assumed that you will not remove the mirror in your regular clothes, working with your bare hands, but will take care of appropriate protection, namely:
- put on thick gloves made of fabric with a special coating;
- put on a thick jacket with sleeves and pants, also made of thick fabric;
- put on safety glasses;
- when working with toxic substances, use a respirator or mask;
- Protect your feet by wearing boots or at least thick socks and slippers.
Do not use our advice. Quite often, working with a mirror that has crumbled during processing leads to disastrous results.
Safety construction glasses help you protect your eyes from small pieces of glass.
The second point we mentioned involves preparing for the fact that the mirror will break and crumble. To prevent the fragments from scattering and causing you harm, you should first cover the mirror with tape. There is no need to make several layers, just sequentially apply solid strips of material to its surface. They will hold the pieces that break off. And if the mirror still retains its integrity, then you can easily wipe off the glue remaining from the tape using a solvent.
As you can see, there were only two rules, however, both of these rules are very, very important for us, as they allow us to protect ourselves during work related to dismantling.
It is safest to work in a horizontal position
Instruction No. 1 - how to peel a mirror from a cabinet using a solvent
The first method that we will tell you will be quite simple, however, unfortunately, it does not always work. However, it should be considered and tried first. If everything works out, you will be able to keep both the mirror and the surface of the cabinet in their original form, guaranteed to protect them from damage.
Step No. 1 – look for adhesive packaging
So, to use this method, it is advisable to find packaging from construction glue, liquid nails or other specialized substance that was used to glue the mirror to the cabinet. The fact is that quite often on the back of the packages they write which solvent may be suitable for removing this composition.
Even if there is no relevant information on the package, keep it anyway if you find it.
If you suspect that sooner or later you will want to remove the mirror, do not throw away the packaging of construction adhesive so that you can later select a suitable solvent for it
Step No. 2 - let's go buy a solvent
So, it’s good if you have decided on the solvent by finding out its name and reading the information on the packaging of the adhesive. If this still does not happen, go to a packaging store to consult with sellers who can tell you which product to choose.
Go to the store, and among the entire range of substances you need, select the right solvent, using the help of the seller
If the packaging was not found and you don’t even remember the name of the substance, try purchasing one of the following solvents:
- acetone;
- petrol;
- white spirit, etc.
One of these products may well help you remove the glue concentrated between the mirror and the surface of the cabinet.
Step No. 3 – apply the product
Use the solvent according to the instructions supplied with it. Place the previously removed cabinet door on a covered area of the floor to allow toxic substances to drain onto the material, which you will then discard.
Before starting work, remove the door from the cabinet
Apply the solvent and wait the time specified in the instructions. Once it is finished, begin to carefully separate the mirror from the surface of the cabinet, using auxiliary objects if necessary.
After separating the mirror, once again treat the surface of the cabinet and the back of the mirror with solvent, finally removing any remaining adhesive.
Remove any remaining adhesive from the surface of the mirror after removing it
Please note: unfortunately, in some cases, the solvent can have a detrimental effect on the finish of the cabinet if, for example, it was painted, so after removing the mirror you will have to restore it.
Instruction No. 2 - removing a mirror glued to the cabinet using a hair dryer
Step No. 1 – preparation
To remove the mirror in this case you will need:
- powerful construction hair dryer;
- ruler or stick;
- an assistant who will hold the mirror if it cannot be removed.
Don't forget to prepare the mirror accessory for removal using the method we discussed earlier.
Step No. 2 - heating the glue
Now we will need to heat the mirror, and with it the glue, which is in direct contact with the back surface of our long-suffering interior part.
Start heating the mirror with a hair dryer, and do not stop until the glue begins to melt
This method also does not provide a 100% guarantee of mirror separation, since in some cases the connecting substance has increased resistance to temperatures, however, in most cases it can and should work.
Step No. 3 – separate the mirror
As soon as you feel that the mirror has begun to “walk” in place, that is, it has become more mobile, you can begin the separation process. This movement indicates that the glue has begun to melt and has loosened its grip.
Begin to carefully separate the mirror from the surface of the cabinet, lifting it with a ruler or other device you have prepared. After the mirror plate has completely moved away from its place, clean it of any glue residue using any means available to you.
Clean the mirror from any glue residue or other dirt.
Instruction No. 3 – removing the mirror from the cabinet using an iron ruler and a mallet
This method is most often used in situations where:
- you want to remove and throw away the damaged mirror;
- this mirror will no longer be used for any other reason.
The fact is that by forcibly separating the mirror from the cabinet door, in this case you will, with a 99% probability, damage it.
Step No. 1 – collect the necessary materials
So, in order to dismantle the mirror in the manner stated in the title of the instructions, we will need the following tools:
- mallet;
- metal ruler;
- sandpaper.
Prepare a mallet and a metal ruler.
Prepare these devices, and let's get to work.
Step No. 2 - preparing the ruler for work
So, in order for us to achieve our initially set goal, we will need to do the following: sharpen the ruler by sharpening it with sandpaper.
For this:
- determine the narrow edge of the fixture;
- bring sandpaper to it and begin to rub the surface of the ruler with it as much as possible.
Sharpen the ruler with the most ordinary sandpaper.
Having sharpened the tool in this way for some time, let's get to work.
Step No. 3 - peel off the mirror from the cabinet
So, take a mallet and a sharpened ruler in your hand. Now, with a sharpened edge, insert the ruler behind the mirror, into the space between the back of the accessory and the surface of the cabinet door.
Now start very gently tapping the end of the ruler, moving it further and further.
Please note: the main thing is not to make sudden movements, as you can damage the mirror.
In this case, it is imperative to secure the mirror with tape before you start processing it, so that the fragments do not fly apart.
Separate the mirror from the cabinet surface using a mallet
So continue to go lower and lower, without raising the edge of the ruler too high.
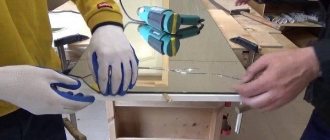
Instruction No. 4 – separating a mirror glued to the cabinet using cutting wire
Step No. 1 – collect the necessary materials
So, in order to separate the mirror using this method, you will need to prepare the following:
- cutting wire, which is often used to repair car windows (it can therefore be bought at any store that sells auto parts);
- tape to cover the surface of the mirror;
- oilcloth, newspapers or bags in which you will pack the removed but damaged mirror.
Buy cutting wire at a car store.
Having collected everything, we will continue our work.
Step No. 2 – install the film in the correct position
So, first you will need to stretch the wire behind the mirror, and try to immediately stretch it from the near corner to the far one. If you can’t do this just like that, smoothly make cutting movements with the wire, pressing it more tightly to the surface of the cabinet.
Pull the wire behind the mirror
Please note: at the same stage you need to connect an assistant to hold the mirror, if you did not follow our advice and did not remove the cabinet door from its hinges and then lay it on the floor.
Step #3 - Remove the mirror
Now you will need to cut down the mirror from top to bottom, cutting the glue. Of course, the reflective item will be damaged, but if you covered it with tape, it won't fall off right away and you can safely remove it.
Hold the mirror so it doesn't fall
Instruction No. 5 - how to remove a mirror from a wardrobe
Sometimes we have to remove really large mirrors, for example, reflective surfaces from a wardrobe, which, normally, occupy the entire surface of this device. Let's look at how to quickly remove the mirror in this case.
Step No. 1 – collect the necessary materials
To remove the mirror this time, we will need the following materials:
- adhesive tape for obligatory pasting of the mirror surface;
- bags, thick, fabric if possible, for disposal of the seized mirror;
- chisel;
- flat screwdriver.
Prepare a chisel and a flathead screwdriver.
Now let's move on to considering the technique for removing the mirror.
Step No. 2 – preparation
Carefully cover the mirror with tape. Remember, in this situation it may not crumble, but it will still burst. Therefore, in order to prevent your damage, you will need to provide for this circumstance by covering the reflective surface with tape.
Don't forget to cover the mirror with tape
Step No. 3 – procedure
So, use a screwdriver to pick up the mirror from one of its sides, which is easiest for you to reach. You will be surprised, but it is really easy to do.
Use a chisel or wooden wedge to pry up the free edge
After the hook is complete, take a chisel and start running it around the perimeter of the mirror, moving it inward, gradually peeling it off over the entire area.
Be sure to lay something on the floor to prevent debris from falling onto an unprotected surface.
You will need to move the chisel as long as it takes to separate the entire canvas.
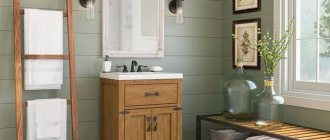
Attachment methods
To install a new mirror, you can use:
- Double sided tape. If the room is damp or cold, this method is not suitable. At temperatures below ten degrees Celsius the mirror will fall off. The tape also does not tolerate high heat. This is not a very reliable way to attach mirrors to wardrobes.
- Liquid Nails. It smells strong. Sometimes it can destroy the amalgam. The glue must be suitable for mirror surfaces.
- Construction silicone. The most optimal option. Does not give side effects. Glue by placing the composition in intermittent strips along the contour of the mirror.
- Profile crimping. The mirror is clamped along the edge, and it becomes part of the door leaf. Professionals recommend it as a reliable method.
- Mechanical fastening. Fastening is carried out with thin screws, screwing in plastic stops and metal clamps.
Let's sum it up
Removing a mirror is an incredibly labor-intensive process, since mirrors are usually attached to cabinets so that they hang in a specific place for them even after the cabinet itself fails. It would be good if reusable fasteners were used to install the reflective surface, however, as a rule, we are talking about the use of adhesive construction substances that make easy removal of the mirror from its current location impossible. Please read the instructions we have provided above carefully. At least one of them must be suitable in your case. Then you can peel the mirror off the cabinet and place a newer model in its place.
Video - The process of removing a mirror from a cabinet door
Safety regulations
Removing the old or damaged surface of a mirrored wardrobe is quite dangerous. To perform such work, it is better to contact a professional company.
If you had to change the mirror yourself, do not forget about your own safety:
- choose clothes that cover your body and arms;
- Protect your eyes with tight-fitting goggles;
- work outdoors;
- exclude the presence of children nearby;
- When dismantling indoors, do a thorough cleaning after work.
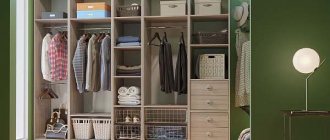
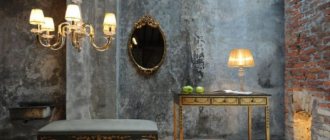
Wardrobe design
First, a few words about the design of the wardrobe. Since they are of different types, we will look at the design of a two-door wardrobe made of chipboard. So, the cabinet consists of the following assembly units:
- Basement,
- frame,
- Rear wall,
- Doors,
- Shelves,
- Fastening and guiding elements.
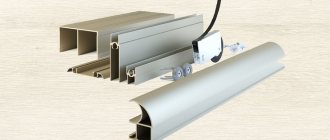
The door, in turn, consists of:
- door leaf,
- Vertical profile,
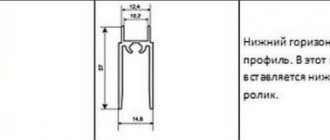
- horizontal profile,
- Top guide,
- Bottom guide,
- Lower rollers,
- upper rollers,
- Assembly screws,
- Adjustment screws,
- Seals,
- Stubs.
To repair a wardrobe door, you need to determine the type of damage and assess whether you can fix it yourself.