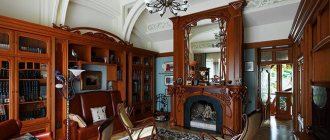
The popularity of parametric furniture is obvious, because products in this style look like fantastic objects. Unusual streamlined shapes of furniture and decor attract the attention of those who want to stand out, be different from everyone else, and have original products in their home or office. As a result of the combination of a rigid frame and a flowing shape, you can get any configuration and bring various interior and furniture ideas to life to get a unique design item with which you can surprise your guests.
This new direction in the design and decoration of premises interested the next guest of Reconomica . Mikhail Melnikov has been designing and producing furniture and decor in the style of parametric design for about three years. Mikhail will tell readers of the magazine about the creation of the studio and his own production, and will also share his future plans in this area.
What is
Parametric furniture differs from traditional models in its unusual, exotic shape.
The avant-garde design style excludes clear geometry, the use of identical elements, and emphasis on functional areas. Pieces of furniture are more reminiscent of art objects with smooth, flowing surfaces and random curves. Complex forms are designed to convey the beauty of natural lines and create a harmonious, comfortable space around a person. Thanks to the design features, each item can be given an original appearance. The furniture resembles a layer cake. Consistently connected plywood parts are fastened with metal pins, leaving a small gap between the sheets. The result is a reliable, stable structure.
An individual approach makes it possible to create products taking into account any wishes. Already at the modeling stage, you can choose the design of the structure and see it on the monitor screen with reference to a specific interior or location. The advantages of such furniture include its novelty, aesthetic appeal, as well as excellent performance:
- environmental Safety;
- functionality;
- ergonomics;
- structural strength;
- durability of use;
- good maintainability.
A new direction in furniture design has found application in the design of offices and shopping centers, cinemas, concert halls, clubs, and restaurants. Garden and park areas are decorated with gazebos and benches in a parametric style. Furniture for the home or office is manufactured to individual orders: chairs, armchairs, tables, sofas, shelving, beds.
To create three-dimensional models, special software and a CNC machine are required, so private craftsmen rarely engage in this difficult task. Another disadvantage of parametric furniture is its very high cost. Its exotic forms do not fit into all interiors, and are especially not recommended for classic ones.
Arrangement of fasteners
All panels included in the product are automatically fastened with certain fasteners. To do this, you must first configure its installation parameters (Fig. 16). The principle of automatic fastener placement is that groups of panels of a certain type of fastener are assigned to match them.
All fasteners in the model are conventionally divided into three groups: main, additional and alternative. The main fastener refers to the fastener that bears the main load during operation of the product. It is divided into fasteners for the overhead back wall and fasteners for the remaining panels.
The rear wall is attached according to the face-to-end pattern to the ends of all non-removable (stationary) vertical and horizontal panels to which it is adjacent. Fasteners are placed along all joints in increments not exceeding the specified maximum value.
Rice. 16. Window for setting fastener parameters
Rice. 17. Automatic fastener placement parameters
To assign different fasteners for the remaining panels, the concepts of connection length (joint), center distance and distance from the edge of the panel are used (Fig. 17). The number of fasteners is selected based on these parameters. For example, a pair of values “750 - 3” in the table in Fig. 16 is deciphered as follows: each joint with a connection length from 500 mm to 750 mm inclusive will be secured with three fasteners.
The center-to-center distance is calculated automatically taking into account the assigned number of fasteners, indent values, multiplicity of spacing, as well as the fastener location pattern. The multiplicity of the spacing step is the number to which all values of the interaxial distances will be multiples. For example, if you enter a step value of 32 mm, then all center distances will be multiples of 32 mm (“furniture system 32”).
Additional fasteners are dowels, which (if necessary) are installed in addition to the main one. When using it, a dowel is added to each main fastener element, regardless of the placement algorithm, at a distance equal to the specified offset value.
Rice. 18. Example of automatic fastener placement
An example of the implementation of automatic placement when attaching a horizontal partition to a vertical one based on the rear (Fig. 18a) and front (Fig. 18b) sections with the following parameters:
- type of fastener - eccentric tie with an additional dowel;
- distance from the selected cut - 50 mm;
- the minimum distance from the opposite cut is 50 mm;
- product depth - 450 mm;
- the multiplicity of the spacing step is 32 mm.
Reasons for the development of this style
How to assemble furniture yourself, detailed instructions
Throughout the history of the development of architecture, people have strived to erect buildings that would keep up with the times and meet their needs (aesthetic and practical).
In modern architecture, people strive to create projects that would combine many different functions, provide for economically viable costs for their implementation, and would be practical to use in the future. Aesthetics and beauty fade into the background, but exclusivity or at least unusualness still prevails.
Modern architects have a desire to create something new, unique, something that is based on the latest developments and principles of architectural structures.
And, as a result, the architect begins to master new tools for further work - animation, parametric modeling, mutation and other achievements of modern computer graphics. And only now, with the advent and development of advanced parametric design systems, parametric architecture took shape as a separate style and began to gain increasing popularity and demand.
Drawings of doll furniture: part No. 1
And again, this drawing of doll furniture is for children. Those who have been using this resource for a long time know that in the “Doll Houses” section there are many cool layouts of different houses for dolls. But the house is empty without furniture, let's fill this gap. If you want to make doll furniture with your own hands, this collection will help you with this. Includes elements and drawings of kitchen furniture for dolls.
I will say that I personally completed these drawings. It seemed to me that their size was a little small, so in the archive you will find two files for Corel: one as it was, the second is 10% larger and the locks are slightly smaller so that they can be assembled without glue. I especially liked the vector layouts of the doll lounge chair and mini rocking cat. Here, every item will find its place in your princess's dollhouse.
If this is your first time encountering the opportunity to make furniture for dolls with your own hands, I will tell you how to do it, cheaply and quickly. So:
DIY doll furniture where to start
I’ll say right away that you don’t need any carpentry skills. You don't even need any skill in graphics programs. Simply, download the archive with files from the links at the end of this article. It contains files in a variety of vector formats, so that no workshop can sell you an additional service for adapting files or some other crap. The files are completely ready for cutting. And the drawing looks like this:
After you download the archive, you need to find “laser cutting services” in your city (write that in the search + your city). Send them the entire archive, or you can send just one file in the format they ask.
There are a few more important points you need to know:
- The drawings of this doll furniture are designed for plywood with a thickness of 3 mm.
- Professionals in their field, in our case laser machine operators, calculate the cost of cutting services based on the total length of the cut.
Imagine that we took all the lines, curves, arcs of each part of this drawing, folded them and stretched them into one line - this will be the total length of the cut. For example: the cost of cutting 3 mm thick plywood per linear meter costs around 20-25 rubles. And now the most interesting thing, I always try to indicate the length of the cut in the characteristics of the layout. This makes it much easier for you to calculate the cost of services.
And so: downloaded, found the service, received the correct price, paid, took all the details. Next you will need one of the PDF files from the archive - this is detailed assembly instructions. Here I advise you to involve your child in the process, because you have an excellent educational constructor on your hands. Stock up on a small tube of Moment wood glue. Not all parts will fit tightly - features of laser cutting, and specifically each individual machine.
That's basically it! You save money because this method is 3 times cheaper than buying a ready-made similar construction set. Besides. There are many companies that will send ready-made parts according to your sketches to your home. You don't even need to leave the house! And most importantly, you can tell everyone that this doll furniture was made with your own hands and the hands of your children!
Characteristics of the doll furniture layout:
- the total length of the curve is about 18 linear meters
- drawing adapted for plywood 3 mm thick
- Detailed assembly instructions included
- archived files in formats: cdr x4, eps, dxf, svg, pdf
(.zip file, 5.53 MB)
Download drawings of doll furniture from file hosting sites:
⇒ Google ⇐
⇒ Yandex ⇐
⇒ Mail.Ru ⇐
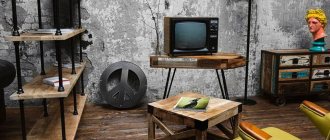
Parametrics in interior design
Upholstered furniture: classification, selection and production
At this time, this style is just beginning its development, which is rapidly progressing. Most of the work of designers in this area is aimed at shopping centers, restaurants, galleries, museums and other commercial buildings.
Parametric architecture in the interior of private housing is developing much more slowly, the reason for this is the need for large dimensions, since parametricism needs a certain scope and a large area to feel maximum comfort for the people in the room.
This new style in the interior allows you to make it calmer, smoother and less brutal than, for example, country or Provence styles.
It is possible to make the ceiling, walls, partitions, furniture and decorative elements parametric.
Natural materials are often used for parametric interiors. It is mainly wood and stone, which create a feeling of comfort and privacy, helping to hide from the bustle of the big city.
The predominant colors are calm and classic tones of white, black, ivory, gray and brown, as well as many shades of wood.
This style is characterized by smooth lines that flow and flow like fabric.
All decorative elements and furniture in parametrics have a simply fantastic, cosmic appearance, in which clear edges and right angles are erased.
Parametric design stands out from all other styles by the ability to create such architectural volumes and elements that previously seemed unrealistic and impracticable. The main reasons for this were the complexity and high cost of completing such projects. An interior in this style looks like a postcard from the future.
Parametricism in the premises is unique, it is practical and multifunctional.
Making drawings
Small objects can be made without any diagrams, just by eye. But plywood doll furniture looks more impressive if you develop something like a project in advance. For drawings, it is best to take graph paper.
Bed drawing
You can make a bed for a doll with your own hands from plywood according to the simplest drawing. You need to take measurements:
- bed length;
- width of the bed, back;
- the height of the back combined with the legs.
The diagram can be done like this:
- Draw a rectangle on graph paper for the future bed, strictly in size.
- Draw a rectangle for the back.
- Mark where the backrest will be up and where it will be down.
- Mark the place where the stock will be attached, draw a line - it should run parallel to the top and bottom.
- Along the bottom line from the corners, mark the width of the legs: for a small crib it is 1 cm, for a large one – 5-8 cm, mark the points, for example, A and B.
- Divide the bottom line in half.
- Draw a perpendicular to the middle to the desired height of the legs - it can be very small, and almost to the bed, mark a point, for example, B.
- Connect points A, B and B with an arc.
- Think about what the top edge will be like - you can, of course, make it straight, but if you want a curly one, mark a line of corresponding curvature.
- Cut out the patterns - the diagram is ready.
Other types of furniture
As you can see, there is nothing impossible in making drawings of furniture for dolls from plywood - the diagrams are quite simple. Drawing patterns for a sofa is no more difficult. It consists of four parts:
- seats;
- backrests;
- two armrests.
We take measurements in the same way as for the bed. The further procedure will be as follows:
- Draw a rectangle for the seat - this is the main part, all the others are drawn from it.
- Draw the back - its length is the same as that of the seat, and its height is arbitrary. At the same time, calculate so that the seat is attached to the middle of the backrest, then the sofa will be more stable.
- Draw a rectangle for the armrest - its width is equal to the width of the seat or slightly less, plus the thickness of the plywood. And the height is approximately two-thirds of the height of the backrest.
- Then, again, we give free rein to our imagination and decide what the back will look like - with a straight top or with a curly top, and draw a profile line.
You can make a diagram for a chair in the same way. The only difference is the size of the seat and backrest.
Drawing a table
That's where there is room for imagination! The table can be:
- round on one leg;
- oval on one leg;
- rectangular or square on four legs.
Furniture for plywood dolls can be extremely simple. For the table we make a very simple drawing:
- Draw the tabletop - the easiest way is in the form of a circle or rectangle; no one forbids using a compass.
- Mark the middle - for a circle it is the intersection of diameters, for a square and rectangle it is the intersection of diagonals.
- Mark a place for the legs.
- Make drawings of the legs - for a table with four legs, this is just a strip, but for a round table you need something more massive, like a cross.
- For a table on one support, make a drawing of the stand, which will be at the bottom - in the form of a circle or a smaller square.
Multifunctionality of parametricism
How to make garden furniture with your own hands?
A distinctive feature of this design trend is the versatility of its individual elements. This is achieved thanks to the soft transition of lines in trigonometric space and their intersection.
For example, a wall can simultaneously serve as a bench or chair. A table made in this style can simultaneously serve as a small shelf with the help of several niches that were formed as a result of the interlacing of lines.
Even the interior walls of the room are finished this way, creating the illusion of expanding space due to the absence of straight lines and volume of surfaces.
How to make a cabinet
Nowadays, homemade cabinets made from sheets of plywood are very popular among modern designers and property owners. You can make such furniture using the following materials and tools:
- sheet plywood;
- screwdriver and screws;
- four blanks for legs. You can prepare it yourself from wooden blocks;
- special glue for fixing wood.
To create the base of the bedside table, you will need to take four pieces of plywood of the required size. Furniture plywood blanks should be 15 by 45 centimeters for the side components, and 45 by 45 cm for the lower and upper bases. All elements are produced in duplicate.
A bedside table is considered easy to make. You can do it yourself in a short time.
The side panels are fixed to the bottom base using wood glue. The upper part of the cabinet with the prepared frame is fastened in the same way. The legs are connected to the base with self-tapping screws.
If desired, you can coat the finished furniture with varnish or paint.
Materials and colors
The basis for multi-layer furniture are parts made of wood and sheet materials. The most popular are plywood made from various types of wood, MDF composite boards, plexiglass and much less commonly laminated chipboard. The selection of raw materials is related to the design features and purpose of the furniture:
- For outdoor objects, water-repellent properties are important, so preference is given to birch plywood.
- Solid or coniferous plywood is suitable for interior spaces.
- Furniture items for painting are made from MDF (fine fraction). The material is durable and holds fasteners well.
- LDSP (laminated chipboard) is not very durable, so it is used for light, simple structures or decoration.
When making furniture from natural materials, they try to emphasize its beauty. Most often, the texture and natural shade of wood from light to dark tones are preserved. Popular colors range from white to all shades of gray, black and red lacquered surfaces. To emphasize the advantages of the material, the principle of contrast is used. They use tabletops made of glass, plastic or effective lighting to show the originality of the design.
Birch plywoodSolid pine
MDF
laminated chipboard
Edgebanding
Finishing the edge of a panel is a technological process of gluing it with some kind of tape or sheet material. In the BAZIS-Cabinet module, the edges of all panels present in the product are automatically lined with a certain edge material. When designing the body and interior of the cabinet, as soon as any panel is installed, it will already have lined edges. Automatic application of various types of edge material becomes possible if the parameters of the corresponding algorithm are previously configured.
To assign cladding, the edges of all panels present in the product are conditionally divided into functional groups, that is, cladding is assigned not to each individual edge, but to all edges of all panels included in this group.
All edges are called open, except those that are the joints of panel joints with permanent fasteners. Visible edges are those that can be seen if you look at the product (if there are doors, then conditionally with the doors removed) from the front, left and right and which are not blocked by other panels. Thus, a removable shelf resting on shelf supports will have the front edge open and visible, while the right, left and back edges will be open but invisible. The separation of the edges was probably done so that it would be possible, if necessary, to line the invisible edges with cheaper material.
The window for setting parameters for edge covering is a table of correspondence between different groups of panel edges and a specific edge material. The set of algorithm settings provides for taking into account all the technological features of this operation: taking into account the trimming of panels, the presence of technological allowances, etc.
Last changes
06.04.2019
The address of the organization is excluded from the register of the Federal Tax Service Addresses indicated during state registration as the location of several legal entities
24.01.2017
Gushchin Andrey Viktorovich: information about the manager’s INN 257583389764 has been added
Added information about the TIN of the founder Andrey Viktorovich Gushchin: 257583389764
04.12.2016
The address of the organization is included in the register of the Federal Tax Service Addresses indicated during state registration as the location of several legal entities
19.11.2016
The address of the organization is excluded from the register of the Federal Tax Service Addresses indicated during state registration as the location of several legal entities
23.10.2016
The address of the organization is included in the register of the Federal Tax Service Addresses indicated during state registration as the location of several legal entities
10.05.2014
Manufacturers of plywood furniture
At the moment, there are a lot of companies that produce furniture from this wear-resistant material for decorating residential premises. But, unfortunately, not many manufacturers offer ready-made kitchen sets made of plywood. For this reason, the majority of craftsmen who prefer furniture plywood choose to make products with their own hands.
You should not be afraid that the furniture will have some flaws - imperfections can be hidden with the help of painting or decorative textiles.
Collapsible furniture made from plywood sheets today is very popular among craftsmen and property owners. Using this material, you can create original interior items that will harmoniously fit into the design of a children's room, kitchen, bedroom and living room. Very often, garden furniture is made from plywood, as it is highly resistant to wear.
In most cases, it is enough to coat the plywood with a protective matte transparent varnish - this will preserve its shade and pattern.
The ease of manufacture, availability and quality of the material contribute to the fact that furniture plywood is present in almost every home. The main success factor in the production of such interior items is a professional approach to the creation of drawings, because they influence the final result of the project.
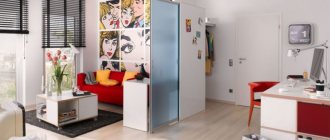
Unusual models
The external originality of parametric furniture is actively used by designers to create visual effects when decorating premises. Any item, be it an armchair or a lamp, a table or a bar counter, exactly corresponds to the conceptual choice. The ease of implementation of ideas provides enormous opportunities for creative imagination
A counter in a hotel or office reception, designed in the shape of a wave, will look interesting - it will definitely attract the attention of visitors. An original option for the home - open shelves for storing decor or unusually shaped books
Perhaps in the future there will be more models for playgrounds and rooms, gyms, and schools. A great way to change consumer perception is to offer relaxation furniture options. A corner where the standard space of an apartment or office is reminiscent of a sandy beach or sea surf can be quite easily realized using parameters. Modern technologies are a prerequisite for further individualization of furniture. In the future, each person will be able to decorate their home in accordance with personal needs and stylistic preferences.
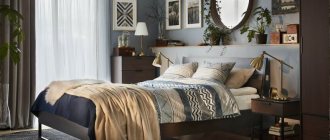
Furniture for home
Plywood furniture can be used in any room of a house or apartment. However, it is necessary to select products depending on operating conditions. For example, some rooms require furniture made of plywood that can withstand high humidity, while for others laminated material is not recommended.
Hallway and living room
For a hallway, plywood furniture is an excellent option, since the material is practical, strong and durable. A high level of wear resistance, good appearance and ease of restoration - these are the properties that furniture installed in a room such as a corridor, which is visited repeatedly every day by all household members, should have. For the hallway, furniture made from either laminated or bent plywood is suitable. These can be original tops, ottomans, banquettes, a couch or a dressing table.
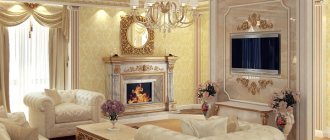
The living room is the central room of any house or apartment.
Therefore, it should attract attention, be cozy and practical. Upholstered furniture with a plywood frame, a coffee table, original shelves and racks would be appropriate.
This setting will look great in a country, Mediterranean, classic, or Provençal interior. Suitable for ethnic and modern styles.
Bedroom and children's room
The advantage of using plywood to make bedroom and children's furniture is the environmental safety of the material. For these premises, lumber of class no lower than E1 is recommended. Beds for children and adults, console tables, desks or computer tables, racks, cabinets, floor and wall shelves, dressing tables, chairs and armchairs are made from plywood. For safety reasons, it is recommended that all corners of children's furniture be rounded. The material can be painted or have a natural color and texture, or treated with stain or varnish.
1 of 5
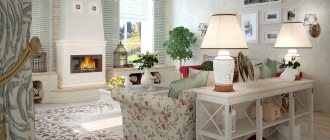
Kitchen, bathroom and loggia
The kitchen, bathroom and loggia are rooms with high humidity. In terms of its technical and aesthetic characteristics, moisture-resistant plywood can easily replace solid wood, chipboard and plastic. Furniture can be completely or partially (facades) made of plywood. Sets, tables, bar counters, shelves and cabinets can last quite a long time, especially if the material is treated with special protective compounds.
1 of 7
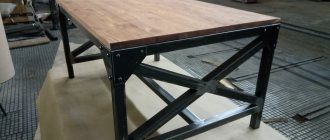
Manufacturing technology
The process of creating parametric furniture is very technological thanks to the use of computer programs in design and production. Accurate design calculations and process automation reduce the time from initial design development to the final result. On average, the production period takes from 5 to 20 days. The whole process can be divided into four stages:
- Creation of a furniture design project. To do this, it is necessary to take into account the external features of the product, its dimensions relative to the installation site, and select the material. A 3D model is created using design programs. If necessary, a scaled model is made from plasticine or plastic. All changes and adjustments are taken into account by the time the design project is approved.
- Preparation of design drawings and calculations for furniture production. Parametric programs calculate the load, the number of parts, their thickness, and the most rational way of laying them out on a plane. At this stage, the location of the fastening rods or studs, their number, and length are determined. All features of the model are taken into account, and a specification for coating or painting is prepared.
- The process of manufacturing the necessary parts. The program transmits information to a CNC machine, which cuts furniture elements according to specified parameters. Each part is sanded and coated with a protective compound. Depending on the location, three to five layers are applied. The varnish protects the surface from fading and moisture, and increases the service life of products. The prepared parts are grouped and prepared for assembly.
- Checking the design for quality. The furniture is assembled by checking the length of the fastening rods. Each of them begins and ends with carvings. Depending on the complexity of the configuration, one model may contain from 5 to 50 metal pins. The tested product is disassembled and transported to the installation site.
The advantages of computer-aided design are obvious. The furniture created according to the parameters exactly corresponds to the original project, is distinguished by its quality and ease of assembly. To extend the service life, and this primarily applies to objects located in public places, it is necessary to periodically check the tightening of the nuts and clean the surface of the structure from dust and dirt.
Creating a design projectPreparing drawingsSawing and assembly
Design quality check
Design of internal filling
The internal elements of the cabinet are vertical partitions, fixed and removable shelves, drawers and stiffening panels. The general principle of their installation is that each element is installed in a section formed by two vertical and two horizontal stationary partitions. The boundaries of sections do not necessarily have to be entire panels - one panel can be the boundary of several sections at once.
The first request when installing any internal content element is the request for the section in which it will be installed. All elements are installed from the rear edge of the cabinet, and their dimensions correspond to the dimensions of the section.
When installing vertical and horizontal panels, the depth of the panel is equal to the minimum depth of the dimensional elements of the section, reduced by the offset amount. The offset is the distance from the front end of the section's overall panel to the front end of the installed panel. For vertical panels, the offset is calculated from the horizontal boundaries of the section, and for horizontal panels, from the vertical boundaries.
The system defines the concept of a minimum section size - a distance closer than which two elements of the same type of internal filling cannot be located nearby. This allows you to control the correctness of the designer’s actions.
When installing elements, several additional options are provided to significantly speed up this process:
- explicit indication of the sizes of newly formed sections;
- if the marker is “snapped” to one of the extreme points of the panel, then it is automatically positioned on the side that is closer to the section border. In this case, the specified numerical value will be perceived as the width of the section that currently has a smaller width;
- If at any time before the command completes you set the number of panels, then exactly this number of panels will be uniformly installed in the specified section.
The rigidity panel is understood as a front panel that takes on all lateral loads that arise during operation of the cabinet. When installing, its positioning in depth is made from the rear edge of the cabinet. The rigidity panel is always placed between those vertical walls that are located between the bottom and the lid of the product, including between the side walls. All horizontal and vertical panels that completely or partially fall on the stiffening panel are automatically trimmed to its thickness. The following options for installing stiffener panels are possible:
- with a given offset from the rear edge of the cabinet. If the offset exceeds the depth of the cabinet, the stiffening panel is installed flush with the front cut;
- with positioning from the upper or lower horizontal partition;
- between specified levels within a section.
All three options for installing stiffening panels are shown in Fig. 9.
Rice. 9. Options for installing the stiffening panel
In addition to the listed stationary elements, shelves can be placed in the cabinet sections - horizontally located panels designed to accommodate various items. They are installed on shelf holders and are not load-bearing structural elements, so they can be easily removed without the use of any tools. The shelves are always placed evenly in the specified section with the specified side gaps.
Drawers can serve as elements of the internal filling of the cabinet. They come in various types and extension systems and are very often found on furniture products for a wide variety of purposes. A special command has been introduced into the BAZIS system that allows you to install boxes on a product model in an automated mode. It supports work with boxes of three main types of systems:
- drawers with roller, ball or hidden (TANDEM type) guides;
- BOX type extension system, which is a standard design in which the guides are part of the side walls;
- drawers made of linear material, in which the side and back walls are a single whole, and the drawers are completely finished drawers, only without a front.
To work with this command, you must first create a library of drawer systems and drawer designs. For this purpose, the BAZIS system includes a special module - the Box Master, in which a structured parametric library is formed.
The parameters for installing boxes on the model are grouped into four groups: design, dimensions, materials, settings. The box design selection window is shown in Fig. 10. When installing a box on a model, two options for the location of the facade are possible: overhead and inset. For an overlay facade, the distances from the outer sides of the right and left side fastening posts are specified, and for an inset facade, the gap between it and the sidewall and the depth are specified.
Rice. 10. Box design selection window
Rice. 11. Window for specifying box materials
The system allows the installation of drawers with fronts made of various materials. In Fig. Figure 11 shows the window for specifying materials with a table located on it, the number of rows in which is equal to the specified number of boxes. The first column of the table displays the serial number of the box, the second - the name of the material, and the third - its thickness. The materials from which the sides of the box and its bottom are made are specified in a similar way.
Lining the edges of the sides and the bottom of the box can be done in two ways - the facing material is glued either in a circle, that is, along all the ends of the panels, or only along the open ends. Open ends of panels are considered to be those to which no other panel is attached along the entire length.
The following methods of installing drawers are allowed in the BAZIS-Closet module:
- to section—boxes are evenly placed in the specified section;
- from the panel - drawers are installed from the upper border of the section and take up as much space as necessary; when using this installation option, control of the correct placement of their height falls on the designer;
- to the line - the lower boundary of the placement of boxes is the auxiliary line;
- from the line - the upper boundary of the placement of boxes is an auxiliary line;
- between the lines - both the upper and lower boundaries of the placement of boxes - there are auxiliary lines.
Peculiarities
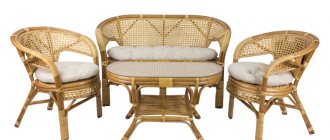
Furniture, as a smaller model of avant-garde urban architectural structures, suddenly began to gain popularity, but mainly among foreign consumers. It is used to decorate gardens and parks and to create modern interior design.
Today, the creation of parametric furniture from plywood and other wood materials is associated with eco-design. For this direction, saving natural resources is important, and models using computational design can be assembled practically from plywood production waste. They also meet other requirements of environmental design: they are natural, laconic, lightweight, they are created using the simplest possible materials, and they look great at the same time.
Such furniture is created from many figuratively cut plywood elements, fastened together using steel threads or strong thin rods. As a result, the product becomes like a layer cake. Such models belong to the avant-garde movement; they resemble art objects with irregular, smoothly flowing geometric shapes. Each piece of furniture has its own exclusive appearance, which can vaguely resemble animals or be completely abstract.
Modern computer technologies make it possible to calculate and see the future art object on a monitor surrounded by the interior into which its further integration is planned.
Parametric furniture has a wide range of applications:
- streets, gardens and parks;
- offices, playgrounds;
- private houses and apartments;
- restaurants, shopping centers;
- clubs and concert halls.
The unusual beauty of art objects fascinates and attracts. But they also have negative sides:
- not every interior is capable of accepting avant-garde furniture;
- its creation requires CNC machines, which means the work cannot be done privately;
- the cost of each model is quite high.
Making a sofa
The sofa and armchairs are made in the same order as the bed:
Cut out all the parts from plywood.
- Trim the back if it is curly.
- If desired, cut out the outlines of the legs.
- Carefully sand the cuts and remove all uneven surfaces.
- Glue the back and armrests together or connect them with nails.
- Attach the seat along the marked line.
- Decorate the armrests and backrest if you wish.
Soft parts
The chair and sofa can be made soft. If the doll is small and you have thick fabric (for example, cloth) at hand, you can simply cut out the soft parts of the seat and back and glue it. Moreover, the details can be of various shapes, from ordinary circles and rectangles to hearts, flowers, and diamonds.
If the sofa is large, you will need padding polyester or foam rubber. It is better to make the soft parts of the seat and back separately, and then glue them to the corresponding parts of the sofa. To do this you will need a cardboard frame:
- We cut out the frame in the same shape as the back or seat, but slightly smaller in size.
- We cut out a piece of thin foam rubber or padding polyester along it.
- We glue the gasket.
- We cut out rectangles from fabric - they are the same size as cardboard ones, but with allowances on all sides.
- We cut off the allowances at the corners.
- Apply glue to the allowances.
- We glue the upholstery onto the frame.
- Let it dry.
- Glue the soft parts to the sofa or chair.
What does ergonomics say?
At the furniture design stage, regardless of whether it is a stool or a kitchen set, ergonomic requirements are taken into account. Namely, it will be necessary to take into account the correspondence of furnishings to the anthropometric data of a person. Thus, when making furniture for children, the height category to which the child belongs is taken into account. When making chairs, tables, and kitchen furniture, average indicators calculated for the average person are taken into account.
Basic ergonomic requirements
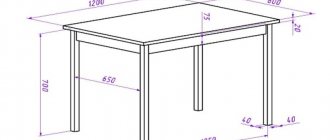
As an example, we can consider the requirements for the main parameters of a kitchen set:
- To draw up a sketch, first measure the height of the room, the length of the walls along which the set will be located, the distance to protruding elements: pipes, window sills, window openings, doors, mark the location of sockets, switches and ventilation holes.
- The standard dimensions of floor cabinets are 850 mm in height, 300 – 800 mm in width and no more than 500 mm in depth.
- The width of the wall cabinets is duplicated by those below, and the depth ranges from 300 to 350 mm. The height can be chosen so that there is a free space of 200 mm between the top of the cabinet and the ceiling. Some design solutions involve placing wall cabinets the entire height of the room.
- The height of the working apron is 600 - 650 mm.
Ergonomics in the kitchen
Ergonomics depending on human height
When developing a furniture project, you will need to take into account the area of the room and choose a place to install the furniture so that it does not interfere with movement around the room. Now there are a large number of computer programs that allow you to visualize a project under given conditions.
Computer program for visualizing a kitchen project
When developing a set of furniture, you will need to prepare explanations not only for the entire set, a wall of furniture or a set of children's furniture, but also for each item separately. Detailing should concern all elements.
Detail drawing of kitchen cabinets
For example, for a kitchen cabinet you will need to reflect the parameters of the back panel, side walls, front and shelves. If it is equipped with a drawer, then its detailing is carried out separately, noting the attachment points of the guides and handles, the dimensions of the sides, front and bottom.