Introduction
In this article we offer you a small master class - Do-it-yourself screen.
The design of the partition is not complicated and you will only spend a couple of evenings on it. The multifunctional screen is made of cedar boards and thin-layer plywood. This portable folding tri-fold screen easily creates a new living space in your room.
A screen for a room is made with your own hands by weaving strips of thin-layer plywood, which will be installed in simple cedar frames.
Fastened together with copper hinges, the screen sections can be installed in almost any room. It can be made to highlight a romantic dining area in a large living room. Or place a screen near a sunny window to create your own tranquil retreat without adding permanent walls. This decorative partition can be used in many ways, giving you plenty of room to be creative.
The instructions for building the screen explain how to make one section. Add as many additional sections as you need.
Materials used
To install the screen you will need:
- guide profile (aluminum can withstand heavy loads and will last longer);
- sheets of plastic or glass cut to size;
- silicone sealant;
- accessories: hinges, screws, etc.
Transparent materials are the most popular: they are economical and do not overload the interior. The most expensive option is tempered glass with a decorative pattern.
Plastic or polycarbonate
Plastic attracts with its variety of colors, decor and low price. It is practical, easier to work with at home: it is easy to cut, does not prick, etc. The main disadvantage of this material is that it will not last as long as glass or polycarbonate, it is easily scratched and quickly loses its appearance.
When choosing this material, keep in mind that plaque and dirt appear on it quickly. With insufficient care, the appearance becomes untidy and the surface becomes cloudy. Fungus or mold may appear.
Polycarbonate is a durable, versatile polymer. It is lightweight and impact-resistant, therefore safe and easy to install.
It is more practical in operation than plastic; it can easily withstand high humidity and temperature changes, which is why it is often used for making cabinets and screens. In appearance and durability, things made of polycarbonate are no worse than glass.
Glass
This material is not as impact-resistant as polycarbonate, although high-quality tempered glass comes close in this characteristic. The safest and most durable is triplex. The risk of injury when using it is minimal: if such glass breaks, it will not crumble into small and sharp fragments.
The remaining performance characteristics of this material are higher than those of plastic. Mold does not form on it; its surface can be easily cleaned with a special product and a cloth or paper napkin.
A transparent glass screen is a win-win option, suitable for any style of bath design.
How to decorate the wedding table of the bride and groom? Lemon vases for fragrant decoration
The first thing modern decorators pay attention to is the naturalness of the elements in everything. Paper garlands or artificial flowers, if possible, should be forgotten by decorators, like balloons. Of course, these are charming and cute, but if the wedding aims to be fashionable, it is better to refuse them
Of course, these are charming and cute, but if the wedding aims to be fashionable, it is better to abandon them.
A wedding composition for the newlyweds' table can be created by the designer from branches, stones, fresh flowers, pine needles, mosses, herbs and even sand. The designer will decide how to combine everything correctly and under what conditions. Think about what elements you would like to see on the newlyweds’ table so that it will be remembered not only for its brightness, but also for the originality of the image.
When decorating a wedding table for the newlyweds, you can’t do without fabric.
Rough fabrics, similar in appearance to burlap, are in perfect harmony for weddings in boho or rustic style. And delicate lace is an absolute favorite of traditional and formal celebrations.
Rough fabric and delicate flowers - sophisticated wedding table decor
Floral arrangements for decorating the newlyweds' table should not be oversaturated with unnecessary elements. An abundance of ribbons, garlands or beads will make their appearance heavier. Decorators are encouraged to move away from the classics of roses and lilies. And if you use these flowers, then in non-traditional forms. For example, place not a bouquet of ordinary roses in a vase, but fix a weaving branch on the table.
Summer wedding “beds” along the edge of the table can be decorated with delicate wildflowers and garden flowers. They can also be used in ordinary bouquets in a vase and in pots, if these are low-growing pansies or small carnations. The combination of moss and curly grass looks beautiful and natural.
Photo of the bride and groom's wedding table decorations - modesty of garden flowers in modern decor
In winter, add pine needles to the design. There is even the possibility of interestingly combining pine cones with available winter flowers. And more recently, designers began to use a florarium with succulents as an unusual accent.
In addition to living greenery, the newlyweds’ table should contain lamps of all shapes and sizes: open candles and in candlesticks, charming lanterns, light garlands as table and background decor. An outdoor wedding without a canopy can afford to install torch decorations. You need to be extremely careful with open fire. But the reflection of the flame on the table of the bride and groom at night will make it look like a fairy-tale event.
Candles and lanterns are a must-have evening decoration for the bride and groom's table
Another popular and fragrant decorative element is fruit. Bright citrus fruits - lemon, lime or orange - look especially good, emphasizing the main colors of the wedding - yellow, green or orange.
Modest but fragrant orange decor on the table for the bride
Photo of the wedding table of the newlyweds - fruit boom
Designers say that the blue, mint and lilac colors so beloved by brides and grooms can play a cruel joke and shade the skin of the newlyweds and guests in the most unpleasant way. Think warm, soft shades of peach or gray. Or vice versa, about bright, dark, rich blue, green or cherry colors in combination with classic white.
In any case, stick to the general style of the wedding. And simplicity of design does not mean the absence of a fresh idea.
Photo of wedding table decoration for the newlyweds - minimalism and discreet style
Screen-picture or just a little about storage
If the screen was made of thin rigid foam plastic (EPS), it, folded, can be stored in a very original way - on the wall, as a decorative panel. To do this, the front side of one of the outer wings of the partition is decorated accordingly - painted, using a fragment of photo wallpaper, or decorated in some other way. And on the opposite side, hangers are made - for example, from pieces of fabric, nylon threads or pieces of chain.
( 72 votes, average: 5.00 out of 5)
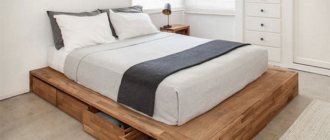
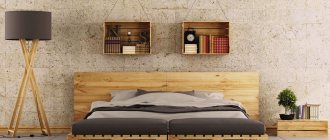
DIY bed headboard
How to choose bathroom furniture
Related Posts
The simplest screen on legs - step-by-step instructions
If you are building a folding partition at home, then to protect the floor you need to cover it with something: hardboard, greenhouse film, or at least a thick layer of newspaper. The sequence of work is expected to be as follows:
- Cut the pieces of timber to the required size. We fold the first frame, not forgetting to leave the legs, align the corners (exactly 90 degrees) and fasten them with furniture corners. We prepare the remaining frames in the same way.
- We tint the frames with stain in the desired color and dry them.
- We place one of the frames on the floor and stretch the prepared fabric (the edges are folded and ironed) over it. It is better to work together: while one person holds the edges of the fabric, the second secures it with a stapler. We leave the distance between the staples minimal - no more than 5-7 cm, otherwise the fabric will soon sag.
Installation of hinges - We connect the frames together with piano or door hinges, choosing one of two options: the screen will be folded in a zigzag or a semicircle.
- We coat the frame with varnish and glue the bearings to the ends of the legs.
Advice. If we take a thinner fabric, attach it in two layers - from the face and from the back of the screen - and between them lay out a heart or a flower from an LED strip, then when plugged into the network we will get a surprisingly festive accessory.
Sustainability
It must be borne in mind that the folding design of the screen loses stability if the opening angle of its doors is more than 150°. You need to focus on the limit of 135° - this will allow you to unfold the partition and “turn” it into a booth, since the reverse angle will be 90°.
The simplest limiters for the corner of the screen are made from laces or nylon threads. And if it is expected that the screen will often be folded and/or put away for storage, on the one hand, such limiters should be made detachable - with buttons or buttons.
Additional installation tips
The service life of the screen largely depends on the assembly. Accuracy of execution, accuracy of measurements and technical nuances are important here.
Before installation, think through all the details:
- Do you need a gap between the top edge and the ceiling to ventilate your shower stall.
- Is there a need to install an additional lamp in the water treatment area?
Pay special attention to the selection of metal fittings: rollers, hinges, fasteners, rubber bands, etc. Products of poor quality are not able to ensure trouble-free sliding or smooth opening of the sashes.
How to film a master class on your phone
Phones are becoming cooler, and their built-in video cameras allow you to take high-quality photos and video master classes. What to consider? What are the features of shooting MK on your phone?
- Monitor the lighting, add reflectors if necessary.
- Use a tripod or holder to avoid “shaking” in the frame.
- Check your video settings - the aspect ratio (frame size) must be 16:9 for further publication on YouTube. Resolution from 720p, better higher: 1080p, etc.
- Set your shooting to horizontal. Despite the fact that the frame can be rotated in editing programs, a vertical picture will greatly spoil your mood - something will not fit into the frame, will be the wrong size, etc.
Understand that there are no special separate rules about how to film master classes on your phone. Use all the recommendations for video shooting - and everything will work out. Test more, check.
Let's move on to the decor
Now let’s work on the fabric that will be used to fill the gaps of the screen. Using a stencil, we apply a design (for example, flowers) to a plain material. If you couldn’t come up with your own ornament, the template can always be found in various sources. The stencil is cut out with a wallpaper knife or scalpel.
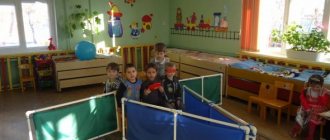
If you are making a children's screen, you can decorate it with your own hands with little animals or any “cartoon” motifs.
Dip a small roller into textile paint purchased in advance and roll the fabric over the stencil. It doesn't matter if the edges of the flowers come out slightly blurred. Each time we lay the sheet with the stencil on the fabric in an arbitrary direction, this will make the drawing more picturesque. In addition, the fabric can be additionally decorated with elements sewn on top (soft fabric flowers to match, for example, gauze).
The fabric is stretched over the frame and secured with a stapler. You can decorate the screen from the inside with platbands made of thin strips of fiberboard. By the way, it is not at all necessary to fill the screen panels with fabric. Instead, you can insert into the frames sheets of fiberboard or thin plywood (or even very thick cardboard), pre-pasted with wallpaper to match the walls or, on the contrary, with contrasting wallpaper. Just be careful not to get too colorful.
Loops
Screens are rarely stationary; Almost every item has to be folded like an accordion and hidden in a pantry/closet. In order for the screen to fold into a compact package, the hinges must be placed alternately on one and the other side of the sashes, see fig. At the top there the proportions are distorted for clarity. To ensure rigidity of the sash, the upper hinges are placed above the nearby cross member (frame beam); the lower ones are lower than the nearby one.
If the screen will be arranged as a booth, at the ends of the doors on the back side of the hinges you need to remove the bevels at 40-45 degrees; Please note - at the top and center in Fig. The bevels at the ends of the outer sashes are also shown conditionally, taking into account the installation of additional sections. If the screen is not extended, the ends of the outer sashes remain straight or are rounded as you wish.
About fabric covering
It is better to cover the screen frames by sewing covers or with ties (see above), rather than by attaching the fabric to the ends with a stapler. The cover is secured at the top with buttons or a zipper. Then you can remove the covering for washing and tighten the sagging fabric.
Comparative characteristics
You can buy ready-made solutions for decorating events, you can order the necessary elements to be made by craftsmen, you can rent or create the decoration yourself. To help you objectively choose which solution is best for you, please refer to the summary table
Decorating the background for the newlyweds - a fabric backdrop for a wedding.
Our experience, the ability to see beauty in the simplest things, the ability to feel the client, as well as a serious material and technical base - our own fabric warehouse, allow us to offer customers exactly the decor for the backdrop that best suits their individual requirements. At your request, we will create a cozy and romantic corner for two or, on the contrary, we will make the podium pompous, solemn, arousing the genuine admiration of guests.
Alternative option from cardboard tubes
When making screen partitions, any available means are used: plastic pipes, acrylic panels, bamboo branches and even CDs or records.
A screen-partition made of cardboard tubes, which is very similar to bamboo, only smoother, but just as environmentally friendly, looks original.
Take 16 to 20 pipes, decorative rope and paint to cover the frame. The tools you will need are a tape measure, scissors and a drill.
It’s easy to make a screen partition out of cardboard yourself:
- Pipe fitting. Cut the cardboard using scissors or a construction knife (you can alternate it to achieve a non-uniform effect). Lay out the structure in a row, fitting the bottom along one line.
- Marking. Make marks for holes on each pipe 20 cm from the bottom of the future screen-partition. Do the same 1 m from the top of the structure, focusing on the highest pipe (mark point B).
Make another point in the center of the partition and call it C. - Make holes. Using a drill at low speeds, drill holes strictly according to the markings on the partition screen.
- Connecting parts. Pass through points A, then B and C along the rope, slide the screen and tie the decorative thread securely.
The final stage is the processing of the partition screen with a coloring material. You can choose a light brown shade, and additionally draw “eyes”, like those of trees, imitating bamboo.
Design and installation
It is best to place a screen-partition for a room on symmetrical shortened legs with furniture bearings (anti-slip). These are the legs:
- will reduce the visibility of the space behind the screen;
- will increase the stability of the structure;
- will allow you to install the screen in any position without thinking too much about where the top is and where the bottom is (very convenient in a small room).
Important: You should not plan a screen without legs at all. It will get dirty faster and rub the floor. And it will probably be stuffy to be behind her.
What is needed for making
Lightweight screen partitions, made using a wooden frame, paper or fabric, are suitable for visual zoning of a room. When using a durable screen, you can achieve functionality: install small shelves for accessories, and, if necessary, hang clothes and bags on the top of the structure.
In order for the partition screen to serve for a long time and not cause trouble, at the project planning stage you need to take care of the availability of all materials. Necessary tools for a small screen partition of 3 sections with paper and fabric filler:
- dense textiles with a width of at least 0.5 m - to fill the gap in the structure;
- paper and tea leaves for aging - calculate the number of sheets based on their size, and take at least 5 tbsp of tea leaves. l. for 3 liters of water;
- timber for the frame with a section of 4 x 4 cm – 6 pcs. 2 m long and 6 pcs. short elements (0.5 – 1 m);
- nails and screws of different sizes;
- accompanying elements: PVA glue, wood varnish, paint brush, scissors;
- construction stapler, tape measure, screwdrivers, hammer, square to determine the accuracy of the design;
- door canopies – 4 pcs. small size for fastening sections;
- braid for decorating the joints of fabric and wood.
You can do without the help of a drill, but if you have a tool, it’s easy to screw the screws into the partition screen.
Instead of wood, bamboo rods, plastic profiles or aluminum are used, but working with them is somewhat more complicated than making a screen partition from bars.
The fabric-paper web will be replaced by sheets of drywall, which can be attached to the profile with small nails and self-tapping screws.
How to make a screen partition for a room with your own hands
Making a screen partition with your own hands using fabric is a simple process even for a person who has recently started creating homemade things for the home.
Moreover, a lightweight changing partition is an excellent opportunity to practice making simple furniture for your home.
When preparing materials for a partition screen, check the dimensions of the planned frame, fabrics and other components for filling the openings, take 3-4 cm more in width and height. It is best to cut the fabric from a common roll and try it on the made frame.
Before designing your own screen plan, explore a few ideas for creating functional and durable screens.
Frame making
After drawing up a sketch of the partition screen and calculating the dimensions, they begin to manufacture the frame:
- Adjustment of bars to size. The wood is sawn, the accuracy of the coincidence of the parallel and vertical slats of the screen-partition is checked.
- Wood processing. It is necessary to coat parts of the frame with primer and impregnation before joining the frame, so that the sides also absorb the protective substances.
- Connection of elements. You can use spikes by making grooves in each bar, like on zippers for clothes (suitable holes are sawn through each element). When the grooves are stuck into each other, they are coated with adhesive. The second option is to use nails and screws.
- Processing of the finished partition screen. Treat the wooden frame with stain and leave until completely dry.
You can make a screen-partition with legs, then the horizontal bars from below are attached 7-10 higher from the vertical wooden slats. In this way, 2 more sections of the partition screen are made if the structure consists of 3 parts.
Screen cloth
While the frame for the screen is drying, prepare the main canvas to fill the structure:
- Calculation. Calculate the width and length of the fabric pieces for the partition screen, add 4-5 cm in the areas of attachment to the partition frame. Choose the color of the fabric so that it matches the interior design, but does not show through the paper too much.
- Marking. Cut out 3 pieces to insert into the screen, decorate with paper pages or other elements. The pages are pre-soaked in tea for 2-3 hours, taken out and dried well. Iron the sheets.
- Gluing pages. Apply PVA glue to the paper, apply it to the textile and smooth it out. Make sure that the glue does not leak onto the fabric; it is very convenient to use a paint brush for this.
- Fabric fastening. Use a staple gun to secure the fabric to the screen. Both parts of the partition should dry well. The distance between brackets should be 4-5 cm.
Instead of a stapler, rubber-based glue or decorative loops are used to attach the canvas to the partition.
Remember that when connecting fabric to different compartments of the screen, it must be stretched well.
Special construction pins are also suitable for these purposes.
Screen assembly
The final stage is connecting the sections of the screen-partition. Pre-prepare hinges corresponding to the size of the frames and the expected weight of the partition screen. Start assembly:
- Mounting markings. Using a tape measure, mark the places where the loops will be located. The distance from the top and bottom borders should be the same for all sections.
- Installation of mechanisms. Using self-tapping screws and a drill (screwdriver), install the previously selected hinges.
- Varnish treatment. Paint - stain - is applied before joining the parts, but it is better to varnish after attaching all the elements.
- Processing with finishing details. Using braid, connect the places where the fabric is attached to the wood - glue it using PVA or rubber glue. It is important to ensure the straight position of the braid parallel to the wood of the frame.
After 1-2 days you can start using the screen. In addition to the fabric, if desired, pockets are attached in which various small items are stored. The main thing is that the partition can withstand the weight.