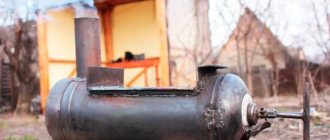
An old gas cylinder is one of the most useful things in the household. They make a lot of things out of it: stoves, potbelly stoves, barbecues and barbecues. and all because the form is almost ready. There are still minor alterations that only take a few hours. For example, you can make a barbecue from a gas cylinder with your own hands in three to four hours (this is if you don’t make the legs).
If desired, the grill can be decorated very attractively, for example, in the form of a steam locomotive
Cylinder markings
Most often, a 50-liter propane cylinder is used for a fryer. This results in the optimal size for preparing 6 servings of shish kebab. These products are standard, so the markings will be common for everyone.
The outer diameter of the cylinder is 96 cm. It is perfectly divided into 4: it turns out to be 24 cm. There is also a mark against which it is convenient to make markings: this is the longitudinal seam. It is worth setting aside all distances in relation to it: then everything will be smooth, without distortions.
First, we set aside 24 cm from the seam in both directions and draw lines. Having placed the cylinder horizontally, seam down, on one of the lines we make markings for skewers. We retreat 3 cm from the circular seams on the right and left, and then put marks every 8 cm. We get 6 marks. You will need to drill holes in them with a diameter of about 1 cm.
From the line on which the markings were made we put 10 cm upward (from the middle seam it will be 34 cm). This is where the lid of our grill will end.
Marking a gas cylinder for barbecue
Next we mark the lid itself. This will be the distance between the first line you marked and the one you just drew. Between them, departing 3 cm from the circular welds, we draw lines. We drew a barbecue lid on the cylinder. It takes up less than half the diameter (in the photo it turned out below).
Read how to make a barbecue from sheet metal here.
Making a grill from a gas cylinder
We carry out all these manipulations with a cylinder filled with water. We marked it, and first of all we cut it along the line to which the lid will be attached (look at the photo below). Just remember: when cutting the balloon, do not reach 3 cm from the circular seams.
Once you have made a cut along the entire length of this line, stop. There is no need to cut further yet: we will immediately weld the hinges.
If you first cut off the entire lid, it will be difficult to weld the hinges: you will have to somehow fix the lid, keep it at the same distance. It is impossible to do this alone; you will need an assistant. Stopping after the first cut along the line, it is easy to do everything alone.
Having made the first cut along the top of the lid, we immediately weld the hinges
Having welded the hinges, we continue to work with an angle grinder - we cut off the door, but it turns and does not fall. Now you can empty the water from the tank.
Read about how to cook with an inverter welding machine here.
Next, so that the open lid does not fall back and break the hinges, we weld pieces of the corner along the cut line between the hinges (see photo below). A width of 3-4 cm is enough, and cut off the corner as you like - 40*40 mm or 50*50 mm. Such stops are needed on both sides of the cover - right and left.
The distance to which the lid will open is changed by straightening the corners. Choose a distance so that it is convenient for you to close it - you don’t have to lean forward to reach the handle. But at the same time, you shouldn’t push it too far forward, so that it doesn’t slam shut and hit your hand.
We weld a piece of corner between the hinges - this will be a stopper for the lid
The remaining bottom rim can be easily removed by making a cut. It is advisable not to touch the side (circular) seams. They contain sealing rings that rigidly hold the entire structure of the barbecue. That is why, when marking the lid, we stepped back a few centimeters from them: so that the grill was durable and reliable.
We attach a handle to the lid. She can be anyone. If there is something suitable in the stash, we use it; no, we can simply weld a piece of appropriately bent fittings. It would be advisable to add another piece of wood so that you can handle it with your hand.
The next step when making a barbecue from a gas cylinder is necessary to ensure that the lid does not fall inside. To do this, we cut out a strip about 3 cm wide from metal 1-3 mm thick. And weld it to the cutout in the cylinder.
From the inside, around the entire perimeter, we weld a strip of metal that will prevent the lid from falling through
Next, according to the previously applied marks, we drill holes for the skewers.
Previously, we made marks every 8 cm. Now we drill holes along them
On the other side, on the welded plate opposite each of the holes, we make cuts. This is also a place for skewers.
The next step is to cut slots on the bottom for air intake. The design of the barbecue is closed, and without this, firewood and coals will burn poorly. Therefore, we turn the grill upside down, and set aside 10 cm from the seam on both sides. Next, from each of these lines we set aside another 10-12 cm and also draw lines. It turned out that at an equal distance from the central seam, we have two strips 10 cm wide. In these strips, we cut holes for air supply every 5 cm with a grinder. If you wish, you can drill holes instead of making strips, but there should be a lot of them, and making the strips will take less time.
This is what the markings for the air supply holes look like
About why the holes are not made at the very bottom. Firstly, it is not advisable to touch the seam. It gives rigidity to the structure. Secondly, any holes at the bottom quickly become clogged with fat mixed with ash and ash. Then this mixture smokes heavily, and air flows through the clogged holes very poorly, you have to constantly fan the firewood and coals and often clean the holes.
The final touch is to cut off the tap and weld the hole.
We cut off the tap, apply a patch and weld it
The grill itself from a gas cylinder is already ready. All that remains is to attach the legs. How - read a couple of points below.
What should be the result: a grill made from a gas cylinder with a lid
Read how to make a barbecue from sheet iron here.
Simple design
The option described above is convenient, but quite difficult to manufacture. Everything can be made simpler. The easiest way is to cut a propane tank in half lengthwise, cut skewer-like indentations along the edges, drill holes in the sides for air intake and attach legs. That's all the work.
The simplest grill from a propane cylinder
If you want to make a grill with a lid, the second half is welded onto the hinges. And so that the lid does not fall through, a strip of metal 3 cm wide is welded to it along the outer and side sides (in the previous version, the strip was welded to the body, and not to the lid).
To prevent the open lid from falling, a piece of chain is sometimes used as a stopper. A piece of the required length is welded on the right and left. But the option with stops at the back is much more practical: the chain gets tangled and dirty: when the lid is closed, it ends up inside the grill.
Dangers
When making a grill from a regular cylinder, you need to take into account potential hazards that may affect the quality of the product, namely:
- Poorly performed welding work will certainly affect the strength of the grill. If you are not competent in this matter, it is best to use the services of experienced specialists.
- By using a heat-resistant coating for your product , you will significantly improve its aesthetic appearance.
- The finished structure will have an impressive weight , which will affect the ease of transportation.
Consider the above nuances when making your own barbecue.
Barbecue from a barrel
It is advisable to find a barrel of almost the same volume - 50-60 liters - this is the optimal size. Moreover, its diameter should not be too large: skewers are usually 50-60 cm long. In order for them to lie tightly on the frying pan, there should be at least 10-12 cm of free length. So it turns out that the diameter of the barrel should not be more than 40-50 cm.
Barbeque made from a barrel with a lid. Manufacturing down to the smallest detail coincides with the process when using a gas cylinder
If it is wider, there are two options - make skewers according to the required dimensions or weld a corner on the far side from the inside on which to rest their tips. You won’t be able to win much, but 5-6 cm, depending on the size of the corner, can be won back.
Barrels must have walls at least 2-3 mm thick. Of course, you can’t use fuel containers. Nothing can burn them out to such an extent that you can cook food.
The sequence of making a brazier from a barrel is no different from those described above. Only the preparatory stage goes away by itself - there is no need to fill it with water. With very different sizes, you will need to make adjustments to the markings - down or up - see for yourself.
You can also make the simplest barbecue from a barrel - weld the legs to a container cut along the length and cut grooves for skewers along the edges
They make very functional barbecues from barrels - add a container for coal or firewood next to it (also with a lid). One of these is in the photo.
Barbecue from a barrel with a container for coal
Although, no one bothers you to make the same one from a cylinder: next to the 50-liter propane one, attach it in exactly the same way, but with a capacity of 27 liters.
Brazier made from propane cylinders with a container for coal or firewood
Tools needed for work
To work quickly, you need to prepare the appropriate tool. You will need a set of home craftsman tools, as well as a few additional things:
- grinder or grinder;
- welding machine of any type;
- personal protective equipment, glasses, gloves;
- metal door hinges in the amount of 3 to 5 pieces;
- rivet gun, rivets;
- chisel, hammer;
- screwdriver, adjustable wrench;
- drill with a set of drills (a 10-12 mm drill is required);
- chimney pipes and legs, the latter using materials from unused sewing machines.
Using tools requires certain skills; the material of gas containers is quite thick, not every novice master will be able to competently saw and weld metal.
Brazier made from a pipe and with a pipe
Building a brazier from a pipe is a little more difficult. In the sense that you will need to weld the ends. All other operations are no different. Even the designs are exactly the same.
Barbecues made from pipes - manufacturing will require a little more time: you need to weld the sides
But using a pipe has its advantages: since we’re going to weld the sides anyway, why not make a door (pictured on the left). You can use an old one from the stove - you can put firewood through it, and also regulate the air supply while the coals are “cooking”.
Brazier with pipe
To ensure better draft and so that smoke does not disturb those nearby, you can attach a smoke exhaust pipe to the side of the barbecue from a cylinder, pipe or barrel. This will add more work, but not very much. But it will be more comfortable to use: the smoke is good on a barbecue, but you don’t want to breathe it at all.
Barbecues with a pipe are more comfortable - the smoke goes up. You can also arrange everything in different ways.
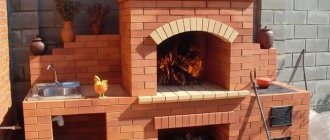
Read about how to make a simple brick grill here.
Which wood chips are suitable for what?
In order for the smoking result to please you, the wood chips must be:
- equal in size to produce uniform smoke;
- large enough - small ones produce a lot of burning, which worsens the taste;
- moistened so that it burns gradually without drying out the product.
A few recommendations that will make your dishes even tastier or save you from disappointment:
- The best wood for successful smoking is considered to be aspen, alder, and fruit trees.
- Coniferous wood chips and sawdust are much easier to find, but it is better not to use them. They produce a lot of soot, and the product is imbued with a pungent, inedible odor.
- When preparing wood chips yourself, you need to remove bark from it, wood spoiled by fungus or bark beetle.
- Before use, part of the wood chips is soaked for 1-2 hours.
- For hot smoking, wet wood chips are loaded into the firebox and roasting pan; for cold smoking, sawdust is used.
- Twigs of shrubs and herbs will add an original aroma. Try sage, mint, rosemary, almond, eucalyptus, bay.
Which wood chips will best reveal the taste of the dish:
| Alder | universal for all products, especially good for fatty fish |
| Fruit: apple, plum, cherry, apricot, peach | suitable for most products: meat, poultry, lard, vegetables |
| Cherry | poultry, pork, cheese, vegetables |
| Pear | lean fish, game, meat, cheese |
| Oak | beef, sausages |
| Juniper | meat, lard |
| Beech | meat, poultry, sausages, fatty fish |
| Ash | meat, poultry |
| Aspen | usually used as a mixture |
Conduct your own experiments, try combinations.
Barbecue grill
It’s not always possible to put everything on skewers. Then you need a grill or barbecue grate. If you want to have something similar, then instead of welding a strip of metal along the long side of the barbecue body, weld not a strip of metal, but a 30*30 mm corner. You will receive a shelf on which you can place the grill. The grate itself can be welded from a rod.
Barbecue grill made from a gas cylinder
As an option, you can make a support for the grill by welding pieces of corners 3-4 cm wide just below the door level.
The video shows the design of a barbecue made from three gas cylinders, which can be both a barbecue and a smokehouse. Very clever design. Look! Healthy!
Making barbecue from brick is described here.
Smoking methods
There are two main methods for smoking: hot and cold. They differ:
- according to the temperature maintained in the smoking chamber;
- smoking time of products;
- shelf life of the processed product.
| Characteristic | Hot | Cold |
| Temperature, оС | up to 100 | 19 — 25 |
| Time watch | 4 — 8 | 24 — 72 |
| Shelf life, months | up to 2 | 2 — 6 |
Differences between hot and cold smoking
If the temperature or cooking time falls between these parameters, you will get a semi-hot smoked dish.
Smoking fish
For cold smoking, which lasts several days, the products are pre-processed: salted or boiled.
Making legs
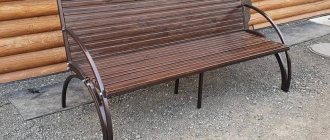
They can be made from a corner, a round or profile pipe, fittings, or a strip of thick metal. Use what you have on the farm. Some ideas are in the photo below.
The simplest legs made from a pipe and a corner were welded to the bottom. You can make spacers at the bottom and place a shelf on them
Almost the same can be done from thick steel strips.
Legs made of thick metal strips
Comfortable legs for a barbecue made from a propane cylinder can be made from a profile pipe. They can be shaped like an inverted "T" and welded to the middle. You can make a support in the form of a frame by making a shelf (or several shelves) at the bottom for firewood, bowls, etc.
Legs made of a profile pipe for a barbecue made from a gas cylinder
You can make the legs from round pipe and/or fittings. If you want to have a portable grill, then small pieces of fittings are welded to the body, and pieces of pipes of suitable diameter are placed on them (the internal diameter of the pipes is slightly larger than the outer diameter of the fittings). You can do the opposite: weld pieces of pipes and insert fittings.
How to make legs for a barbecue from pipes and fittings
Just keep in mind that with such legs it will be difficult to move it: the legs will fall out. To avoid this, cut a thread.
See a video example of making one of the homemade barbecues from a propane cylinder below.
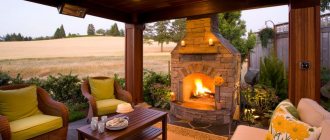
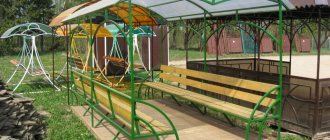
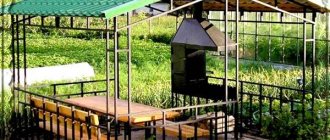
Read how to build a summer kitchen here. Maybe you need to build a gazebo where you can enjoy barbecue? Read about the construction of a metal gazebo here (with a photo report).
Preparatory actions
At this stage, a gas cylinder is selected, diagrams or drawings with dimensions, materials and tools are prepared.
Barbecue diagram
This is a fairly simple structure. To create it, you do not need complex drawings, but it is advisable to make a diagram with dimensions. This will help determine the amount of materials required and plan the order of actions.
You can also consider the drawings offered online: they will help make useful changes to the proposed version of the barbecue, improve it or simplify the manufacturing process
What you need
In addition to the cylinder itself, you will need the following materials:
- sections of angles and pipes made of steel;
- door hinges;
- metal handles (they are needed for the lid);
- for a chimney: pipe with an elbow (at an angle of 90 degrees) - diameter 100 mm;
- bolts and nuts;
- materials for decorating and finishing the structure - primer, solvent, paint, selected decor, etc.
Tools needed:
- welding transformer;
- grinder (angle grinder), as well as cleaning and cutting discs for it;
- electrodes with a diameter of 3–4 mm;
- electric drill and metal drills;
- clamps - necessary for securing metal parts;
- long metal ruler;
- core;
- brushes for painting the grill (you can also use a brush attachment on a drill to simplify the painting process);
- gas, adjustable wrenches and a set of wrenches.
Cylinder selection
A cylinder with a capacity of 50 liters is suitable. Its design allows you to use skewers over their entire length, making it faster to cook for a large number of people.
If you need a mobile and lightweight barbecue, take a 27 liter cylinder.
The wall thickness of such containers is at least three millimeters, so even those products that have been outside for a long time can most likely be used. The main thing is to check for corrosion. If it is, it is better not to take such a cylinder.
Safety rules when working with cylinders
When working with gas cylinders, follow three simple safety rules:
- Do not use the angle grinder until you are sure there are no hazardous substances inside the cylinder. An unscrewed valve of the container and the absence of gas in it is a sign that the pressure inside is already equal to atmospheric pressure, but not always that the cylinder is safe. Often condensation and gasoline remain in it. These substances must be removed. They do this:
- turn the container over to drain any remaining hazardous substances;
- return to normal position and fill with water;
- wait 2–3 days;
- drain the liquid - after this the cylinder becomes completely safe to work with.
Before opening the cylinder, all contents must be removed from it.
- When welding or cutting metal, do not forget to protect your hands and eyes, and use special clothing.
- Work outdoors or in a spacious, well-ventilated area free of children or pets.