The barbecue is an integral part of organizing trips to nature, relaxing in the countryside and receiving guests in a country house. It has become a tradition for many families to gather together at the table to the fragrant smell of cooking barbecue. However, more and more often, men (and we know that they are the ones who prepare the best kebabs) do not so much compete in the quality of cooking meat as they brag about the functions and appearance of the technical “filling” of this process - the barbecue. Many people are no longer so interested in buying a “leaky box with legs”, but want to make something special. A brazier made from a gas cylinder, although at first glance seems like ordinary scrap metal, copes with its tasks much more effectively than other industrial designs. In this article, we will consider in detail all the stages of work associated with the self-assembly of the finished product, including preparing the cylinders, marking them and cutting them, and also provide useful tips for working with such homemade equipment.
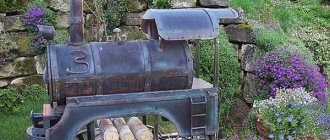
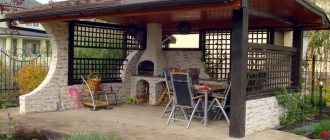
When looking at such a work of art, you don’t immediately realize that this multifunctional grill is made from recycled materials
Types and principles of operation of barbecues
The design is an open device or a closed system used for lighting a fire for the purpose of heat treatment of meat, vegetable, fish ingredients and subsequent preparation of various dishes.
The classic grill contains a set of skewers and grooves for installation. The device has high heat resistance. Any type of smokehouse maintains geometric stability under conditions of regular thermal shock and prolonged heating to extreme temperatures.
The design provides technological openings of small diameter through which atmospheric air penetrates, necessary to maintain the chemical combustion reaction. The model, design and dimensions of the fryer are chosen based on your own needs and the workpiece used.
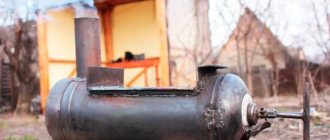
A barbecue made from a gas cylinder with a smokehouse is intended for use in open spaces - in the courtyard of a private house, on the shore of a reservoir, in a forest clearing.
Factory models are equipped with:
- a set of skewers;
- poker;
- scoop;
- wire brush and other accessories.
It is recommended to equip a handmade product with similar accessories. Standard gas cylinders have a volume of 5, 12, 27 or 50 liters. To make an improvised brazier, mainly tanks with a capacity of 50 and 27 liters are used.
The operating principle of the device depends on your own needs. In a product intended for hot smoking, the flame and smoke source are located in close proximity to the product being processed.
A lower temperature effect is provided by a distance of 50-70 cm. This is necessary for the cold smoking procedure. The temperature can be controlled by a system of pipes and dampers. Below are the types of Dutch ovens available for DIY.
Brazier
The classic version is a rectangular product. When manufactured independently, taking into account the round cross-section of the gas cylinder, the device can be given a streamlined geometric configuration.
The walls of the improvised brazier made of heat-resistant metal are intended for laying out skewers on which to string:
- pieces of meat;
- bird;
- sausages;
- slices of vegetables;
- mushrooms or other products intended for heat treatment.
Most of the heat obtained from the burned material is stored inside the container and is not blown away by the wind. The barbecue differs from other types of braziers in that it prepares dishes using skewers. The rectangular shape allows them to be placed rationally and sustainably.
Smokehouse
Structurally more complex than the previous version. The smokehouse is a two-level device with a hermetically sealed lid. In the lower segment of the structure there is a chamber for storing fuel, in the upper segment there is a compartment for hot-smoked processed products.
The lid is necessary to achieve the desired temperature and high smoke concentration. Firewood or charcoal is used as fuel. Such burned materials fill the processed products with a special aroma and pleasant taste.
Hot and cold smoking devices differ:
- the temperature created in the combustion chamber;
- estimated processing time for products;
- shelf life of dishes exposed to heat;
- location of the fuel compartment.
In a hot smoking unit, the combustion chamber is located directly under the compartment with the dishes being processed. In a device designed to operate at lower temperatures, the fuel compartment is moved to the side. The smoke enters the chamber with the food through a pipe, managing to cool somewhat along the way.
Comparative table of hot and cold smoking parameters:
| Characteristic | Hot heat treatment | Cold smoking |
| Temperature Range | 80-120°С | 40-60°С |
| Cooking time | 5-10 h | 2-3 days. |
| Shelf life of smoked products | Up to 60 days | 3-6 months |
A barbecue made from a gas cylinder with a smokehouse provides for adjustable dampers and keeping the prepared dish in a smoke-filled chamber to saturate it with combustion products of wood fuel.
B-B-Q
The design is a special oven, which is designed for frying meat over smoldering coals. Fuel is placed inside the brazier to burn and produce thermal energy.
A metal grid is installed in the upper plane of the device, on which sliced slices of meat or fish ingredients are laid out. A round gas cylinder will make a classic shaped barbecue.
For ease of movement and use, the device is equipped with small wheels and an additional lattice table installed at the bottom of the product for laying out dishes, containers with seasonings, and cutlery.
Factory models are equipped with special tongs for turning hot pieces of meat, a kitchen spatula and other accessories. The principle of operation of a barbecue is similar to a classic barbecue.
The difference lies only in the replacement of skewers with a grid, which determines the design features. A barbecue is inferior in efficiency to a classic roasting pan with a lid and is not suitable for cooking kebabs.
Therefore, it is less popular than a standard grill or a unit with a lid that retains heat in the internal space. There are special requirements for the fuel used. The firewood must be approximately the same size so that it burns synchronously.
Grill
An improved and modernized version of the previous roaster. It differs from a barbecue in the shape and presence of a lid that retains heat in the internal space. The cooking principle is similar, but the energy efficiency is much higher with a grill.
The hermetically sealed hinged lid allows you to regulate the temperature. Suitable for frying, smoking and baking dishes. The main feature of the grill is to give food products a special taste, rich aroma and crispy golden crust.
The unit, by increasing the temperature in the internal space, makes it possible to reduce oil consumption compared to traditional frying in a frying pan or in the oven. Grilled dishes are considered dietary, but are somewhat inferior in quality to steamed food.
Smoker
The most difficult version of the roaster to make yourself. The multifunctional device consists of several separate compartments, which allows the unit to be used for different types of thermal processing of food products.
In a smoker, dishes are cooked at a relatively low temperature in an isolated environment of the internal space, which is ensured by a tightly closing lid. The unit is equipped with a grid for laying out pieces of meat or fish, slices of vegetables and other ingredients.
Unlike grills and barbecues that are similar in design, a smoker heat treats the contents with indirect heat. The meat is evenly baked in it with the formation of characteristic smoke rings. As a result, the dish turns out soft and delicate in taste.
The unit is made by hand from a gas cylinder, large-diameter pipe sections, and sheet steel. The device consists of 2 or 3 sequentially located chambers, the lowest of which plays the role of a firebox.
Important manufacturing nuances
How to open the cylinder?
Safety comes first, so cutting the cylinder is allowed only after it has been opened.
This procedure refers to the process of removing gas residues. Take this seriously, because your life may depend on how well you clean the vessel. The process follows the following algorithm:
- Lather the hole near the valve.
- Turn the cylinder upside down and unscrew the valve. Since air is lighter than gas, the latter will fall down, the remainder will go through the valve. The appearance of bubbles means that gas is escaping from the container.
- Fill the container with water and rinse thoroughly to completely remove the substance.
How to paint the grill?
The need for painting is due to the fact that the grill will be outdoors for quite a long time, and therefore will be exposed to external factors. There is a high probability of corrosion and rust occurring. Currently, there are three ways to protect the surface of the grill:
- Application of heat-resistant paints that can withstand temperatures above 600–800 degrees. They are non-toxic, that is, when heated, they do not emit substances harmful to the human body. Such products are varied in color.
- Use of heat-resistant powder paints. To apply them, a high-temperature drying chamber is required.
- Oxidation (bluing). This is a chemical process that results in the surface becoming a deep black color and becoming resistant to rust.
Of the listed options, the first one is the most accessible.
Preparation of materials
The material used is a propane cylinder that can withstand extremely high temperatures and high pressure. The set of necessary tools and additional materials varies greatly depending on the chosen design, equipment and desired design.
A barbecue made from a gas cylinder with a smokehouse in the simplest version will require:
- a preliminary detailed drawing indicating the exact dimensions;
- welding machine with electrodes with a diameter of 3-4 mm;
- door hinges for attaching the movable cover;
- electric screwdriver;
- screwdrivers with a flat blade;
- pliers;
- metal handles;
- an extendable wrench with long handles that create a large leverage;
- circular saw with metal discs;
- hacksaws;
- electric drills with a set of drills of different diameters;
- large file;
- sandpaper;
- reinforcing bars;
- brushes for sweeping away metal shavings;
- hammer;
- chisels;
- center punch;
- personal protective equipment – special construction seals, welding mask;
- paint and varnish and finishing materials – primer composition, fire-resistant paint, solvent;
- fastening elements - screws, bolts, nuts, steel angles and profiles, rivets.
- grate;
- steel hooks.
The appropriate size of the adjustable wrench is selected in accordance with the diameter of the existing body blank. Usually a tool with an extension range of 27-40 mm is sufficient. Additionally, you will need durable metal elements to make mounting supports or wheels, which will give the fryer mobility, ease of use, and functionality.
The material must have adequate strength to withstand the weight of the structure itself and auxiliary devices - fuel, skewers, food. It is recommended to choose a pipe with a diameter of at least 10 mm.
To secure the metal parts, you will need a clamp, and for measurements, you will need a tool steel ruler. Depending on the design of the fryer, 2-3 gas cylinders will be needed. The best option for making a housing is a propane container with a capacity of 50 liters and a height of 120 cm.
How to paint it “cheaply and forever”
A metal structure must be painted for both aesthetic and practical reasons. Unprotected steel will quickly rust, which will not add either beauty or durability to the structure. Any heat-resistant paint intended for car mufflers is best suited for painting a barbecue, but its high price and complex application technology do not allow us to call this option ideal. Silicone-based paints, specially created for painting metal stoves, fireplaces, barbecues and barbecues, have the same disadvantages.
A cheap and practical material is Kuzbass varnish and similar mineral compositions based on bitumen resins.
Painting will hide all manufacturing flaws and make the design complete.
The coating should be done in 3-4 layers, with complete intermediate drying after each application. Of course, there is no need to paint the inner surface of the grill - a coating of soot, on the contrary, will help to obtain an ideal product.
The disadvantages of this method are long drying times and unpleasant, toxic fumes. In addition, the paint remains fragile for a long time, so it requires careful handling. The first 2-3 firings are best done “idle”. This will eliminate the odor and make the coating more durable and safe. Once the mineral composition is sintered, it will be very difficult to damage it. Practice shows that such a composition does not require updating for decades.
What cylinders can be used?
A product of the AG-50 brand of the corresponding displacement is best suited. Its height is 640 mm, diameter – 300 mm, weight – 17 kg. From such a cylinder you can make a grill of a size sufficient to store a large amount of food. The model has a cylindrical shape.
To make a relatively small barbecue, a propane-butane mixture cylinder with a volume of 27 liters is suitable. The advantages of such a roaster are its compactness and ease of storage.
It is advisable to select a cylinder without traces of corrosion on the body.
To make a stove for a cauldron with a rounded bottom, you can limit yourself to a model with a volume of 20 liters. Such cylinders are installed in vehicles and used for storing and supplying medical oxygen. The wall thickness of such products is 3 mm or more.
Dangers
When making a grill from a regular cylinder, you need to take into account potential hazards that may affect the quality of the product, namely:
- Poorly performed welding work will certainly affect the strength of the grill. If you are not competent in this matter, it is best to use the services of experienced specialists.
- By using a heat-resistant coating for your product, you will significantly improve its aesthetic appearance.
- The finished structure will have an impressive weight, which will affect the ease of transportation.
Consider the above nuances when making your own barbecue.
Preparation and work with the cylinder
The durability, operational reliability and functional characteristics of a homemade fryer largely depend on the quality of the work performed. The tank is pre-prepared for transformation into a barbecue body.
They sequentially clean the product and drain the remaining gas mixture, marking and cutting. The cylinder must be checked for traces of rust, dents and cracks. If there are corrosive areas, they are cleaned with sandpaper. It is not recommended to use a product with cracks in the case.
Removing gas residues
An extremely important procedure in terms of compliance with safety regulations. When cutting a cylinder, the gas mixture may explode or ignite. Work on releasing hazardous substances should be carried out in an open space away from residential premises, people and pets.
The gas mixtures used in such products are highly toxic, explosive and emit a strong, unpleasant odor. To completely bleed the substance, you need to unscrew the valve all the way with an adjustable wrench. The volatile mixture will gradually dissipate on its own. Waiting time – 2-3 days.
You can start making a barbecue from a cylinder only after the dangerous gas substance has been completely released. The future unit with a smokehouse involves the use of a body blank that has been finally cleaned of the propane-butane mixture.
Otherwise, when working with an angle grinder or a welding machine, there is a high probability of an explosion. Check whether gas is flowing using a soap solution. Cover the valve with it and observe whether bubbles form. If they are not present, the mixture is completely removed.
Condensation settles on the inner walls of the cylinder. It is drained by turning the product over with the outlet hole facing down. The dangerous liquid will leak out on its own within a few hours. Then you need to remove the valve and fill the bottle with water.
The procedure ensures the final removal of volatile explosive residues. Drain the water away from residential premises and cultivated plants. The liquid contains sulfur analogues of alcohol, which are highly toxic.
It can be difficult to remove the valve from an old cylinder. In this case, it is carefully cut off with a hacksaw. The final procedure for removing a hazardous substance involves testing with an open flame. When a match or lighter is placed near the outlet, there should be no fire.
Marking work
Use a marker or chalk, a metal ruler. It can be difficult to apply markings on curved and rounded surfaces. To create lines in accordance with the drawing, you can use a measuring tool made of soft and elastic material.
The diameter of a gas cylinder with a volume of 50 liters is 96 cm. When applying marking lines and choosing a ruler, the features of the geometric configuration of the workpiece, its overall parameters, the passage of welds, the placement and number of technological holes are taken into account.
Cylinder cutting
Use a gas cutter or a circular saw with a metal cutting disc. Mark the outline of the lid along the lines previously drawn with a marker or chalk. It is recommended to make an indent of 5-6 cm from the weld seam connecting the side surfaces of the cylinder with the bottom and upper end surface.
The hole for the lid is cut in a circle, trying to maintain a perpendicular position of the cutting disc in relation to the workpiece. If the walls are too thick and the diameter of the cylinder is too large, the tool may become unusable before the work is completed.
Cooling with water and leisurely cutting will help to avoid burning the disc. In some areas, the cut can be done incompletely to save tools. The body segment is knocked out with a chisel and hammer. To make a homemade roasting pan, you need to remove almost the entire side surface, the place of which will be taken by the lid.
Installation of a chimney pipe for a barbecue
The chimney pipe is not a mandatory element of our homemade barbecue, but it gives a more aesthetic appearance and works as a regulator of the degree of smokedness of the prepared product.
A pipe with an outer diameter of 90 m is quite suitable for the manufacture of this element. and length 70cm. Since factory corners have a very smooth turn, you can weld an acute corner yourself by first cutting out a pipe segment, which is marked from the turning point using a square in two directions at 45 degrees around the circumference of the pipe. Having cut out a segment with a grinder, we bend the smaller part to the larger one, use a corner to check the angle of 90 degrees and weld them in place. After this, we position the pipe to the welding site, where we installed the damper, and weld the pipe well in a circle. It should be noted that each seam must be cleaned with a cleaning disc. This way it takes on a more aesthetic appearance and the quality of the weld is clearly visible.
When the pipe is welded, install a protective cap. It is secured with a clamping bolt.
Device without cover
Grooves are cut in the upper plane for installing skewers. An approximate drawing with dimensions can be drawn up on paper or in a graphics editor if you have skills in working with 3D modeling programs. To make such a simple design, great precision is not required.
A barbecue made from a gas cylinder with a smokehouse will require a more detailed diagram, since it assumes the presence of an insulated compartment with technological holes for access of combustion-supporting oxygen with atmospheric air. A 50 liter container will make a roasting pan with a total height of 300 mm.
The size of the side plane cut out for installation of skewers reaches 92 cm, taking into account the distance from the end surface where the valve was originally located. The length of the lower plane of the product, in which it is necessary to weld the legs or the structure of reinforcing bars for the wheels, is 980 mm. The height of the end part reaches 15 cm.
These dimensional parameters can be indicated in the drawing and observed when performing marking work.
Step-by-step instructions for making a simple open grill without a lid:
- Use a grinder to cut out the side surface, making a 5 cm indentation from the top and bottom edges of the cylinder.
- Weld a metal plate in place of the removed valve, which will close the hole and ensure heat retention in the internal space of the grill.
- Using a circular saw, cut grooves for installing skewers on both surfaces of the workpiece, maintaining parallelism.
- Deepen, process the surfaces, remove metal burrs from the grooves with a large file and sandpaper.
- Weld supports made of reinforcing bars to the bottom surface of the cylinder, onto which furniture legs or small wheels are mounted.
- Prime and paint the finished product.
Making such a simple barbecue will require a minimum number of technological operations, which can be completed by any home craftsman who has metalworking skills and knows how to work with a welding machine.
Features of using do-it-yourself barbecues
To cook always delicious barbecue on a new homemade grill and increase the life of the structure, do not forget about the simple rules for using this useful structure:
- watch the heat - properly heated coals are red with a gray coating;
- do not turn the skewer frequently - to ensure even cooking of the meat, this only needs to be done twice;
- cook meat in the zone with maximum heat, and vegetables or fish in others;
- do not bring the barbecue indoors, for example, when it starts to rain - this will worsen draft, and therefore increase the amount of carbon monoxide in the air;
- do not place the structure close to flammable objects;
- do not throw away the ashes immediately after use to prevent fire: they smolder for up to a day.
With lid and chimney
This design requires the installation of door hinges in place of the cut out wall of the cylinder. The optimal number of them for a barbecue from a gas tank with a volume of 50 liters is 3. If a 27-liter cylinder is used, 2 loops are enough.
Setting up a barbecue from a gas cylinder.
They are secured by welding and then cleaned with a file. The hinges are installed before the cuts and holes are formed in the body. To make a lid, a cut out segment of the tank wall is suitable.
It is supplemented with handles and installed on hinges after completing the work on making the barbecue. The chimney is cut into the end surface of the improvised barbecue. First, a pipe is welded to the hole formed by the grinder.
Its internal diameter should be 4-5 mm larger than the size of the chimney duct. To manufacture this element, a round or profile pipe made of galvanized steel or carbon alloy is used. Recommended wall thickness is 4 mm.
Visual instructions
So, the cylinder is completely ready and washed. Now you need to cut it into 2 parts. The simplest option is to simply cut the cylinder into two halves lengthwise and get two classic open barbecues.
The easiest way is to cut the cylinder in half and use it as a regular open grill
If you are making a barbecue grill, then you need to “cut out” and cut off a rectangle that will be the grill cover, and the second part remains as the base. Draw a rectangle of cut lines on the surface, the horizontal lines will run approximately in the middle of the balloon or 5 cm above it, and the vertical (transverse) lines will run about 20 cm from its edges.
Cylinder cutting
To cut the cylinder, use a gas cutter or grinder. Mark the boundaries of the lid: step back 5 cm from the welding seams connecting the base and the bottom of the container and mark the line along which the cut will be made. Cut from the middle towards the edge, while holding the grinder disk perpendicular to the cylinder.
This is what a cut cylinder looks like - a blank for the barbecue
Grill legs
Consider what height your barbecue should be, and then start attaching the legs. You need to firmly install the grill on the ground so that it is convenient to weld the lid.
The easiest way is to attach legs from an old sewing machine or a metal base from a small desk to the grill
You can construct legs from pipes by bolting them to the bottom. Make 4 holes in the bottom of the base, insert bolts into them with the threads facing outward. Secure them with nuts or weld them to secure them. Attach bolt nuts to the tops of the legs and screw them to the base of your grill.
Installing the Cover and Handle
To attach the lid, make holes for the hinges, secure them with rivets and weld them. If this is not done, the lid may become detached due to exposure to high temperatures. You can install a removable lid without hinges, then inside the transverse edges of the grill you need to attach metal strips so that the lid does not fall inside.
Secure the lid to the grill using welded door hinges
You can use bolts to attach the handle to the lid. Simply drill holes for them and secure them. Choose simple, heat-resistant handles to prevent them from getting burned later. Very comfortable handles can be made from a metal rod by welding it to the base.
Choose comfortable heat-resistant handles for the grill
Now you need to install the limiter on the cover. Make it from a corner or part of a pipe. And the lid itself can be fixed on one or both sides using chains, thereby determining the maximum possible amount of its “tilting”.
Assembly
- You may experience deformation of the roasting pan when you cook on the grill. To avoid this, weld the corners to the inner longitudinal edges of the base. You can place a barbecue grill or skewers on the ledge formed from the corner. The high legs of the barbecue also require additional fixation, which you can easily provide if you weld a corner along the outer perimeter of the structure, which will increase its rigidity.
- Drill holes in the bottom of the grill. They are needed to make it convenient to pour out coals or drain water accumulated after rain. In addition, wood in a barbecue will burn better if you provide air draft from below.
- In the hole where the valve was, install a smoke exhaust pipe and weld it. Not everyone does this; some leave the grill without a chimney, especially if they plan to cook mainly with the lid open.
- If you did not attach a corner inside, you can use a grinder to make slits in the sides of the base into which skewers will be installed.
Use a grinder to make slits in the walls of the container for skewers.
With a smokehouse of 2 cylinders
To make a sealed compartment, you will need an additional tank of a smaller volume - 15-27 liters. As the base of a heavy structure, use reinforcement or a stand from a sewing machine. A hole for the blower is formed in the firebox. In a makeshift smokehouse I build a lid using the method described above.
A grate is installed inside to place products. Combustible materials are placed on the bottom. The firebox must be equipped with its own chimney with a damper that allows you to regulate the temperature and the amount of gaseous substances released during fuel combustion.
A barbecue from a gas cylinder with a smokehouse is made according to the scheme described above. The sealed chamber is connected to the body of the fryer with a thick pipe. Such a unit can operate in several modes, allowing you to prepare a wide range of dishes. The type of smoking depends on the distance between the body and the sealed chamber. It is determined by the length of the pipe.
Preparatory stage before disassembling the cylinder
Before you properly make a grill, you should prepare a cylinder. It is necessary to remove the remaining gas from it by unscrewing the valve with an adjustable water wrench and a steel pipe used as a lever. Removing the fitting on the cylinder is quite problematic, since it is securely soldered to the body. To prevent the container from turning, a stop angle should be attached to its bottom.
You can apply “wedash” to the junction of the faucet with the body and wait several hours until the threads loosen. The procedure must be performed only outdoors, away from potential sources of fire and other places where fire may occur.
There should be no traces of propane left inside the cylinder.
Helpful advice! To make sure that the cylinder is empty, the valve should be soaked in soapy water. If it bubbles, then gas is still escaping.
After the cylinder is completely empty, it is recommended to turn it upside down so that all the accumulated condensate can drain out. Next, the container is filled with water, which helps displace all vapors and residues. To do this, the water hose is connected to the location where the tap is installed. Water should be supplied under low pressure. This simple operation helps prevent dangerous situations associated with disassembling the product. The faucet is put in place, and the structure remains in this state for 2-3 days to remove all odors.
With a stove for a cauldron of 3 cylinders
The design is vertical. For its manufacture, a large diameter gas cylinder and 2 smaller ones are used. A cauldron compartment is welded to the side surface of the body, equipped with an individual firebox and a door located on the front side of the unit.
A blower with an adjustable damper plate made of steel sheet is equipped on the lower surface of the combustion chamber. The side planes of the main tank are equipped with additional longitudinal ventilation holes.
You need to make a lid for the cauldron. It is cut out of sheet steel and complemented with a handle. The upper part of the cylinder, which serves as a cauldron, can be equipped with a detachable burner from the solid fuel stove. This solution will allow you to use a frying pan for cooking.
What to paint with?
The surface of the barbecue, which is made from an old cylinder, can be covered using several materials. For these purposes the following is used:
- Organosilicon enamel with good heat resistance. This coating can withstand temperatures up to 600 degrees.
- Powder thermal paint. This option is not allowed for home use, as it requires firing in a kiln at high temperatures.
- You can also use oxidation. It is a good option for anti-corrosion treatment of barbecues.
There is also a folk method that will protect the grill from rust for a long time. First of all, the container body should be treated with a 5% sulfuric acid solution. Then boil it in a solution of high concentration laundry soap. After this, the product should be boiled in sodium hydroxide for 30 minutes.
Processing the barbecue is considered a mandatory step, since iron can oxidize and rust. These measures help extend the service life of the structure. When painting your structure, make sure that the material used meets the qualities stated above.
With a table
This device, which provides ease of use of the unit and improves its functionality, requires a larger amount of welding work. The table can be made retractable, folding or detachable. It is attached to high legs made of steel profiles or reinforcing bars.
For reliability, these elements are reinforced with welded crossbars.
The table is mounted directly under the lower plane of the grill or taken to the side. For a retractable structure you will need profiled guides. The folding or removable version is installed on door hinges similar to those used to secure the lid.
Dangers
When making a grill from a regular cylinder, you need to take into account potential hazards that may affect the quality of the product, namely:
- Poorly performed welding work will certainly affect the strength of the grill. If you are not competent in this matter, it is best to use the services of experienced specialists.
- By using a heat-resistant coating for your product, you will significantly improve its aesthetic appearance.
- The finished structure will have an impressive weight, which will affect the ease of transportation.
Consider the above nuances when making your own barbecue.
In the form of a grill
The design is a universal type of barbecue. The difference lies in equipping a homemade brazier with welded steel corners on which a mesh is installed.
Universal step-by-step instructions for making a grill from a gas cylinder:
- Mark the contours of the lid on the body of the prepared tank.
- Using a circular saw, cut the side surface along the marked lines.
- Sand the edges of the oval hole with a file and sandpaper.
- Weld the door hinges.
- Cut out the lid from the cut out segment of the cylinder and drill holes in it for the handle.
- Weld the grid supports to the inner surfaces of the tank.
Marking can be done not only with a marker, but also with regular chalk. Supports for the grille are made of steel profiles or corners. In the first case, it will be more securely fixed. This solution will provide the structure with additional rigidity and will allow the installation of gratings of different sizes.
After completing all the technological operations, all that remains is to mount the lid with a handle screwed to it and select or personally make a grid from thick steel wire. This barbecue grill can be equipped with a smokehouse using a gas cylinder of smaller capacity.
What to make barbecue supports from
Any materials that can be found on the farm are suitable for supports:
- metal corners;
- profiled, round pipes;
- strips of thick steel;
- fittings
Drawing of a stand with lodgements
To make a mobile structure, small pieces of fittings are welded to the brazier, onto which pieces of pipe of the appropriate diameter are placed.
Air holes
In the “marking” section, we marked the line for the air supply. This line is located at a distance of 10 cm from the longitudinal weld on both sides. Then we take a drill with a diameter of 8mm. and drill out these holes. I believe that a hole diameter of 8mm is quite sufficient for air supply, since a larger diameter can affect the spillage of burning coals during the heat in the grill. These holes can be drilled both at the beginning of our assembly of the barbecue and at the end of the work.
You can also add handles to the sides of the grill for ease of movement around the area.
Safety precautions when cutting a gas cylinder
You cannot start cutting the workpiece right away. A flammable gas remains inside, along with gasoline (gas in the form of a liquid). If you start any mechanical processing: drilling or cutting, a spark is possible that will cause an explosion. It is necessary to remove any remaining flammable substances from inside the container.
Unscrewing the valve
It can be quite difficult to unscrew the valve. Over many years of operation, quite strong bonds are formed between the elements, and diffusion of one metal into another is often observed. You need to do this.
- Secure the cylinder against possible rotation around its axis. Here they use belts or thick wire.
- A gas key (No. 2) is installed on the valve.
- It can be extended by a pipe by about 1 m.
- Select a position so that the resulting lever has a stroke of at least 40...50 cm.
- Press the lever sharply to create a shock load.
In most cases, this approach is effective. To make it easier to tear off the valve, you can tap the neck with a hammer.
The balloon is filled with water. It will squeeze out all existing flammable substances. Now you can cut the gas cylinder.
Attention! It is advisable to carry out all procedures away from residential areas. A rather unpleasant odor is released.
Places for skewers and grill grids for barbecue
For a comfortable location of the skewers, we drill holes on the back wall of our barbecue. The skewer has a pointed part at the front, which clearly fits into these holes and holds firmly there. As we can see in the photo above, six skewers can be conveniently placed on the grill. To do this, we make markings, departing from the top edge of our grill cover cutout, 10 cm. down on both sides, put marks and draw a line with chalk. This is the level of the holes. Then retreating from the edge of the radius cut 4 cm. and put a drill mark. And then every 10cm we put the same marks. Using a drill and a drill bit, we drill holes according to the marks. To do this, we first use a thin drill, for example, 4mm, and then drill it out with a 10mm drill, and finally chamfer the hole with a 12mm drill. or a round file. On the front side of the grill we also make markings on the top edge of the grill and use a grinder to cut out grooves for skewers. When this operation is completed, cover the grill with a lid and transfer the marks of the places where the cutting was made to the grill lid. We also do the cutting. This needs to be done so that when the skewers are installed, the grill lid closes more tightly.
You can also make seats for the grill - a grid. To do this, we just need to weld metal shelves between the holes for the skewers. We cut out pieces 3 cm long from the corner and weld them to the walls of the barbecue, having previously marked the welding points so that the mesh has six support points along the perimeter of the barbecue. We clean the welding areas and cut off sharp corners.
To cook meat on a grill grid, you can use a stainless steel grid with a 10x10 or 15x15mm cell, having previously cut the perimeter of the seats to the size as in the photo below.