Where to start assembling
The most important thing is to study the instructions. To make it easier to understand the fittings, they should be sorted into separate groups. For small components, an organizer or several plastic containers are suitable. It is better to count all the small parts in advance and check their quantities with those indicated in the manual. Structural elements need to be checked for chips and uniform color.
With a competent approach to assembling the cabinet, it will last at least 10 years.
It is difficult to assemble a wardrobe alone, so it is better to call 1-2 partners.
If everything is in order, there are no missing parts or damage, you can begin assembly.
Instructions for assembling the wardrobe must be included with the purchased piece of furniture.
Assembly steps
To quickly and conveniently assemble the cabinet, we will divide the work according to the instructions into small steps:
- Base;
- Frame;
- Rear wall made of fiberboard;
- Shelves;
- Installation of compartment doors;
After installing the cabinet, all that remains is to install the linen rod and put the drawers. Next, we will continue the assembly according to the diagram, in more detail at each stage.
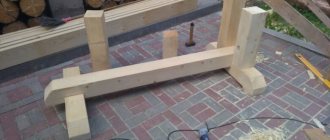
Base
It is necessary to start assembly from the base part of the sliding wardrobe, since this is the base on which the wardrobe stands. To begin with, all the stiffeners are assembled using a dowel, then tightened with an eccentric tie. A horizontal chipboard board is installed on the assembled frame and secured using euroscrews or corners with self-tapping screws as shown in the photo.
Frame
The body is assembled quickly; for convenience, it is better to do the entire assembly on the floor. To do this, you need to start by attaching the two side cabinet posts to the base part, then install the last side wall. Already at the last stage, the top cover of the cabinet, called the upper horizon, is installed.
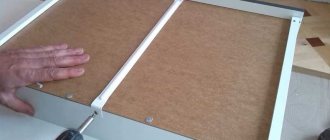
Rear wall installation
After assembling the case, it is necessary to install the back wall made of fiberboard or HDF. The back wall will align your cabinet diagonally. To do this, install the back wall on the body in a lying position and fix it with self-tapping screws or simple nails. Use a screwdriver or a hammer if you are using nails.
Installation of shelves and guides
We proceed to the installation of shelves and guides. To do this, lift the wardrobe into a vertical position and fix it near the wall. It will be easier to install the guides in a vertical position. Holes are made in the guides with a drill and then secured with self-tapping screws to the upper horizon. The lower guides are attached to the base part with self-tapping screws. At this stage, we complete the installation by installing the shelves on the shelf holders.
Door installation
The assembled doors are installed as follows. The doors are first inserted into the upper part of the guide, then with a smooth movement, we fix the lower part of the door with a roller on the lower guide. Before installation, install the stopper in the lower guide in advance; then this cannot be done.
2 doors
The two-door cabinet can be installed in any order according to the installation diagram described in the previous paragraph. Adjustment is made using the lower roller.
3 doors
For a three-door wardrobe there is an installation sequence. Doors are usually installed in a checkerboard pattern, because the guides have two rails; one door is placed in the center on the front rail, and two doors are installed on the rear rail.
This was a short express instruction for assembling doors with your own hands. For a visual assembly, we suggest watching the video. Using the video example, it will be easier to assemble the cabinet.
Preparing all materials for assembly
You need to prepare in advance the tools that may be needed. Usually the minimum required is: keys, screwdriver or screwdriver, hammer (rubber and regular), pencil, ruler, tape measure. It is also advisable to use a building level to check how level the cabinet is assembled relative to the floor.
You need to assemble the cabinet on the floor. It is optimal to do this in such a position that lifting a heavy body after assembly requires a minimum of effort and energy.
Advice. Parts should not be immediately removed from their packaging. After inspection, it is better to put them in boxes so as not to accidentally damage them.
Wardrobe assembly procedure
The first step is to install the base. Usually the stove is attached to stands that are located along the long side. It is mounted using Euro screws - fastenings with a recess in the head for a hex key.
It is important to know that a number of cabinet filling elements will also require preliminary marking and installation of fasteners, since this work will then be complicated.
The next step in the order of assembling the wardrobe is mounting the body. These are load-bearing parts.
Next, the back wall is attached. Shelves, hanging rods, that is, all the internal contents, are installed in the finished housing.
Assembling a sliding wardrobe with your own hands requires the master to have a clear understanding of the functions of all structural parts and fittings. Some shelves can be put back in place only after the furniture has been installed in a vertical position.
Lastly, the doors are mounted to the cabinet.
Advice. If the model has mirrors, it is attached to a fully assembled cabinet.
Before installing the side outer wall, we recommend pre-fixing the corner shelves that will be on the outside.
Main advantages
Sliding wardrobes with the Alliance door system are in high demand because they meet all the needs of our users. They value, first of all, comfort of use, long term trouble-free service and proven reliability. The advantages of using it are obvious:
- paired rollers (lower and upper) are mounted very simply, directly to the door leaf using self-tapping screws - without additives and even without preliminary markings;
- sliding door facades can be manufactured directly at the cabinet assembly site;
- a wide range of colors allows you to perfectly match customer requirements;
- Almost all components for sliding doors of the Alliance system are interchangeable and versatile, which makes it possible to create the necessary furniture;
- reasonable prices.
IMPORTANT. If sliding doors with the Alliance guide system begin to make noise when moving, their lower rails need to be cleaned.
Purpose of materials and panels
During operation, the main load falls on the base or stand. Therefore, it is important to check the strength of the part and install it on the most flat surface possible.
If the perimeter of the built-in structure will be walls, floor and ceiling, it is important that they are as smooth as possible. A level is useful for measuring the angle of inclination and leveling surfaces before installing shelves, walls and doors.
Body parts are necessary to protect things from the external environment, and they also serve as load-bearing elements to which all shelves are attached.
To correctly measure the locations for drilling holes, you need to fold all the shelves.
The back plate is usually made of thin sheet material; the part does not bear body load.
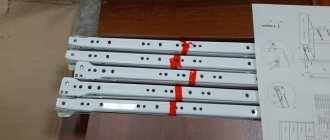
Important! So that smooth movement mechanisms are installed on the drawers.
It is recommended to immediately screw the base of the telescopic guides.
When assembling the plinth, it is necessary to mark the location for attaching the slats or adjustable legs. Long cabinets will require at least 6 supports. The cross strips are attached to the bottom of the cabinet with corners and self-tapping screws.
As for the through holes for confirmation, which are made from the outside, difficulties may arise with this, since the markings are made inside.
Before installing the housing, it is advisable to check the evenness of the floor with a level. If it is uneven, it is better to choose a model with adjustable legs that can be adjusted in height.
Sometimes it happens that in order to eliminate defects of poor quality assembly, you have to disassemble the wardrobe and then reinstall it.
Important! After assembling the main parts of the structure, it is necessary to level it. First, measure one diagonal with a tape measure, then the other. This method is used to check how even the corners are. By calculating the difference in values, you can determine in which direction the top of the furniture needs to be moved.
The distance between opposite corners should be the same. Otherwise, the cabinet will stand crookedly and the doors will not close tightly.
It is necessary to align the geometry of the cabinet so that there are no problems with installing the doors.
Installation of hardware
Responsible furniture manufacturers prepare all holes for hardware during production.
On the bottom bar, you need to pre-drill several holes and insert anchors on which the rack bars will be attached.
The specific set depends on the model and manufacturer, but for most cabinets you need to have hex keys and a set of screwdrivers, including ones for Eurobolts.
The first step is to install the side planks; if there is a middle post, it is installed after.
The top bar is fastened with corners and self-tapping screws or confirmations.
Advice. It is better to assemble the cabinet in a standing position, since fitting the parts while lying down is problematic. To install the roof, a minimum of 10 cm must be left.
Each hardware has its own technical parameters and requires special fixation technology.
Nailing the back wall
If you choose suitable fastenings for a panel made of fiberboard (the back wall is most often made from this material), then over time it will move away from the structure. It is best to screw it on with self-tapping screws.
The elements should fit into the holes prepared by the manufacturer easily, but at the same time not wobble.
The panel is placed behind the cabinet and then screwed, holding the bulk of the wall. Self-tapping screws are inserted in increments of 10-20 cm.
As soon as the actual loads exceed the maximum values, the thin part of the chipboard is destroyed. The holes will have to be redone, which means additional costs and loss of time.
Advice. If there are several back slats, they are first fastened end-to-end with ties.
“Alliance” profile for sliding wardrobes – buy in Moscow and Moscow Region
If you need to purchase high-quality systems for Alliance sliding doors that meet modern ergonomic and environmental requirements, contact RIAL-MOSCOW. Our online store is available at any time of the day, and applications from our customers who place an order online are accepted automatically.
If you have difficulty choosing a system for sliding wardrobes, our employees will always help you choose the right interior and place an order.
Installation of additional materials
Usually shelves are fastened with corners and self-tapping screws. Manufacturers pre-drill holes for hardware on these parts. All that remains is to measure and determine the optimal distance between the shelves and screw them to the side and central strips.
During assembly, never tighten fasteners until all parts are in the correct position.
The hanger bar is mounted on the flanges that come with it. If necessary, the pipe can be shortened using a hacksaw.
Work very carefully and hold the elements constantly.
To install drawers, you first need to attach the mechanisms to the rack strips. It is very important to install them parallel to each other at the same height. Then there will be no problems with retractable mechanisms.
The fiberboard boards are fixed with wood screws. Screw them in carefully; the screws should land exactly in the middle of the furniture boards.
Door installation
Before installing the doors, it is necessary to install the guides, strictly observing a straight line. First of all, screw on the upper rails, and then the lower ones.
When installing sliding doors, you should always install the inner one first, and then the outer one.
The upper guides are attached flush with the side edge, and the lower ones with an indentation of 8-15 mm. Holes for mounting are drilled in a staggered pattern on both lines.
Once the doors are adjusted, the stoppers should be adjusted correctly. They are needed to ensure that the doors remain stationary in the closed position.
2 doors
Before installing the doors, you need to check and clear the bottom track of any debris. If foreign particles get into the roller mechanism, the door will jam.
The door that will run on the far rail is installed first. The door is first inserted into the top track, and then the end rollers are placed in the bottom channel.
If there is more than one door, the outer latches are adjusted first, and the rest are centered on them.
3 doors
To install 3 doors on a wardrobe, first install two doors that will run on the rear rail. They are also mounted: first in the upper guide, then in the lower. After installing the doors, stoppers are installed to prevent the doors from colliding.
Please note that a mirror door is expensive and will be unpleasant if it falls out due to improper installation.
Lastly, the door is mounted, which will run on the front rail. A mirror is usually attached to it. It is very important that the doors are installed level, otherwise they may fly out of the grooves, which is not safe to use.
The Alliance coupe system is a simple and reliable option
One of the most budget-friendly options for a closet or partition with sliding doors is the Alliance system. It has a minimal cost, but not at the expense of quality. As a result, the user receives both efficiency and functionality.
Alliance guides for sliding wardrobes are frameless bottom-support systems. Special paired rollers are attached at the bottom and top of the door leaf, which move along an aluminum guide profile mounted on the bottom shelf of the cabinet or directly on the floor. Sliding doors with this system move smoothly and effortlessly, thanks to high-quality sealed bearings on the lower rollers. Each pair of rollers can withstand a load of about forty to sixty kilograms.