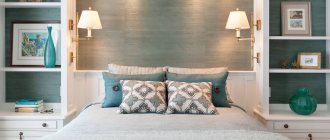
Various “caves” are often included in apartment layouts. With some creativity, a recess in the wall can be turned into a useful space. Place a comfortable bed in it. Do not turn it into a banal storage room or utility room. Make your small one-room apartment cozy.
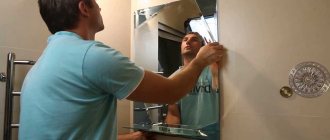
Even when there is no alcove, you can make it yourself. Anyone who is comfortable with a hammer and a screwdriver will be able to cope with such a not at all difficult task.
A feeling of comfort and security are important motives for turning a “hole in the wall” into a cozy nest.
Decorative plaster
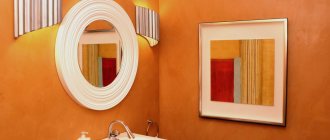
A niche covered only with decorative plaster has an advantageous design. The walls, bottom and ceiling of the alcove are white and blend perfectly with other interior features.
In addition, this finishing method does not require special skills and abilities, and the material is adequately durable. Before applying plaster, all surfaces must be coated with 1-2 layers of primer, which will increase the adhesion of the plaster to the underlying wall.
Decorative painting
For those who do not like interior decoration and large-scale renovations, there is an alternative option - stencil painting. For this purpose, a set of stencils (sets of PVC films) and acrylic paints are used.
The surfaces of the niche walls are pre-coated with plaster or liquid wallpaper. After the coating has completely hardened, you can proceed directly to the design of the alcove.
This method is especially popular for decorating children's bedrooms, because with the help of paints and a brush you can draw a whole fairy-tale plot in the room and create a fascinating atmosphere.
Decor elements
In a studio apartment, the bedroom is located behind a partition
With the current variety and relative cheapness of building materials, as well as advances and technologies in the field of woodworking and paint and varnish industry, there is a great variety of different layouts and interior design solutions for apartments. The information content of our time allows us to learn innovations almost first-hand and combine different styles.
Color selection
First of all, you need to choose a color scheme for the bedroom. The choice of niche color is made based on the bedroom interior, and it is advisable to use one of two methods. First: the color is chosen to decorate the niche in the same style as the room; for greater harmony, contrasting colors are avoided.
Possibility of using small shelves or cabinets in a niche.
First of all, you need to choose a color scheme for the bedroom.
Second: they deliberately highlight it, designing it in a different style so that it catches the eye. Specially use colors that contrast with the overall color scheme of the bedroom. The second method is great for children's bedrooms.
The ability to visually expand the room.
Specially use colors that contrast with the overall color scheme of the bedroom.
Features of different types
The peculiarities include the fact that the purpose or functionality of the beds built into the niche is different. That is, in the case of cabinets and shelves there will be more practicality, and in the case of themes - decor, beauty, originality. These two conditions can also be combined.
Stylish and comfortable design of a niche in a room with built-in furniture and a sleeping area
Let's say, applicable to a children's bed, a kangaroo with locker bags, a lock when installing a bunk bed in a niche: the lock gate is a bed; windows - cabinets with glass doors, castle towers - lamps.
Beautiful openings in the wall, made in the form of houses with triangular roofs for beds in a girls’ room
When applied to adult beds, the folding option with a niche-wall is interesting for its originality. The bed is retracted against the wall and frees up additional space in the room. At the bottom of such a bed it is possible to arrange a decorative design: a painting, a family photo gallery, an interior composition of unusual vases, jugs, artificial plants and flowers. The last option will require securing the interior items, since this is the bottom of the bed, and at night you will unfold it for sleeping. As for the rest, the imagination is limitless!
A functional solution for a small apartment - a folding bed
Try placing a large mirror with or without a carved frame on the bottom of the bed, it all depends on the style of the room design (loft, modern classic, hi-tech, etc.), or a folding desk. This will require some technical tricks and some knowledge of physics and geometry. It will take a little more time to manufacture and install (if you work independently), or a larger financial investment, but the return will be greater. High spirits and envious and inquisitive glances of guests from the beautiful execution of simple things.
Loft bed with sleeping area above and sofa for guests below
When limited in quadrature, use combinations of a niche-podium or move the sleeping place to the second tier. The option with a podium can be designed as a bed on top and drawers at the end of the podium. But it is more practical to place the bed at the end of the niche - a pull-out bed on wheels or guides with folding legs. The top is a podium with a workspace (desk), or a relaxation area with a sofa, coffee table and TV.
It is also possible to place a small bookcase or shelf behind the sofa. Such a living area allows you to economically use the space of a one-room apartment.
Luxurious niche made of light wood with open shelves located on the side and top areas
When the apartment has one permanent resident, the sleeping place in the niche can be moved to the second tier. The lower space will be placed under a desk, a dressing area, or a reading area, with shelves for books and a comfortable rattan chair (how best to use the lower space depends on the size of the one-room apartment, the location in the niche and the preferences of the residents). This arrangement of a niche is suitable near the side wall of the room (without a window). It would be nice to equip such a sitting area with a sliding door in the Japanese style - “shoji”.
Bed on the second floor in a room with high ceilings and a full wardrobe on the 1st tier
Each technical and interior solution has its pros and cons. The first option with a wall niche will have the advantage of originality, modern design, the ability to choose various curves, steps, semicircles on the walls, smooth or broken lines in the niche itself.
The niche can be supplemented with lighting fixtures
Playing with light will add intimacy to the atmosphere in the evenings. It is possible to paste with photo wallpaper or a regular pattern. All kinds of accents in the niche-wall on vases, patterns, decorative items, etc. The disadvantages include:
- the folding bed will have to be cleaned and laid out every day (in this case, the bed linen will constantly get confused);
- the load on the folding mechanism will require special attention to be paid to it;
- when arranging a pattern or decor at the bottom of the bed, it will collect a lot of dust (resulting in frequent cleaning of the apartment);
- installation of a canopy is difficult (for lovers of comfort and privacy).
The niche-podium option is more common, cheaper and not much inferior to its predecessor (niche-wall) in interior design and functionality. Particular attention is paid to functionality, since this article examines the arrangement of a bed in a one-room apartment with maximum benefit from the space used.
Unusual long bunk bed in a niche
It would be ideal to place a bed in such a niche at the end of the room, near the wall with a window. When installing a bed on top of the podium (or in the middle of the podium), it is convenient to place the bed with its side facing the window, but not too close, since in cold times cooling from the window is possible (and at the same time excessive heat from the radiator). Ideally, in this case, it would be to leave a reserve for the bedside table or just a small passage. This option is good for both one couple living in an apartment and a family with a child.
Functional design of a niche in the room: a travel bed, a small closet and a comfortable workplace
In addition to beauty, simplicity, convenience, the ability to arrange shelves, drawers, book and storage cabinets, cabinets (without losing “empty” space in the niches), there are also enough opportunities for design solutions and separating the sleeping area from the main room space.
Decorating a studio apartment using built-in plywood furniture
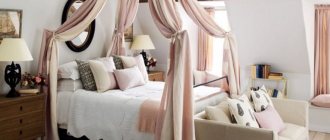
The latter is especially popular as it creates an original room design, provides a separate place for parents from the child, and separates the sleeping space, in which a completely different design is possible (calmer and gentle colors), different from the living room and relaxation area. A canopy or curtain is hung at the border of the podium.
You will get a beautiful niche if you place elegant furniture in it, decorated with a canopy.
Just like in the version with a bed in the second tier, the “shoji” sliding wall will create a pleasant atmosphere of Japanese style. The sliding wall will eliminate extraneous noise (if any), and extraneous odors from the kitchen (especially if the apartment is inhabited by those who like to take an afternoon siesta and read books).
Japanese sliding door, the design of which contains modern materials
You can install shoji-style blinds on the window; this will reduce cold flows in winter, prevent headlights from passing cars, and during the day will create additional darkness in the room.
Japanese blinds are one of the most practical solutions that combine sun protection with sound insulation
When placing a rollaway bed in a niche on wheels at the end of the podium, the possibility of zoning the sleeping area is eliminated. This location is not suitable for privacy lovers. On the podium above the bed you can arrange a seating area with a TV, upholstered furniture and a bookcase. This sector can also be delimited by a sliding door. The main disadvantage here is the dubious comfort, since the bed rolls out almost into the middle of the room.
A podium can be made in the bedroom or living room with a roll-out bed on wheels
Important! The wheels will leave marks on the floor, so you should put a carpet on the floor under them, or make another folding device. (The option of guides with folding legs is possible. This will require great effort during transformation).
Such a bed, in addition to a cozy corner located on the podium, can be equipped in a niche with an automatic self-extending electric drive.
What should you consider before ordering bedroom furniture?
The answer is the distance and passage between the bed and the closet.
Ergonomics in the bedroom are rules and mathematics that turn even the smallest space into a functional one, where corners don’t leave bruises, vacuuming is convenient, and making the bed doesn’t turn into torture.
Whatever interior style you choose, these numbers will remain the same in any room:
70 cm is the minimum distance between the bed and a wardrobe with sliding doors; if the doors are hinged, add another 10 cm - about 50 cm is “eaten up” by the open door, another 30 cm is the passage along it. The distance is measured from the edge of the furniture.
56 cm is the minimum distance between two beds with a bedside table in the middle. For example, in children's rooms. This is enough to make changing the sheets convenient.
120-160 cm is the minimum distance between a bed with drawers and a closet (wall and any other furniture).
Scheme of distances between furniture in the bedroom
Location and lighting
An artificially created alcove is often located in the wall, in a place where there is no window opening, so that direct sunlight does not fall inside the recess and does not interfere with daytime sleep.
Bringing a unique design into the bedroom.
First: the color is chosen to decorate the niche in the same style as the room; for greater harmony, contrasting colors are avoided.
The amount of lighting depends on the depth of the niche. It is best to use a spotlight, since being located inside the wall, it does not take up space, and the use of 3-5 spotlights with a double or triple switch will allow you to illuminate completely or only the required area in a niche.
Since the bed takes up a lot of space in the bedroom, recessing it into a niche frees up a lot of space.
Second: they deliberately highlight it, designing it in a different style so that it catches the eye.
How to make a niche under a bed
How difficult is it to create something like this with your own hands? In fact, everything is much simpler than it might seem at first glance. The main thing is to have a clear idea of what you need to get in the end, to have a tool and the ability to work with it, and a desire to make your life more comfortable.
Setting up a bed inside a niche
As you already understood, such a design has three main parts: the bed itself, which can be purchased separately or presented in the form of a mattress; podium (not always used); partitions and boxes.
Podium
Let's look at what and how all this is made, and we'll start with the podium.
Table. Instructions for making a podium.
| Photos, steps | Description |
| In this example, the bed is not located in a niche, but for us this will not matter, since the work is done in exactly the same way. So, the first step is to take a level (water or laser), with which you mark the perimeter of the walls at the desired height. Advice! You can use a bubble level, but be prepared that this tool may produce an error, which is not critical, but unpleasant. |
| Next, along the perimeter of the walls (according to the marks), we fix the beams cut to length. In our example, the master does this with metal anchors. This solution may not be suitable for a niche, especially if it is made of plasterboard. In this case, wooden mortgages are made inside the structure, resting on the floor, to which the beams are tied with powerful screws. |
| At the next stage, load-bearing beams are placed across the main ones. They need to be installed every 40-50 cm, and secured with long self-tapping screws. |
| The main beams are quite securely fastened to the walls, but over time the connections will begin to loosen and sag, which can lead to unpleasant consequences. To prevent this from happening, it is necessary to install vertical racks under these elements, which will take the main load. At least 3 of them need to be installed on a two-meter beam. The racks, just like the beams, are connected to the walls, but you can already use plastic dowel screws. |
| We use powerful timber as beams, but it can also bend under loads. To make the bed reliable and squeak less, we install vertical stands under these elements, in the amount of 1-2 pieces. These racks will help you divide the space under the niche into sections if you plan to install drawers inside. |
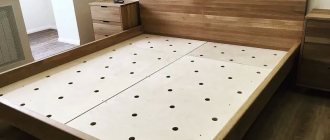
| Having thoroughly strengthened everything, we sheathe the resulting structure with plywood. The ideal material thickness would be 20 mm. |
| Those parts of the structure that remain visible must be puttied. An elastic wood putty is used, which will then be sanded to a perfectly smooth state. The surface is subsequently covered with paint. |
| Step 8: Finishing | After painting, the boxes are assembled and installed (if planned), and the surface of the podium is refined. In this case, it was decided to cover it with laminate. Everything turned out beautifully and neatly as a result. |
Bed accessories
Plasterboard niche
If you have ever worked with drywall, you should not have any difficulties; if not, then read carefully, and everything will definitely work out. You are free to enter any form, so we won’t pay attention to that now. Our task is to understand the principle of construction.
Table. Instructions for creating a niche.
| Photos, steps | Description |
| First of all, it is necessary to apply markings to the walls, floor and ceiling. This is necessary in order to accurately mount the wall profile PN 50*40. The easiest way to do this is to use a laser axle builder. If desired, it can be replaced with a plumb line and a water level. You will also need a pencil, tape measure, and a lace tap to quickly draw straight lines on the indicated surfaces. Attention! If the partition is parallel to the finished wall, then when making markings, it is necessary to shift it in depth by 12 mm - the thickness of the wall plasterboard layer. |
| According to the completed markings, U-shaped wall profiles are attached. They are mounted using dowel screws or self-tapping screws if the fastening is to wood or a plasterboard surface. The width of the PN profile used is selected according to the planned thickness of the partition. Standard option – 50*40 mm. |
| Next, the PS 50*50 rack profile is installed - it has stiffening ribs, which allows it to better resist bending. It is rigidly connected to the guides, which is easiest to do using a cutter, as shown in the photo. The step between the rack profiles is 60 or 40 cm. |
| If there is a doorway in the partition, then the racks framing it must be reinforced with wooden beams of the appropriate section. The remaining racks should also be strengthened, for which the following technique is used - the profiles are paired to form the letters “H”, as shown in the photograph. They are connected to each other with self-tapping screws. |
| After this, the frame must be sheathed with sheets of plasterboard. They are fastened with metal screws 25 mm long. The installation step of the screws is 15-20 cm. The work is done quickly and quite easily. The main thing is to ensure that the joints fall exactly in the middle of the profiles. |
How to cut drywall
Subsequently, the drywall is puttied and finished with various materials. The most popular solutions are painting and wallpaper, but for these purposes you can use the most unusual options, which will make the design of the bed unique.
Interior finishing options
Today, a wide variety of interior finishing models for building niches are available to craftsmen. All finishing materials are available at any hardware store at reasonable prices. At the same time, the master will have to take into account the complexity of the design, the cost of the material, and the future design.