Kitchen design from scratch
Calculating kitchen furniture does not require special mathematical knowledge. It is enough to carefully measure all the indicators, write them down and not confuse them during sketches.
To create a kitchen from scratch, you need to measure all the indicators and plan the placement of the furniture elements.
Preparing a sketch
For a preliminary sketch you will need to measure, record readings and draw to scale:
- wall length;
- wall width;
- wall height;
- window locations;
- where are the entrance and balcony doors located?
- sockets and ventilation.
Mark all this in the diagram so that at the first stages you can understand where and what kind of kitchen furniture is placed. Then define what is called the “work triangle area.” This is the constant path that is made in the kitchen between the sink, refrigerator and stove. There should be no obstacles, decor or furniture along this path. Depending on the layout of the kitchen there will be a dining area.
It is necessary to determine where the main furniture and equipment will be located.
When you have placed the main composition on the sketch, allocate the remaining space for cabinets, a dishwasher, other appliances or furniture.
The remaining space is used for decoration and secondary elements.
Determining the minimum configuration of a kitchen set
How to calculate a kitchen set yourself? Before ordering a kitchen set, you need to familiarize yourself with the concept of basic equipment. This is a single set of kitchen furniture blocks 2.4 meters long.
Each headset has a basic configuration.
Placed here:
- 3 wall cabinets 60, 45 and 45 cm wide;
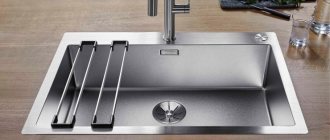
- 4 lower cabinets (under the sink, under the oven, and two cabinets 60 cm wide);
- moisture-resistant tabletop;
- base;
- water trap.
The basic package includes a certain set of elements.
Having such a standard kitchen set, its minimum configuration, makes it more convenient for the seller and buyer to speak the same language. Depending on the area and type of premises, you can easily calculate your equipment and its pricing policy.
Having a sketch will make it easier to explain to the seller what exactly you want.
What you need to know to size kitchen cabinets
To calculate the appropriate dimensions for kitchen cabinets, it is necessary to take into account some features regarding this process. If you have not had to do this before, of course, you may encounter various difficulties.
For everything to work out, you need to do the work sequentially, namely:
- First, calculate the area of the room by taking general measurements;
- then study the size of the specific part of the kitchen where you will presumably install the set.
The size of the cabinets will be determined, first of all, by the requirements for them.
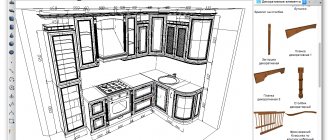
It is highly advisable during preparation to create a project for the future kitchen, while implementing it, for maximum accuracy, in some 3D editor. Since in this way it is possible to achieve an understanding of the spatial arrangement of cabinets as accurately as possible.
You can develop a drawing on a computer using one of the many design programs. A special article will tell you about the main nuances of making kitchen furniture drawings yourself.
Of course, in order to carry out this embodiment, you will have to hire professionals or ask people with specialized skills to help you. However, if you also have the skills you are looking for, then you will not need outside help.
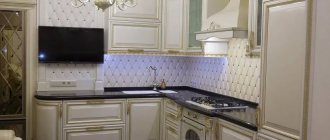
It is important that in the end the kitchen looks as harmonious as possible
Kitchen unit layout options
The layout of the kitchen determines convenience and comfort during cooking and eating.
There are several options for positioning the headset.
Corner (L-shaped) placement
Classic placement of kitchen units in the shape of the letter “L”. This is an option for square or rectangular rooms. The rule of the “working triangle” is followed here, since there is a lot of free space in the middle. Corner placement of kitchen furniture is not suitable for a narrow or very small room.
Corner placement is considered classic and is suitable for square-shaped rooms.
U-shaped placement
U-shaped placement of the headset occupies three walls at once, usually two long and one short. Many household appliances can be placed here, including a washing machine and dishwasher. A large number of cabinets allows you to arrange all the services and kitchen appliances.
In a U-shaped arrangement, the furniture occupies three walls.
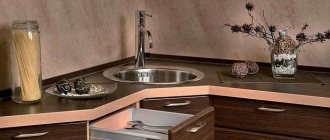
Peninsula accommodation
The peninsular planning method is a combination of the L-plan and the island one. Here one long wall and part of the second, short one are completely occupied. In this case, a small protrusion appears. That is, an “island” that is tightly adjacent to the entire kitchen structure of the unit. This is usually a small work desk with a lower cabinet, dividing the kitchen into a work and dining area. But there are other options.
The peninsula layout has a small overhang that is adjacent to the main structure.
Island location
The island layout combines elements of a linear and separate “island”. This is a combination of dining and work areas. One of the walls is occupied by a kitchen unit, and in the middle of the free space there is either an element of the work area or a dining table. The “island” can be of any size, from a bar counter for one to a huge table for a large family.
With an island arrangement, a working or dining area is located in the middle of the room.
Linear method of arrangement
The linear arrangement method is good for small rooms, studios or narrow kitchens. One of the walls is completely occupied by kitchen furniture and appliances. When cooking, a person moves in a straight line from the refrigerator to the sink to the stove. The remaining free space is allocated for a small dining area, folding table or bar counter.
With a linear placement method, all furniture and appliances are placed along one wall.
Double row arrangement
The double-row or parallel design method involves placing the headset and equipment along the walls “facing” each other. In this case, the sink and refrigerator are on one side, and the stove and cabinets are on the other. This option is suitable for a spacious kitchen with large, bright windows.
The two-row arrangement is also called parallel. It is suitable for a large spacious kitchen.
The main rules regarding drawing up a plan for a future kitchen
Before you begin creating your kitchen layout, there are a few rules to learn that will help maximize the space's efficiency and usability. Let's look at them in more detail.
What rules must be followed to make the kitchen as comfortable and functional as possible?
#1 - Work triangle rule
This is the basic rule that needs to be taken into account when determining exactly how you will place your kitchen unit. So, according to the working triangle rule, you cannot arrange in a linear order:
- sink;
- stove;
- fridge.
On the contrary, these three points of the room should follow a triangular pattern, moreover, so that each of the points is located at a distance of no more than 180 centimeters in relation to each other.
What does a work triangle look like in the kitchen?
Think about this rule from a logical point of view, if you still haven’t been able to understand it, by considering the typical order of food preparation:
- food is removed from the refrigerator;
- they are then prepared for cooking by washing the mud, that is, in a sink;
- then, next to the stove, the ingredients of the future dish are mixed and chopped;
- Afterwards, the desired food products are sent to the stove.
Options for placing a working triangle
If you place the three main points of the kitchen further from each other, then you will spend several times more time and effort on:
- transportation of products;
- control of what is happening at any point;
- cleaning after cooking.
This rule is the main one, and with its help it is used and taken into account when planning all subsequent rules.
Work triangle in the interior
No. 2 – Rule for reasonable sink placement
So, first of all, the location of the sink is always determined. It should be built no further than 2.5 meters from the riser. Of course, you can set it beyond this indicator, however, in order to realize such an idea within the framework of a traditional urban dwelling, it is necessary:
- direct the water supply pipe at an angle;
- or install a pump.
Of course, this can only be done if the expected layout and thickness of the wallet allows it.
It is very important to place the sink correctly
In a private home, it would be wise to place the sink opposite the window, as this will have many positive effects:
- the ability to observe events happening outside the window while washing dishes, for example, thereby making this activity less boring;
- the opportunity to seriously save on electricity.
If you decide that you don’t want to wash dishes, but would rather spend money on a dishwasher, then this unit must be installed on one side of the sink:
- on the left if the owner of the apartment is right-handed;
- on the right if left-handed.
Placing a sink in a small kitchen
This way you will create the most comfortable and convenient space for yourself.
No. 3 – Rule for slab location
Next, you need to understand where you will place the stove or hob. According to the rules, it should be no further from the sink than a distance of 180 centimeters. The same applies to:
- ventilation;
- gas pipeline, if there is one.
It is better to place the stove one countertop after the sink, since this is where you will process washed food before cooking.
The length of said surface separating the stove and the sink should be about 90 centimeters - not too much, but also enough to do everything necessary.
It is convenient to place the stove in the area of a beveled corner
On the other side of the hob, according to safety regulations, it is also necessary to leave at least 40 centimeters of free space.
Please note: the stove should also not be placed near a window, at least at a distance less than 40 centimeters. This is contrary to safety regulations, and in addition, completely impractical.
No. 4 – Safe Distance Rule
So, it is necessary to correctly verify on the plan not only the location points of this or that item, but also the distances over which you will move while in the kitchen.
When planning a kitchen, be sure to take safety rules into account
So, the smallest width of passages in this room should be 120 centimeters. Thus, in this gap, 2 people can calmly, without interfering with each other:
- a person who is busy preparing food;
- a household member who came to the kitchen to pour himself some water or drink tea, for example.
In addition, this distance will be required so that you can comfortably and without incidents:
- load dishes into the dishwasher;
- remove food from the oven, refrigerator, cabinets, etc.
If the kitchen is a passage room, then you need to be even more attentive to the safety of distances.
If the kitchen is a passage room, which is especially common in the layout of cottages and private houses, then this distance must be increased to one and a half meters.
If the kitchen is very small and is not a walk-through room, you can arrange meter-long passages in it.
No. 5 – Rule for proper placement of the refrigerator
So, the refrigerator must be placed as close as possible to the sink, and not from the stove, because:
- Most foods are washed before cooking;
- Then the refrigerator can be placed in the nearby built-in oven and microwave unit.
However, in small kitchens, the refrigerator can, in principle, be installed in another room located near the kitchen, for example:
- in the corridor;
- in the living room, etc.
The refrigerator must be within the working triangle
No. 6 – Competently bypassing the inconvenient nuances of the finished room
As a rule, the kitchen plan is drawn up already at the stage of the presence of erected walls in the apartment. And not always their architecture can be convenient for everyone.
So, let's see exactly how you can get around the inconvenient nuances in the table below.
Table 1. How to solve problems that arise when planning a kitchen arrangement
| Nuance | How to adapt a feature to your needs |
| Ledges | Sometimes kitchens are equipped with completely unnecessary projections at various points in the room. They can also be used to place cabinets, however, so that the furniture does not stick out, taking up the free space of the room, it must be made shallow, that is, the internal capacity must be reduced. |
| Niches | Niches that cannot accommodate any piece of furniture, such as a closet, can be filled with shelves, and things needed in the household can be stored on these shelves, for example:
|
| Excessively narrow or wide doorways | If possible, doorways can be:
|
| Kitchen space is too small | If you want your small kitchen to be equipped with all the necessary appliances, you need to choose mini electronics options. It’s even better to take the built-in one, as it allows you to seriously save space. Among other things, you can save space by reducing the following electronic parameters:
|
The disadvantages of any kitchen can be turned into advantages
No. 7 – Creating a kitchen plan simultaneously in professional computer programs and in reality
To ensure that no problems arise after installing furniture in the kitchen, you must use the following to create a plan for its location:
- real room;
- professional computer programs.
It is better to create a kitchen drawing in specialized programs.
In other words, it is desirable that everything coincides in reality, the kitchen should be drawn at the beginning, for example, in one of the following free planners:
- program from IKEA;
- Planner5D;
- SketchUP Pro, etc.
Then, having sketched out a rough plan for furniture placement, go to your apartment or house and draw squares or other shapes directly on the floor and walls, replicating your furniture in full size. In this way you can:
- see the errors made in the calculations;
- confirm in the decisions made;
- come up with something new.
Kitchen project in SketchUp
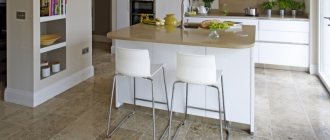
No. 8 – Rules for arranging the dining area
Not every apartment is so large in area that you can fit a spacious kitchen and even a dining room into it. Usually, when eating, people sit at the table exactly where the cooking is done. That is why it is important to take into account some important nuances regarding the arrangement of the dining area.
1. So, first of all, it must be said that each seat has its own parameters, namely:
- 60 centimeters wide;
- 40 centimeters deep.
Please note: the above parameters are relevant for traditional furniture, but more comfortable chairs, for example, with armrests, will have a larger width and length, therefore, these parameters will have to be increased.
Dining area
2. From the edge of the tabletop to the wall, for comfortable movement of the chair and the person sitting on it, there should be a space of approximately 80 centimeters. If the space is smaller, the person will have to sit literally squeezing into the table, which will be harmful:
- for his digestive system;
- musculoskeletal system;
- psyche, since while eating the body should experience complete comfort.
Be sure to follow the recommendations regarding the distance that should be between the chairs and the table and the wall
Design features of the kitchen set
After you have created a sketch, made accurate calculations, chosen a layout and decided on the material, you transfer the drawings to the workshop. Designs of kitchen sets with dimensions, creation of details, selection of accessories can be left to professionals. In the workshops, wood is cut into the necessary parts.
The sketches are transferred to the workshop for cutting out parts from wood.
Preparatory stage
First, you need to prepare the room so that you can easily measure the kitchen for the kitchen set. Nothing should be lying around underfoot; there should be free access to walls, risers, heating appliances, windows and other parts.
You should start measuring once the space meets the following requirements:
- The renovation of the walls and floors is completely completed. The windows have been replaced (if necessary), the cornice has been suspended. The walls must be level. If required by the project, a wall panel (kitchen apron) is installed, or everything is tiled. The same thing with the floor - all finishing work must be completed.
- The room is clean - the garbage has been completely removed, the floor has been washed.
- All furniture, household appliances, etc. were removed from the area where the set will be located.
Arsenal of available materials and tools:
- Roulette;
- Paper;
- Pen-pencil).
Experts use a laser tape measure to make the measurement results more accurate. She is easy to handle. Therefore, any client of a furniture company can measure their future furniture themselves with such a tape measure.
Edging parts
Having received the necessary parts, it is important to properly process the edges, since they cannot be hidden with paint or varnish. For this purpose, the ends are edged. This involves sealing all visible areas throughout the thickness of the wood with melamine or plastic tape.
- Place the part vertically so that the cut is at the top.
- Melamine or plastic tape has one adhesive side.
- Apply the adhesive side of the tape to the cut.
- For the best adhesion, the cut with the melamine tape is heated with an iron at medium temperatures through a clean sheet of paper.
- To prevent the plastic tape from melting from the iron, use a hair dryer to heat it.
- If you need to remove all excess and protruding fragments, wait until the part has completely cooled.
- Use a knife or other sharp tool to trim off the unnecessary edge.
- Round the corners, remove cut unevenness and roughness with sandpaper.
It is very important to properly process the edges of wood parts.
Placement of wall cabinets
The height and depth of wall furniture is also determined by your height. Stand against the wall and imagine that you are opening a wall cabinet and taking something out of it. Mark a spot on the wall where the cabinet handle, corner of the door, or bottom should be.
The optimal distance between the upper and lower cabinets is considered to be 50-55 cm, but it can be greater if it is more comfortable for you.
But will you be comfortable standing on tiptoes? Although this is a very useful exercise, you may become bored with it over time.
You may have been surprised by the specific point where we mentioned habits. If for young people or middle-aged people they are not so significant, then the same cannot be said about older people. If the kitchen will be at their disposal, it may be worth measuring a favorite old table or discussing his preferences with the person in advance.
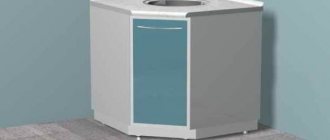
Features of designing corner cabinets
With a U-shaped or L-shaped layout, you need to design a corner cabinet. If the structural blocks are connected to each other at right angles of 90 degrees, you need to carefully plan drawers and opening doors. In this case, special inserts are made. This allows the doors and roll-out drawers not to intersect with each other.
For some layouts, you will need to design a corner cabinet.
If a corner cabinet is joined at a 45-degree angle, during the assembly phase the bottom and top of the cabinet are installed between the sides rather than on top. Only in this case will you get a smooth façade and be able to attach hinges.
Finding out the dimensions of the floor part
The height of the tabletop and, accordingly, the working area should be such that you do not work in a bent and unnatural state. Typically, this value is set by household appliances, but to increase it, you can purchase a thicker countertop or use a plinth.
The width of the work area is usually dictated by the size of the household appliance. The depth of shelves and drawers is determined by the volume of kitchen equipment. Alternatively, you can measure the shelves of your old furniture (if you still have it) that held everything you need.
What to consider when designing a drawer
Roll-out boxes are functional and spacious. There are two types of such elements:
- the metabox drawer operates on a roller system using metal guides;
- a box made of chipboard, which is made to individual measurements.
Drawers come in two varieties.
It is also worth understanding the differences between ball and roller guides.
- Roller guides are attached to the lower edge of the bottom of the drawer or cabinet. This is a budget-friendly and durable option for fittings that does not need to be lubricated. The drawer doesn't slide out completely, so you don't get a full view of the contents.
- Ball guides are attached to the central part of the roll-out drawer. They allow you to roll out completely and provide a full view of the kitchen utensils.
It is necessary to decide on the type of guides.
What type of guides you plan to use must be known at the sketching stage. Because for roller ones there is a tolerance of approximately 1 mm.
Instructions on how to take measurements step by step
When you need to measure the kitchen yourself, it is better to follow the same procedure followed by experts.
Measurement steps:
- Drawing up a drawing on a piece of paper. Here a rough plan for the placement of modules and household equipment is drawn in relation to existing utilities (water, sewerage, gas, heating, ventilation).
- Separately, make a sketch of the wall, which is planned to be covered with furniture. Here it is important to show flat details - where, what kind of sockets, switches, kitchen apron, ventilation hatch, window, doorway will be located.
- Find the curvature of the room - the optimal result is the smaller value of the difference between the parameters from the resulting picture.
- The distance between objects that are most important for the kitchen work area. Everything must be measured from one point. They usually take as a basis one corner that is closest to the future headset.
- Separately, the design of furniture details is made. It is necessary to measure facades, buildings, etc.
It is better to draw a plan from several angles: top view, frontal view. It is also necessary to indicate the opening angle of swing doors.
The premises are measured at least at three points to understand how crooked the ceiling is in relation to the walls and floor. For example, if this is the length of the wall, then measurements should be made taking into account some indentations.
| We measure the length of the kitchen in three places | Offset from the floor |
| Bottom wall length | 100 mm. |
| The middle of the kitchen - in the area where there will be (or already is) a wall panel (kitchen apron) | 850-900 mm. |
| The top of the kitchen is in the place of the planned furniture. | 1600 mm. |
In the case where there are differences in length of 3 m by 30 cm, adjustable legs for kitchen modules are used. They allow you to align the headset as required by ideal geometry.
Placement of equipment and sockets
The electrical network and sockets are thought out during the period when you create the first sketches of kitchen units. Even if you don’t currently have a dishwasher, but are planning to buy one in the future, be sure to make an outlet for it. Otherwise, some time after creating your dream kitchen, you will have to solve new problems of lack of network connection points.
It is recommended to provide an outlet for the dishwasher.
Each built-in appliance must have its own outlet.
- For the hob and oven, make two sockets so as not to connect a double or tee. Don't make the sockets too high or low. 0.6-1 m from the floor level is considered optimal.
- The refrigerator usually has a short cord. The socket must be in the area where it is located and on the side where the wire comes out.
- For a washing machine or dishwasher, the sockets are located quite low, 20-40 cm from the floor level.
- If you plan to install an outlet immediately behind the equipment, add 5-10 cm to the depth so that the equipment fits into the niche.
- Install the microwave oven and coffee machine at shoulder or eye level of an adult. Since this is an appliance that is used daily, sockets must be freely accessible.
- The hood requires a separate outlet, which is designed in the upper area behind the kitchen cabinets.
It is recommended to place sockets and switches according to the diagram.
How to select the correct size of cabinets
The standard size of kitchen cabinets is therefore a standard because it was designed for use in standard kitchens. However, unfortunately, the premises in our new buildings are not built according to the standard at all; accordingly, even being called standard, they may have slightly different parameters. It turns out that cabinets need to be selected based on this risk. But it’s better not to take risks, but simply prepare by taking preliminary measurements of the kitchen.
The parameters of the kitchen set, even average ones, may not be suitable for your seemingly typical kitchen
So, the headset should fit into the room as accurately as possible. If, for example, a kitchen water heater is installed, then the pencil case for it needs to be built in so that it:
- did not clutter the room;
- fit in height.
Of course, if the furniture is selected for a kitchen that is decorated in a loft style, then, most likely, you don’t have to worry so much, since a loft does not imply the presence of small rooms at all. However, for all other kitchens, choosing furniture products is not so easy.
Loft style kitchen
Height detection
So, the optimal height of cabinets from the floor should be from 180 to 250 centimeters. At the same time, the height of the cabinets located below should be selected based on the height of the people using it. So, on average it will be about 85 centimeters. Therefore, when choosing a specific cabinet, try to immediately evaluate the dimensions of the products. They must necessarily match your height.
Ergonomics in the kitchen
The same should be done for the upper cabinets. Imagine that you hung them too high, while your height, so to speak, is small. As a result, it will be very inconvenient for you to get dishes and other kitchen kitsch from the upper, and sometimes lower, shelves.
Between the tabletop of the lower row of cabinets, as well as the lower end parts of the upper row, there should not be a distance exceeding a gap of 45 or 50 centimeters.
If you don’t guess with some sizes, then you yourself will subsequently find it inconvenient to cook in your own kitchen and, in principle, to be there
The total height of kitchen cabinets from floor to ceiling should not exceed 250 centimeters , since in this case the pieces of furniture we are interested in simply will not be included in either a standard or non-standard kitchen, with the only possible exception when it comes to on the design of space in a separate residential building.
Depth detection
Such an indicator as the depth of the cabinets is very important, since it is this that ensures the complete and most comfortable storage of the items you need in the kitchen, for example, sets of dishes and other utensils. Thus, it is recommended to increase the standard value of 20-40 centimeters, for example, to 50.
Today it is quite easy to make custom furniture, so you can move away from standardized norms in favor of less trivial solutions
However, if you want, you can also design cabinets of greater depth, the only thing is that in this case you need to make sure that they do not clutter the room.
Definition of width
Standard widths for kitchen cabinets may vary due to certain differences between these designs.
Table 4. Width of cabinets of various designs
| Description of design | Options |
| Single door lockers | This indicator of a single-leaf type of structure, the width normally ranges from 30 to 50 centimeters |
| Double door cabinets | For cabinets with two doors, the figure we are interested in will be approximately 60 to 100 centimeters |
| Corner designs | Corner cabinets, as a rule, are produced by themselves with a width of 90 centimeters. At the same time, however, the width of their facades is calculated according to the formula of isosceles triangles, which we have known since the time we studied geometry at school. So, in our case it will be equal to 130 centimeters. |
| Upper cabinet width | The width of the upper cabinets directly depends on the same indicator for the lower cabinets. So on average this figure ranges from 30 to 100 centimeters. |
| Facades of upper corner structures | An indicator such as the width calculated for the upper corner cabinets will be about 85 centimeters. |
Kitchen ergonomic rules
How to Design a Very Small Kitchen
In a small kitchen, use every useful inch. Even small rooms can be made cozy, convenient and comfortable.
- If possible, move the dining area to another room. This way you can create your workspace as comfortably as possible.
- Remove doors with hinges that open into the room. Make an arch or sliding structure.
- Make a kitchen set to order or do it yourself. Only individual measurements will give you maximum functionality of the furniture.
- Take your room design seriously. Make a kitchen in light colors without large patterns with light-reflecting surfaces.
If you follow the recommendations, even from a very small room you can extract the maximum useful space.
Now that you know almost everything about the layout, location of appliances and outlets, it's time to take a critical look at the kitchen. You may want to improve and transform something, replace or create something with your own hands.
Why is it better to make a kitchen yourself?
Objective reasons for making your own kitchen according to your own sketches and drawings are the following:
- It is possible to create furniture cabinets and shelves that are ideal for a specific room in terms of its parameters and configuration. In addition, when creating a kitchen sketch, you can immediately determine the convenient location of all kitchen accessories, the number and shape of furniture pieces.
Self-made kitchen furniture will definitely become a source of pride for the owner.
- Considerable cost savings are achieved, since a ready-made set will cost significantly more, although it can be made from the same material, which you can choose yourself. Everything is understandable - in addition to the material, you have to pay for the work of the craftsmen, transportation costs, and a whole list of all sorts of other taxes and deductions known only to accountants. All this is included to one degree or another in the selling price of the kit.
- The exclusivity of the design of the furniture set is ensured.
- It will probably not be an exaggeration to say that for the majority of real owners (let’s not take into account pathological lazy people) such independent furniture making becomes a very exciting activity, an opportunity to show their skills and creativity. Well, the finished kitchen furniture, made with one’s own hands, is an indisputable source of pride.
As you can see, there are quite enough reasons to make a kitchen set with your own hands. Well, their totality should generally dispel all doubts. Naturally, if the owner is not a complete layman in these matters.
Options for the location of kitchen units - 50 photos
Working surface height and other furniture parameters
When manufacturing a kitchen set according to your own dimensions, it is possible to comply with ergonomic requirements and take into account the anthropometric data of the kitchen owner when calculating the main parameters of furniture modules (height, depth). The main parameter that ensures functional and comfortable activity in the kitchen is the height of the working plane.
Recommendations for choosing the height of the work surface
Note! The height of the working surface should be the same for the entire set.
The anthropometry of a man and a woman is different, so it is worth taking into account the gender of the kitchen owner.
The average height of typical countertops is 85–86 cm and is aimed at the average height of a woman – 164 cm. For taller people, the height of the countertop is 90 cm. At the same time, 15–20 cm is the height supports. You should also consider the following recommendations.
Table 5. Standard parameters
| Illustration | Description |
| The maximum height at which wall cabinets and shelves can be located is 210 cm. |
| Parameter No. 2 | The standard working surface depth is 60 cm and corresponds to the parameters of the stove and refrigerator. |
| Parameter No. 3 | Comfortable and safe is the height of the top shelf of the wall cabinet not exceeding 190 cm. |
| The pencil case has standard sizes from 210 to 240 cm. |
| Parameter No. 5 | The standard depth of wall cabinets is 30 cm. |
Note! When making a kitchen set, corner, straight and end connecting and protective strips are used to connect individual elements of the countertop, which protect the joints from dirt and moisture.
Types of connecting strips
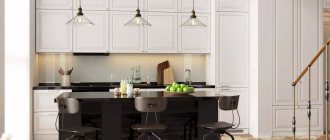
In small kitchens, small-sized household appliances are used, which saves space while maintaining the full functionality of the room.
Interior of a small kitchen