At a certain age - not very respectable, but already almost reasonable, everyone was naughty and schoolchildren. Even the inveterate excellent students dreamed of conducting a stinking chemical experiment under the window of the sports teacher - so as not to force the scientist to dangle on the horizontal bar like a sausage. Having our own inventive back-eaters, we already have to ask the exact opposite question: How to eliminate the consequences of the actions of a domestic demon? Today on the agenda are specifics: Do-it-yourself school board made or restored.
Today we will make a modern school board
All about slate paint: benefits, application, DIY
Chalkboard paint is an excellent option for creating a stylish, modern interior.
Elements with such a coating will be appropriate almost everywhere – from a children’s room to a solid office. Recently they have become a real design trend! But the use of unusual paint in the interior is justified not only from a design point of view. Slate surfaces are also very practical. They are a great help in raising children, communicating with family, at work, and just in everyday life.
Features of slate paints
These paints are popularly called chalk paints. They create a durable matte, slightly rough coating on the surface on which you can write with chalk. The effect is like the familiar school board, only much better.
Blackboard effect in an apartment using slate paint
Modern slate paints have high performance characteristics:
- create a very hard, abrasion-resistant coating;
- have high adhesion;
- They don’t give any shine at all (drawing on such a surface is a pleasure);
- after drying - fireproof and non-toxic, suitable for use in children's rooms;
- easy to clean with soapy water (removing annoying chalk patterns is not a problem at all);
- Easy to apply and dries quickly.
On a note! Chalkboard paints are sold in cans (for application with a brush or roller) and in cans (for easy painting of geometrically complex surfaces).
Manufacturers offer ready-made emulsions in a variety of colors. Thus, Siberia paint is available in gray, burgundy, brown, black and dark green. Tikkurila offers those who wish to tint the colorless base into one of the three hundred shades of the branded palette. And Rust-Oleum has a completely transparent slate coating. It can be applied to any colored surface in the house.
What is a chalk board?
The paint that is used for slate boards is used specifically for furniture to give the surface a matte, velvety finish. It helps make the item pleasant to the touch. It was created by British designer E. Stone. It appeared on the building materials market in the mid-90s.
In addition to the fact that you can draw with crayons on this paint, it also has other advantages:
- Great for any surface and lays down in a perfect, even layer;
- in contact with the surface, exhibits excellent adhesion qualities;
- helps to hide defects that were on the old coating well;
- quick drying;
- no pungent odor;
- is not a toxic material.
The only disadvantages include the price and shortage in the construction market. It costs much more than regular paints and is not always available. Therefore, in order to save money, most make slate coating using cheaper and more accessible components.
The created board will be an interesting item that will help simplify life for all family members: keep the little ones busy with drawing, and give adults the opportunity to leave live messages in the kitchen.
What to paint under the slate
Chalkboard paints can be used throughout the home:
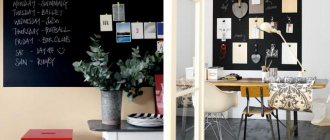
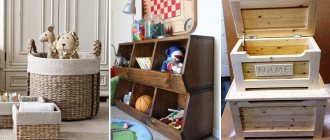
- In the nursery. If you install a large board here or paint over an entire wall with chalkboard, children will have a place to create and learn. And the rest of the walls in the house will be completely safe.
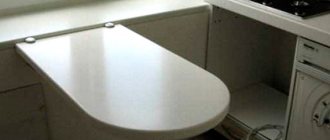
- In the kitchen. Individual slate boards, kitchen aprons, and painted kitchen cabinet doors look very nice here. You can write down recipes, menus, reminders, shopping lists, and just declarations of love for each other on them.
Important! Some paints become discolored by hot grease, so they should not be applied near a stove.
A variety of materials can be painted to look like lead:
- wood, chipboard, MDF, fiberboard;
- metal;
- plaster;
- drywall;
- brick;
- glass;
- ceramics.
Slate paints have found their application not only in school classrooms, but also in apartments, cafes and other public institutions.
All slate paints are intended for interior work. They do not tolerate low temperatures.
Dyeing technology
Chalkboard paint is very easy to use. Anyone can paint a wall or make a cute note board with their own hands.
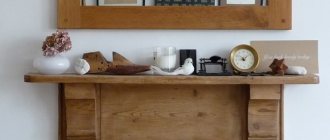
A hand-made slate board is not only a stylish, but also a functional attribute in the interior
The painting procedure is as follows:
- The surface to be painted should be cleaned of old coatings. If necessary, it is leveled with putty or sanded, and then washed to remove dust and dried.
- To ensure that the paint lies evenly, the surface underneath is primed and dried. Ideally, you should use a special primer for slate paints.
- To create a neat slate rectangle on the wall or refrigerator door, cover the surface around the perimeter with masking tape.
- The emulsion is mixed well and applied in several layers. Each layer must be completely dry before the next one is applied. Painting should be done in a ventilated area with an air temperature of +10°C and humidity up to 85%.
Advice! Slate paints harden quickly, so you need to work with them quickly.
You can wash the slate surface with soap or other household chemicals only a month after painting.
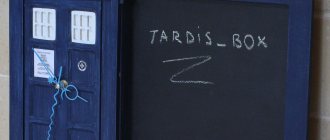
Laconic master class
After a long conversation about materials, it was finally time to make the board itself. I tell and show how we made a board from plywood in the 152x152 cm format. 1. Take a sheet of plywood and use sandpaper or a sander to smooth out everything that seems uneven. 2. We mount the sheet on the wall in several places using screws.
3. Use putty to mask the installation sites. After drying, sand off the excess putty.
4. Prime the surface twice. 5. Use a roller to paint the surface with chalk paint. We wait for it to dry and paint again.
All is ready! All that remains is to dress it up in a baguette to give it the most complete look and hide the side surface of the sheet.
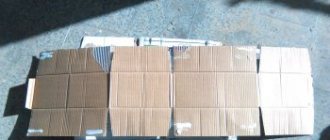
We use the remaining paint usefully: we paint all the small cardboards in the house that we can get our hands on. After drying, we insert it into a frame, and we get magical souvenirs that can be given to friends or thrown at home for notes.
With this simple method you can decorate your home or office interior, vary it with chalk lettering and add a little more comfort to the environment. Happy crafting and beautiful chalk boards!
How to make your own slate paint
Factory emulsion is sold in cans and jars of 0.5 and 1 liter. But many simply do not need such an amount of material. In this case, paint with a chalkboard effect can be made with your own hands. It's much cheaper.
First way
All you need is:
- Any acrylic paint – 1 cup.
- Cement (regular “pure” or any cement mixture) – 2 tablespoons.
The ingredients are thoroughly mixed and inexpensive chalkboard paint is ready.
On a note! Dolomite or marble chips are added to factory paint. A homemade cement mixture will not provide such a durable coating. It will get scratched faster.
The most difficult and interesting thing in this matter is choosing the color of the emulsion. Many people don't like traditional dark shades. In this case, you can use other colors on which the chalk pattern will be visible. Light, faded, pastel colors are immediately excluded. But it will be almost as convenient to draw on a bright background as on a dark one. Excellent options are bright red, rich purple, grass green, deep blue.
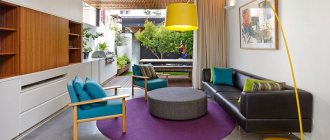
The slate wall does not have to be black; any color of rich tones can be used for painting
It will be very interesting if you use several slate panels of different colors in the interior at once.
Second way
Before you make slate paint using this recipe, you should make sure that you already have everything you need on hand. If you have to buy each ingredient, then it may be cheaper to immediately purchase a ready-made factory emulsion.
To prepare about 50 ml of slate paint you will need:
- 3 tbsp. l. acrylic paint of the desired color;
- 1 tbsp. l matte acrylic varnish;
- 1 tbsp. l. (without a slide) cement, cement putty or grout for ceramic tiles;
- 1 tbsp. l water.
First, grout powder or cement is placed in the container - it will provide a rough surface. Then add paint, which will give the finished mixture the desired color, and varnish (it will make the emulsion more plastic). Now all that remains is to add water and mix everything very thoroughly.
Important! The mixture should be well mixed. If there are lumps in the mixture, they will ruin the painted surface.
Do-it-yourself slate paint is applied in the same way as store-bought paint. It is given time to dry and harden before applying the chalk designs.
Don’t forget about careful use of finished surfaces. Despite their high wear resistance, slate panels are easily scratched by hard, sharp objects. Therefore, it is not recommended to draw on them with cheap “school” chalk mixed with sand and pebbles. And if you use soft crayons and wash the drawings with a soft, wet cloth, the slate coverings will decorate the interior for a long time and serve as a convenient field for creativity.
Source: otdelkagid.ru
What materials will be needed?
I will dwell on this issue in detail, because it is the most difficult in the entire manufacturing process. First of all, because you can take almost any materials, but the result will be different. Now some details.
In order to make a chalk board, you need three things:
- base for painting,
- special paint,
- frame of suitable size with suspension.
We take a ready-made frame, if available, or order it from a framing workshop. If you need a standard format like 70x50 or 30x40, then it’s cheaper to buy a ready-made one at any large construction hypermarket (Ikea, Obi, Leroy Merlin and the like). But in a baguette there will be a richer choice and it is possible to make the desired size with an accuracy of 5 mm. By the way, the finished frame can be decorated so that it fits exactly into the interior. You can read more about this.
LiveInternetLiveInternet
– Quote book
Sizes: XS-S(M)L(XL). You will need: Novita Isoveli yarn (75% wool, 25% poly.
Choosing a fillet knit for a cotton cardigan is a wonderful decision, resulting in an eff.
A long cardigan is a universal item in the wardrobe, and if you choose the color of the yarn, take into account.
The brightness of the cardigan, which with buttoned fronts looks like a poncho, is excessive at first glance.
–Categories
- BAGS, WALLETS (93)
- knitted, wicker (42)
- sewn, patchwork (34)
- leather (8)
- other materials and techniques (7)
- BATIK, PAINTING (42)
- HEADWEAR (34)
- knitted (48)
- stitched (13)
- various materials (12)
- bandages (3)
- FOOTWEAR (10)
- (0)
- PAPER PLEASURE (80)
- cardboard (32)
- scrapbooking (29)
- newspaper (23)
- BEING BEAUTIFUL IS SIMPLE (97)
- EMBROIDERY (274)
- KNITTING (1078)
- accessories (49)
- shawls, capes, ponchos (46)
- scarves, bacti (38)
- handbags (11)
- hats, headwear (7)
- children's (31)
- swimwear (33)
- men's (29)
- coats, suits, dresses (215)
- shoulder products (342)
- belt products (51)
- patterns, techniques (313)
- DECOUPAGE (121)
- HEALTH (141)
- INTERIOR. REPAIR AND DESIGN (226)
- furniture (44)
- bathroom/toilet (12)
- mosaic (27)
- lamps (21)
- INDOOR GARDEN (126)
- useful gadgets (13)
- exotics (10)
- annuals for balconies (9)
- berries (8)
- orchids (8)
- herbs and spices on the window (7)
- vegetables on the balcony and window (6)
- COOKING (608)
- fish dishes (40)
- cakes, pastries (40)
- meat dishes (25)
- bread (19)
- From chicken and other poultry (17)
- vegetable (13)
- flatbreads, pancakes, pancakes (12)
- legumes and cereals (11)
- quick pies (10)
- soups (5)
- distillery (67)
- baked goods (37)
- blanks (86)
- molding and rolls (19)
- salads and snacks (75)
- sweet-faced (65)
- sauces, seasonings, toppings, spreads (26)
- tea joys (24)
- MOLDING (132)
- gypsum, other masses (27)
- polymer clay (62)
- gadgets (19)
- cold porcelain (24)
- PATCHWORK, QUILTS, PATCHWORK (74)
- FAVORITE Cottage (127)
- MACRAME, WEAVING (38)
- FUR (36)
- MINIATURE (23)
- FASHION AND WARDROBE (51)
- details (38)
- images (21)
- color (19)
- directions and styles (17)
- collections (12)
- designers, personalities (6)
- ABOUT NOTHING. Truth of life (66)
- ALTERATIONS, CUSTOMIZING (63)
- GIFTS, SOUVENIRS (86)
- SAILOR YANIHA (193)
- underwear and others like that. (23)
- outerwear (12)
- toys (25)
- padding and accessories (10)
- belt products (21)
- simple patterns (55)
- transformers (14)
- sewing: devices, techniques, tips (43)
- ENTERTAINMENT AND INTERESTING (77)
- COZY TEXTILES (161)
- JEWELRY AND Bijou (miscellaneous) (164)
- beads and beads (89)
- wire and metal (16)
- FELTING (20)
- PHOTOGRAPHY (19)
- STORAGE, ORDER, CLEANNESS (106)
- DIY FLOWERS (96)
- Templates, sketches, ornaments, prints (37)
- I'm a braggart (8)
- APPEARANCES, PASSWORDS (87)
–Photo album
–Tags
–Links
-Music
–Search by diary
–Subscription by e-mail
–Interests
-Friends
– Regular readers
–Communities
-Statistics
Making your own slate board for drawing or writing
Monday, August 26, 2013 18:03 + to quote book
When my boys were little, they committed sabotage worse than the pests of the 30s. Either they improved the design of freshly hung wallpaper using felt-tip pens, or they managed to cut out flowers from wallpaper prepared for hanging. And of course they got it for gingerbread. It’s a pity at that time I didn’t even realize how easy and simple it was to arrange a place for kids to draw on the wall. I hope someone finds the special paint recipe useful. You can draw on it with crayons, like on a blackboard. Wash with a damp cloth.
Any surface can be painted. The ingredients are simple.
Prepare a special composition in a small container in the ratio of 2 tablespoons of cement to 1 cup of paint. If you are making a note board, you won't need as much paint - reduce the amount while maintaining the proportion. Mix the composition thoroughly. The cement is the most common, acrylic paint. You can take black, or you can take colored. Just keep in mind that cement will make the paint color a little lighter.
Apply the composition to the surface of the hardboard. Place your strokes in one direction. When the layer dries, apply a second one, working with the brush perpendicularly. You can make a writing board, or you can paint part of a wall or a cabinet door.
There is a special paint that performs the same functions - turning any surface into a place for drawing or writing. But it is quite expensive, about 800 rubles per liter. It has no odor and dissolves in water. 1 liter jar is enough for 9 - 12 sq. m.
Here's how it works in an example:
Use it! Joy to your children and saved nerves to you.
Source: www.liveinternet.ru
Base for painting
The most exciting thing is that it can be virtually anything:
- Fiberboard,
- chipboard,
- plywood,
- binding cardboard with a width of 1.2 mm.,
- iron sheet.
We turned all these materials into slate boards and they behaved unsurpassedly during future use. You can completely do without such a base, and just take and paint a piece of the wall in the room. The wall must be plastered and well primed. If you paint the wall, then the frame will not be useful. Let's say that you need a specific board. How to choose the material? I’ll write briefly about the pros and cons of each.
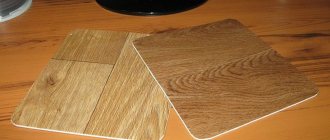
Cardboard is light in weight, usually a sheet of cardboard can be 70x100 cm in size. It is comfortable to work with, it is easy to find on sale, and if desired, it can be cut to a suitable size with an ordinary breadboard knife. The most interesting thing is that the paint lies evenly on it, forming a narrow film on the surface, after which the cardboard itself no longer resists water, so you can wipe off the chalk from it using an ordinary dampened rag. Disadvantages of cardboard:
- limited size,
- Without a solid back in the center, on huge formats it can sag in a bubble, but on 30x40 this will not happen yet, so for small sizes it is virtually flawless.
Plywood is a good eco-friendly material, suitable for large formats, it will not lead anywhere even at a size of 1.5x1.5 m. It is convenient to mount it on the wall. The fasteners can be recessed and the space where the sheet is attached to the wall can be leveled with putty. In general, everything is fine with one exception: - plywood does not provide a completely smooth and even surface. After painting, the structure of the wood is visible in some places. In principle, this does not interfere with drawing, but it will not suit perfectionists. An iron sheet is taken in those cases when you want to make the board also magnetic, and the paint has already been purchased as an ordinary one, without magnetic primer. The paint adheres perfectly to the alloy, there are no problems with this, but a narrow alloy can also bend at enormous sizes.
Chipboard and fibreboard give a completely smooth surface after painting. The impressive dimensions of the sheets allow you to approach the matter on a grand scale, without limiting yourself to the moderate 50x60 or 70x100. It is also easy to mask the fastening points on the chipboard with putty. It is more problematic to do this on fiberboard, but with some skill it can be done. A significant disadvantage of chipboard is its greater weight. Fiberboard does not have such a defect, which makes this material the most comfortable of all the above.
DIY school board
We were all schoolchildren, and once stood at the school board, answering a lesson. Now such writing boards have migrated to offices and homes, because on such a surface you can write not only equations and formulas, but also schedules and to-do lists. If you have a schoolchild in your house, then you can make him this convenient device and then he will be able to do his homework using a homemade school board. Making a school board with your own hands is not difficult, the main thing is to follow the technology, and then the board will turn out almost the same as those available for sale.
Content:
Content:
What is it for?
Such a necessary thing in any household may be needed for thousands of different circumstances:
- it is very comfortable to write about all temporary promotions (coffee to go, discounts only now, promotion of the day and the like),
- this is a beautiful planner for the next week or month: all tasks are visible from afar and are always in sight;
- At home, this is a good way to keep children busy with drawing, practicing writing letters, learning a foreign language or vocabulary words, because the notes are always in front of their eyes and the information is remembered much faster;
- it can become a real art object if you just master chalk lettering yourself or order its beautiful design from a specialist.
Here are some examples of great designs for inspiration.
Materials and tools
To make a school board with your own hands, you will need the following tools and materials:
- For 16 mm thick chipboard base
- For the front surface, frosted glass with a thickness of at least 3 mm.
- Aluminum U-shaped profile with a width of 25 mm and an internal distance of 20 mm
- The enamel is black or dark green. You can also look for paints with fine porcelain abrasive (for example, these are found in machine tool industry). This enamel is highly durable and will last for many years.
- Canopies for wall mounting
- Self-tapping screws
- Silicone sealant (you can use glass glue)
- Insulating tape for seal
- If you want to make a school board with opening sides, you will need butterfly hinges or piano hinges. But usually preference is given to ordinary rectangular boards without sidewalls and with dimensions of 200x135x2.5 cm.
Do it yourself on “Good IS!”
Have a nice day, honored guests of the “Good IS!” project, the “Do It Yourself” section!
In this article I will tell you how you can make a school board with your own hands. I don’t understand how anyone, but as a child I tried to make a drawing board at home, and according to my memoirs, I only made my parents laugh. I hope that after reading the article, you can amuse your own children with practical advice, and help them build a real school board without the help of others. Naturally, you can purchase a school board, but believe me, following the instructions below, building it with your own hands will not be difficult for you, the main thing is to be careful and take turns.
School board details
Since this product uses glass, it is better to entrust its cutting to craftsmen in a glass workshop. You can also order delivery of finished parts there. So, the school board consists of the following parts:
- Glass dimensions 1997x1347 mm
- Chipboard dimensions 1999x1349 mm
- Upper and lower profile (2 pcs.) 2002 mm.
- Side profiles (2 pcs.) 1347 mm.
Before starting work, all profile parts must be cut at an angle of 45 degrees and filed with a needle file or a fine file.
Choosing a board base
You can choose absolutely any base, it could be:
- Any plywood
- Any piece of board, table top or piece of old facade
- Mirror glass or
- Cardboard - take apart the old cardboard box and the base is ready
If you choose wood as a base, then do not forget to sand it and treat it against corrosion - read more about processing wood, cuts and branches here.