The Pax cabinet from IKEA is one of the most convenient cabinets to place in a small room or hallway, as it does not require much space. Pax is able to accommodate many different things, from shoes to clothes that need a hanger. At the same time, it is not capable of spoiling the interior, since it is made in classic colors that match virtually any color scheme.
Wardrobe Pax Ikea
However, assembling Pax without instructions is not so easy, and there are a lot of cases when instructions are missing. For example, a cabinet was purchased through Avito, but the previous owner lost the instructions somewhere and can only explain the cabinet’s structure in words. Unfortunately, under such conditions, it is no longer possible to call an installer from an IKEA company store, and you will have to rely only on your own strength.
Cabinet interior
Self-assembly of IKEA brand furniture. The main mistakes when assembling a cabinet - Pax coupe from Ikea
The Pax cabinet from IKEA is one of the most convenient cabinets to place in a small room or hallway, as it does not require much space.
Pax is able to accommodate many different things, from shoes to clothes that need a hanger. At the same time, it is not capable of spoiling the interior, since it is made in classic colors that match virtually any color scheme. However, assembling Pax without instructions is not so easy, and there are a lot of cases when instructions are missing. For example, a cabinet was purchased through Avito, but the previous owner lost the instructions somewhere and can only explain the cabinet’s structure in words. Unfortunately, under such conditions, it is no longer possible to call an installer from an IKEA company store, and you will have to rely only on your own strength.
Cabinet interior
Final stages
When the set is mounted and installed, decorative elements are attached to it. Door handles, glass, etc. Drawers are inserted.
Check the strength of the structure. Fix the decorative plinth near the table top.
The assembly of the IKEA Method kitchen is carried out in a similar way. The difference between old IKEA models and new products is only in appearance and some small details.
Article on the topic: DIY kitchen cabinet
Video instructions for assembling metal furniture
| Video instructions for assembling Wardrobe Systems |
| Video instructions for assembling filing cabinets of the KR series |
| Video instructions for assembling bag cabinets of the ShRM series |
| Video instructions for assembling medical cabinets |
| Video instructions for assembling SHAM series archival cabinets |
| Video instructions for assembling a metal cabinet of the ShRM-AK series |
| Video instructions for assembling a metal workbench of the VP series |
The main mistakes when assembling a wardrobe - Pax coupe from Ikea
Difficult? Let's do it - assembling Ikea furniture - at your home or office!
The manufacturer makes changes to the technical characteristics of its product over time to improve the quality of the parts.
► How to properly disassemble Pax wardrobe doors?
Additional options include door closers and interior lighting using photo elements. Attention was also paid to filling the cabinet, including auxiliary elements. In our opinion, the instructions for assembling the Pax wardrobe, developed by Ikea, best show the step-by-step sequence of connecting parts and all the nuances of assembly; only the inattentiveness of the assembler and external factors can lead to errors.
► How to assemble a Pax wardrobe with low ceilings?
When installing a wardrobe on their own, the buyer sometimes encounters certain problems.
The Pax wardrobe doors touch each other and do not move well along the guide.
1. The doors are mixed up. On older cabinet models, the vertical frames of the front door are wider than on the inside. The frames of the door closest to the cabinet frame are marked “A”
. It is necessary to rearrange the roller system on the doors.
2. Do not tighten the screws when tightening frames or installing rollers. If the screw cannot be fixed - it is torn off or does not “go” along the thread - it is unscrewed using pliers, we “drive” the thread with a tap, and tighten the screw.
3. The roller has come off the guide, the door stop is not closed. We install the roller and bottom bracket into the guide and fix the limiter.
4. A foreign object has fallen between the doors.
5. Changes in cabinet geometry: uneven floors, uneven screeding of cabinet frame sections, fastening to the wall, which caused the cabinet to bend. Level the structure and eliminate all unevenness in the cabinet frame.
The closet door knocks when opening.
1. The wheel in the roller system is deformed. If the wheel is chipped, replace the roller bracket.
2. Visually inspect the roller wheel and remove any adhering particles of debris.
3. Sand in the top guide. We remove dust and other objects from the guide groove.
It is impossible to hang an assembled door.
Move the limiter on the inner door to a horizontal position, then hang the door - then move it to a vertical position - the door is locked.
Updated interior door roller! To open the lock - press on the appendage and pull it down. Secure the pax wardrobe door - pull it up until it clicks.
On the outer door the limiter is towards you, after hanging it - away from you.
Updated roller for the outer door of the Pax wardrobe! To open the lock - lift the element and pull it towards you. Lock the lock away from you until it clicks.
The Pax closet door rattles.
1. The density of the internal elements of the door is lost. Older models were equipped with rubber bands and foam stickers; perhaps over time the rubber bands lost their rigidity or popped out. There are often cases when the client himself removes the seal from the door frame during assembly, citing the reason that it was difficult to insert, which is absolutely not necessary to do, since the door will subsequently rattle when opened. More details - how to remove the door from the Pax wardrobe.
2. The screws are not tightly secured when assembling the doors and installing the roller brackets.
Drawers hit the doors when rolling out
1. Adjust the doors.
2. Move the bumper on the upper guide to the desired position.
3. Install the cabinet frame level, aligning the doors.
The back wall is falling out.
According to the assembly diagram of Ikea furniture, the Pax cabinet is attached to the wall of the room - this is what the Ikea manufacturer provided. This is not only for safety reasons, but also for the smooth movement of doors and the tight fit of the back wall of the cabinet to the wall of the apartment. If for some reason you refuse to drill, replace the nails with self-tapping screws.
There are not enough screws to assemble the doors.
Read the instructions carefully; not all holes are screwed into all the holes when connecting door frames. After installing the device for smooth closing of doors, the screws in the roller mechanism fastening are replaced and three extra screws remain.
► video of the assembly of the Pax wardrobe from Ikea
Correct installation of door closers - a device for smooth closing of doors
see instructions Let's do it - assembling an Ikea cabinet - at your home or office! When installing a wardrobe on their own, the buyer sometimes encounters certain problems. 2018-11-27T21:16:20+00:00, Furniture Service Masters
How to mount
The easiest way to deal with all the complexities of installing a Basya wardrobe is to entrust this process to professionals. But, if you don’t want to spend extra money, or are simply used to doing everything yourself, then you can try to assemble your furniture yourself.
When the frame is ready, you can nail the back wall to the base. Chipboard sheets are attached using self-tapping screws. They begin to be fixed from above and fall down. The back wall must be secured both from the outside and from the inside. After completing this process, it is advisable to check whether all parts are securely fastened - an installation error can significantly reduce the life of the cabinet.
Having secured the main parts, you can fix individual shelves inside the cabinet. To secure the five shelves, you will need self-tapping screws, wooden dowels, glue and a drill. The main tip to remember when installing shelves is to start at the top and work your way down.
When installing shelves, pay attention to the fact that their front edge is in front, and not rough, raw edges.
The most difficult step is installing the door. The sliding wardrobe door mechanism must be installed so that the door opens and closes well. How convenient it will be for you to use the wardrobe depends on how correctly the mechanism is installed. All rollers and fixing elements are included with the main parts. Additionally, there is also a mirror for the facade on a film basis. Finally, after all these procedures, close all visible holes with the decorative plugs included in the kit and check the quality of the assembly.
You can determine the high-quality assembly of Basya's wardrobe by a few simple details. First of all, a well-mounted cabinet stands level on the floor, without tilting anywhere. There are no cracks or openings at the fastening points. And the compartment door slides smoothly when opening and closing and does not make any unnecessary sounds. A properly installed closet can be moved to the desired area and you can start filling it with things.
Every apartment must have such a multifunctional piece of furniture as a wardrobe. It will save space in your home and organize space. Not everyone can afford to purchase it due to various circumstances. This is not a reason to refuse such a thing. For a jack of all trades, it won’t be too difficult to make and assemble it yourself.
Of course, some knowledge will be required. There is nothing complicated here as it seems at first glance. In addition, what joy and pride you will experience from the work done. After all, furniture assemblers charge quite a high fee, but you can handle it on your own.
After the decision to buy a wardrobe has been made, the need arises to assemble it correctly.
To assemble purchased furniture, you must follow the cabinet assembly instructions provided by the manufacturer. There are certain rules. By following them, you will assemble any item with high quality and in a short time.
- You shouldn’t take everything out of the packages at once, much less mix parts from different packs. Maintain the order.
- Read the instructions carefully so that later there are no overlaps and you don’t have to redo it again.
- Make sure the fittings and components are in place. Otherwise, you will not be able to completely assemble the furniture. The handles must match the color scheme. It is necessary that the drawer guides have a soft movement.
- Assemble one section at a time in order. You need to start from the bottom, gradually moving to the sides.
- Open the package, lay out the parts, prepare the tools.
- Mirrors and glass are installed at the final stage. This way you will avoid damage.
For assembly you need a screwdriver, a screwdriver, a hex key, and a tape measure.
If you do the manufacturing yourself, it will be much easier to assemble.
It is very important to follow the assembly sequence, otherwise you will be forced to disassemble and reassemble the cabinet in the correct sequence
Metal Furniture Assembly Instructions
| Instructions for assembling metal wardrobes: | |
| Assembly instructions ShRM-AK | |
| Assembly instructions ShRM-22 | |
| Assembly instructions ShRM-11 | |
| Assembly instructions ShRM-33 | |
| Assembly instructions ShRM-21 | |
| Assembly instructions SHAM-11.R | |
| Assembly instructions ShRM-24 | |
| Instructions for assembling TITAN-GS wardrobe systems: | |
| Instructions for assembling medical furniture | |
| Assembly instructions M1/M2 | |
| Instructions for assembling modular wardrobes: | |
| Assembly instructions ShRM-22M | |
| Assembly instructions ShRM-M | |
| Instructions for assembling metal archival cabinets: | |
| Assembly instructions for SHAM-11 | |
| Assembly instructions SHAM-11.K | |
| Assembly instructions SHAM-0.5 | |
| Assembly instructions for SHAM-12 | |
| Instructions for assembling metal shelving: | |
| Instructions for assembling a metal rack of the TITAN MS series | |
| Instructions for assembling a metal rack of the TITAN MS-T series | |
| Instructions for assembling metal handbags: | |
| Instructions for assembling a bag cabinet | |
| Instructions for assembling metal workbenches and tool cabinets: | |
| Assembly instructions for the VP series workbench | |
| Instructions for assembling a workbench of the VP - E series | |
| IP assembly instructions | |
| Instructions for assembling metal filing cabinets: | |
| Instructions for assembling KR card files | |
| Operating instructions for metal safes: | |
| Instructions for safe ESD 101H-ESD 104AH | |
| Instructions for safe SD101K-SD104AK; DS23K2 – DS50K2 | |
| Instructions for safe SD101-SD104A; DS23-DS50 | |
| Instructions for safe SD104 – DS182 | |
| Instructions for SFT series safes | |
Advantages of a modular system
Despite the fact that a modular kitchen set does not involve custom-made
(although sometimes this happens), it cannot be said that this furniture is completely standardized and faceless.
Modular systems are good because everyone can combine different modules to create their own unique interior.
In addition, the modular system allows you to save money by eliminating some unnecessary cabinets or tables, while at the same time increasing the ergonomic characteristics of the kitchen, filling it with only functional items. The advantages of modular systems also include speed of production: as a rule, all the main items of furniture from IKEA are available in the company’s warehouses, so you can immediately purchase and pick up your purchase immediately.
“Method” rulers are interchangeable,
and this allows you to avoid problems and unnecessary repair costs. So, if one module fails or is damaged in IKEA stores, you can buy another one of the same type, and if necessary, replace individual parts (for example, fronts, drawers or inset shelves), they can also be purchased separately.
An important aspect when buying modular furniture is the fact that the consumer knows exactly the final price: the cost of individual modules is fixed, so even before purchasing you can calculate exactly how much money will be spent on the set. The only figure that will be approximate is the cost of delivery, assembly and installation of furniture at the customer’s home: prices may vary among different specialists who engage in such types of work.
Opinion of a professional assembler
Probably, as a professional assembler, I come across what seem to me to be obvious shortcomings, but the ordinary consumer does not notice them at all, or considers them very insignificant. Or, as an option, the customers themselves have underestimated requirements for the quality of the kitchen, because for that kind of money they don’t expect anything else. Some people would agree with this, but I think that Borovichi’s quality is at a very low level.
Here is an example that Borovichi had to encounter during the last assembly of furniture. The side of the kitchen pencil case (the same part) is shown from opposite edges. If made correctly, they should be mirror identical, but we don’t see this
If you pay attention, the distance from the edge of the part to the center of the hole for the tie should be 8mm, but in this case it is 13mm and 3mm. It won't be hard to imagine how the pieces will fit together
Let's consider other cases with elements of furniture purchased in one of the supermarkets. On two of them we will see a half-glued edge. But this is not the worst flaw in the product, since these untreated ends will not be visible later. In the following photographs you can see the result that was obtained when the parts for the dowels were drilled incorrectly. Please note that only the right side of the cabinet is drilled correctly. The edge of the chipboard part is glued incorrectly.
Peculiarities
Swedish IKEA sliding door systems have their own distinctive features:
It is possible to assemble the door yourself from separate double door frames with guides and a set of different panels made of different materials in several color variations. To diversify the design, you can combine 2 sets of panels in one door system: make a different design for each leaf, or arrange the panels in a checkerboard pattern.
Frames with PAX guides for IKEA sliding doors are available in three color options:
They are made of aluminum.
Distinctive features
The products of the famous brand are really easily recognizable thanks to their special “handwriting”:
- Simple and concise lines.
It may seem that this decision seriously limits the range of furniture. But today there are quite a lot of trends in design that preach just such simplicity. Kitchen lines fit well into most fashionable interiors: from Art Deco and minimalism to cozy country and Scandinavian style.
- Standard sizes of furniture modules.
Most Ikea kitchens are distinguished by the traditional cabinet depth of 60 cm and the same dimensions. On the one hand, this allows you to freely combine furniture elements from different collections, on the other hand, non-standard models for the kitchen are quite difficult to find and, most likely, they will have to be ordered separately.
- Unified production technology.
It involves the manufacture of kitchen furniture from the most durable substitute for solid wood today - MDF or cheaper chipboard, but without the use of frame structures. The sets are durable, but the wall mounting system requires the use of special screws, plates and dowels.
Note: IKEA pays more attention to the reliability of veneered and laminated kitchen facades than to the walls. A multi-year guarantee is given only for furniture doors made of natural wood. Therefore, owners will have to worry about the safety of the laminated side panels themselves: keep them away from hot steam and water.
DIY corner cabinet design
Well, the dimensions: 850*110*2250. In height, almost to the ceiling. Those. You will have to assemble it while standing, which imposes some restrictions on fasteners.
I ordered laminated chipboard for cutting and edges at the factory according to my drawings. Drawings were prepared in SketchUp. If you are interested in how to design furniture in SketchUp, then there is a corresponding article: SketchUp: 3D modeling for carpentry.
In the picture, the sizes are creeping onto each other: this is a bug of Sketchup (or a feature): the font size does not scale when moving away. I sent each part to the factory in a separate file, everything is visible there.
Preparation of door facades
The same conductor made an additive for the shelves and hinges.
I ordered the doors from the same office where I cut the chipboard. They are an MDF profile in a film, fastened with special “butterflies” and in the center 8mm laminated chipboard. It was possible to insert a mirror, but since the bed is located opposite the door, it is not very good to hang a mirror: not everyone likes to see themselves when they are asleep
I marked the holes for the hinges using a ruler and drilled them with a forstner cutter - nothing complicated. Large diameters should be drilled at low speeds. I did this at the first speed of the screwdriver; as a result: neat chips do not scatter everywhere and it is easier to control the depth. It’s good if the centering spout is not very large, so there is less chance of drilling through.
I saw a jig for hinges on sale, but for me this is already overkill.
Examples in the interior
Ikea chairs look organic in any interior, especially Scandinavian. It is characterized by a light background and the most comfortable functional furniture, which 100% includes folding chairs. If you choose a discreet shade of the cover, then the furniture becomes almost invisible to others, while bright fabric, on the contrary, makes the chair stand out from the “gray mass” or the rest of the room’s decoration and makes it an accent.
The transformable chair looks good in a children's room and serves as its decoration if you choose a cheerful color - turquoise, black and white geometric print or light yellow.
Additional replaceable covers make it easy to update the sofa and change the interior.
The compact chair-bed easily turns into a comfortable single bed.
Three mattress options and a wide range of covers allow you to create the optimal combination.
Designer
Frame
Wipe clean with a cloth dampened in a mild detergent.
Wipe with a clean dry cloth.
Environment
The material from which this product is made is recyclable. Check the recycling regulations in your country and find out if there are recycling facilities in your area.
Materials
Steel, Steel, Epoxy/polyester powder coating
| The classic look of a folding chair bed. Unlike the other two models, there are armrests. The mechanical part of the structure is hidden. Due to the type of transformation, there are two transverse folds on the berth. By default, the kit comes with a medium-hard mattress. | |
| Ikea PS | Armchair: 88хх110х88 cm |
| The series is made in high-tech design. The transformation mechanism uses the accordion principle: the front part moves forward, pulling the back behind it. A tangible plus is an almost flat sleeping area with the exception of a fold in its lower part. This arrangement does not affect the quality of sleep and the orthopedic properties of the mattress. | |
| Lycksele | Armchair: 80x100x87 cm |
| Lycksele's design adheres to the Art Nouveau style, with its inherent minimalism. The model does not have wheels or side rails. It has an orthopedic mattress, making it suitable for daily use. Thanks to the latex filling, the sleeping place completely follows the contours of the body, which promotes proper rest. |
New items and catalog trends
The range of rocking chairs in Ikea catalogs is not that wide. But the small choice is due to the diversity of the model range. Almost all types of these products are present in the assortment. There is a wicker, wooden and combined rocking chair. Let's talk about them in more detail:
It's time to talk about how much a rocking chair costs in IKEA catalogs, and whether it is possible to buy products inexpensively, because, you see, price is one of the most important qualities of a purchase.
Source
Required Tools
To assemble a Malm single bed from Ikea you will need:
- accessories included: screws, dowels, bushings, plugs, nuts;
- hex wrench;
- wrench for adjustment from IKEA (included);
- screwdriver: flat and Phillips;
- screwdriver (if available);
- hammer.
To assemble the canopy, give preference to specialized VIDGA kits from IKEA. These include:
- ceiling fasteners;
- bus corner connection;
- single tire;
- runner with hook;
- miter box.
- curtains (1 pair);
- hacksaw;
- ladder;
- drill;
- pencil;
- screwdriver;
- measuring tape.
Difficulties in purchasing and incredible difficulties in assembly.
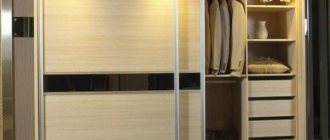
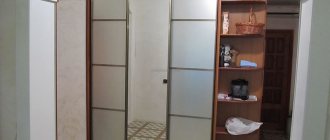
We purchased this five-door wardrobe for the nursery.
It was very difficult to create the required set of contents.
When the cabinet is now assembled, it seems like it’s nothing and there’s nothing special inside.
But we chose every drawer, every barbell, shoe rack, well, literally every design element with great effort.
We spent several hours at Ikea. I can’t give exact examples, I forgot the specifics, like a bad dream, but believe me, difficulties arose literally through one element.
And, of course, it was not without mistakes.
Instead of one of the three simple drawers for linen, we got a drawer with a glass front panel. It costs much more, but we didn’t go to change it.
And during assembly it also cracked! I definitely advise you not to take boxes with glass. The construction is flimsy.
Now about the assembly. This is absolute hell! My husband is not a beginner, he knows how to work with his hands, all the tools are available. But he also completely screwed up!!
It is very difficult to assemble a cabinet alone (even with my help). The instructions are not obvious.
And for some reason there were a lot of extra mounting holes.
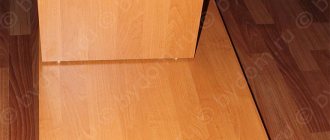
Already at the first stage, when assembling the frame, my husband confused the holes where to insert the base.
He assembled three cabinets in succession and installed a plinth in each with different hole options.
Take a closer look, in case 1 the base is placed correctly, in the holes in the front.
In cabinet 2 the base is recessed. There is a second row of holes, absolutely unnecessary. So he put it in them.
Well, in the 3rd case, he placed the base diagonally, connecting the first row of holes on the right and the second on the left.
Since the cabinet is face down during assembly, he did not notice this.
I drilled the cabinet firmly into the wall. I hung the doors. And I discovered this joint only when I started washing the floor and crawled up from below.
Of course, this is not striking. But why is there this additional row of holes? The cabinet should not come together if it is skewed. And he got ready.
But there are no holes for installing handles at all.
Of course, there are several handle options available, the holes may be in different places. But at least one starting universal hole could be made.
To push off from it and drill a second one if necessary.
Or at least make markings on the inside of the door.
No, figure it out yourself. It's good that my husband has a laser level.
How to arrange 5 pieces of handles evenly on a completely smooth surface?
Only professionals can do this.
And of course, the husband made a mistake. By the time he attached the handles, he was already tired, and drilled one hole in the wrong place. Exactly in the center of the handle-brace.
I was terribly upset. But we didn’t go buy a door to replace the damaged one.
We moved this door from the window closer to the corner, he filled the hole with a piece of wood, sanded it and painted it with white varnish. Almost invisible.
So my advice is, if you are not confident in your abilities, do not mess with this designer.
Source
Installation begins when planning the kitchen
Kitchen assembly is an integral part of the project . Therefore, the question of how it will be installed is something we must ask ourselves from time to time when planning an IKEA kitchen.
It is especially worth paying attention to such decisions as: the direction of furniture assembly, which will determine the width, the junction of the tabletops or the collision when opening the door.
When planning your kitchen, try to imagine the installation process.
We are skipping here the inclusion of such obvious issues as the shape of the kitchen, reflecting its unevenness and curvature, the location of electrical outlets or pipes running along the walls, without which you cannot plan at all.
Our advice when designing an IKEA kitchen is to ask yourself from time to time how it will be installed and visualize the process. This simple solution will allow you to avoid many unwanted surprises during the actual kitchen assembly.
PAX planner: set dimensions and choose design
PAX can be planned independently in the planner program, or with a specialist when visiting a store. The good thing about the second method is that a specialist can give you some advice or warn you against mistakes in planning. The first one will please those who do not have the opportunity to visit the store, because... IKEA is not available in all cities of Russia and CIS countries.
The price will depend on the content and dimensions. The most expensive will be tall cabinets with glass doors or veneer fronts. Panels on sliding doors made of fiberboard are the most budget-friendly.
In general, a cabinet assembled using the PAX system costs from 5 thousand rubles.
The project above is exactly my closet. And this is what it looks like in reality.
Dimensions of my closet: 236x58x150 cm. The price in this configuration, as can be seen in the screenshot from the program, is almost 27 thousand. In my opinion it is very cheap.
Facades: one sliding door - “Mehamn” under stained ash; the other is mirrored.
Frame sizes
Although IKEA claims that this wardrobe system allows you to assemble a wardrobe for almost any room, the size and capabilities of PAX are still limited.
In the catalog you can choose only 2 types of height and 2 depths:
The width is also not so simple. There are only three standards:
I wanted to install PAX not only in the room, but also in the hallway for outerwear. But precisely because of the width, we had to look for other options for arranging the hallway.
Corner
The PAX system allows you to assemble a corner or U-shaped wardrobe option. To do this, you need to purchase a special module.
Unfortunately, IKEA does not currently have options for frames with a beveled corner. And, in my opinion, it looks more beautiful with a right angle. Although, perhaps, a corner wardrobe in the shape of a trapezoid is more convenient to use.
Doors: hinged and sliding
Sliding ones save space, but from personal experience I will say that it is inconvenient to dress alone with such a wardrobe: while one half is open, access to the other is closed.
But in a small apartment or in a narrow corridor, there aren’t really any other options besides sliding doors.
But there are more design options among swing designs.
Internal filling
The interior arrangement and organization of storage is a separate delight. For this I am ready to endlessly praise IKEA.
Everything is thought out to the smallest detail:
This is simply paradise for those who love order and functionality!
Open wardrobes PAX
A large dressing room is every woman's dream. And with IKEA’s open storage system, you can get closer to your dream by organizing a mini version of it in the pantry, for example. Or under the stairs.
And if the size of the bedroom allows, then you can build a partition from plasterboard, organizing storage behind it.
Design options
For sliding doors, the catalog offers the following facade options:
The sliding door frame can be composed of different facades, because... its parts are sold separately.
The frames are available in only three colors: white, bleached oak and black-brown.
There is a larger range of swing doors. There are blue, green, gray, black, black-brown, light or dark wood, white and even with a floral pattern. There are smooth facades, with panels or with a mirror.
Internal filling
When purchasing a wardrobe from Ikea, each buyer has the opportunity to fill out the internal structure at his own discretion . Holes for the selected elements are made along the entire height of the frame. With this arrangement, you can place them at a convenient height. For internal equipment, the company has developed not only the usual shelves, rods and drawers, but also pull-out baskets and hangers for trousers.
If desired, closed drawers can be supplemented with suitable size dividers or inserts. The inserts are made of soft material and have different locations of compartments. Perfect for storing small items. The divider is designed for storing belts, scarves and other small items.
An alternative to closed drawers is a wire or metal pull-out basket. Due to its design, it provides a good overview of the contents and promotes air circulation. This element is available in various widths and depths.
An equally interesting element is the pull-out shelf for trousers. The design is equipped with several double slats, allowing you to simultaneously place two pairs of trousers or jeans on each holder. And the retractable mechanism provides convenient access and a good overview of the located items.
The clothes rail is selected according to the size of the closet and can be positioned either parallel to the length of the compartment or perpendicularly. The latter arrangement is usually chosen for a cabinet with a depth of 35 cm and has a retractable mechanism that allows you to easily reach clothes hanging at the back. On a parallel bar, you can install another additional one, with which you can place short items in two rows, thereby saving space.
The internal structure of the cabinet can be supplemented with flat pull-out shelves, complemented by dividers or inserts, special shelves and inserts for shoes, dividers for the frame and many other elements that help to organize things correctly and conveniently.
Assembly instructions
If you have at least minimal skills in working with a screwdriver, and the instructions do not seem like a bunch of incomprehensible words and pictures, then you can safely assemble it yourself. But not alone. Call a friend for help: sliding doors with glass are especially heavy and it is very difficult to install them alone. My husband and I assembled the closet together. We got it done in a couple of evenings.
Detailed instructions are included with the furniture. And if you lost it for some reason, you can find it electronically in the product card on the official website.
To imagine the full scale of the upcoming assembly work, watch the video:
Be sure to secure cabinets to the wall for safety.
Tools
Assembly occurs not only with the help of instructions, but also with the correctly selected tools. Depending on the type of product being assembled, additional The tools may vary, but the most commonly needed are the following:
- flat screwdriver;
- crosshead screwdriver;
- hammer;
- screwdriver
If for some reason you do not have the tools required by the instructions, buy them at the nearest construction supermarket. You should not try to make do with improvised materials, replacing, say, a Phillips screwdriver with a kitchen knife. This is wrong, since the assembly will be unsuccessful or fail, and the knife can also damage not only the surface of the furniture, but also you.
Opinions on review sites
In addition to quality, it is worth evaluating other properties and characteristics of this furniture. What do other buyers say about this?
My blog has also previously published reviews of PAX