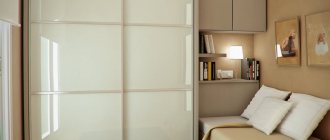
During the renovation of the apartment, my sister had a question about the future fate of the old wardrobe. After dismantling a narrow niche in the corridor under the ceiling, there were many things left that needed a new place. The best option turned out to be a balcony. Despite the small area, placing a closet there seemed like a good idea, but the test subject's dimensions did not match the required ones. So I decided to do a remodel.
Old double door wardrobe
The donor in our experiment was a 10-year-old 2-door wardrobe for dresses and linen produced by Zarechye LLC from Tyumen. This monster was made using old technologies; the doors, like the entire body, were made of chipboard, rode on combined guides and weighed several tens of kilograms. Mirrors on the front side added additional weight. The sagging ceiling of the cabinet put pressure on the upper rail, and tired lower plastic runners made it difficult to move the doors.
This is what the test subject looked like before disassembly, the doors were removed
What size will the rack be?
The width of the far part of the balcony is 1.1 meters. Minus the window sill, there remains 98 cm. They decided to leave the original depth - 60 cm. I foresee the question “why not make a built-in frame?” and there are several reasons:
- The plastic covering of the balcony did not provide for additional installation of internal structures - to install a built-in cabinet or shelving, it would have been necessary to remove panels and lay timber.
- The window and sill would still require a wall on the left.
- Time is the most valuable resource, and designing built-in furniture is not an easy process.
It was not possible to tear the mirrors off the doors, and there was no other material available for making the doors. Therefore, the closet turned into a rack. I also did not attach the back wall due to the difficulty of assembly in cramped conditions.
Decorate with mosaic
It is very easy to create a mosaic from broken tiles with your own hands. The article “Creativity from leftover tiles” has complete instructions for action. Such a wardrobe or chest of drawers will look especially luxurious in Mediterranean styles. You can also purchase ready-made mosaics in blocks.
Cutting the bottom and top plates
For this work, a Metabo circular saw and a hand saw for particularly difficult areas were used. Unlike the jigsaw, there were no chips left on the laminated surface of the chipboard. I sawed the bottom slab without removing the plinths, and the top slab on a stool. It is recommended to cover the cut areas with trim tape to protect them from moisture.
Expert opinion
Alexander Didenko
Furniture assembler at Mabaks
Do not repeat what was described yourself, trust the professionals. Using a circular saw is dangerous to your health.
Dust and sawdust flew around, so we worked with smoke breaks to ventilate the room. If you have a workshop or a vacuum cleaner to connect to the saw, this will be a big plus - dust from chipboard is harmful, cleaning sawdust from the floor is still a pleasure.
LiveInternetLiveInternet
– Quote book
: “...In 1985, after two operations, I was discharged from the Moscow Oncology Clinic and sent back.
Warm summer and spring days have only one drawback - nasty insects that...
We all age with time, but who said that in addition to age we should receive a bouquet of bo.
1 kg carrots 1 tsp salt 3 tbsp. l. granulated sugar 1 head of garlic 2 tsp coriander 1/2 cup.
The beneficial properties of patchouli oil have been known for a long time. In India it was used to flavor linen.
–Categories
- HEALTH (7216)
- DACHA (4907)
- BAKERY,DESSERTS,DAIRY (3203)
- SEWING (3203)
- MISCELLANEOUS (3116)
- KNITTING (2315)
- COSMETICS FOR EVERYTHING (1979)
- FOOD (1774)
- SUNSET (1698)
- MEAT (1584)
- SALADS (1014)
- CONSTRUCTION (913)
- DRINKS, TINCTURES (835)
- DIET (771)
- FISH (646)
- CHILDREN'S (613)
- magic (577)
- EMBROIDERY (494)
- COMP (368)
- Natuska KAKUSKA (294)
- herbs (267)
- exercise (190)
- MUSHROOMS (183)
- CINEMA (136)
- MULTICOOKER (130)
- photoshop (94)
- beads (62)
- DRAW (39)
- AIR GRILL (22)
- Dumpling (12)
- tatting (4)
- knitting needles (0)
- knitting needles (0)
-Music
–Search by diary
-Statistics
Installation on the balcony
Reassembly went faster, I already understood the procedure:
- We place the lower platform on its side closer to the window and screw the vertical partition from below.
- We lift it into working position and fasten the right side panel.
- We move everything to the opposite side from the window, a space appears on the left, now we can screw on the second side panel.
- We install the structure in the place where it will ultimately stand.
- Screw on the horizontal partition.
- We install the top plate.
- We insert shelves into the left side of the cabinet.
- We measure the width of the right side, cut off the remaining chipboard sheets to make additional shelves. We install them on metal shelf holders.
- For better stability of the cabinet in each compartment, we fix one of the shelves with screws (optional).
- The new closet without doors and back wall is ready, let's put things away.
Note: I made the holes for the shelf supports with a 5 mm drill, but I still had to hammer them in with a hammer. To ensure that the shelf lay flat, I used a square and drew a line with a pencil. Unfortunately, it is not always possible to take into account the nuances. The chipboard from which two additional shelves were cut was crooked and therefore lay slightly askew.
The saying “measure twice, cut once” comes into play here. Initially, the cutting of the material was carried out correctly, but the second time the eye became blurred and the ceiling turned out to be equal to the rest of the horizontal slabs. It was not possible to drill holes for confirmations from the sides; the drill simply did not fit there. I didn't want to take apart the closet for the third time. The solution is simple - secure the upper part with metal furniture corners. They were also used to strengthen two shelves in the middle of the cabinet.
Paint
Paint will be a real lifesaver in furniture restoration. Before applying paint, sand the surface and coat with primer.
You can simply paint the cabinet in 1-2 colors, or you can paint a real picture on it. If painting is not enough for you, you can create a sketch using a stencil. Geometric stripes and shapes can be easily created using masking tape - it will serve as an even border for the paint. And for the most complex ornaments and pictures, the stencil will have to be created specially.
We talked about methods of transferring images to surfaces here: “Happiness is drawn on walls.” And the link given to us contains detailed {instructions} for using stencils: “Experience: paint a wall using a stencil.”
Lack of back wall and doors
I admit that the rack can be modified and turned into a full-fledged closet. It's a matter of time and desire. It is unlikely that it will be possible to attach the back wall with a single sheet, unless you throw gnomes there (or completely clear the balcony by moving the cabinet forward). There are ways to install it by analogy with kitchen modules. It is long, difficult and requires certain skills.
The shelves on the right were mounted taking into account large items
Sliding doors naturally won't work here. Very narrow and impractical - the additional costs of purchasing a new sliding system offset all the savings. Therefore, we are considering classic swing doors. It is best to make 4 sashes (2 each on top and bottom). This will reduce weight and stress on the hinges, and will also allow you to place a large item near the cabinet below, providing access to the upper shelves.
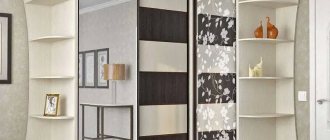
Where can I buy and how to choose the right cabinet
The right choice and purchase of a sliding wardrobe are determined by several factors. Follow the recommendations of professionals so that the furniture solves all the tasks for your family.
- Trends in the furniture world. Every year new solutions, original designs, and more sustainable structures appear. Be interested in new products that make life much easier, both in choosing a new coupe and creating it from scratch.
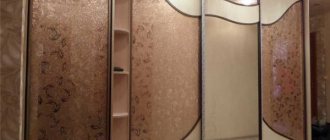
- Consider the uniqueness of your room, the location of the heating system, windows, doors. The closet should solve your problems, not set new ones.
- The appropriate type of coupe design is important for ease of further operation. Semi-built-in wardrobes, for example, can act as a dividing wall when one large room becomes two.
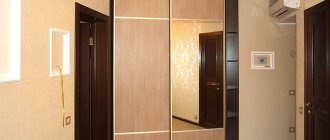
- Choose a comfortable type of door opening mechanism. Sliding with rollers is convenient in bedrooms and living rooms. The hanging type without bottom guides is more often used in children's rooms so that the child does not stumble or step when he wants to get something.
- Don't skimp on the quality of materials. A good cabinet lasts for decades.
Results
Any old wardrobe can be remade, giving it a new life. You will need a little time, tools and skill. To assemble a cabinet cabinet without doors on the balcony it took me about 4 hours with a lunch break. If you take your time, carefully measure all the details and think about every step, you can make furniture that is indistinguishable from the factory one.
I’ll tell you another important fact: the house is nine floors, and on each balcony there is an emergency hatch leading to the neighbor below. So we opened it and found that the neighbor had covered his balcony and the opening was closed. In theory, you can break through it and climb down if necessary. But now there is a closet there and even with all the desire there is no such possibility. What do you think about this issue?
That's all. If you do not agree with the theses voiced and would like to make amendments or suggestions for improvement, express your opinion in the comments. If you have personal experience in making, repairing or assembling furniture - send stories with photos to the feedback form or to
Transforming an old wardrobe into a dressing room
To transform an old furniture set into a new storage area, you will need tools and skillful hands.
- Initially, we remove all shelves, doors, rods, and clothes hangers. All that remains is the frame for the future dressing room.
- Next, we follow the previously prepared drawing and install partitions to create the interior space of the furniture set. Partitions can be made of gypsum board or chipboard.
- In each section, we mark with a marker the places for future shelves, hangers, and rods.
- An important stage is the installation of doors. Doors can be made sliding, mirrored, or done without them at all. It is best to hire a professional for installation.
- The final stage is filling the closet with things and accessories.
You can do without drastic changes; with a little ingenuity and available materials, you can change the appearance of an old wardrobe.
Make old
Almost all styles, for example, shabby chic, Provence and vintage, are furnished with artificially aged furniture. Therefore, if your closet is ugly old, you can make it beautifully old. We discussed the methods in this post, choose the most suitable one: “Aging techniques: an overview”
Work order:
At first I wanted to paint it like this without removing the door, then I realized that it would be inconvenient. So I took a risk. and took it off. It turned out not to be difficult. True, worries about how to put them back on were present until the last moment. In the end, I also screwed it myself; I didn’t have the patience to wait for my husband))).
I pulled out the built-in lights and wrapped them in a suspended state with masking tape. The same tape was used to protect the walls on the sides of the cabinet, the floor, and the mirrors on the doors. Prepared the workplace. I decided to paint it. on the bed)))! I covered it carefully with polyethylene. And I have never regretted this choice. The bed was large and high, everything fit, there was no need to bend over and crawl on all fours. I prepared approximately equal stacks of books and wrapped them in cling film. They are needed as substrates so that the doors can be lifted and painted as if suspended; the painted edges will not come into contact with a flat surface.
Stage 2.
I sanded all surfaces that needed to be painted. It is necessary to sand lightly, without fanaticism, with the finest sandpaper. Light circular movements. Purpose: to create roughness without removing the laminated layer. If there are dents and scratches, they should be filled with putty at this stage. After sanding, thoroughly wipe all surfaces with degreaser. It will remove dirt, grease marks, and everything that can disrupt the adhesion of the primer and paint.
Stage 3.
Primer. I went through hard-to-reach places with a brush, and the rest with a roller. A thick layer is absolutely not necessary; it must be covered with primer without drips and in a thin layer. Uneven coloring is not a problem, but there should be no gaps. I didn’t prime the rattan inserts; the paint applied well to them anyway.
They are easy to paint - just roll them with a roller; with a brush it is more difficult not to go beyond the edges. Wipe off any blemishes immediately with a cloth. Each layer was dried as recommended by the manufacturer; the acrylic dries “touch” in an hour and, in principle, you can carefully turn the door over and paint the other side.
Stage 5.
I assembled the closet. I screwed the doors and handles. I removed the masking tape and cleaned everything up. At first I planned to keep the doors open for two days, I was afraid that they would stick. Nothing like that - you can close it right away.
Dresser.
Mirror.
Important!
Acrylic paints dry quite quickly “touch-free”, but polymerize for at least a month; with a primer the process can take even longer. The painted product can be used almost immediately (or it’s better to wait 2 days) and even wiped with a damp cloth. But within a month, the coating remains very vulnerable; it must be handled carefully, not scratched or rubbed with force. If shelves or horizontal surfaces are painted, then it is better not to immediately place things on them that could “stick”, wait until the paint “sets”. Although I immediately put everything I needed on the chest of drawers, nothing stuck).
Here you go. The work is labor-intensive, but I was pleased with the result. The paint job ends up looking no worse than the factory paint, no brush marks are visible. It holds up well too. I haven’t tried scratching, I use the furniture as usual. But usually I don’t scratch it))). Although I will conduct an experiment in a month. The room has been pretty updated). Alas, the photos after compression leave much to be desired; in fact, the colors are brighter and cleaner, but this is not so important.
We immediately agree with the sawmill
The question of where you will cut your boards needs to be worked out immediately. It only seems at first glance that you can contact any relevant company, and they will do everything for you. I personally looked into this issue and this is what I found out. Indeed, many people saw, but they sawed exclusively their own materials. Why?
Because circular saws are mostly expensive foreign equipment for those who do this professionally. And few people will take unknown material for sawing. As one master told me, there are boards impregnated with such resins that when sawing, you can damage the saw blade, and with it all the equipment.
Therefore, before you start making sudden movements, it is useful to find a company that will agree to work for you. Professional sawmill services are very inexpensive. For the complete cutting of the cabinet to our dimensions, taking into account edge cutting, drilling the holes we needed and delivery to the house, I paid about 3,500 rubles. For these essentially pennies we received colossal benefits:
- you don’t need to cut the cabinet yourself (you need a jigsaw and a workbench to work);
- you can’t cut the boards yourself as smoothly as you can on a sawmill;
- saved a lot of time, because the volume of cutting was very large;
- immediately sent the sawn-off boards for edging (in principle, this cannot be done at home);
- I didn’t have to prepare for work and then clean the apartment;
- The most important thing is that we received ready-made parts to assemble the new cabinet!
That is why it makes sense to find a company for sawing and edge cutting, measure everything at home, draw it up, send it to work and receive back the finished parts from which you will assemble your furniture.
I think your aspirations to assemble a wardrobe with your own hands are quite realistic if you believe in your abilities and follow a simple proverb:
The eyes are afraid, but the hands are doing.