The dream of any owner is to have a comfortable, stylish, unparalleled kitchen. Design proposals are very diverse, but expensive, so it’s worth trying to make a kitchen sketch yourself. To do this you will need paper, pencil, tape measure, cardboard, glue and a good mood.
Benefits of working independently
The most important advantage is the opportunity to model a sketch of the kitchen of your dreams, using your previous skills in drawing, measurements, calculations, creative ideas and the desire to draw a one and only kitchen project. This exciting work will bring a lot of pleasant emotions, because... In addition to self-expression, it provides for the wishes of household members in terms of comfort for everyone. Therefore, all family members will be able to draw a kitchen on paper, and in a general meeting, you can choose the most original sketches.
The second advantage is significant cost savings on calling a designer and fully developing the project. Having imagined this amount, it is recommended that you still try to draw a sketch of the kitchen on your own.
Images to order
Photo wallpaper in the kitchen interior can be completely exclusive. There are many companies where similar decor is made to order. And the time frame will not exceed a week, even during the busiest periods. But you should know that such pleasure is not cheap.
Several components influence the final cost. First of all, you need to choose the material for the base. Then the width of the canvas and the presence of joints are calculated. Latex ink is cheaper, but ultraviolet printing is much better. Moreover, it is more durable.
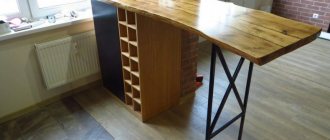
Unusual photo wallpaper for the kitchen Source dizainexpert.ru
The customer should also know that the company will definitely include additional design services in the bill. They usually include preparing the picture for printing and adjusting the layout. As well as color proofs and color correction.
Not every image will be accepted for work. There is a simple rule. The number of pixels in the photo must match the parameters of the future wallpaper in millimeters. For example, for a photograph measuring 2.5 by 3 meters, the image must be at least 2500 pixels by 3000. And this is with a resolution of 72 dpi.
Therefore, if the photo does not have the required quality, you will be asked to create a collage of several images. But at the same time the price of work will increase significantly. Because the designer will need to edit the pictures.
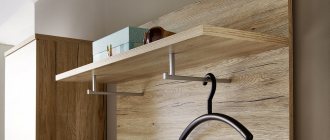
A selection of photographs for photo wallpaper Source gaphotoworks.com
Disadvantages of working independently
There are always very few disadvantages in creative work, because... it allows you to gain additional skills and gain experience in a new business. The only thing worth paying attention to is the careful, scrupulous execution of the task of measuring every centimeter of the kitchen area and transferring it to paper, making cardboard models and other work that requires time and accuracy. Otherwise, the kitchen set will not fit in size or the door will open halfway, hitting the furniture. Therefore, when making a sketch, you should not ignore the advice on completely recreating the future small-sized kitchen on paper, then everything will work out and fall into place.
Saving/loading a project
To save the kitchen and continue designing later, click Save Project - Floppy Disk with the down arrow on the top menu. A file with a project with a name like “project_20.6.2018_12_37.dbs” will be saved to your computer. The file will be saved to the download folder specified in your browser settings. You can send this file by mail, or download it to a flash drive to open on another computer.
To continue designing, load the saved file - to do this, click on the folder button on the top menu and select the backup.dbs file.
Video on use from the program developers:
If you want to develop a detailed 3D design of your future kitchen, these instructions will help you.
Instructions for making a sketch
Before you design the kitchen of your dreams, you need to stock up on some sheets of paper, a pen, pencil, cardboard, glue, scissors, a ruler and a tape measure.
Stage 1: measurements
The first step is to measure the room. To do this, it is necessary to determine the length and width of the floor, the height, length and width of walls, doors, windows, balconies, all protrusions and depressions present on each surface. Before starting measurements, it is recommended to completely complete the repair with leveling the walls, decorating the ceiling and screeding the floor. This will allow you to take into account every centimeter and prevent inaccuracies in the sketch. Walls must be measured at the level of the floor, ceiling and at the middle of the width, the floor must also be determined at the threshold, in the center and at the opposite wall. Transfer all this data onto paper. If the repair is not done well enough, you can correct mistakes before you begin arranging the furniture, avoiding unforeseen issues with uneven walls or ceilings.
Stage 2: drawings
The next step is to draw the top view. To do this, it is necessary to determine the exact scale, arbitrarily chosen by the master for convenience. It could be 1:10, 1:20, 1:30, etc.
Another sheet will be a sketch of the wall, which will show how to draw and arrange a set of kitchen furniture as conveniently as possible.
Then you should one by one make sketches of all the walls with designations of doors, windows, balconies, etc. It is recommended to make several photocopies of each such drawing. This will help to realize all the ideas as much as possible, because changing the design on paper is much easier than subsequently moving the furniture in reality.
Stage 3: electrical wiring design
The wiring diagram is very important and should be carefully considered. In addition to full lighting, care must be taken to have the required number of sockets. To do this, it is recommended to think about how many household appliances are planned in the kitchen, and where they will be located.
Stage 3: furniture arrangement
The next step is to actually arrange the furniture, and you should start the project from the top view. Having decided on the layout, you need to arm yourself with the required dimensions of each furniture block. In this case, there are standard parameters that it is advisable to adhere to for ease of use, but individual production allows you to deviate from the templates and arrange furniture in the kitchen of the most unusual shape. At the same time as arranging the headset, you should take care of the built-in equipment, which is presented in stores in a huge assortment and allows you to choose the most suitable model in size.
After drawing up the drawing from above, you should start designing the wall with the arrangement of the furniture set in front view. This sketch will show the entire front part of furniture and household appliances with the corresponding parameters.
Next, you need to similarly repeat the design of the remaining walls with appliances and furniture, done on an appropriate scale.
Stage 4: layout
Armed with sheets of sketches of kitchen views from all sides with the required dimensions, you can begin making mock-ups of furniture and appliances from cardboard, having previously cut out the required shapes and sizes. After drying, the glued models of furniture sections and household appliances should be arranged as expected in a real kitchen. If desired, the initial sketches can be loaded into a special design development system in 3D mode on a computer and look at the result of your work in the final version. But psychologists recommend making a model, because... this will be a fun activity for all family members, especially if there are children in it. The kitchen area and furnishings can be decorated in the same colors as the future kitchen, so it will become even more realistic.
Set up the room
In the first step, indicate the dimensions of your kitchen in millimeters.
If desired, install a window, door, ventilation duct, partitions, ledges and beams to bring the project as close as possible to the actual conditions of your apartment. Select the required element and, holding down the left key, move it to the desired location. After this, you can set its dimensions (to do this, click the “dimensions” button and specify the required values in the panel on the right).
If you wish, select a different wall color and floor finish from the appropriate sections of the catalog.
Advice from designers for self-taught craftsmen
When sketching a kitchen, it is necessary to take into account the size and shape of the room. Based on these parameters, you need to decide which layout is most suitable for a comfortable pastime. Thus, a direct arrangement of furniture in one row can be used for a small kitchen or households who rarely use it for cooking and focus attention on the relaxation area or receiving guests. The corner layout is considered to be universal, because it saves space and meets all ergonomic requirements. Double-row linear, U-shaped, island and peninsular are suitable for a large kitchen, in most cases combined with a living room or dining room. Each of them is very comfortable and stylish, allowing you to make maximum use of both the work area and the relaxation area.
Many novice craftsmen try to make with their own hands not only a model, but also the furniture itself. This saves money twice and allows you to create a unique design that meets all the taste preferences of the owner. But the danger lies in the fact that it is quite difficult to make a quality product without certain skills. In this case, it is recommended to use ready-made facades that are sold on construction markets. An option may also be to partially do it yourself for those steps that are easier to handle. And professional cutting, fastening and even the consumption of materials can be entrusted to specialists who offer their services in construction companies and specialized furniture manufacturing salons.
Designers recommend that novice designers be very attentive to every measurement in the kitchen and millimeter on paper. Such seemingly insignificant errors can completely ruin the entire project and upset the balance in the environment. Having made a layout, you should carefully double-check it and in case of the slightest mistake, do not be lazy to redo it completely.
Any job requires some effort. But updating your apartment according to your own design, taking into account the wishes of your household and having a wonderful time together will significantly improve the atmosphere in the family and bring many happy moments.
It is difficult to buy the kitchen of your dreams in an ordinary furniture showroom, because ready-made sets are made according to average statistical measurements. What to do if you are short? A lot of kitchen appliances or dishes? We bet! Was there at least one very inconvenient cabinet in your old kitchen that you never used? This should not happen in a new kitchen! Knowing how to draw a kitchen with a pencil step by step, you will be able to realize all your ideas about the ideal home.
In this article we will tell you how to correctly draw a kitchen design, taking into account important nuances - appliances, dishes, your height and other details.
Customize the design of the headset elements
The most convenient way to customize materials is from the corresponding section in the left menu. Once you have chosen the right cabinets and built the desired layout, you can experiment with finishing - choose the material of the facades and the finishing. You can immediately “repaint” all the doors of the future set at once or choose a different material and/or coating color for the upper and lower modules.
If you want to make the upper and lower facades from different materials, click on the “Separate facades” button in the “Facade Material” menu section (after clicking it will be replaced by the “Identical facades” button).
In addition to conventional smooth panels, doors with two types of milling are available.
In this section you can choose one of four materials - MDF, plastic, chipboard and solid wood. This choice affects which decors will be available in the next “Front color” item. For example, if you click on “chipboard” in materials, Egger chipboard decors will appear in the colors. And if you left MDF, you can either “paint” the facades in your favorite shade according to the RAL palette, or choose a film coating.
The color of the facades is set in the appropriate section according to the same principle as the material: for the entire set at once or divided into tiers.
In the appropriate sections of the menu, configure the finish of the cabinet, tabletop, plinth and apron.
You can also change the type, material and color of facades only for one specific module using the pop-up menu buttons:
The accessories section presents different handle options. The presence/absence of closers should be indicated if you want to send the project for calculation and find out the cost of manufacturing the headset.
How to draw a kitchen with a pencil step by step for beginners?
It is quite difficult to create a high-quality kitchen project, which is why professional decorators charge so much money for its preparation. But, using our detailed instructions on how to draw a kitchen with a pencil, you will cope with this task without any problems.
1. Draw a “top view” diagram As a rule, a kitchen plan means a top view. On paper, they schematically depict the room, where they mark the location of doors, windows, furniture and the so-called kitchen triangle - stove, sink and refrigerator. The approximate dimensions of the kitchen, furniture and appliances, and the distance between them are written on the plan. It is important to correctly measure all parameters with a tape measure. This will be our master plan.
Before you start drawing a kitchen, you need to do three things:
- determine the location of the working triangle;
- have an up-to-date wiring diagram on hand, or at least know where and how many sockets are;
- clearly understand what shape the set will be - corner, in line, U-shaped, with an island or a bar counter.
2. We measure, we count, we draw The view from above is, of course, important, but we are looking at our kitchen from the front, which means we need to depict it on paper in the same way. So, how to draw a kitchen set with a pencil so that it is comfortable and beautiful?
Let's start with the furniture. Kitchen cabinets come in three types: floor-mounted, wall-mounted and pencil cases (they are also called columns). Each manufacturer has its own size range, so before learning how to draw a kitchen plan, you should decide on the factory where you are going to order the set. Please note that not all manufacturers meet the customer halfway. In most cases, the dimensions are approximately the same:
- wall cabinets: depth 300 mm, height 350 - 900 mm, width 200 - 900 mm;
- floor cabinets: depth 600 mm, height 720 mm, width 200 - 900 mm;
- cabinets: depth 600 mm, height 1800 - 2300 mm, width 400-600 mm.
Save the project
If you plan to continue working on the project later and change something in it, save it to your computer or flash drive by clicking on the third icon in the top menu.
Depending on your browser settings, you will be able to select the save location and change the file name, or the file with the date in the name and the .dbs extension will be automatically downloaded to the “Downloads” folder.
When you want to return to designing and finalize the headset, upload the saved file to this designer again. To do this, click the button with the image of the folder in the top menu.
The result of your work can be printed or saved as a screenshot.
If you are ready to order a kitchen in the near future, in the “Submit for calculation” section you can receive offers from kitchen furniture manufacturers from the Linkmebel service, indicating your data in the application (relevant for residents of Russia).
«>
How to draw a corner kitchen?
The corner set is ergonomic and, therefore, the best option for small kitchens, especially if the room has an irregular shape. If you don’t know how to correctly draw a corner kitchen step by step, first remember your school drawing and drawing lessons. Our instructions will help.
- Sketch the walls and floor. We recommend starting the drawing from the corner where the kitchen will be located. By the way, it is more convenient for right-handers to draw the right corner, and left-handers - the left.
- Now sketch out the furniture and appliances: cabinets, sink, stove, dishwasher, washing machine, refrigerator, dining table, chairs, work surfaces, taking into account their sizes. If you don’t know how to draw, then you can definitely draw suitable three-dimensional figures.
- Draw all the lines. Add the necessary interior details that you would like to see. Remember the rule: first you draw large objects, then smaller objects.
- Mark the boundaries of the ceiling. Next, draw the door, windows and curtains, if they are in the walls that interest us.
- Lastly, determine the light sources: main and spot, do not forget about illuminating the working surfaces. Using a dark pencil, draw in the shadows cast by objects.
Types of photo wallpaper
It is necessary to consider only those materials that are suitable for the kitchen space. And it is considered a working area in which frequent temperature changes occur and humidity changes regularly. In addition, grease and soot inevitably gets onto the walls from the hob.
Therefore, it is better to even pay attention to purely paper options. Kitchen conditions will very quickly ruin their attractive appearance. And wet cleaning is problematic. Water will cause the surface to become hopelessly unusable. For the same reason, you should abandon photo wallpapers on canvas and velor.
Therefore, non-woven wallpaper made from pressed fibers is considered the best for this room. This material has increased wear resistance. Allows for wet cleaning when dirty. Such photo wallpapers do not fade in direct sunlight. Not subject to deformation. And they are very easy to care for and keep in order.
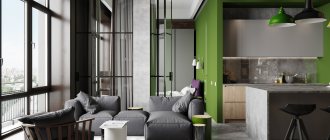
Unusual photo wallpaper for the kitchen Source dekormyhome.ru
You can also choose photo wallpaper made from fiberglass. They are included in the natural category and are not afraid of either high humidity or temperature changes. In addition, mold cannot take root on them. And the biggest advantage is that their surface has an antistatic effect and dust does not settle on it.
Separately, it is necessary to say about anti-vandal photo wallpaper. This material was specially developed for public places. Such as cafes and restaurants. The base can be any material. Even plain paper. But on top the surface is covered with a special vinyl film or laminated.
Also pay attention to the texture, and it happens:
- smooth;
- for decorative plaster;
- matte with sand texture;
- imitating linen;
- mosaic;
- in the form of a canvas.
Each type is selected individually to suit the design style. But also important are both the personal preferences of homeowners and the properties that allow them to keep photo wallpaper in order for a long time.
Beautiful photo wallpaper for a small room Source dizainexpert.ru
Sequencing
Drawing a sketch for a kitchen means exploring it from all sides.
First, find out the dimensions of the entire room: the length and width of the room, calculate the distance between the walls, windows and doors, floor and ceiling. The beginning of the work is choosing a scale and drawing a rectangle. On a blank sheet of paper, elements are indicated: walls, switches, sockets, pipes, heating equipment and other components of the room. (First, it is advisable to draw a diagram with a top view).
Cutting out rectangles and squares from colored cardboard and their corresponding layout on the diagram will make the work much easier. Once all the “objects” are in place, the sketch is transferred to paper.
The drawing of pieces of furniture should be clearly thought out. Having identified each of the walls, the first thing you should do is schematically depict large objects: capacious cabinets, household appliances, a refrigerator, a freezer. After this, you can draw tables and hanging cabinets.
The composition should be depicted as accurately as possible, with rational use of every centimeter of area. It would be wise to think through the placement points of built-in appliances, some of which should be hidden, and take into account the workspace of the kitchen, which has the shape of a familiar triangle: sink-stove-refrigerator. In the space between these elements there is a working area that provides maximum convenience in work. Having marked the place of each item, you can sketch out a diagram of the kitchen. It’s good if these drawings are made from different places, the better point will be the one from where the room is better visible.
Windows and doors are studied most carefully. Here it is important to take into account the opening trajectory of the sash, recording this moment on the diagram. Such a sketch will help to avoid mistakes by preventing this space from being filled with furniture. Windows, like heating appliances, must be freely accessible, which allows for periodic ventilation of the room and unhindered air circulation.
When preparing a sketch, it is important to take care of fire safety measures. So, the stove should not be placed near a window, especially if there are curtains hanging on it, which could ignite if a spark falls on them. Installing a hood will avoid any problems.
After the sketches are ready, they can be transferred to 3D format; there is a special computer program for this. A more detailed placement plan can be ordered from specialists. You can draw any decorative elements on the diagram: paintings, flowerpots, flowers, still lifes and ikebana. When attaching these parts, it is important to ensure the integrity of the wiring and provide the plants with a pleasant microclimate.
Element Management
Move modules, equipment, windows, doors, etc. from the catalog to the room and across it, you can hold down the left mouse button.
The second method is to select the desired item in the catalog and click on it once with the left mouse button. He will appear in the virtual room. Grab it with your mouse and, holding down the left key, drag it to the desired location.
To visually zoom in and out of the headset, move the camera up/down, left or right, use the arrows and magnifying glass icons in the bottom menu.
- hold the right mouse button and move the image in the desired direction
- Hold down the alt key and press the up/down/right/left arrow buttons on your keyboard
- roll the mouse wheel back and forth.
You can control each element individually. Select it by clicking on it with the left mouse button. A radial menu with different functions will appear. With their help, you can quickly and easily change the dimensions of the module, the type of facade and the method of opening it, the finishing material, the spatial orientation, install a sink or hob, or remove it altogether.
You can also get rid of an unnecessary element using the Delete key.
To open a front or pull out a drawer, move the mouse cursor over it and click on the middle button (wheel) of the mouse. Repeat to seal.
If you want to expand an element, use the cursor and the left mouse button to move it close to the desired wall - it will position itself as needed. Or use the buttons on the pop-up control panel for the desired module.
The top menu has a button to switch to full-screen mode - convenient for small screens.
How to properly distribute furniture and lighting fixtures?
Any sketches must take into account the location of sockets, switches, and hanging lamps. This will avoid incorrect wiring distribution and the resulting difficulties. The height of wall cabinets should be adjusted to the height of the residents.
Any sketch of a kitchen includes designations of appliances and furniture on the drawing. Do not forget about the placement of heating radiators, communications and taps. If the existing wiring is not long enough, it can be easily extended with a flexible hose. Objects are indicated on the diagram so that the furniture does not interfere with the function of supplying water, gas, or electricity.
When drawing a kitchen, it is important to take into account the location of the refrigerator: it should not be located near the stove or sink. Heat and moisture will have a detrimental effect on the engine and will quickly damage it. Any arrangement of furniture should begin with determining its dimensions.
Important nuances
Any development of a furniture layout is built in accordance with certain rules regarding the strict order of placement of the main elements of the kitchen:
- fridge;
- sink;
- table for work needs;
- plate.
Such strict adherence will allow you to achieve the most rational stay in this room, in which every action will be productive. The stove should not be located under a window so that a random blow of wind does not suddenly extinguish the fire. It is also not recommended to install it near a wall, because constant cooking and boiling oil will not have the best effect on its surface.
Detailed study
A list of elements of each cabinet, which indicates the number of necessary parts for the future set, will help you make the diagram correctly. To obtain cuts of materials, you can contact any workshop specializing in the production of kitchen furniture. On the eve of such treatment, you should draw a diagram and sketch of the parts in disassembled form.
What does the process of making furniture yourself include? Here are the stages of work:
- drafting;
- creating the design of the future headset;
- designation of room dimensions;
- furniture arrangement planning;
- organization of three-dimensional images;
- ordering cutting of the required number of parts;
- sealing the ends;
- selection of facades;
- purchase of accessories;
- assembly process.